manuals.online logo
Brands
  1. Home
  2. •
  3. Brands
  4. •
  5. BROSA
  6. •
  7. Indoor Furnishing
  8. •
  9. BROSA Mia Narrow Bookcase User manual

BROSA Mia Narrow Bookcase User manual

ASSEMBLY GUIDE
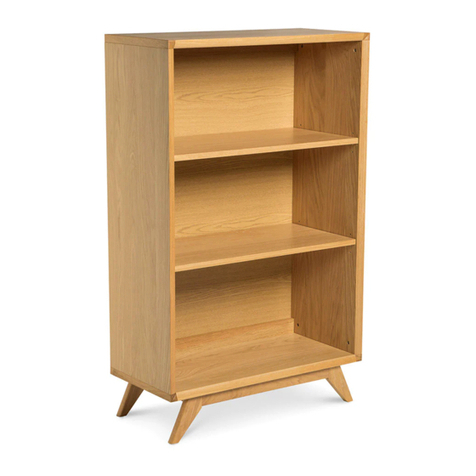
Mia Narrow Bookcase
Components:
Upon unpacking your bookcase from it’s delivery box, you should have the
pieces shown. Follow the steps on the next pages to assemble
your new bookcase.
Step 1
Dx10
Lay all parts on a at and stable surface. Attach cam screws
(D) into the pre-drilled holes on side panels (1) & (2) as shown.
Use a pozi screwdriver to turn ttings (D) clockwise to tighten.
Step 2
A x 4
C x 4
2.1 Attach steel dowels (A) into top panel (3) as shown. Use a
pozi screwdriver to turn dowels (A) clockwise to tighten.
Ensure the direction of dowels (A) are facing correctly as per
diagram.
2.2 Attach steel dowels (C) into bottom panel (A) as shown.
Use a pozi screwdriver to turn ttings (C) clockwise to x.
Ensure the direction of ttings (C) are facing correctly as per
diagram.
3.1 Insert wooden dowels (F) into the pre-drilled holes on
xed shelf (6) as shown.
3.2 Insert wooden dowels (F) into the pre-drilled holes on top
back rails (7) and bottom back rail (9).
3.3 Insert wooden dowels (F) into the pre-drilled holes on top
middle back rail (8) as shown.
Step 3
F x14
Step 2.1
Inset Fitting
C
A
4
3
Step 4
E x 5
4.1 Attach back rails (7), (8), (9) and xed shelf (6) onto
left side panel (1) as shown. Ensure cam screws (D)
and wooden dowels (F) are aligned correctly with the
holes of mating parts before attaching.
4.2 Secure parts (6), (7), (8), (9) to part (1) using cam
locks (E) clockwise to tighten.
Step 5
E x 5
5.1 Attach right side panel (2) onto xed shelf (6) and back
rails (7), (8), (9) as shown. Ensure cam screws (D) and wooden
dowels (F) are aligned correctly with the holes of mating parts
before attaching.
5.2 Secure part (2) to parts (6), (7), (8), (9) using cam locks (E)
as shown. Use a pozi screwdriver to turn cam locks (E)
clockwise to tighten.
Step 6
B x 8
With help of assistant, carefully turn the unit down so the back
side of the unit is facing up as shown.
6.1 Attach right side panel (3) and bottom panel (4) onto the
structure assembled in Step 5 as shown. Ensure steel dowels
(A), (C) and wooden dowels (F) are aligned correctly with the
holes of mating parts before attaching.
6.2 Secure top panel (3) and bottom panel (4) to side panels
(1) & (2) using grub screws (B) as shown. Use a pozi
screwdriver to turn ttings (B) clockwise to tighten.
6.3 Attach trim caps (V) onto the holes on side panels (1) & (2)
as shown.
6.4 Secure top panel (3) to part (7) using bolt (R) as shown.
Use allen key (Q) to turn bolt (R) clockwise to tighten.
R x 1
Q x 1
V x 4
A x 4
C x 4
F x14
Step 6.4
Step 6.2
Step 6.3
Step 7
N x32
Secure back panels (11), (12) onto back side of, using
round head screws (N) as shown.Use a screwdriver to turn
screw (N) clockwise to secure back panels in place.
Step 8
G x 4
8.1 Insert cross dowels (G) into the holes on top of each leg (10)
as shown. Ensure the horizontal marking on each dowel (G) is
facing as shown.
8.2 Screw threaded bolts (H) into dowels (G) that are already
concealed in legs (10) as shown. Continue to re-tighten until
they are securely fastened.
H x 4
H x 4
Step 9
J x 4
9.1 Attach each leg (10) into place by inserting threaded bolts
(H) into the pre-drilled hole of each metal corner bracket as
shown.
9.2 Insert in order the at washer (J), lock washer (K) and hex
nut (L) onto threaded bolts (H) on leg (10) as shown.
9.3 Tighten hex nut (L) using spanner (M) as shown.
Continue to re-tighten hex nut (L) until it is securely fastened.
Repeat above procedures with the remaining legs (10).
K x 4
L x 4
M x 1
Step 10
P x 4
10.1 With help of assistant, carefully stand the unit upright.
10.2 Insert wood shelf supports (P) into the pre-drilled holes
inside the unit as shown.
10.3 Insert the wood shelves (5) with the holes facing
downward inside the unit and securing onto pins. Ensure the
holes on wood shelves (5) are facing down, then place wood
shelf (5) onto the pins of wood shelf supports (P) as shown.
Step 11
J x 4
11.1 Attach steel dowels (S) into the pre-drilled holes on
drawer (13) by screwing (S) into the inset ttings that are
located onto drawer front as shown. Ensure the direction of
the holes on dowels (S) are facing correctly as per diagram.
11.2 Insert wooden dowels (U) into the pre-drilled holes on left
& right drawer sides (14) & (15) as shown.
12.2 Slide drawer bottom (17) into the slots inside drawer sides
(14) & (15) as shown. Ensure the drawer bottom (17) is placed
completely in the slot of drawer front (13).
12.3 Place drawer back (16) onto the top of constructed drawer
box as shown. Ensure the slot under drawer back (16) is aligned
correctly with drawer bottom (17) before attaching.
12.3 Secure drawer back (16) to the drawer box using round
head screws (T) as shown. Use a screwdriver to turn screws (T)
clockwise to tighten.
dd x 2
12.1 Attach drawer sides (14) & (15) onto drawer front (13)
using small grub screws (dd) as shown. Ensure wooden dowels
(U) and small steel dowels (S) are aligned correctly with the
holes of mating parts before attaching. Use a pozi screwdriver
to turn screws (dd) clockwise to tighten.
dd x 2
Step 12
Step 12 Insert the assembled drawer into the unit as shown and
enjoy your new bookcase!
Tip Kit Instructions
Notice: To prevent injury and property damage from unexpected tipping of furniture, we
highly recommend installation of the anti-tip kit included with this project.
Attaching furniture to wall with anti-tip kits.
1.
2.
3.
4.
5.
Determine where the piece is to be placed and mark location on the wall for the
mounting bracket screw holes. ey should be place approximately 1” below the
bottom of the back of the piece of furniture.
Drill the hole and use the appropriate wall plug that is suitable for your walls
composition. Warning: before drilling check wall for hidden pipes and cables.
Attach the mounting bracket vertically to the wall using appropriate fastener,
through the holes in the bracket and 2 wall plugs that are suitable to your wall and
then tighten securely.
Next using the short screws attach the 2nd bracket to the back of the piece of
furniture’s top.
Lace the nylon strap through the brackets. Slide the thin end of the strap through the
receiving end of the nylon strap. Pull to tighten the piece of furniture snug against
wall.
Wood Brick or Masonry Cavity Wall
If fixing to
wood make
sure that is isn’t
chipboard as
screws can
easily pull
away from the
core structure.
Use an
appropriate
wall plug
provided when
you are sure
your wall is
sound.
Special toggle
wall plugs are
needed. Seek
expert advice.

Other BROSA Indoor Furnishing manuals

BROSA Siesta 3 Seater Sofa Bed User manual

BROSA

BROSA Siesta 3 Seater Sofa Bed User manual

BROSA Parc Tall Boy User manual

BROSA

BROSA Parc Tall Boy User manual

BROSA Gina Dining Table 200cm User manual

BROSA

BROSA Gina Dining Table 200cm User manual

BROSA Elizabeth Entertainment Unit User manual

BROSA

BROSA Elizabeth Entertainment Unit User manual

BROSA Ethan 4 Drawer Tall Chest User manual

BROSA

BROSA Ethan 4 Drawer Tall Chest User manual

BROSA Elizabeth Nesting Tables User manual

BROSA

BROSA Elizabeth Nesting Tables User manual

BROSA Caledonia Rattan Compact Chest of Drawers User manual

BROSA

BROSA Caledonia Rattan Compact Chest of Drawers User manual

BROSA Hans Entertainment Unit User manual

BROSA

BROSA Hans Entertainment Unit User manual

BROSA Elizabeth User manual

BROSA

BROSA Elizabeth User manual

BROSA Single Size Upholstered Gaslift Bed Base User manual

BROSA

BROSA Single Size Upholstered Gaslift Bed Base User manual

BROSA Ava Armchair User manual

BROSA

BROSA Ava Armchair User manual

BROSA Elizabeth Sideboard User manual

BROSA

BROSA Elizabeth Sideboard User manual

BROSA Junior Kids Desk User manual

BROSA

BROSA Junior Kids Desk User manual

BROSA Parc Media Unit User manual

BROSA

BROSA Parc Media Unit User manual

BROSA Field Entertainment Unit User manual

BROSA

BROSA Field Entertainment Unit User manual

BROSA Magnus 3-Seater Sofa User manual

BROSA

BROSA Magnus 3-Seater Sofa User manual

BROSA Mia Oak Veneer Chair User manual

BROSA

BROSA Mia Oak Veneer Chair User manual

BROSA Caledonia Rattan Bench User manual

BROSA

BROSA Caledonia Rattan Bench User manual

BROSA Dominic Narrow Bookcase User manual

BROSA

BROSA Dominic Narrow Bookcase User manual

BROSA Elizabeth User manual

BROSA

BROSA Elizabeth User manual

BROSA Memphis Entertainment Unit User manual

BROSA

BROSA Memphis Entertainment Unit User manual

BROSA Marin Round Dining Table User manual

BROSA

BROSA Marin Round Dining Table User manual

BROSA Field Extendable Dining Table User manual

BROSA

BROSA Field Extendable Dining Table User manual

BROSA Majime Wide Sideboard User manual

BROSA

BROSA Majime Wide Sideboard User manual

Popular Indoor Furnishing manuals by other brands

heute wohnen 61618 Assembly instructions

heute wohnen

heute wohnen 61618 Assembly instructions

Coaster 2389B Assembly instructions

Coaster

Coaster 2389B Assembly instructions

Kinfine HOMEPOP K7195 Assembly instructions

Kinfine

Kinfine HOMEPOP K7195 Assembly instructions

DIVERSIFIED WOODCRAFTS STUDENT SERVICE ISLAND-DOUBLE C2420K Series Assembly instructions

DIVERSIFIED WOODCRAFTS

DIVERSIFIED WOODCRAFTS STUDENT SERVICE ISLAND-DOUBLE C2420K Series Assembly instructions

BLUM TANDEM plus BLUMOTION 563F installation instructions

BLUM

BLUM TANDEM plus BLUMOTION 563F installation instructions

Sauder Orchard Hills 401292 Instruction booklet

Sauder

Sauder Orchard Hills 401292 Instruction booklet

Mocka Avoca Assembly instructions

Mocka

Mocka Avoca Assembly instructions

AKANTE Influence DT082 Assembly instructions

AKANTE

AKANTE Influence DT082 Assembly instructions

Clarke CS4600BO Assembly instructions

Clarke

Clarke CS4600BO Assembly instructions

Kaboodle W-51603 Assembly instructions

Kaboodle

Kaboodle W-51603 Assembly instructions

Unikito Program A manual

Unikito

Unikito Program A manual

Rauch ME623 Assembly instructions

Rauch

Rauch ME623 Assembly instructions

Furniture of America CM3152PC-2PK Assembly instructions

Furniture of America

Furniture of America CM3152PC-2PK Assembly instructions

GALA MEBLE D90N Assembly manual

GALA MEBLE

GALA MEBLE D90N Assembly manual

Coaster 724217 Assembly instructions

Coaster

Coaster 724217 Assembly instructions

Triarch Indoor Lighting MR29230 Assembly instruction

Triarch

Triarch Indoor Lighting MR29230 Assembly instruction

Whittier Wood Furniture Ellison 2143AST Assembly instructions

Whittier Wood Furniture

Whittier Wood Furniture Ellison 2143AST Assembly instructions

Birlea JESPER Assembly instructions

Birlea

Birlea JESPER Assembly instructions

manuals.online logo
manuals.online logoBrands
  • About & Mission
  • Contact us
  • Privacy Policy
  • Terms and Conditions

Copyright 2025 Manuals.Online. All Rights Reserved.