6
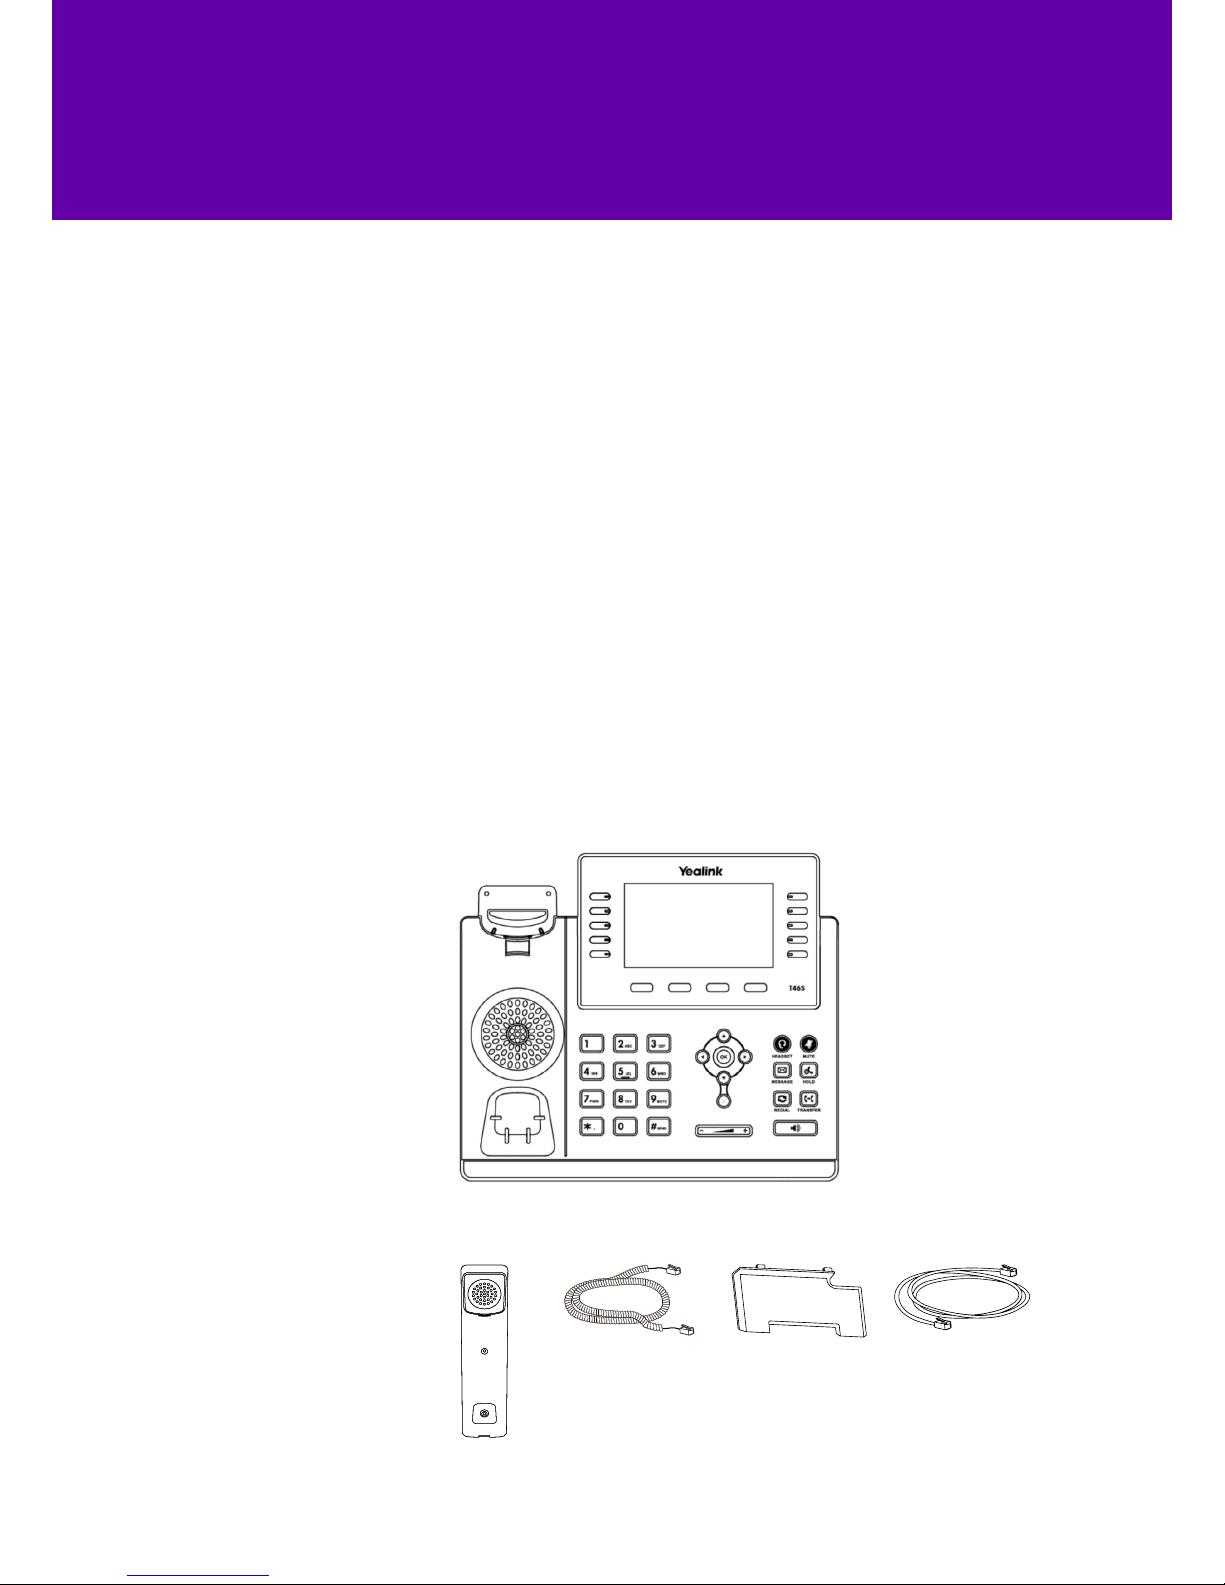
2. Getting to know your phone
The most important parts of your T46 are the screen and the keypad.2.1 Features and keys
8
11
12
3
13 1
3
10
4
5
6
7
9
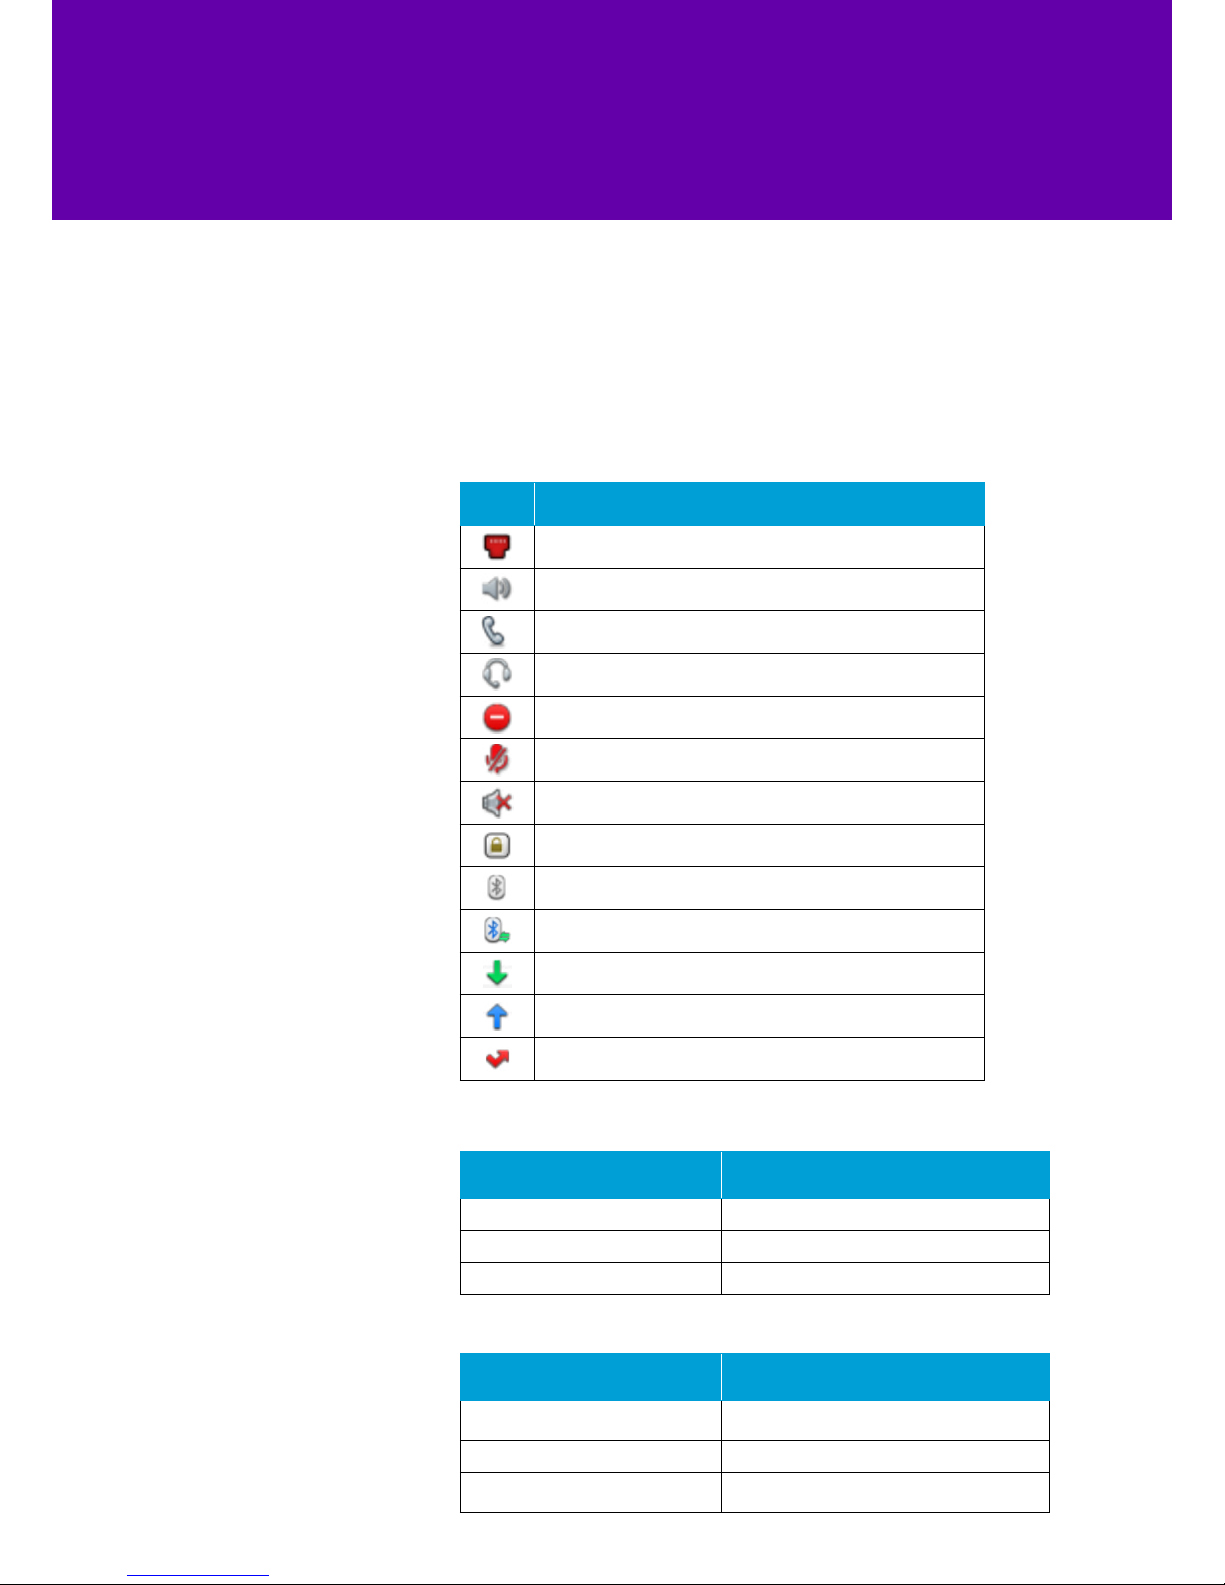
Feature About this feature
1LCD screen
Tells you about calls, soft keys, time, date and
more, including:
• Call information like caller ID and call length
• Icons
• Missed calls or second incoming caller information
• Prompt text
• Time and date
2 Power LED Flashes fast when a call comes in
Flashes slowly when receiving a voicemail or text message
3 Line keys Used for call handling
4
Togglestheheadsetmode.
Redialsapreviouslydiallednumber.
Togglesthehands-freespeakerphonemode.
Adjuststhevolumeofthehandset,headset,speaker,andringer.
Providesthedigits,lettersandspecialcharactersincontext-sensitive
applications.
Provideshands-free(speakerphone)audiooutput.
Bounceswhenthehandsetispickedupandthephoneconnectstothe
line.Thephonedisconnectsfromthelinewhenthehandsetisreplaced
inthehandsetcradle.
SecuresthehandsetinthehandsetcradlewhentheIPphoneismounted
vertically.
Displayicons.
IconsyoumayseeintheLCDscreenaredescribedinthefollowingtable:
Theprivatelineregisterssuccessfully.
Hands-freespeakerphonemode.
(Headset key) Turns headset mode on and o
Togglestheheadsetmode.
Redialsapreviouslydiallednumber.
Togglesthehands-freespeakerphonemode.
Adjuststhevolumeofthehandset,headset,speaker,andringer.
Providesthedigits,lettersandspecialcharactersincontext-sensitive
applications.
Provideshands-free(speakerphone)audiooutput.
Bounceswhenthehandsetispickedupandthephoneconnectstothe
line.Thephonedisconnectsfromthelinewhenthehandsetisreplaced
inthehandsetcradle.
SecuresthehandsetinthehandsetcradlewhentheIPphoneismounted
vertically.
Displayicons.
IconsyoumayseeintheLCDscreenaredescribedinthefollowingtable:
Theprivatelineregisterssuccessfully.
Hands-freespeakerphonemode.
(Mute key) Turns mute on and o
5
Togglestheheadsetmode.
Redialsapreviouslydiallednumber.
Togglesthehands-freespeakerphonemode.
Adjuststhevolumeofthehandset,headset,speaker,andringer.
Providesthedigits,lettersandspecialcharactersincontext-sensitive
applications.
Provideshands-free(speakerphone)audiooutput.
Bounceswhenthehandsetispickedupandthephoneconnectstothe
line.Thephonedisconnectsfromthelinewhenthehandsetisreplaced
inthehandsetcradle.
SecuresthehandsetinthehandsetcradlewhentheIPphoneismounted
vertically.
Displayicons.
IconsyoumayseeintheLCDscreenaredescribedinthefollowingtable:
Theprivatelineregisterssuccessfully.
Hands-freespeakerphonemode.
(Message key) Dials voicemail
Hold key Places a call on hold or resumes a call
Togglestheheadsetmode.
Redialsapreviouslydiallednumber.
Togglesthehands-freespeakerphonemode.
Adjuststhevolumeofthehandset,headset,speaker,andringer.
Providesthedigits,lettersandspecialcharactersincontext-sensitive
applications.
Provideshands-free(speakerphone)audiooutput.
Bounceswhenthehandsetispickedupandthephoneconnectstothe
line.Thephonedisconnectsfromthelinewhenthehandsetisreplaced
inthehandsetcradle.
SecuresthehandsetinthehandsetcradlewhentheIPphoneismounted
vertically.
Displayicons.
IconsyoumayseeintheLCDscreenaredescribedinthefollowingtable:
Theprivatelineregisterssuccessfully.
Hands-freespeakerphonemode.
(Redial key) Redials the last number you dialled
Transfer key Transfers a call to another party
6Speakerphone key Turns speakerphone on and o
7 Volume key Changes the handset, headset, speaker or ringer volumes
8 Keypad Lets you enter numbers, letters and special characters
9
Scroll through your on-screen options
Answers calls and conrms actions
Rejects calls and cancels actions
10 Soft keys Can be programmed to do dierent things
11 Speaker Plays speakerphone audio
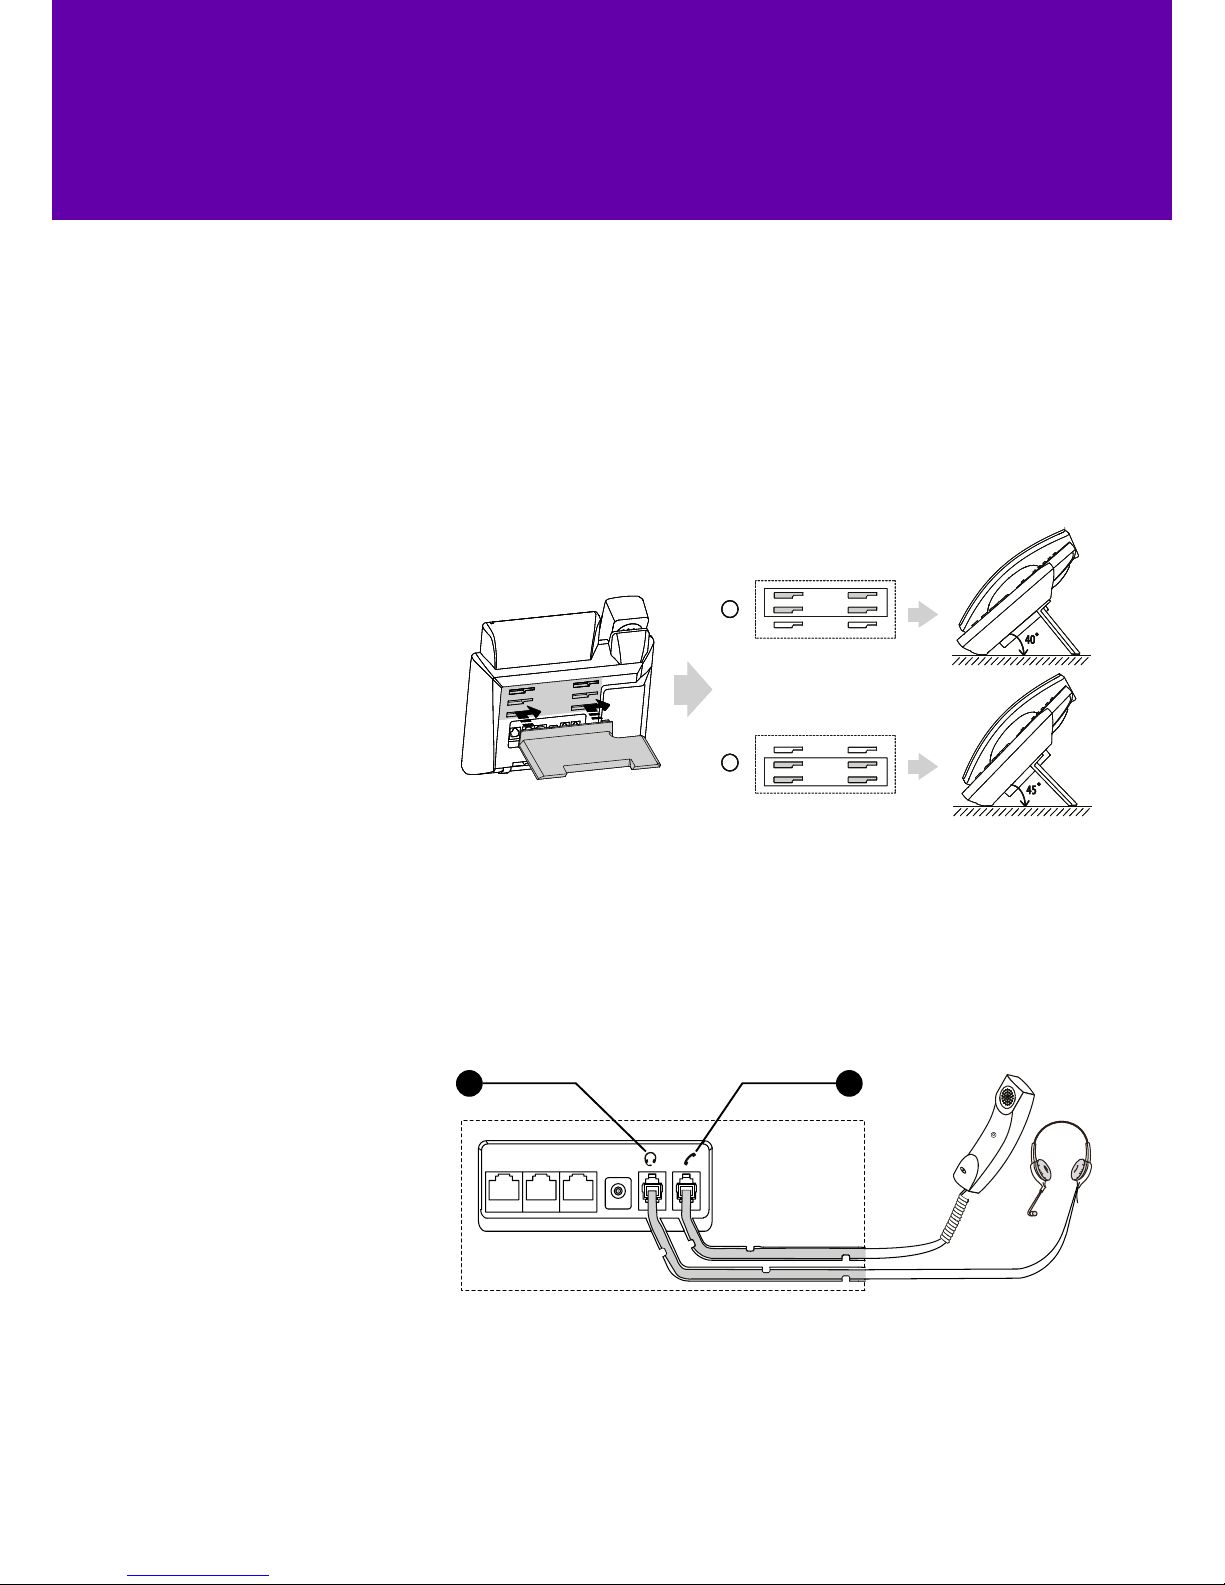
12 Hookswitch tab Holds the handset in the phone cradle when the phone is mounted vertically.
13 Hookswitch Bounces when the handset is picked up and the phone connects to
the line. Ends the call when depressed as the handset is replaced.
2. Gettingtoknowyourphone.
Phonefeaturesandkeys.
ThemainhardwarecomponentsoftheSIP-T40PIPphonearetheLCDscreenandthe
keypad.
Showsinformationaboutcalls,messages,softkeys,time,dateandother
relevantdata:
•Callinformation—callerID,callduration.
•Icons(forexample,).
•Missedcalltextorsecondincomingcallerinformation.
•Prompttext(forexample,"Savingfile!").
•Timeanddate.
Indicatesphonestatus:
•Receivesanincomingcall—fastflashing.
Automaticallylabelledtoidentifytheircontext-sensitivefeatures.
Scrollthroughthedisplayedinformation.
Confirmsactionsandanswersincomingcalls.
Cancelsactions,rejectsincomingcalls.