BT Yealink W53P User manual

Yealink W53P
Wireless DECT Phone
A guide to using your phone with Cloud Voice

Contents
What’s in the box? 3
Let’s get started 4
Check you’re set up on Cloud Voice 9
Getting to know your phone 10
Phone display 11
Using your phone 15
Troubleshooting 16
General information 17
2

What’s in the box?
We’re here to help you get the best out of your new phone.
Just follow the instructions below. Here’s what you should find
when you open the box.
Ethernet cable Quick start guide 2 x Power adapters
USB charger cradle Yealink W53P handset and Yealink W60B DECT base
Rechargeable batteryBelt clip
Base stand
Got everything?
• Yealink W60B DECT
base (pictured)
• Yealink W53H Additional
handset (pictured)
• Ethernet cable
• Quick start guide
• Base stand
• 2 x Power adaptors
• Belt clip
• Rechargeable battery
• USB charger cradle
3

Let’s get started
Set up your phone
To start using your phone, you need
to get your base station working,
power up your USB charger, and
charge your phone. Here’s how.
Get your base station working
Your base station can use AC power
or Power over Ethernet (PoE). Ask
your IT team what’s best for you.
To connect to AC power:
• Take the Ethernet cable and plug
it into your base station.
• Plug the other end of the Ethernet
cable into your hub or switch.
• Connect the power adaptor to
your base station.
To connect to PoE:
• Check your hub or switch is up
to IEEE 802.3af standards – see
your user guide or refer to the
manufacturer if you’re unsure.
• Take the Ethernet cable and plug it
into your base station.
• Plug the other end of the Ethernet
cable into your hub or switch.
4

You can set up your base station to
stand by itself. To do this, connect the
cables, then snap the stand into place
at the back of the base station.
Alternatively, you can mount your
base station on a wall. Take two
screws, drive them into your wall
59mm apart, then hang the base
station on the screws.
59mm
59mm
5

Power up your USB charger
It’s a good idea to have your charger
close to where you’re most likely to
take calls in your office. Plug your
charger into the nearest outlet - set
the USB charger on a desk or mount
it on the wall using two screws, driven
into the wall 36mm apart.
Then, connect the charger’s USB
to the power adapter, and plug the
power adapter into the outlet.
36mm
36mm
6

Charge your phone
It takes three hours to fully charge the handset.
To start charging, put batteries into the back of
the handset, then turn it on.
Then place the handset into the USB charger.
As it charges, you’ll see your phone’s battery status
at the top of its screen.
Note: Turn off the handset before taking out its
battery or you risk losing data. And don’t use a
damaged battery.
Fully charged
80% charged
60% charged
40% charged
20% charged
7

And here’s how to use the belt clip
If you need your hands free at work, the belt clip’s the
best way to keep your phone by your side. Attach it
to the back of your handset by pushing part of the
clip into the notch at the back of the handset, then
slotting the rest of the clip onto the phone.
8

Check you’re set
up on Cloud Voice
Your phone comes with everything you need to get set up on
Cloud Voice.
Once your phone’s connected to the network, it’ll update its
firmware. This might take some time, so please be patient.
Once it’s finished, it’ll show this symbol: If something has gone
wrong, you’ll see this symbol :
If this happens, just give us a call on 0800 389 0537 and we’ll be
able to help.
Once everything is updated and ready to go, your Cloud Voice
number will show on the screen.
9

Getting to know
your phone
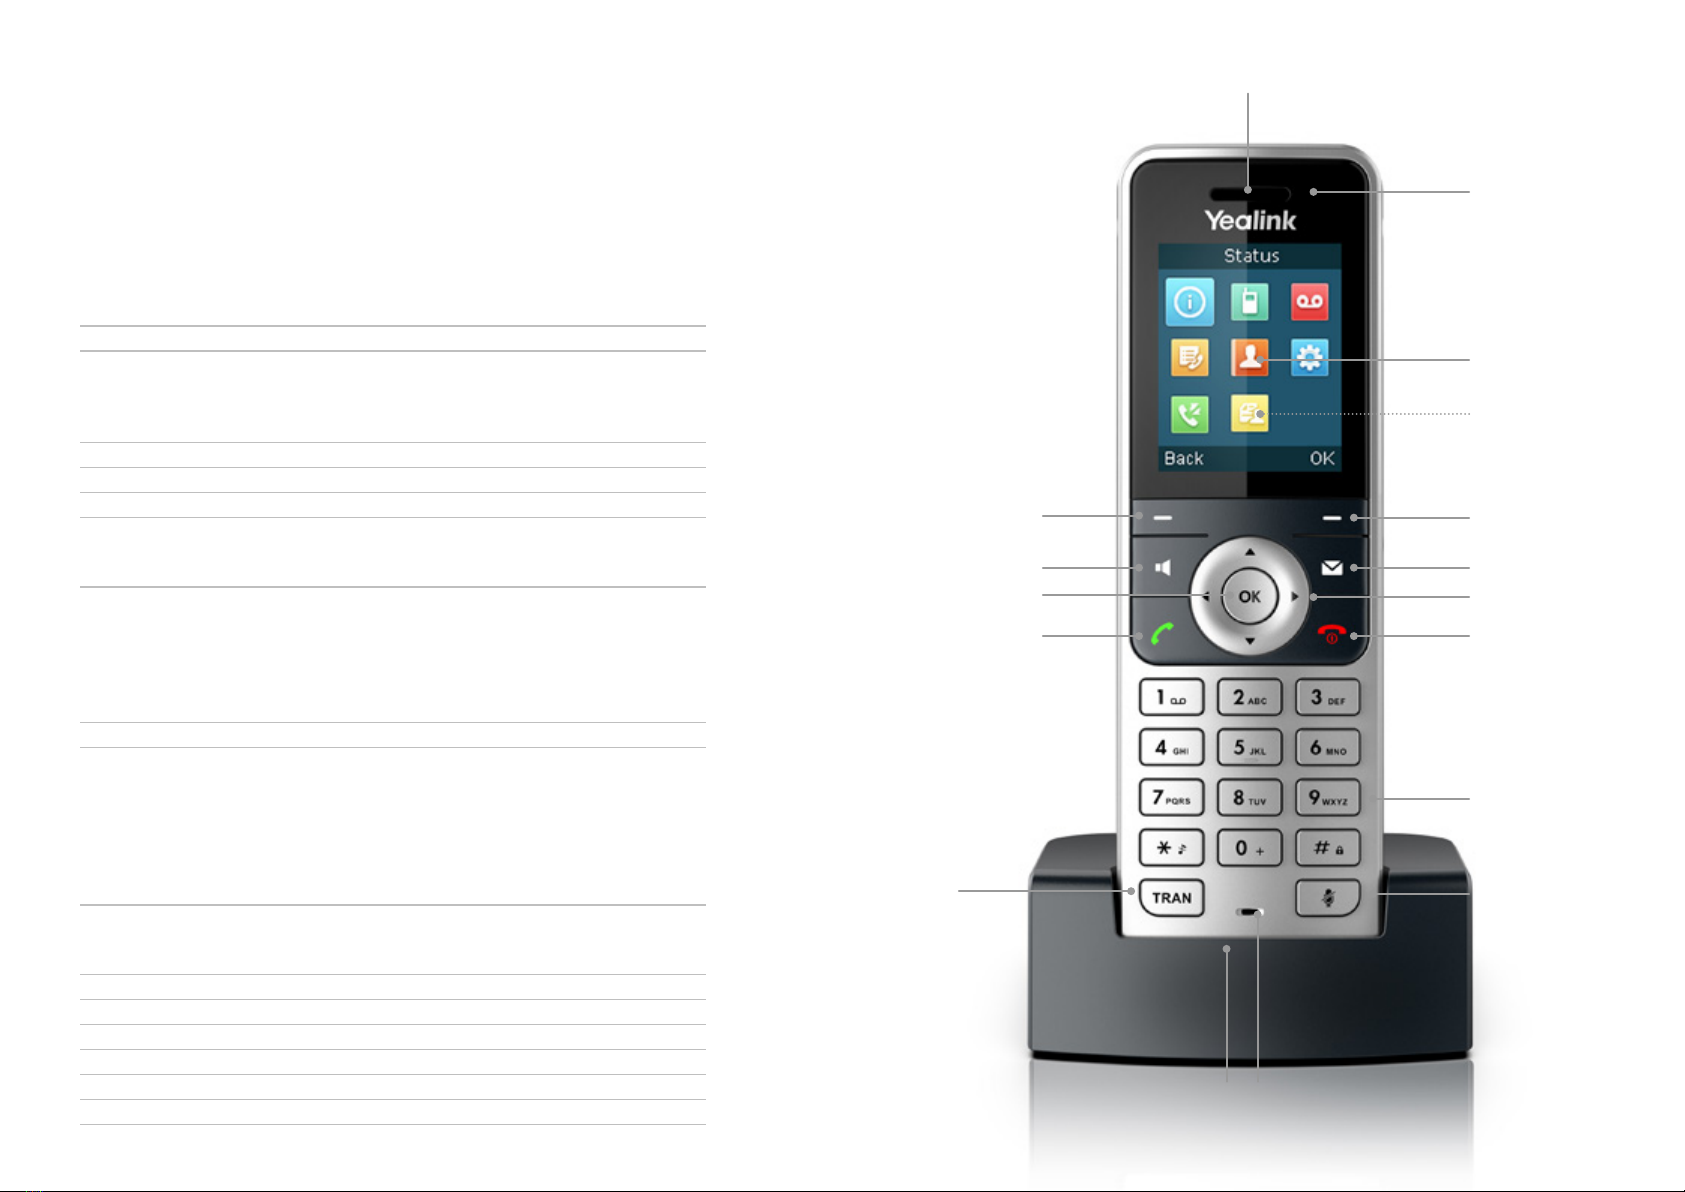
Phone features and keys
1 Listen to calls using the earpiece.
2
The flashing light tells you when something’s going on.
• Fast red flashes = there’s an incoming call.
• Slow red flashes = you have a voicemail or missed call.
• Solid red light = the handset’s battery is charging.
3Find out more about the screen from pages 11 & 12.
4 These soft keys help you use the phone’s features.
5The message button opens your voicemail and missed calls
6
Make a call using the speakerphone.
• Switch from the earpiece or a headset.
• Answer a call on speakerphone.
7
The directional arrows help you navigate menus.
• Take shortcuts.
• Scroll through information.
• Move the cursor.
• Adjust the volume.
• Switch between values.
8 Confirm an action or go to the main menu with the OK button.
9
This button ends calls and turns on the handset.
• Press once to go back a step.
• Press and hold to return to the home screen.
• When off, press to turn the phone on.
• While on the home screen, press to turn the phone off.
• Cancel an action or end a call.
• Reject an incoming call.
10
Answer an incoming call with the off-hook button.
• Enter the redial call list.
• Switch to the earpiece or a headset.
11 Dial numbers with the keypad.
12 Transfer a call to another number with the TRAN button.
13 Stop being heard by pressing the mute button.
14 Speak into the microphone.
15 Listen to calls hands-free over the speaker (back of handset).
16 Connect a headset through the 3.5mm headset connection.
1
12
4
3
15
2
5
9
10
6
4
8
11
13
7
1416
10

Phone display
Home screen
1
Check your reception using the signal strength icon.
• No reception =
• Weak reception =
• Strong reception =
• Eco mode =
2 Find your feature status here.
3
See how much charge you have left using the battery
charge icon.
• Extremely low battery =
• Low battery =
• High battery =
4Find out which handset you’re using by reading its
name and number.
6Find out which handset you’re using by reading its
name and number.
6The default soft key labels are History and Line.
11

Line Status screen
You can reach the Line Status screen by pressing the
Line soft key on the Home screen.
1 This is the menu name.
2
Find out the registered line number and
corresponding line.
• This is your DDI number by default.
• The default outgoing line displays on the first
line of the screen.
3The line status icon tells you whether a feature’s
assigned to the line.
4 The two soft key labels.
123 Your registered handsets and their numbers
Earpiece mode is on
Headset mode is on
You’re using the speakerphone
The keypad is locked
You have voicemail
You’re using silent mode
This is a contact
This is a received call
This is a missed call
This is a placed call
This call is on hold
You are muted
Do not disturb is switched on
This is an intercom call
This is an unassigned outgoing line
This is an anonymous call
Reject the anonymous call
Understanding your screen icons
12

Your base station
1
Press the paging key to make your handset ring when you can’t find it.
• Toggle through the registration mode.
• Reset the base station to its factory settings.
2
Check the base station’s mode with the registration LED.
• Fast green flashes = the station’s in paging mode.
• Slow green flashes = the station’s in registration mode.
• Steady green light = a handset is registered to the base station.
• No light = there’s no registered handsets.
3
Check your base station’s connected to the internet with the
network status LED.
• Slow green flashes = the station’s offline.
• Steady green light = the station’s connected to the internet.
4
Check power with the power indicator LED.
• Slow green flashes = the station’s upgrading its firmware.
• Steady green light = the station has power.
• No light = the station doesn’t have power.
2
3
4
1
13

How to register a new
handset
The handset that came with your
Yealink W53P DECT IP phone is
already registered. But you’ll need
to register any separate handset to a
base station - you‘ll know you need to
do this if the screen says ‘Press base
paging 2s then press OK’.
To register a handset:
• Press and hold the button
on the base station until the
registration LED flashes
• Press the Reg soft key on
the handset.
If this doesn’t work, try registering
from the handset:
• Press
• Select Register Handset.
• Choose your base station from a
list of nearby devices then press
• Once the handset’s found it, press
again.
• Enter the base station PIN
(default: 0000).
• Press the Done soft key to finish
registering the handset.
The handset screen will briefly show
‘Handset Subscribed’ and ‘Base
NOXXXX’ - the ‘X’s represent the
last four characters of the connected
base station’s unique Media Access
Control, or MAC, address, so you
know which of your base stations
the handset is connected to. Once
registered, its name and number will
show on the home screen.
Note: If you’ve set up the base station
and registered a handset successfully,
all LEDs will show green.
14

Using your phone
Making calls
You can use your Yealink W53P to
make calls in various ways.
To call a new contact
• Dial their number
• Press
To call a contact in your directory
• While on the Home screen, press
• Select Phonebook
• Choose the contact you want
to call
• Press
To call a number from your
call history
• Press the History soft key
• Choose the number you want
to ring
• Press
To call a number from your
redial list
• While on the Home screen, press
• Choose the number you want to ring
• Press
To make a call on speakerphone
• Dial a number
• Press
Answering calls
When someone rings you, the call will
appear on the screen of your handset.
You’ll also see the caller’s details, and
how long you’ve been talking.
To answer a call with the earpiece
• Press or the Accept soft key.
To answer a call on speakerphone
• Press
To answer a call when using a
headset
• Press the Accept soft key.
Note: you can ignore an incoming call
by pressing the Silence soft key, or
reject it by pressing the off-hook key.
To answer a call when you’re on
another call
• Select the incoming call with
• If using the handset or a headset,
press or the Accept soft key
• If you’re on speakerphone,
press
Transferring calls
You can transfer a call to another
person in one of two ways. The
simplest way is as follows:
• Press during a call
• Dial the number you want to
transfer the call to
• Press again to complete
the transfer.
The call will then be connected to the
number you’re transferring it to.
If you want to make sure the call’s
answered once you’ve passed it
along, you need to:
• Press during a call
• Dial the number you want to
transfer the call to
• Press to dial out
• When you hear the target
phone ringing or it’s answered,
press again to complete
the transfer.
Ending calls
You can hang up by pressing or
the End soft key.
15

Troubleshooting
How do I restore power to
the base station?
• Check you’re set up correctly,
using page 4 for reference.
• If you’re using AC power, try
plugging the power adaptor into
another socket.
• If you’re using power over
Ethernet, connect the base station
directly to your LAN switch. If
there’s no power light on the base
station get in touch with your LAN
provider, if it’s not part of your
Cloud Voice service.
• If you still need help, just call us on
0800 389 0537.
How do I check a handset’s
registered with a base
station?
• Press the paging key on the
base station. If your handset rings,
it’s registered with the station.
• If the handset shows Unregistered
on its screen, follow the steps on
page 4 to register.
How do I check a base
station’s connected to my
network?
Press the paging key on the
base station. You should see your
IP address on the screen. If it says
‘0.0.0.0.’, it isn’t connected. Your IT
team should be able to help.
Can I check my line status
from a handset?
Yes. Press the Line soft key on your
handset. You’ll see your number at
the top of the Line Status screen. If
you see a red cross next to it, your line
isn’t working. You’ll need to check
your phone’s registered to the user on
the business portal.
I can make calls, but people
can’t call me. What’s gone
wrong?
Your handset could be set to Do
not disturb. Look for by the signal
indicator . Dialling *79 on your
keypad will turn this off.
My phone still isn’t working
Don’t worry. We should be able to
help. Call us on 0800 011 3237, any
time between 8am and 6pm.
16

General information
Important – 999 or 112
emergency calls
• Your Cloud Voice number is
registered to a specific address,
so when you make a 999 or 112
call from your phone number,
that’s the address the emergency
services will see.
• If you use Cloud Voice at a
different address, the registered
address won’t automatically
change. So if your work location
changes, please let your
administrator know so they can
update your registered address.
• You might not be able to make
999 or 112 calls if there’s a power
or network failure, or you’re
using the service from an app
or mobile phone.
Safety information
Do not open the handset or the base.
This could expose you to high voltages
or other risks. If your phone needs to
be repaired, call us on 0800 389 0537
and we’ll be able to help.
Cleaning
Clean the handset and base with a
damp (not wet) cloth, or an antistatic
wipe. Never use household polish as
this will damage the product. Never
use a dry cloth as this may cause a
static shock.
Environmental
• Do not expose to direct sunlight.
• Make sure your phone is on a dry,
flat surface, not on a carpet or
anything which has fibres. Make
sure it can always get a free flow of
air over its surfaces.
• Do not submerge any part of your
product in water and do not use it
in damp or humid conditions, such
as bathrooms.
• Do not expose your product to
fire, explosive or other hazardous
conditions.
• There’s a slight chance your phone
could be damaged by an electrical
storm. Should this happen, contact
your BT service desk.
Product disposal instructions
• The symbol shown here
and on your phone means
your product is classed as
electrical or electronic equipment.
You shouldn’t throw it away with
other office waste once at the end
of its working life.
• The Waste of Electrical and
Electronic Equipment (WEEE)
Directive (2002/96/EC) has been
put in place to recycle products
using best available recovery and
recycling techniques to minimize
the impact on the environment,
treat any hazardous substances
and avoid the increasing landfill.
• Business users should contact
their suppliers and check the terms
and conditions of the purchase
contract and ensure that this
product is not mixed with other
commercial waste for disposal.
Guarantee
Your Yealink W53P is guaranteed for
a period of 12 months from the date
of purchase. Your guarantee covers
the repair or replacement of your
phone or any of its parts (other than
batteries) if they’re faulty or below
standard, or they break because of
bad workmanship or materials. If your
product is more than 28 days old, it
might be replaced with a refurbished
or repaired product.
The conditions of this guarantee are:
• The guarantee shall only apply
to defects that occur within the
12-month guarantee period.
• You provide proof of purchase.
• You’ll need to return your phone to
us according to our instructions.
• We don’t cover any faults or
problems that are caused by
accidents, misuse, fair wear and
tear, neglect, or if you’ve tried to
repair the equipment yourself.
This guarantee does not affect your
statutory rights.
17

Offices worldwide
The services described in this publication are subject to availability and may be modified from time to time. Services and equipment are provided subject
to British Telecommunications plc’s respective standard conditions of contract. Nothing in this publication forms any part of any contract.
© British Telecommunications plc 2021. Registered office: 81 Newgate Street, London EC1A 7AJ. Registered in England No. 1800000.
September 2021
18
Table of contents
Other BT IP Phone manuals