BVL Dairy Feeder User manual

Rev. 0 /10.12 Art.Nr. 99872
Dairy Feeder Installation
Feeding made easy
Your intelligent weighing system for precise feed
management

2
Contents
Contents .................................................................................................................................................................. 2
Introduction ........................................................................................................................................................... 3
1. Installing the Internet connection .......................................................................................................... 4
1.1.SIM card (data SIM card) ........................................................................................................................... 4
1.2.Setting up the Internet connection........................................................................................................ 5
1.3.Check the setup of the PDA...................................................................................................................... 8
2. Connecting the Dairy Feeder system to the feeder mixer wagon ............................................. 9
2.2.Attaching the PDA......................................................................................................................................10
2.3.Connecting the Dairy Feeder software to the existing weighing equipment......................11
2.4.Calibrating the Dairy Feeder System...................................................................................................19

3
Introduction
Dairy feeder is a web-based feed management system that lets you access your feed data from
anywhere at any time. To access the web-based feed program all you need is the Internet. Go to
www.dairyfeeder.de and log in using your user name and password to get to your feed data. The
first time you dial in from the PDA you will also need your activation key.
You will receive your user name, password and activation key in a separate letter from Daily
Feeder. Please look after this document carefully!
Description of the components:
PDA Transceiver Box:
P ersonal
D igital
A ssistant
TMR pilot:
Web-based feed software
www.dairyfeeder.de
You can reach your personal account by logging in.
Service
You can contact our hotline on the following number if you have any further questions:
+49 (0) 176 100 480 43
or send an e-mail to:
info@dairyfeeder.com

4
1. Installing the Internet connection
1.1. SIM card (data SIM card)
To be able to use the Dairy Feeder system you require an Internet connection between the PDA
and Dairy Feeder via a valid PDA data SIM card. Please acquire such a SIM card from your mobile
telephone operator. A simple data SIM card that provides you with a monthly volume of 10–20
MB is sufficient. Ask your mobile phone operator whether it is possible to combine your existing
contract with one that provides you with a data SIM card. Check the network coverage (GPRS or
3G) for the area in which you intend to use the Dairy Feeder system.
If you are a Vodafone customer, you can order the required SIM card directly by calling + 49 (0)
800-172 1234. This is then added to your existing contract. They will provide you with what is
called an Ultra Card, the data tariff of which is connected to your existing contract.
The tariff at Deutsche Telekom is called Mobile Connect Medium. If you are a Deutsche Telekom
customer, then call the following telephone number: +49 (0) 39 43 / 40 999 19
Data contracts can also be concluded with all other mobile telephone operators.
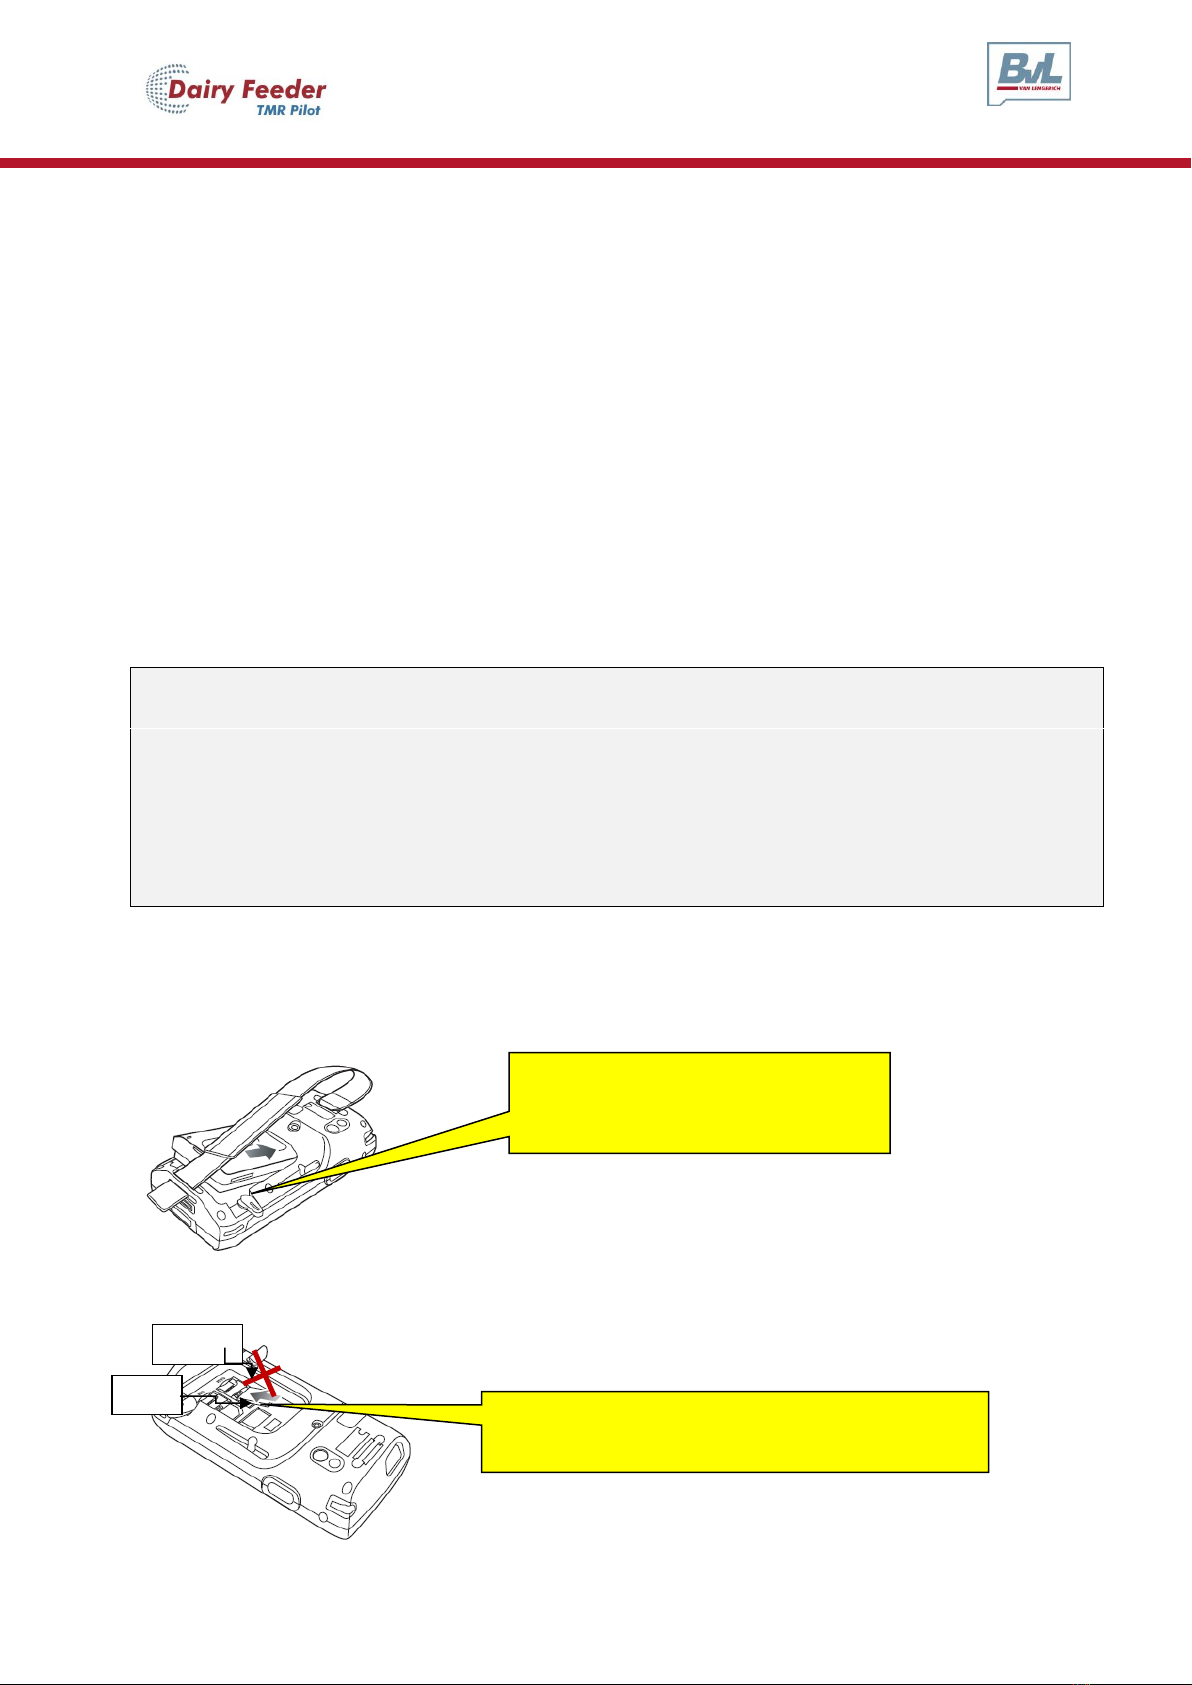
Insert the active data SIM card for your Dairy Feeder System into your PDA and activate the
internet connection of your PDA.
a. Remove the battery
b. Insert SIM card
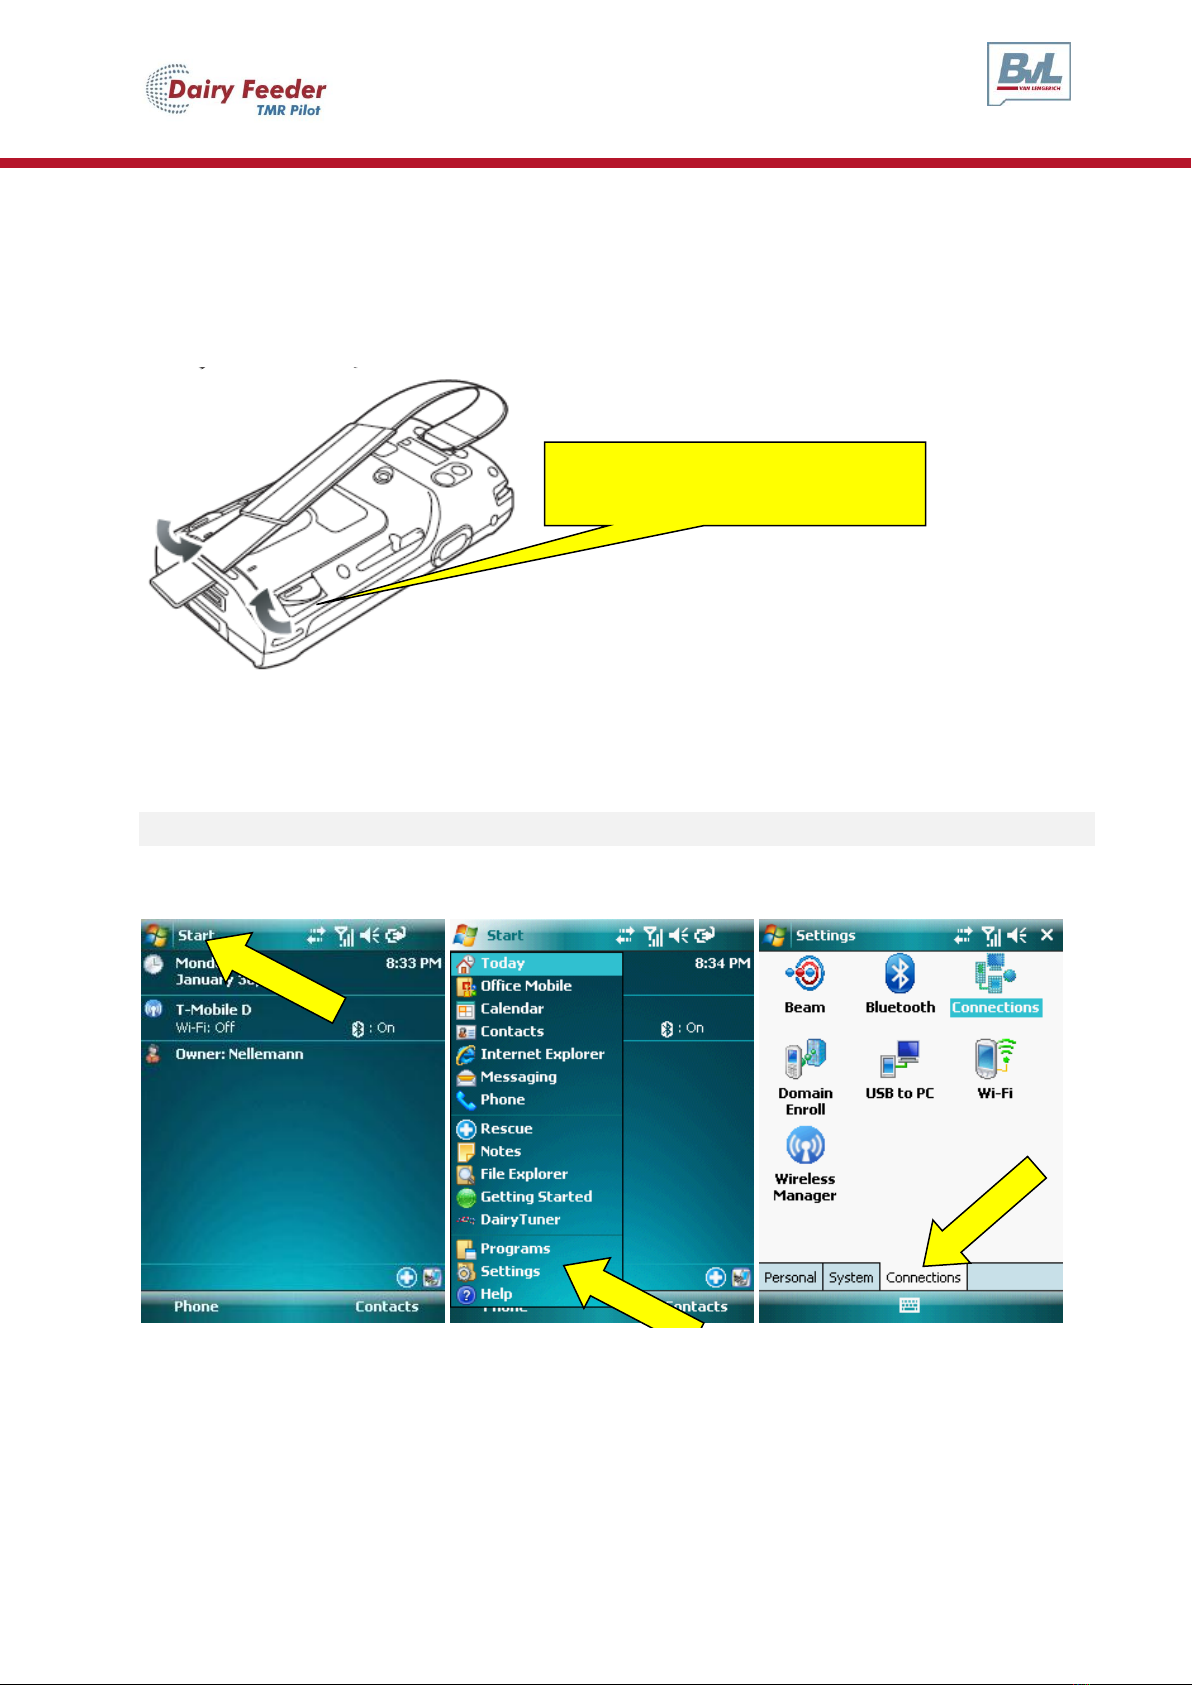
Unlock by turning outwards and
insert battery
Insert the SIM card here (not into the SAM
compartment!)
SIM
SAM

5
Make sure you use the right slot for your SIM card (the PDA gives you two possibilities. Use that
one which is named SIM).
c. Insert battery again
1.2. Setting up the Internet connection
Follow the following instructions to set up the Internet connection:
Start > Settings > Connections > Automatically configure connection
Select Start to get to the menu selection.
First, press Start.
Turn lock inwards and secure
battery
In the settings menu
choose Connections in the
bottom part of the screen.
Select Settings here.

6
Goal achieved: The Internet connection has now been established and
the PDA is activated for operation.
If automatic setup is not possible, then you will be informed of this. Then please configure the
Internet connection manually as follows.
Select Automatically
configure Connection
here.
Then select the field
Connections.
The PDA will recognize the
operator of the SIM card
automatically and set up
the connection. Select Next
and the installation is
carried out automatically.
After configuring, the
process is concluded with
Done.

7
Manual configuration of the Internet connection
Start > Settings > Connections > Connections
You end manual configuration by clicking Finish without entering anything else in this field.
Go to the settings menu as
described at the front and
now select the function
Add a new modem
connection.
Then enter the name for
the connection in the first
field, e.g.: Dairy Feeder
web. This is now the name
for the connection.
Select Cellular Line
(GPRS) to select the most
stable Internet connection
under Select a modem
and then press Next.
In the following menu
enter the Access Point-
Name. The access point
name varies by country
and network. You can find
out the valid Access point
name from your mobile
phone operator.
After entering the Access
point name, press Next.

8
1.3. Check the setup of the PDA
If setting up the Internet connection was successful, then the following symbols will appear on
your PDA desktop. Also take into account that the battery has to be charged enough to establish
an Internet connection.
The Bluetooth connection to your Dairy Feeder Transceiver Box has to be active so that you can
use your Dairy Feeder system.
You can also check and if necessary change the individual connection types by selecting the
connection manager on the desktop. Wi-Fi has to be switched off; Bluetooth and the phone have
to be on.
Battery status (Please always ensure that there is sufficient
power)
Network reception (If the mobile Internet connection is
active, then its strength is shown in a bar. Please ensure that
there is always sufficient reception strength. It might be
necessary to change the type of connection (GPRS, 3G, …))
Bluetooth status (the Bluetooth connection has to be
active to allow a connection between the PDA and the
transceiver box). Setting up the Bluetooth connection as a
retrofit set is described here.

9
Goal achieved: If you were supplied the Dairy Feeder System together
with a BvL feeder mixer wagon, then setup is complete. You can get
started right away. All the following settings were made in the factory.
2. Connecting the Dairy Feeder system to the feeder mixer
wagon
If your feeder mixer wagon was delivered preinstalled together with a Dairy Feeder system, then
you do not need to carry out any installation work. Just skip this chapter.
If you acquired a Dairy Feeder system to be connected to your existing feeder mixer wagon, then
you have to install and calibrate the system. Take the steps described as follows.
2.1. Connect the transceiver box
Connect the transceiver box to your weighing equipment by
connecting the box between the weighing bars and the
weighing computer.
To do this take the cable coming from the weighing bars out of
the weighing computer (not the power cord!) and connect it to
the Dairy Feeder transceiver box.
ON
ON
OFF
Leave the menu
by pressing the
small ‘x’ in the
top right of the
menu list.

10
You then put the cable supplied between the ‘Power’
connection on the transceiver box and the ‘Load
cells/weighing bars’ connection on the weighing computer.
Goal achieved: The installation of the hardware of the transceiver box is
then complete.
2.2. Attaching the PDA
We recommend fastening the PDA in the PDA car holder supplied. You attach this holder in the
tractor or in the loading vehicle. Two holders are supplied. The battery of the PDA is also
constantly charged in the holder.

11
Connect the car holder to the power supply of the tractor or loading vehicle. Ensure that the PDA
is always charged. Ensure that the socket has an uninterrupted supply of electricity.
2.3. Connecting the Dairy Feeder software to the existing weighing equipment
The Bluetooth connection between the PDA and the transceiver box has to be set up.
Ensure that the Bluetooth connection is active and that you and the PDA are within reception
range of the DairyFeeder.
This configuration has already been carried out for machines delivered with the Dairy Feeder
system.
Start > Settings > Connections > Bluetooth
First click on Start and select the ‘Settings’ function.
1
2

12
First click on Add new device to find the Dairy Feeder transceiver box. Select the Dairy Feeder
transceiver box after the PDA has found the box.
2
1
Select Connections and the function
Bluetooth to get to the Bluetooth settings.

13
After selecting the transceiver box, select Next.
Entering a password is not required.
Now select Yes.

14
Select the transceiver box Dairy Feeder XXXXXXXX; DairyTuner single; Dairy Tuner V2S ….

15
Mark Serial port and save the connection by pressing Save.
After both devices (PDA and transceiver box) have
been connected via Bluetooth, then you have to set up
a COM port. To do this select the function New
Outgoing Port in the previous step. To be able to
setup ports you have to be in the tab (lower menu
selection bar) COM Ports.
2

16
Select COM 0 or COM 9 and deselect Secure
connection (the tick must disappear).Now press
Finish.
1
2
3

17
Now the same COM port in the Dairy Feeder PDA software has to be selected that was previously
selected in the Windows Bluetooth settings.
Select the Dairy Feeder
logo directly on the start
screen to start the Dairy
Feeder system.
When you have opened
the DairyFeeder program,
select the function Setup
via Connect.
In the field COM Port,
select the down arrow to
get to the selection menu.
1
2
The selection field will
open. Now select COM9
and then Detail, to
describe the COM Port in
more detail.

18
Goal achieved: The PDA software is connected with the weighing
computer.
1
2
3
You can now determine
the Baud rate in the
detailed description. Select
57600 for the Baud rate
and 8for Data bits.
Confirm this information
with Done.
To complete the
connection between the
transceiver box and the
PDA, leave the program
with Exit and start it again.

19
2.4. Calibrating the Dairy Feeder System
Now you have connected the hardware and software with the existing weighing equipment. To
ensure that the system works precisely, then you have to calibrate both systems to each other
again.
A system can only work as well as it has been calibrated.
Please ensure that the feeder mixer wagon is completely empty before beginning
calibration.
Please first ensure that the existing weighing equipment at the feeder mixer wagon is
recalibrated. To do this, follow the description of the weighing equipment of the feeder
mixer wagon.
Calibration of a new system using a sample weight.
To calibrate the Dairy Feeder system with your existing weighing equipment, calibration is
necessary. All you require for this is a reference weight against which you calibrate the machine or
the system. Ideally this should be between 500 kg and 3,000 kg, depending on the size of the
mixer wagon (the higher the reference weight, the more precise the calibration). First put the
calibration weight to one side because the calibration process begins with an empty feeder mixer
wagon.

20
Tools > Measured calibration
1
2
Start the calibration process
by starting the Dairy Feeder
TMR pilot and select Tools
(1) in the login window. In the
menu is the function
Measured Calibration (2)
Select this function.
Now the following window
will open. Click on Start and
begin the calibration process.
Now wait until the value in
the field Scale output –
Millivolts is stable. Then
confirm the zero point with
the button No Load.
You have determined the
zero value.
Table of contents
Other BVL Farm Equipment manuals

BVL
BVL V-MIX DRIVE Maximus Plus 11-1S User manual

BVL
BVL V-MIX Agilo User manual

BVL
BVL V-MIX Fix Plus User manual

BVL
BVL V-MIX Fix Plus User manual

BVL
BVL V-BIO Combi User instructions

BVL
BVL V-MIX DRIVE Maximus Plus 11-1S User manual

BVL
BVL V-MIX Fill Plus L User manual

BVL
BVL V-LOAD Shear User manual

BVL
BVL V-COMFORT TURBO plus User manual

BVL
BVL MIXDRIVE Maximus Plus 1S Configuration guide