manuals.online logo
Brands
  1. Home
  2. •
  3. Brands
  4. •
  5. Crux
  6. •
  7. Automobile Accessories
  8. •
  9. Crux RVCCH-75 User manual

Crux RVCCH-75 User manual

RVCCH-75
Rear View with VIM Integration Interface and Lip Mount Camera
for Chrysler, Dodge & Jeep Vehicles with MyGig Radio
R
INTERFACING SOLUTIONS
Sightline
Multi View Integration
Crux Interfacing Solutions • 21541 Nordhoff St., Unit C, Chatsworth, CA 91311
phone: (818) 609-9299 • fax: (818) 996-8188 • www.cruxinterfacing.com
rev.021120
1 of 3
• Acvates Mygig radio for enabling video features.
• Spare re mount camera included.
• Interface includes Audio / Video Input to connect an extra A/V source.
• Automacally switches to Rear-view when car is in Reverse mode.
• Supports vehicles with manual transmission but does not supply +12V Reverse Trigger. Camera power
must be tapped from the +12V reverse light wire instead.
• Plug & Play Installaon.
PRODUCT FEATURES:
PARTS INCLUDED:
RVCCH-75 Module RVCCH-75 Harness CUL-03 Lip Mount Camera
INSTALLATION DIAGRAM:
WHITE Wire
Parking Guideline
DP
ON
DIP
SWITCH
LED* *LED RED = Power ON Status
LED BLUE = Data Bus ON Status
Regulator
20 Ft. Coax Cable
8-Pin Molex
Represents Solder Joint
TO RADIO
WHITE
22-PIN
(MALE)
GRAY
22-PIN
(MALE)
WHITE
22-PIN
(FEMALE)
GRAY
22-PIN
(FEMALE)
TO FACTORY
HARNESS
GREEN WIRE
ACTIVATE VIDEO BYPASS
A/V OUT
A/V INPUT
To Source Ground
(ground wire)
(not chassis ground)
WHITE Wire*
(Camera Power Output
+12V 250mA)
RED Wire
Tape O
(Not Used)
CUL-03 Camera
Included
*White wire does not supply Reverse Trigger on Manual Transmissions.
Camera power must be connected to factory reverse light wire instead.
Crux Interfacing Solutions • 21541 Nordhoff St., Unit C, Chatsworth, CA 91311
phone: (818) 609-9299 • fax: (818) 996-8188 • www.cruxinterfacing.com
rev.021120
2 of 3
R
INTERFACING SOLUTIONS
Sightline
Multi View Integration
DIP SWITCH SETTINGS:
INSTALLATION INSTRUCTIONS:
INSTALLING THE CAMERA AND INTERFACE
1. Remove the factory radio to gain access to the factory connectors.
2. Plug in the t-harness with WHITE and GRAY connectors. (See wiring diagram on page 1)
3. Set the proper DIP Switch sengs on the RVCCH-75 module. (See chart above)
4. Test the camera for funconality before installing it.
6. Use the WHITE 12V Reverse Output wire to power the camera (see wiring diagram on page 1). DO NOT
connect the red power wire near the camera to the reverse light and insulate this red wire to avoid from
shorng. If the vehicle has a manual transmission, the camera power must be tapped to the +12V reverse light
wire instead. In this case the WHITE 12V Reverse Output wire is not used and should be insulated to avoid
from shorng.
7. Plug in the Yellow male RCA from the camera cable to the Yellow female RCA of the t-harness with white
connectors.
8. Plug in the AV source and test for funconality.
9. Once camera funconallity has been veried. Remove the spate re at the back of the vehicle.
10. Remove the rear panel and drill a 5/8” hole to mount the CUL-03 camera.
11. Connect the power connecon per the diagram on page 1.
12. Connect the video cable of the camera to the extension cord provided.
13. The CUL-03 camera comes with parking guide lines. To disable the partking guide lines cut the thin white wire
loop on the camera cable.
14. Route the cable towards the radio and plug in the yellow RCA to the t-harness.
15. Test the camera and AV input again before re-installing the radio.
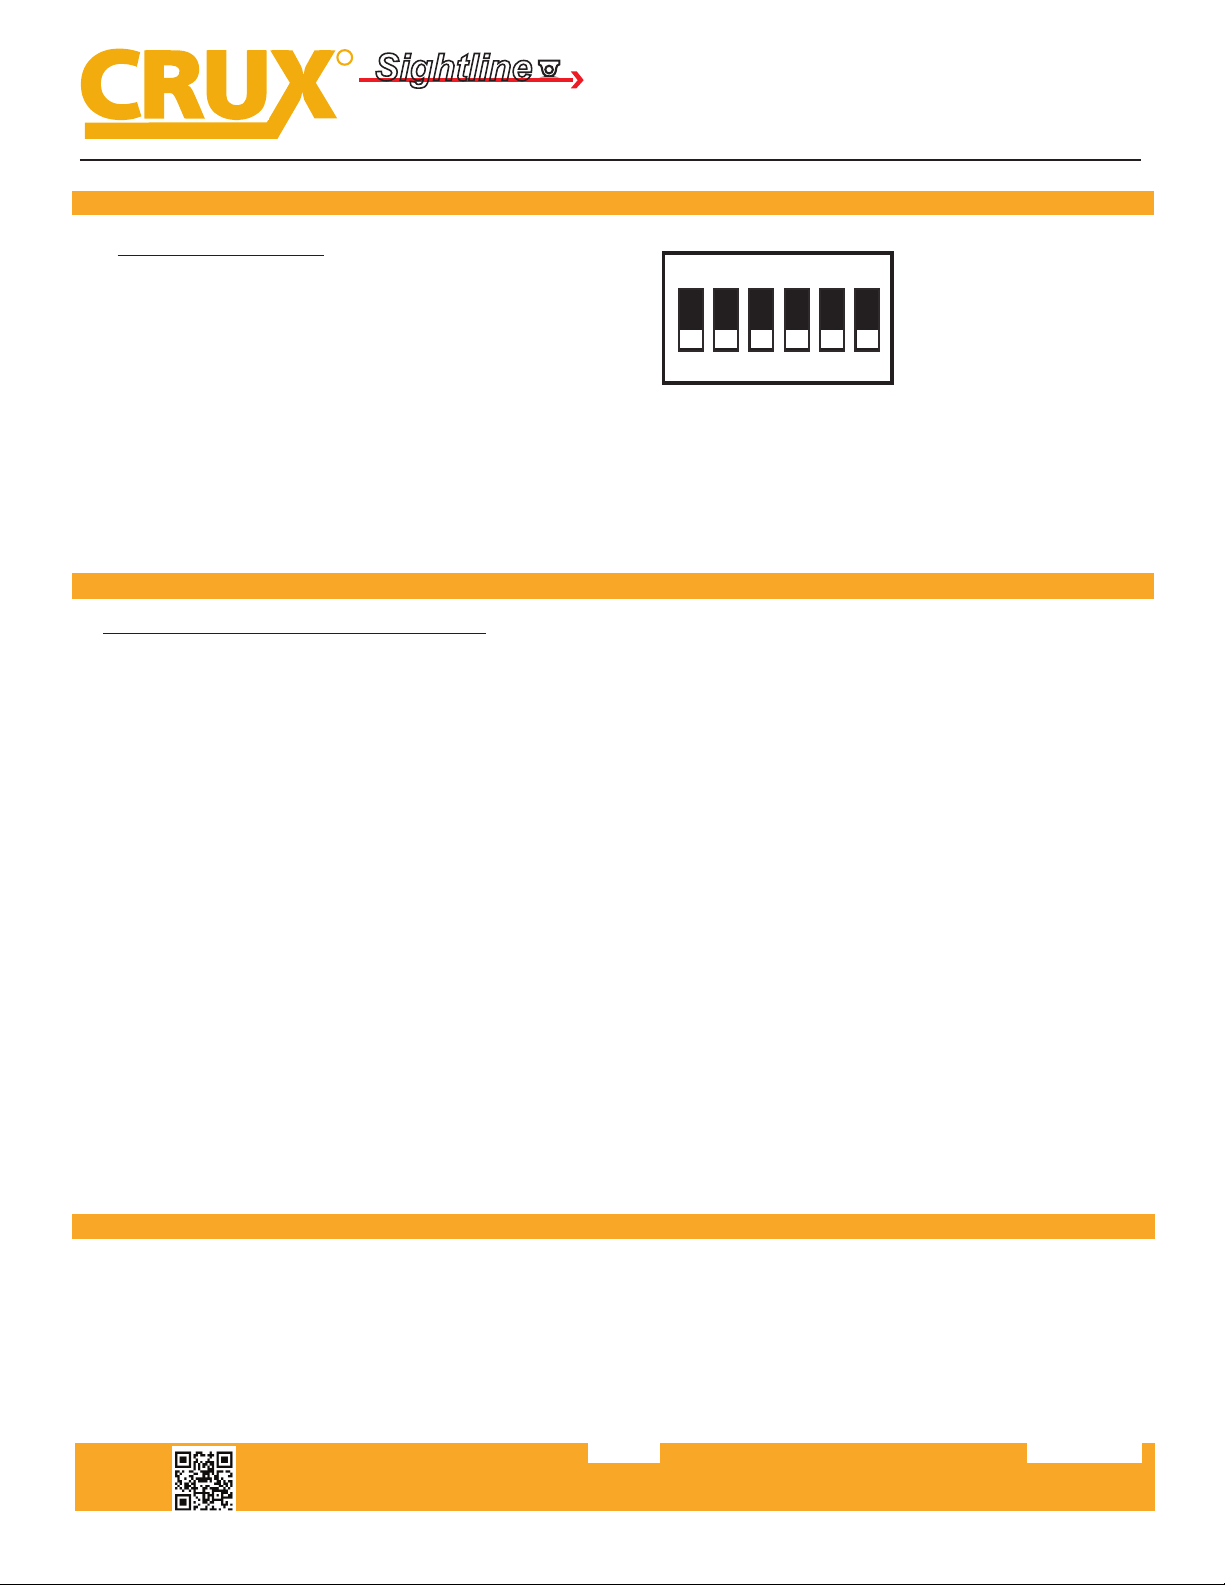
DIP SWITCH FUNCTIONS:
DIP 1 = Video in Moon Acvaon ON / OFF
DIP 2 = Rear View Camera ON / OFF
DIP 3 = Set to OFF
DIP 4 = Set to OFF
DIP 5 = CAN Terminaon Radio Side*
DIP 6 = CAN Terminaon Car Side*
RVCCH-75
*DIP 5 & 6
If the radio is having turn-on issues, please try the following:
Aempt 1: Set 5 & 6 to ON
Aempt 2: Set 5 to ON and 6 to OFF
Aempt 3: Set 5 to OFF and 6 to ON
1 2 3 4 5 6
ON
LED INFORMATION:
The RVCCH-75 module has 2 LEDs on the side of the Molex connector that conrms its funconality as follows:
RED LED = Conrms Power
BLUE LED: PULSING = No BUS, Pending Data
OFF = Complete Power Down
SOLID = BUS Recognized
The GREEN wire is used for a non-permanent VIM feature.
Set DIP #1 to OFF and connect the GREEN wire to +12V to
turn on the VIM feature. Use a toggle switch to be able to
turn it ON or OFF.
Rear View with VIM Integration Interface and Lip Mount Camera
for Chrysler, Dodge & Jeep Vehicles with MyGig Radio
Crux Interfacing Solutions • 21541 Nordhoff St., Unit C, Chatsworth, CA 91311
phone: (818) 609-9299 • fax: (818) 996-8188 • www.cruxinterfacing.com
rev.021120
3 of 3
R
INTERFACING SOLUTIONS
Sightline
Multi View Integration
RVCCH-75
VEHICLE APPLICATIONS:
CHRYSLER
2011 – 2014 200
2008 – 2010 300/300C
2008 - 2010 Aspen
2007 – 2011 Sebring
2008 – 2017 Town & Country
DODGE
2007 – 2015 Avenger
2010 – 2012 Caliber
2008 – 2017 Caravan
2009 – 2014 Challenger
2008 – 2010 Charger
2008 – 2012 Dakota
2008 – 2013 Durango
2009 – 2010 Journey
2007 – 2012 Nitro
2009 – 2012 Ram
PARKING GUIDE LINES:
The parking lines are there to assist you while reversing. To deacvate the parking lines simply cut the WHITE loop
wire located near the 4 pin camera connector and cycle the camera power.
What the Lines mean:
Green Line: CLEAR
Yellow Line: GETTING CLOSE
Red Line: WARNING - VERY CLOSE
GREEN
YELLOW
RED
SWITCHING SOURCES:
VES will be your source for the AV Input.
To access the VES buon, press the RADIO/MEDIA buon on the le side of the radio. The VES buon is only acve
aer the interface is properly installed.
HDD DISC AUX VES
COMPATIBLE RADIO:
MyGig Radio
(HARD DISC DRIVE or HARD DRIVE printed on the lower right hand side of radio face)
Rear View with VIM Integration Interface and Lip Mount Camera
for Chrysler, Dodge & Jeep Vehicles with MyGig Radio
JEEP
2008 – 2010 Commander
2008 – 2016 Compass
2008 – 2013 Grand Cherokee
2008 – 2015 Liberty
2009 – 2017 Patriot
2007 – 2018 Wrangler*
VOLKSWAGEN
2009 – 2013 Routan
*Use RVCCH-75W (with license plate light camera included)
or RVCCH-75WT (with spare re mount camera include)

Other Crux Automobile Accessories manuals

Crux Sightline PCM-3 User manual

Crux

Crux Sightline PCM-3 User manual

Crux F Series User manual

Crux

Crux F Series User manual

Crux BEECR-35D User manual

Crux

Crux BEECR-35D User manual

Crux TDR-RVM32 User manual

Crux

Crux TDR-RVM32 User manual

Crux Sightline RVCAD-81 User manual

Crux

Crux Sightline RVCAD-81 User manual

Crux AVIGM-04S User manual

Crux

Crux AVIGM-04S User manual

Crux SOOCR-26 User manual

Crux

Crux SOOCR-26 User manual

Crux Sightline VIMMB-85N User manual

Crux

Crux Sightline VIMMB-85N User manual

Crux RVCVL-82S User manual

Crux

Crux RVCVL-82S User manual

Crux ACPBM-77Z User manual

Crux

Crux ACPBM-77Z User manual

Crux RVCGM-80I User manual

Crux

Crux RVCGM-80I User manual

Crux SWRTY-61N User manual

Crux

Crux SWRTY-61N User manual

Crux SWRVL-54 User manual

Crux

Crux SWRVL-54 User manual

Crux Sightline VIMFD-95F User manual

Crux

Crux Sightline VIMFD-95F User manual

Crux Sightline VIMPR-90P User manual

Crux

Crux Sightline VIMPR-90P User manual

Crux RVCCH-75WM User manual

Crux

Crux RVCCH-75WM User manual

Crux AVICH-03 + VCIP5 User manual

Crux

Crux AVICH-03 + VCIP5 User manual

Crux RVCAD-81M Use and care manual

Crux

Crux RVCAD-81M Use and care manual

Crux Sightline VIMCF-93C User manual

Crux

Crux Sightline VIMCF-93C User manual

Crux BEELINE Series User manual

Crux

Crux BEELINE Series User manual

Crux BTI-ISO User manual

Crux

Crux BTI-ISO User manual

Crux MG-3 User manual

Crux

Crux MG-3 User manual

Crux RVCCH-75 User manual

Crux

Crux RVCCH-75 User manual

Crux VIMGM-94M User manual

Crux

Crux VIMGM-94M User manual

Popular Automobile Accessories manuals by other brands

Blaupunkt BT DRIVE FREE 112 OPERATING AND INSTALLATION Manual

Blaupunkt

Blaupunkt BT DRIVE FREE 112 OPERATING AND INSTALLATION Manual

Denali MA11151 quick guide

Denali

Denali MA11151 quick guide

Whispbar K822W Fitting instructions

Whispbar

Whispbar K822W Fitting instructions

DICE MediaBridge user manual

DICE

DICE MediaBridge user manual

WABCO TP19039 manual

WABCO

WABCO TP19039 manual

SpeedTech Lights STL Boss quick start guide

SpeedTech Lights

SpeedTech Lights STL Boss quick start guide

MIRAGLIO 30/959 manual

MIRAGLIO

MIRAGLIO 30/959 manual

Dometic COOLFREEZE CDF16 operating manual

Dometic

Dometic COOLFREEZE CDF16 operating manual

TAUBENREUTHER 50-10JT9864 manual

TAUBENREUTHER

TAUBENREUTHER 50-10JT9864 manual

Circontrol Wallbox eNext T installation manual

Circontrol

Circontrol Wallbox eNext T installation manual

Scosche GM1522B instructions

Scosche

Scosche GM1522B instructions

bosal 023784 Fitting Instructions & Contents List

bosal

bosal 023784 Fitting Instructions & Contents List

Amphenol Excel Mate CC manual

Amphenol

Amphenol Excel Mate CC manual

COBB Tuning AccessPORT user guide

COBB Tuning

COBB Tuning AccessPORT user guide

Smappee EV One Home Quick install guide

Smappee

Smappee EV One Home Quick install guide

SportRack Frontier A21008S installation manual

SportRack

SportRack Frontier A21008S installation manual

VEKOOTO SW5-1 Operating	instructions and installation guide

VEKOOTO

VEKOOTO SW5-1 Operating instructions and installation guide

rockymounts Quick Release manual

rockymounts

rockymounts Quick Release manual

manuals.online logo
manuals.online logoBrands
  • About & Mission
  • Contact us
  • Privacy Policy
  • Terms and Conditions

Copyright 2025 Manuals.Online. All Rights Reserved.