dji AGRAS T40 User manual

T40/T20P
Intelligent Charger
User Guide
使用者指南
Panduan Pengguna
ユーザーガイド
사용자 가이드
Panduan Pengguna
Hướng dẫn sử dụng
Guía de usuario
Guia do Usuário
Руководство пользователя
Посібник користувача
v1.0

1
EN User Guide 2
Contents
CHT 使用者指南8
ID Panduan Pengguna 14
32
JP ユーザーガイド 20
KR 사용자 가이드 26
TH 44
VI Hướng dẫn sử dụng 50
RU Руководство пользователя 69
UK Посібник користувача 76
83
Guía de usuario 56
ES
PT-BR Guia do Usuário 63
AR
MS Panduan Pengguna 38
KM

EN
2
Disclaimer
Congratulations on purchasing your new DJITM product. Read this entire document and all safe and lawful
practices DJI provided carefully before use. Failure to read and follow instructions and warnings may result in
serious injury to yourself or others, damage to your DJI product, or damage to other objects in the vicinity. By
using this product, you hereby signify that you have read this document carefully and that you understand and
agree to abide by all terms and conditions of this document and all relevant documents of this product. You agree
to only use this product for proper purposes. You agree that you are solely responsible for your own conduct
while using this product and for any consequences thereof. DJI accepts no liability for damage, injury, or any legal
responsibility incurred directly or indirectly from the use of this product.
DJI is a trademark of SZ DJI TECHNOLOGY CO., LTD. (abbreviated as “DJI”) and its aliated companies. Names
of products, brands, etc., appearing in this document are trademarks or registered trademarks of their respective
owner companies. This product and document are copyrighted by DJI with all rights reserved. No part of this
product or document shall be reproduced in any form without the prior written consent or authorization of DJI.
This document and all other collateral documents are subject to change at the sole discretion of DJI. This content
is subject to change without prior notice. For up-to-date product information, visit www.dji.com and go to the
product page for this product.
Warning
1. Read these instructions carefully before use. Failure to follow the relevant instructions may result in property
damage, personal injury, or death. The warnings and precautions in this manual do not cover all possible
situations and the user must practice common sense in relation to the product that is not mentioned in this
manual and maintain a cautious attitude.
2. Only qualied electricians can wire the charger to three-phase AC power and they must wear insulating gloves.
3. To use the T40 Intelligent Charger with a third-party generator, make sure to purchase a three-phase generator
which has a rated voltage of 380 V and rated output of 12 kW or above. To use the T20P Intelligent Charger
with a third-party generator, make sure to purchase a three-phase generator which has a rated voltage of 380
V and rated output of 6 kW or above.
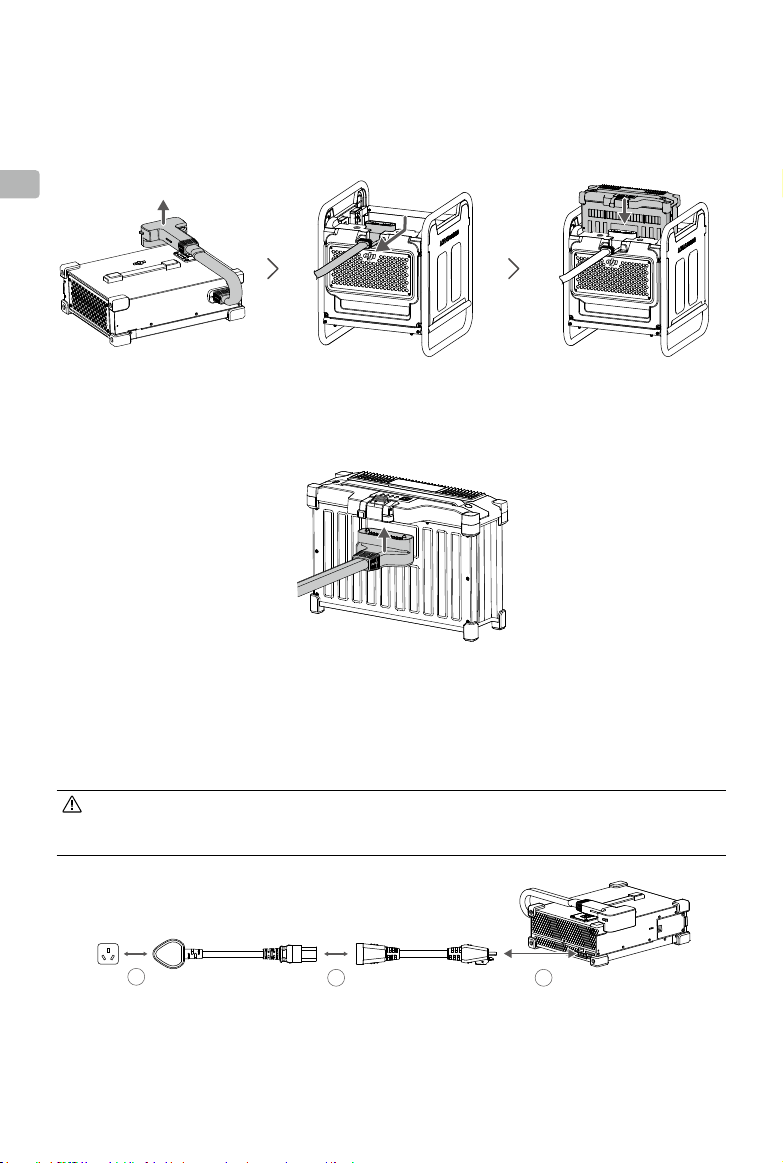
4. To disconnect or reconnect the connector between the DC module and the AC module, disconnect the
charger from power supply rst. DO NOT perform this operation while the charger is running.
5. DO NOT use the charger under direct sunlight, during a thunderstorm, or in other wet environments.
6. The charger should be kept in an environment with a temperature range of 23° to 104° F (-5° to 40° C).
7. Keep the charger away from heat, pressure, water, ammable gases, and corrosives.
8. Keep the charger away from inammable materials while charging. DO NOT place the charger or charging
batteries on a blanket or any carpeted surfaces when in use.
9. Place the charger on a at and stable surface. In order to prevent re hazards, make sure the device is properly
insulated and that there is at least 50 cm of space for ventilation.
10. DO NOT use the charger in an area where batteries are stored. There should be a distance of at least 30
cm between the charger and any charging batteries. Otherwise, the charger or charging batteries may be
damaged by excessive heating and may even lead to a re hazard.
11. Refer to the user guide of the batteries for more safety instructions before use.
12. In case of re, use a dry powder re extinguisher. A liquid re extinguisher may lead to an electrical hazard.
13. DO NOT unplug the AC power cables or charging cable while the charger is in use. Remove the batteries
after charging is completed.
14. If there is any noticeable buildup on the charging cable connector, clean it up at the earliest possible
opportunity. Make sure the charger is not connected to power before cleaning.
15. DO NOT move or carry the charger by pulling the charging cable. Otherwise, the charging cable may be
damaged.
16. Handle the charging cable with care to avoid damage from strong impact.
17. The dustproof cover should be cleaned regularly to ensure the cooling eect of the fans.
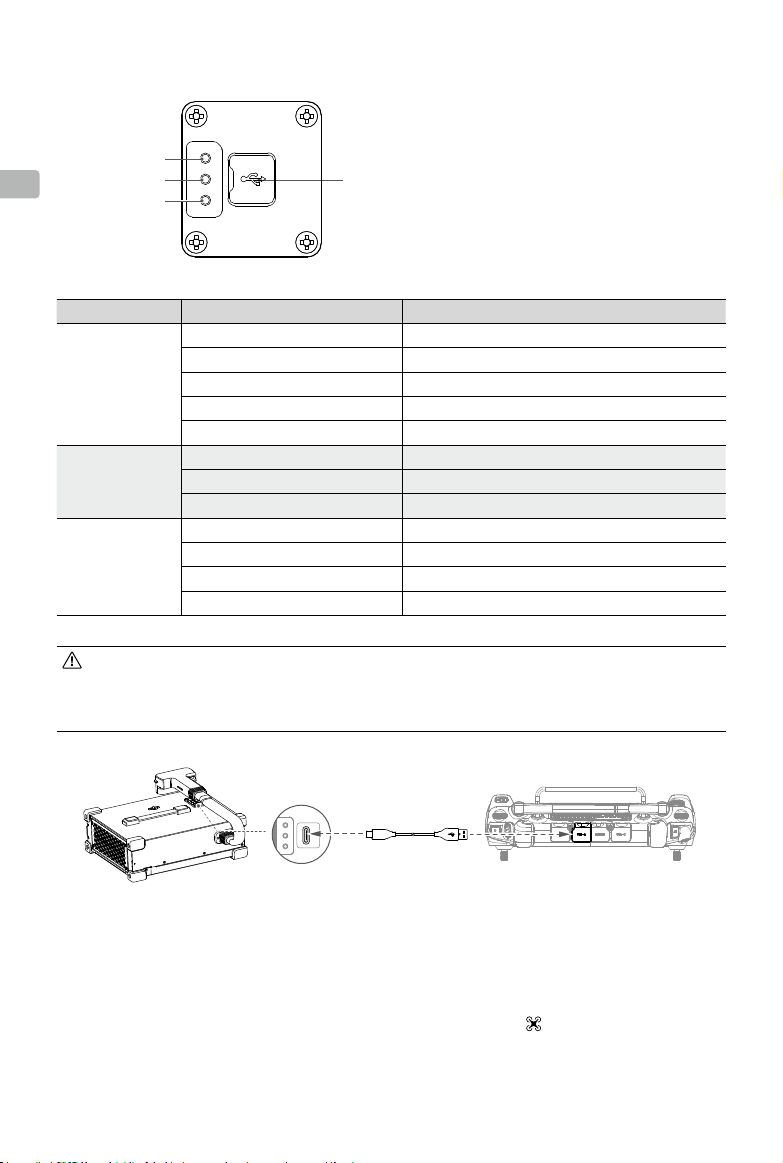
18. Use the remote controller for DJI AGRASTM T40 or T20P to activate the chargers and update rmware. Before
activation or rmware updates, make sure that the remote controller has been updated to the latest rmware.

EN
3
Introduction
The T40/T20P Intelligent Charger supports single-phase and three-phase AC power input and can connect with
one battery. For compatible batteries, see the Specications section.
While charging, the charger monitors the status of the battery and can automatically adjust the charging current if
required. The intelligent power adjustment function ensures charging can continue even if the ventilation holes are
blocked. The charger also boasts a self-diagnostics function. Users can check the status LEDs to conrm if there
are any errors. For more detailed information regarding any errors, users can connect the charger to a remote
controller using a USB-C cable and launch the DJI Agras app.
Additionally, the charger includes overcurrent protection, overcharging protection, under-voltage protection,
overheating protection, and status display.
The general descriptions in this user guide apply to both the T40 Intelligent Charger and the T20P Intelligent
Charger. The T40 Intelligent Charger is used as an example below. The illustrations in this user guide may dier
from the actual product.
Overview
1
5
7
6
2
4
3
1. Charging Cable
2. Status LEDs
3. Dustproof Cover
4. Handle
5. Cable Storage Cover
6. AC Power Port
7. Ventilation Holes
Three-Phase AC Power Cable
(Power Supply) × 1
Three-Phase AC Power Cable
(Charger) × 1
Single-Phase AC Power Cable
(Power Supply)* × 1
Single-Phase AC Power Cable
(Charger) × 1
T40/T20P Intelligent Charger × 1
* The single-phase AC power cable (power supply) is packaged in a separate box. The type of the single-phase AC power
cable (power supply) may vary depending on the country or region and the illustration may differ from the actual product.
In the Box

EN
4
Status LEDs
1. Charging Channel Status LED
2. DC Module Status LED
3. Generator (excl. DC Module)/AC Module Status LED
4. USB-C Connector Cover
1
2
3
4
Status LED Blinking Pattern Description
Charging Channel
Status LED
Solid yellow The charger is ready to connect to a battery
Blink green once continuously Charging
Solid green Fully charged
Blink yellow once continuously Warning for the battery/charging channel
Blink red once continuously Battery/charging channel error
DC Module Status
LED
Blink yellow four times continuously DC module is not activated
Blink yellow once continuously Warning for the DC module
Blink red once continuously DC module error
Generator (excl. DC
Module)/AC Module
Status LED
Blink yellow four times continuously Generator (excl. DC Module)/AC module is not activated
Blink yellow once continuously Warning for the generator (excl. DC Module)/AC module
Blink red once continuously Generator (excl. DC Module)/AC module error
Blink red four times continuously Generator (excl. DC Module) maintenance is required
• When the status LEDs blink for warning or error, connect the charger to the remote controller using a
USB-C cable to see more information.
• If any part of the charger is abnormal or damaged, it is recommended to contact a DJI-authorized
dealer or DJI Support to repair or replace the part.
USB-C Connector on the
Intelligent Charger
USB-A Connector on the
Remote Controller
USB-C Cable
Activation
The intelligent charger must be activated before using for the rst time. Connect the remote controller to the
internet rst. Use a USB-C cable to connect to the USB-C connector of the charger and the USB-A connector of
the remote controller. Run the DJI Agras app on the remote controller and tap on the upper left corner of the
main interface to enter the charging device interface to activate the charger.

EN
5
Using the Intelligent Charger
Connecting to Three-Phase AC Power
• Strictly follow the steps described below in order.
• Besides other electrical devices, make sure that the electrical distribution box can provide at least 12
kW of power (at least 16 A of current) for the T40 Intelligent Charger and at least 6 kW of power (at
least 16 A of current) for the T20P Intelligent Charger. If you need to connect the charger to a third-
party three-phase generator, make sure that the output power of the three-phase generator also meets
the corresponding requirements.
1. Turn o the air circuit breaker for the three-phase AC power supply.
2. Rotate and open the cover of the three-phase AC power cable (power supply) and connect the two three-
phase AC power cables. Connect the three-phase AC power Cable (charger) to the AC power port of the
charger.
3. Connect the intelligent charger to the three-phase AC power supply:
Connect the three conductors (labeled L1, L2, L3) of the three-phase AC power cable (power supply) to the
three hot terminals of the air circuit breaker and the one ground wire (labeled PE) to a grounding terminal of the
electrical distribution box.
• Only qualied electricians can wire the charger to three-phase AC power and they must wear insulating
gloves.
• DO NOT connect the ground wire to a neutral terminal or hot terminal.
1
2
Power Input
Electrical Load
Hot Wire
Hot Wire
L1
L1
L2
L2
L3
L3
Ground Wire
PE
Ground Wire
PE

EN
6
4. Turn on the air circuit breaker of the three-phase AC power supply.
5. Connect the charger to the battery.
• If using Agras T40, connect the charging cable to the air-cooled heat sink before putting the battery into
the heat sink. The charger starts to charge the battery. The four LEDs of the battery blink in sequence while
charging. Remove the battery when the four LEDs turn solid or o and put another battery inside the heat
sink to charge.
• If using Agras T20P, connect the charging cable to the battery directly. The charger starts to charge the
battery. The four LEDs of the battery blink in sequence while charging. Remove the battery when the four
LEDs turn solid or o and connect another battery to charge.
6. When charging is nished, turn o the air circuit breaker before disconnecting the three-phase AC power cable
from the charger.
Connecting to Single-Phase AC Power
1. Connect the two single-phase AC power cables. Connect the single-phase AC power cable (charger) to the
charger and then connect the single-phase AC power cable (power supply) to a power outlet.
• The type of the power outlet may vary depending on the country or region. Choose the appropriate
power outlet accordingly.
• The power outlet should provide at least 16 A of current.
13 2
≥16 A
2. Connect the charger to the battery following the same method described in the Connecting to Three-Phase AC
Power section.
3. When charging is nished, disconnect the AC power cable from the power outlet and then disconnect the AC
power cable from the charger.

EN
7
Updating Firmware
There will be notications when rmware updates are available on the DJI website. Pay attention to the Download
page of the product on the DJI website to get the latest rmware. Follow the instructions below to update the
rmware of the charger using the remote controller.
1. Connect the remote controller to the internet and then connect the charger to the remote controller using a
USB-C cable.
2. Run the DJI Agras app on the remote controller and update the rmware by following the instructions.
Storage and Maintenance
Storage
When you are not using the charger, disconnect the charger from AC power and disconnect the charging cable
from the battery. Place the charger in a stable place.
• DO NOT place the charger under direct sunlight or in rain or other wet environments.
• Keep the charger away from heat, pressure, water, ammable gases, and corrosives.
Maintenance
Clean the dustproof cover regularly to ensure the heat dissipation performance.
1. Remove the four screws and remove the dustproof cover.
2. Clean the dustproof cover and install it back in place. Install the four screws to secure the dustproof cover.
Specications
Item T40 Intelligent Charger T20P Intelligent Charger
Model Number CSX602-9500 CSX602-4500
Operating
Temperature -5° to 40° C (23° to 104° F) -5° to 40° C (23° to 104° F)
Output Channel 1 1
Input/Output
Input: 3 Phase 380-420 VAC, 50/60 Hz, 16 A MAX
Output: 59.92 VDC, 150 A MAX
Input: 1 Phase 220-240 VAC, 50/60 Hz, 16 A MAX
Output: 59.92 VDC, 50 A MAX
Input: 3 Phase 380-420 VAC, 50/60 Hz, 16 A MAX
Output: 59.92 VDC, 70 A MAX
Input: 1 Phase 220-240 VAC, 50/60 Hz, 16 A MAX
Output: 59.92 VDC, 46 A MAX
Compatible
Battery T40/T30/T20P Intelligent Flight Battery T40/T30/T20P Intelligent Flight Battery
Dimensions 400×266×120 mm 318.5×254×108 mm
Weight Approx. 12.7 kg Approx. 8.8 kg

8
CHT
免責聲明
感謝您購買大疆 TM 創新 (DJITM) 產品。使用本產品之前,請仔細閱讀並遵循本文及大疆創新 (DJI) 提供的所有
安全與合規操作指引,否則可能會為您和周圍的人帶來傷害,損壞本產品或其他周圍物品。一旦使用本產品,
即視為您已經仔細閱讀本文件,理解、認可和接受本文件及本產品所有相關文件的全部條款和內容。您承諾
僅出於正當目的使用本產品。您承諾對使用本產品以及可能帶來的後果負全部責任。大疆創新 (DJI) 對於直接
或間接使用本產品而造成的損壞、傷害及其任何法律責任概不負責。
DJI 是深圳市大疆創新科技有限公司及其附屬公司的商標。本文出現的產品名稱、品牌等,均為其所屬公司的
商標或註冊商標。本產品及手冊之版權為大疆創新所有。未經許可,不得以任何形式複製翻印。
本文件及本產品所有相關文件的最終解釋權歸大疆創新(DJI)所有。如有更新,恕不另行通知。請前往
www.dji.com 官方網站以取得最新的產品資訊。
注意事項
1. 使用前請認真閱讀本使用說明,若未遵循相關說明,可能會導致財產損失、人身傷害或死亡。本說明書中
的警告和預防措施並不能涵蓋所有可能發生的情況,使用者必須瞭解本說明書中未提及的產品常識並保持
謹慎的操作態度。
2. 僅限持有效電匠執照的人員才可進行三相電接線操作,且接線時必須佩戴絕緣手套。
3. 若搭配第三方發電機使用,T40 智能充電器需搭配輸出功率為 12 kW 及以上的 380V 三相電發電機,T20P
智能充電器需搭配輸出功率為 6 kW 及以上的 380V 三相電發電機。
4. 若需移除 /連接直流模組與交流模組的插接頭,必須切斷充電器的電源,禁止在充電器運作狀態下進行該
項操作。
5. 嚴禁在陽光直射、雷電及雷雨天氣或潮濕的環境中使用本產品。
6. 務必於合適的環境溫度使用智能充電器(建議為 -5 至40℃)。
7. 本產品應遠離熱源、高壓、水、可燃性氣體、腐蝕劑等危險物品。
8. 充電時,請遠離可燃物。切勿將智能充電器或電池放置於地毯上進行充電。
9. 產品需放置在水平台面上,不可傾斜歪倒,且兩端通風孔務必留有足夠的通風距離(建議 > 50 cm),以
保障產品運作時可保持良好通風。
10. 請選擇開闊場地進行充電,務必遠離電池存放區域。為保證充電安全,充電時,電池與智能充電器之間
的距離需大於 30 cm 且電池應避開充電器兩端的通風孔,以免因為發熱集中而導致智能充電器或電池故
障,甚至造成火災等嚴重後果。
11. 使用智能充電器對電池充電前,請仔細閱讀電池的相關安全說明及使用注意事項,並嚴格按照記載內容
進行操作。
12. 若遇火警,請正確使用乾粉滅火器進行滅火,使用液體類滅火器可能會有觸電的危險。
13. 請勿在充電過程中拔出電源線或電池充電線。充電完成後,請及時拔出電池。
14. 若電池充電線的連接頭附有異物,請及時進行清理。清理前請確保智能充電器並未接入外部電源。
15. 移動或搬運智能充電器時,請勿拉扯電池充電線。
16. 使用和放置電池充電線的連接頭時請輕拿輕放,以防止連接頭因猛烈撞擊而損壞。
17. 風扇防塵罩需定期拆卸後進行清理,以防灰塵堆積影響散熱。
18. 智能充電器可透過 T40 或T20P 農業無人機遙控器啟動和升級韌體。透過連接遙控器啟動及升級智能充
電器前,請確保已將遙控器韌體升級至最新版本。
物品清單
三相電電源線(電源端)×1 三相電電源線(充電器端)×1
單相電電源線(電源端)*×1 單相電電源線(充電器端)×1
T40/T20P 智能充電器 ×1
* 單相電電源線(電源端)位於獨立包裝盒內。根據您所在的國家或地區的不同,單相電電源線(電源端)的類型會有所差異,
實際以實物為準。

9
CHT
簡 介
T40/T20P 智能充電器(以下簡稱「充電器」)支援單相交流電和三相交流電輸入,可連接 1 顆T 系列智能飛
行電池為其充電(適用電池請見規格參數章節)。
在充電過程中,充電器可與電池通訊,並根據目前電池可接受的電流大小智慧調整充電電流。充電器具備全
新的自適應功率調節功能,即使在充電過程中發生散熱孔堵塞等非致命性問題時也能自動調整充電電流,確
保充電持續進行。充電器具備自動檢測功能,使用者可透過狀態燈提示,對充電器的異常情況進行初步診斷,
並可透過 USB-C 傳輸線將智能充電器連接至遙控器,執行大疆農業應用程式瞭解詳細的異常情況說明。
此外,充電器還具有過電流保護、過充保護、欠壓保護、過熱保護及狀態指示等功能。
如無特別指出,本文所描述的均為兩款智能充電器的通用功能特性。同時,本文將以 T40 智能充電器作為主
要圖示,進而進行講解說明。您所購買產品的實際外觀結構,將以實物為準。
零組件名稱
1
5
7
6
2
4
3
1. 電池充電線
2. 狀態指示燈
3. 風扇防塵罩
4. 把手
5. 線槽保護蓋
6. 電源輸入連接埠
7. 通風孔
狀態指示燈
1. 充電通道狀態燈
2. 直流模組狀態燈
3. 發電機組 /交流模組狀態燈
4. USB-C 連接埠保護蓋
狀態燈 閃燈方式 說明
充電通道狀態燈
黃色恆亮 等待電池插入
閃爍綠色 電池充電中
綠色恆亮 電池已充飽電
閃爍黃色 電池或通道警告
閃爍紅色 電池或通道故障
直流模組狀態燈
黃色閃爍四次 直流模組未啟動
閃爍黃色 直流模組警告
閃爍紅色 直流模組故障
發電機組 /
交流模組狀態燈
黃色閃爍四次 發電機組 /交流模組未啟動
閃爍黃色 發電機組 /交流模組警告
閃爍紅色 發電機組 /交流模組故障
紅色閃爍四次 發電機組保養提示
1
2
3
4
•當狀態燈閃爍提示警告或故障時,請用 USB-C 傳輸線連接充電器的 USB-C 連接埠和遙控器的
USB-A 連接埠,在遙控器上查看詳細故障資訊。
•當充電器模組異常或損壞時,建議使用者聯絡 DJI 授權代理商或 DJI 售後維修或更換故障模組。

10
CHT
遙控器的 USB-A 連接埠充電器的 USB-C 連接埠
USB-C 傳輸線
啟 動
首次使用智能充電器時需要先進行啟動。將遙控器連接至網際網路,使用 USB-C 傳輸線連接充電器的
USB-C 連接埠和遙控器的 USB-A 連接埠,在大疆農業應用程式主介面左上角點選圖示 後選擇充電裝置,
進入充電裝置頁面進行啟動。
使 用
連接三相交流電使用
•請嚴格遵照以下步驟順序進行操作。
•除去其他用電裝置,需確保三相電配電箱可為 T40 智能充電器提供至少 12 kW 功率(至少 16 A 電
流);為 T20P 智能充電器提供至少 6 kW 功率(至少 16 A 電流)。若需將充電器連接至第三方三
相電發電機使用,請確保第三方三相電發電機的輸出功率也符合相應的要求。
1. 斷開三相電電源的空氣斷路器。
2. 轉開三相電電源線(電源端)的保護蓋,連接兩條三相電電源線。將三相電電源線(充電器端)連接至充
電器的電源輸入連接埠。
3.
將充電器連接至三相電電源:
將三相電電源線(電源端)的三條火線(分別帶有 L1、L2、L3 標籤)和一條地線(帶有 PE 標籤),分別
與三相電電源空氣斷路器的火線端子以及配電箱內的地線端子連接。
•僅限持有效電匠執照的人員才可進行三相電接線操作,且接線時必須佩戴絕緣手套。
•禁止將地線與零線或火線相接。
1
2

11
CHT
輸入端
負載端
火線
火線
L1
L1
L2
L2
L3
L3
地線
PE
地線
PE
4. 閉合三相電電源的空氣斷路器。
5. 連接充電器和電池。
•若您為 T40 農業無人機的使用者,請將 T40 智能充電器的電池充電線安裝至風冷散熱器上,再將電池放
置到風冷散熱器中。充電器開始為電池充電。在充電過程中,電池的 4個LED 燈將依次閃爍。當電池 4
個LED 燈變為恆亮或全部熄滅,即可直接取出電池,然後放入另一顆電池進行充電。
• 若您為 T20P 農業無人機的使用者,請將 T20P 智能充電器的電池充電線連接至電池。充電器開始為電
池充電。在充電過程中,電池的 4 個LED 燈將依次閃爍。當電池 4 個LED 燈變為恆亮或全部熄滅,即
可直接取出電池,然後連接另一顆電池進行充電。
6. 充電結束後,需先斷開三相電電源的空氣斷路器,再從充電器上斷開三相電電源線。

12
CHT
連接單相交流電使用
1. 連接兩條單相電電源線,將單相電電源線(充電器端)連接至充電器,最後將單相電電源線(電源端)連
接至交流插座。
•不同國家或地區的插座規格不同,請根據你所在的國家或地區,連接至相應的插座。
•交流插座需提供至少 16 A 電流。
13 2
≥16 A
2. 按照連接三相交流電使用章節所述的同樣方式,連接充電器和電池。
3.
充電結束後,從交流插座上拔下電源插頭,然後從充電器上斷開電源線。
韌體升級
若充電器需要更新韌體,DJI 官網將發布韌體升級通知,請留意產品下載頁面。請按照以下方式,使用遙控器
對充電器進行升級。
1. 將遙控器連接至網際網路,使用 USB-C 傳輸線連接充電器的 USB-C 連接埠和遙控器的 USB-A 連接埠。
2. 在遙控器上開啟大疆農業應用程式,並根據提示進行韌體下載升級。
存放和保養
存放充電器
充電完成或不使用充電器時,請切斷充電器的電源並從電池上斷開電池充電線,將充電器置於水平台面放置。
•勿將充電器存放於陽光直射、淋雨或潮濕的環境中。
•充電器應遠離熱源、高壓、水、可燃性氣體、腐蝕劑等危險物品存放。
保養充電器
請定期清潔風扇防塵罩,以確保散熱效果正常發揮。
1. 拆除 4 顆螺絲,取下風扇防塵罩。
2. 清潔風扇防塵罩上的灰塵和汙垢後,按原本的位置裝回,安裝螺絲加以固定。

13
CHT
規格參數
參數 T40 智能充電器 T20P 智能充電器
型號 CSX602-9500 CSX602-4500
運作環境溫度 -5℃ 至40℃ -5℃ 至40℃
輸出通道 1 1
輸入 /輸出
輸入:三相 380-420 VAC,50/60 Hz,最大 16 A
輸出:59.92 VDC,最大 150 A
輸入:單相 220-240 VAC,50/60 Hz,最大 16 A
輸出:59.92 VDC,最大 50 A
輸入:三相 380-420 VAC,50/60 Hz,最大 16 A
輸出:59.92 VDC,最大 70 A
輸入:單相 220-240 VAC,50/60 Hz,最大 16 A
輸出:59.92 VDC,最大 46 A
適用智能電池 T40/T30/T20P 智能飛行電池 T40/T30/T20P 智能飛行電池
尺寸 400×266×120 mm 318.5×254×108 mm
重量 約 12.7 kg 約8.8 kg

14
ID
Penaan
Selamat atas pembelian produk DJITM Anda yang baru. Baca dengan saksama seluruh dokumen ini serta seluruh
praktik yang aman dan sah yang disediakan DJI sebelum digunakan. Kegagalan membaca serta mematuhi
instruksi dan peringatan dapat mengakibatkan cedera serius terhadap diri Anda dan orang lain, kerusakan pada
produk DJI Anda, serta kerusakan terhadap objek di sekitar Anda. Dengan menggunakan produk ini, Anda
dengan ini menyatakan bahwa Anda telah membaca penaan ini secara saksama dan bahwa Anda memahami
dan setuju untuk menaati syarat dan ketentuan dokumen ini serta semua dokumen terkait dari produk ini. Anda
setuju untuk hanya menggunakan produk ini untuk tujuan yang tepat. Anda setuju bahwa Anda bertanggung
jawab penuh atas perilaku Anda selama menggunakan produk ini, dan atas semua konsekuensinya. DJI tidak
memiliki tanggung jawab apa pun atas kerusakan, atau tanggung jawab hukum yang timbul secara langsung
maupun tidak langsung dari penggunaan produk ini.
DJI adalah merek dagang dari SZ DJI TECHNOLOGY CO., LTD. (disingkat sebagai “DJI”) dan perusahaan
aliasinya. Nama produk, merek, dll., yang muncul dalam dokumen ini merupakan merek dagang atau merek
dagang terdaftar dari masing-masing perusahaan pemiliknya. Produk dan dokumen ini merupakan hak cipta dari
DJI dengan semua hak dilindungi oleh undang-undang. Tidak ada bagian dari produk atau dokumen ini yang
boleh diperbanyak dalam bentuk apa pun tanpa persetujuan tertulis sebelumnya atau izin dari DJI.
Dokumen ini dan seluruh dokumen pendukung lainnya dapat berubah dari waktu ke waktu atas pertimbangan
penuh DJI. Konten ini dapat berubah sewaktu-waktu tanpa pemberitahuan sebelumnya. Untuk informasi produk
terkini, kunjungi www.dji.com dan masuk ke laman produk untuk produk ini.
Peringatan
1. Baca petunjuk ini dengan saksama sebelum menggunakan. Kegagalan untuk mengikuti instruksi yang relevan
dapat mengakibatkan kerusakan properti, cedera pribadi, atau kematian. Peringatan dan tindakan pencegahan
dalam panduan ini tidak mencakup semua kemungkinan situasi dan pengguna harus mempraktikkan akal
sehat dalam kaitannya dengan produk yang tidak disebutkan dalam panduan ini dan menjaga sikap yang
waspada.
2. Hanya teknisi listrik berkualikasi yang dapat menyalurkan pengisi daya ke daya AC tiga fase dan mereka harus
mengenakan sarung tangan insulasi.
3. Untuk menggunakan T40 Intelligent Charger dengan generator pihak ketiga, pastikan untuk membeli generator
tiga fase yang memiliki rating tegangan 380 V dan output terukur 12 kW atau lebih. Untuk menggunakan T20P
Intelligent Charger dengan generator pihak ketiga, pastikan Anda membeli generator tiga fase yang memiliki
tegangan terukur 380 V dan output terukur 6 kW atau lebih.
4. Untuk melepas atau menyambungkan kembali konektor antara modul DC dan AC, lepaskan pengisi daya dari
catu daya terlebih dahulu. JANGAN melakukan operasi ini saat pengisi daya sedang bekerja.
5. JANGAN menggunakan pengisi daya di bawah sinar matahari langsung, selama badai petir, atau di lingkungan
basah lainnya.
6. Pengisi daya harus disimpan di lingkungan dengan rentang suhu 23° hingga 104° F (-5° hingga 40° C).
7. Jauhkan pengisi daya dari panas, tekanan, air, gas yang mudah terbakar, dan korosif.
8. Jauhkan pengisi daya dari bahan yang mudah terbakar saat mengisi daya. JANGAN meletakkan pengisi daya
atau baterai pengisi daya pada selimut atau permukaan berkarpet saat digunakan.
9. Tempatkan pengisi daya pada permukaan yang datar dan stabil. Untuk mencegah bahaya kebakaran, pastikan
perangkat diinsulasi dengan benar dan terdapat ruang ventilasi setidaknya 50 cm.
10. JANGAN menggunakan pengisi daya di area tempat baterai disimpan. Harus terdapat jarak setidaknya 30
cm antara pengisi daya dan baterai pengisi. Jika tidak, pengisi daya atau baterai pengisi daya dapat rusak
karena terlalu panas dan bahkan dapat menimbulkan bahaya kebakaran.
11. Lihat panduan pengguna baterai untuk petunjuk keamanan lainnya sebelum digunakan.
12. Jika terjadi kebakaran, gunakan pemadam api bubuk kering. Alat pemadam kebakaran cair dapat
menimbulkan bahaya listrik.
13. JANGAN mencabut kabel daya AC atau kabel pengisi daya saat pengisi daya sedang digunakan. Lepaskan
baterai setelah pengisian selesai.
14. Jika terdapat penumpukan yang terlihat pada konektor kabel pengisi daya, bersihkan secepat mungkin.
Pastikan pengisi daya tidak tersambung ke daya sebelum membersihkan.
15. JANGAN memindahkan atau membawa pengisi daya dengan menarik kabel pengisi daya. Jika tidak, kabel
pengisi daya mungkin rusak.
16. Tangani kabel pengisi daya dengan hati-hati untuk menghindari kerusakan akibat benturan yang kuat.

15
ID
Pengantar
T40/T20P Intelligent Charger mendukung input daya AC fase tunggal dan tiga fase serta dapat terhubung dengan
satu baterai. Untuk baterai yang kompatibel, lihat bagian Spesikasi.
Saat mengisi daya, pengisi memantau status baterai dan dapat menyesuaikan arus pengisian secara otomatis
jika diperlukan. Fungsi penyesuaian daya cerdas memastikan pengisian daya dapat berlanjut bahkan jika lubang
ventilasi diblokir. Pengisi daya juga menawarkan fungsi diagnosis mandiri. Pengguna dapat memeriksa LED
status untuk mengonfirmasi jika terjadi kesalahan. Untuk informasi lebih terperinci mengenai kesalahan apa
pun, pengguna dapat menyambungkan pengisi daya ke pengendali jarak jauh menggunakan kabel USB-C dan
meluncurkan aplikasi DJI Agras.
Selain itu, pengisi daya termasuk perlindungan arus berlebih, perlindungan pengisian berlebih, perlindungan
tegangan bawah, perlindungan panas berlebih, dan tampilan status.
Deskripsi umum dalam panduan pengguna ini berlaku untuk T40 Intelligent Charger dan T20P Intelligent Charger.
T40 Intelligent Charger digunakan sebagai contoh di bawah ini. Ilustrasi dalam panduan pengguna ini dapat
berbeda dari produk sebenarnya.
Ikhtisar
1
5
7
6
2
4
3
1. Kabel Pengisi Daya
2. LED Status
3. Tutup Kedap Debu
4. Pegangan
5. Tutup Penyimpanan Kabel
6. Port Daya AC
7. Lubang Ventilasi
Kabel Daya AC Tiga-Fase (Catu
Daya) × 1
Kabel Daya AC Tiga-Fase
(Charger) × 1
Kabel Daya AC fase tunggal (Catu
Daya)* × 1
Kabel Daya AC Fase Tunggal
(Bilager) × 1
T40/T20P Intelligent Charger × 1
* Kabel daya AC fase tunggal (catu daya) dikemas dalam kotak terpisah. Jenis kabel daya AC fase tunggal (catu daya)
dapat bervariasi tergantung pada negara atau wilayah dan ilustrasi dapat berbeda dari produk sebenarnya.
17. Tutup antidebu harus dibersihkan secara teratur untuk memastikan efek pendinginan kipas.
18. Gunakan pengendali jarak jauh DJI AGRASTM T40 atau T20P untuk mengaktifkan pengisi daya dan
memperbarui rmware. Sebelum aktivasi atau pembaruan rmware, pastikan bahwa pengendali jarak jauh
telah diperbarui ke rmware terbaru.
Dalam kotak

16
ID
LED Status
1. LED Status Saluran Pengisian Daya
2. LED Status Modul DC
3. LED Status Generator (tidak termasuk Modul DC)/
Modul AC
4. Tutup Konektor USB-C
1
2
3
4
LED Status Pola Berkedip Deskripsi
LED Status Saluran
Pengisian Daya
Menyala kuning tanpa kedip Pengisi daya siap disambungkan ke baterai
Berkedip hijau satu kali secara terus
menerus Mengisi Daya
Menyala hijau tanpa kedip Terisi penuh
Berkedip kuning sekali terus menerus Peringatan untuk saluran baterai/pengisian daya
Berkedip merah satu kali secara terus
menerus Kesalahan saluran pengisian daya/baterai
LED Status Modul
DC
Berkedip kuning empat kali secara
terus-menerus Modul DC tidak diaktifkan
Berkedip kuning sekali terus menerus Peringatan untuk modul DC
Berkedip merah satu kali secara terus
menerus Kesalahan modul DC
LED Status
Generator (tidak
termasuk Modul
DC)/Modul AC
Berkedip kuning empat kali secara
terus-menerus
Generator (tidak termasuk Modul DC)/Modul AC tidak
diaktifkan
Berkedip kuning sekali terus menerus Peringatan untuk generator (tidak termasuk Modul DC)/
Modul AC
Berkedip merah satu kali secara terus
menerus
Kesalahan generator (tidak termasuk modul DC)/modul
AC
Berkedip merah empat kali secara
terus-menerus
Diperlukan pemeliharaan generator (tidak termasuk
Modul DC)
• Saat LED status berkedip karena adanya peringatan atau kesalahan, sambungkan pengisi daya ke
pengendali jarak jauh menggunakan kabel USB-C untuk melihat informasi selengkapnya.
• Apabila terdapat bagian generator yang abnormal atau rusak, disarankan untuk menghubungi dealer
resmi DJI atau Dukungan DJI untuk memperbaiki atau mengganti bagian tersebut.
Konektor USB-C pada
Intelligent Charger
Konektor USB-A pada
Pengendali Jarak Jauh
Kabel USB-C

17
ID
Aktivasi
Intelligent charger harus diaktifkan sebelum digunakan untuk pertama kalinya. Sambungkan pengendali jarak
jauh ke internet terlebih dahulu. Gunakan kabel USB-C untuk menyambungkan konektor USB-C pengisi daya
dan konektor USB-A pengendali jarak jauh. Jalankan aplikasi DJI Agras pada pengendali jarak jauh dan ketuk
di sudut kiri atas antarmuka utama untuk memasuki antarmuka perangkat pengisi daya untuk mengaktifkan
generator.
Menggunakan Intelligent Charger
Menyambungkan ke Daya AC Tiga Fase
• Ikuti langkah-langkah yang dijelaskan di bawah ini dengan saksama secara berurutan.
• Selain perangkat listrik lainnya, pastikan kotak distribusi listrik dapat menyediakan daya minimal 12 kW
(setidaknya arus 16 A) untuk T40 Intelligent Charger dan setidaknya daya 6 kW (setidaknya arus 16 A)
untuk T20P Intelligent Charger. Jika Anda perlu menyambungkan pengisi daya ke generator tiga fase
pihak ketiga, pastikan bahwa daya output generator tiga fase juga memenuhi persyaratan yang sesuai.
1. Matikan pemutus sirkuit udara untuk catu daya AC tiga fase.
2. Putar dan buka tutup kabel daya AC tiga fase (catu daya) dan sambungkan dua kabel daya AC tiga fase.
Sambungkan Kabel daya AC tiga fase (pengisi daya) ke port daya AC pengisi daya.
3. Sambungkan intelligent charger ke catu daya AC tiga fase:
Sambungkan tiga konduktor (berlabel L1, L2, L3) dari kabel daya AC tiga fase (catu daya) ke tiga terminal
panas pemutus sirkuit udara dan satu kabel arde (berlabel PE) ke terminal arde kotak distribusi listrik.
• Hanya teknisi listrik yang memenuhi syarat yang dapat menyalurkan pengisi daya ke daya AC tiga fase
dan mereka harus mengenakan sarung tangan insulasi.
• JANGAN menyambungkan kabel arde ke terminal netral atau terminal panas.
1
2
Input Daya
Beban Listrik
Kabel Panas
Kabel Panas L1 L2
L1 L2 L3
L3
Kabel Arde
PE
Kabel Arde
PE

18
ID
4. Nyalakan pemutus sirkuit udara dari catu daya AC tiga fase.
5. Sambungkan pengisi daya ke baterai.
• Jika menggunakan Agras T40, sambungkan kabel pengisi daya ke pembuang panas berpendingin udara
sebelum memasukkan baterai ke dalam heat sink. Pengisi daya mulai mengisi daya baterai. Keempat LED
baterai berkedip secara berurutan saat mengisi daya. Lepaskan baterai saat keempat LED menyala atau
mati dan letakkan baterai lain di dalam pembuang panas untuk mengisi daya.
• Jika menggunakan Agras T20P, sambungkan kabel pengisi daya ke baterai secara langsung. Pengisi daya
mulai mengisi daya baterai. Keempat LED baterai berkedip secara berurutan saat mengisi daya. Lepaskan
baterai saat keempat LED terpasang atau mati, lalu sambungkan baterai lain untuk mengisi daya.
6. Ketika pengisian selesai, matikan pemutus sirkuit udara sebelum memutuskan sambungan kabel daya AC tiga
fase dari pengisi daya.
Menyambungkan Daya AC Fase Tunggal
1. Sambungkan kedua kabel daya AC fase tunggal. Sambungkan kabel daya AC fase tunggal (pengisi daya) ke
pengisi daya lalu sambungkan kabel daya AC fase tunggal (kabel daya) ke stopkontak listrik.
• Jenis stopkontak listrik dapat bervariasi tergantung pada negara atau wilayahnya. Pilih stopkontak yang
sesuai.
• Stopkontak harus menyediakan sekurangnya 16 A arus.
13 2
≥16 A
2. Sambungkan pengisi daya ke baterai dengan mengikuti metode yang sama yang dijelaskan pada bagian
Menyambungkan ke Daya AC Tiga Fase.
3. Ketika pengisian daya selesai, lepaskan kabel daya AC dari stopkontak lalu lepaskan kabel daya AC dari
pengisi daya.

19
ID
Memperbarui Firmware
Akan ada notikasi ketika pembaruan rmware tersedia di situs web DJI. Perhatikan halaman Unduhan produk di
situs web DJI untuk mendapatkan rmware terbaru. Ikuti instruksi di bawah untuk memperbarui rmware pengisi
daya menggunakan pengendali jarak jauh.
1. Sambungkan pengendali jarak jauh ke internet lalu sambungkan pengisi daya ke pengendali jarak jauh
menggunakan kabel USB-C.
2. Jalankan aplikasi DJI Agras pada pengendali jarak jauh dan perbarui rmware dengan mengikuti petunjuk.
Penyimpanan dan Pemeliharaan
Penyimpanan
Saat Anda tidak menggunakan pengisi daya, lepaskan pengisi daya dari daya AC dan lepaskan kabel pengisi
daya dari baterai. Tempatkan pengisi daya di tempat yang stabil.
• JANGAN meletakkan pengisi daya di bawah sinar matahari langsung atau di bawah hujan atau
lingkungan basah lainnya.
• Jauhkan pengisi daya dari panas, tekanan, air, gas mudah menyala, dan bahan korosif.
Pemeliharaan
Bersihkan tutup kedap debu secara teratur untuk memastikan kinerja disipasi panas.
1. Lepaskan keempat sekrup dan lepaskan tutup kedap debu.
2. Bersihkan tutup kedap debu dan pasang kembali di tempatnya. Pasang keempat sekrup untuk
mengencangkan tutup kedap debu.
Spesikasi
Item T40 Intelligent Charger T20P Intelligent Charger
Nomor Model CSX602-9500 CSX602-4500
Suhu
Operasional -5° hingga 40° C (23° hingga 104° F) -5° hingga 40° C (23° hingga 104° F)
Saluran Output 1 1
Input/Output
Input: 3 Fase 380-420 VAC, 50/60 Hz, 16 A MAKS
Output: 59,92 VDC, 150 A MAKS
Input: 1 Fase 220-240 VAC, 50/60 Hz, 16 A MAKS
Output: 59,92 VDC, 50 MAKS
Input: 3 Fase 380-420 VAC, 50/60 Hz, 16 A MAKS
Output: 59,92 VDC, 70 MAKS
Input: 1 Fase 220-240 VAC, 50/60 Hz, 16 A MAKS
Output: 59,92 VDC, 46 MAKS
Baterai
Kompatibel Baterai Penerbangan Cerdas T40/T30/T20P Baterai Penerbangan Cerdas T40/T30/T20P
Ukuran 400×266×120 mm 318,5×254×108 mm
Bobot Kurang lebih 12,7 g Kurang lebih 8,8 g
Other manuals for AGRAS T40
3
This manual suits for next models
1
Table of contents
Languages:
Other dji Batteries Charger manuals