Egro 90 Series User manual
Operating instructions
Series 90

Series 90
21.06.2010 Page 1
Table of contents
1Introduction ...............................................................................................................................3
1.1 Copyright protection...................................................................................................................................3
1.2 Purpose of operating instructions...............................................................................................................3
1.3 Warranty......................................................................................................................................................3
1.4 Symbols........................................................................................................................................................3
1.5 Quality assurance ........................................................................................................................................4
1.6 Sources of danger (example).......................................................................................................................4
1.7 Important safety instructions (example)....................................................................................................4
1.8 Conventional use.........................................................................................................................................4
1.9 User..............................................................................................................................................................4
2Control elements .......................................................................................................................5
2.1 Overall view.................................................................................................................................................5
2.2 Main switch..................................................................................................................................................6
2.3 Mode switch.................................................................................................................................................6
2.4 Keyboard......................................................................................................................................................7
2.4.1 Series 90 ..................................................................................................................................................7
2.4.2 Series 90 Self Package (9031 9032 9034 9035) .......................................................................................7
2.5 Keyboard elements......................................................................................................................................8
2.5.1 Display......................................................................................................................................................8
2.5.2 Stop key...................................................................................................................................................8
2.5.3 Product keys............................................................................................................................................8
3Operation Cooling Box and Milker............................................................................................9
3.1 Cooling box..................................................................................................................................................9
3.2 Milker.........................................................................................................................................................10
3.2.1 Adding milk............................................................................................................................................11
3.2.1.1 Procedure:.........................................................................................................................................11
3.3 Product selection.......................................................................................................................................11
4Operation Coffee machine......................................................................................................12
4.1 Preparations ..............................................................................................................................................12
4.2 Switch on ...................................................................................................................................................12
4.3 Product delivery........................................................................................................................................13
4.3.1 Bean coffee............................................................................................................................................13
4.3.2 Grinded coffee (manual dosage)...........................................................................................................14
4.3.3 Milk products .........................................................................................................................................14
4.3.3.1 Milk Supply (only Milker) ...................................................................................................................14
4.3.3.2 Supply of milk products.....................................................................................................................15
4.3.4 Hot water...............................................................................................................................................15
4.3.5 Steam (if applicable).............................................................................................................................16
5Special functions......................................................................................................................17
5.1 Pre-selection..............................................................................................................................................17
5.2 Cancelling of a selected product..............................................................................................................17
5.3 Switching off..............................................................................................................................................17
5.3.1 Switching off the machine through main switch..................................................................................17
5.3.2 Switching off through keyboard............................................................................................................17
5.4 Automatic start..........................................................................................................................................17
6Operation modes......................................................................................................................18
6.1 Mode switch...............................................................................................................................................18
7Programming............................................................................................................................19

Series 90
21.06.2010 Page 2
7.1 Meaning of the Buttons in Programming.................................................................................................. 19
7.1.1 Keyboard normal................................................................................................................................... 20
7.1.2 Keyboard self........................................................................................................................................ 20
7.2 Adjustments.............................................................................................................................................. 21
7.2.1 Menu Product price change.................................................................................................................. 21
7.2.2 Menu Water volume change ................................................................................................................. 22
7.2.3 Menu Grinded coffee amount adjustment........................................................................................... 23
7.2.4 Menu Pre-Infusion adjustment ............................................................................................................. 24
7.2.5 Date and time adjustment ................................................................................................................... 25
7.2.5.1 Switching winter time – summer time ............................................................................................. 26
7.2.6 Programming Waiter pens.................................................................................................................... 27
7.3 Counters.................................................................................................................................................... 28
7.3.1 Menu Reading out daily counter........................................................................................................... 28
7.3.1.1 Menu Deleting daily counters........................................................................................................... 29
7.3.2 Menu Reading out total counter........................................................................................................... 30
8Maintenance............................................................................................................................. 31
8.1 Daily cleaning ........................................................................................................................................... 31
8.1.1 Automatic cleaning program................................................................................................................ 31
8.1.2 Automatic milk cleaning....................................................................................................................... 32
8.1.2.1 Procedure (Coffee machine + Milker simultaneous cleaning) ......................................................... 32
8.1.2.2 Flushing program.............................................................................................................................. 33
8.1.2.3 Procedure (only Milker cleaning) ..................................................................................................... 33
8.1.2.4 Flushing program.............................................................................................................................. 33
8.1.3 Manual cleaning of milk supply lines of the Milker.............................................................................. 34
8.1.4 Manual cleaning of Cappuccinatore and milk suction hose................................................................. 36
8.1.5 Manual cleaning of cooling box............................................................................................................ 39
8.1.6 Cleaning of bean container .................................................................................................................. 39
8.1.7 Cleaning of waste container, drip grid and drip tray.......................................................................... 39
8.1.8 Cleaning of housing .............................................................................................................................. 39
9Service-messages..................................................................................................................... 40
9.1 Display message Waste container full...................................................................................................... 40
9.1.1 Removal of waste container................................................................................................................. 40
10 What to do when... ................................................................................................................. 41
11 Technical data......................................................................................................................... 42
11.1 Dimensions................................................................................................................................................ 42
11.1.1 Series 90................................................................................................................................................ 42
11.1.2 Models 90P............................................................................................................................................ 42
11.2 Weight and working temperature ............................................................................................................ 43
11.3 Noise level of the appliance..................................................................................................................... 43
11.4 Type plates ............................................................................................................................................... 43
11.4.1 Type plate............................................................................................................................................. 43
11.5 Connection values..................................................................................................................................... 43
11.6 Water connection ..................................................................................................................................... 43
12 Installation and commissioning .............................................................................................. 44
12.1 Installation................................................................................................................................................ 44
12.2 Water preparation.................................................................................................................................... 44
12.3 Connection of water drain ....................................................................................................................... 45
12.4 Electrical connection................................................................................................................................45
13 Consumable supplies............................................................................................................... 45
Series 90
21.06.2010 Page 3
1 Introduction
Welcome among people requiring more from their coffee machines than JUST ability to make good
coffee. Congratulations! You have selected a machine that combines efficiency, saving of energy
and the worldwide acknowledged Egro quality. We wish you good speed.
1.1 Copyright protection
Egro Coffee Systems AG reserves the right to make any technical changes to products described in
these instructions without a prior notice in order to continuously develop and improve the machine.
Partial or full photocopying, reproduction or dissemination, translation into foreign languages or
transfer into electronic or machine readable format of this documentation is strictly prohibited.
© 2003 Egro Coffee Systems AG
All rights reserved. Produced and printed in Switzerland.
1.2 Purpose of operating instructions
These instructions are specially drawn up for employees operating, servicing, maintaining and re-
pairing the machine. The instructions describe the functions and operation of your machine.
All operating persons must carefully read and understand these instructions before starting their
work at the machine. Operating instructions should be stored near the machine.
A failure-free functioning of the machine is guaranteed provided that all these instructions are fol-
lowed. In the event of disregard, especially concerning the chapter Important Safety Regulations,
the device may present a hazard for operating and servicing personnel. Additionally, damages to
the device or surrounding devices may arise.
No liability will be assumed for damages arise through disregard of these operating instructions.
1.3 Warranty
Warranty and ex-gratia payments offered by Egro Coffee Systems AG shall be valid provided that
your coffee machine is installed and maintained on a regular basis by an Egro contract partner. Any
changes or installation of components not approved by the producer will terminate the warranty.
1.4 Symbols
Different symbols are used in these operating instructions. Meaning of symbols is described below:
Danger
This symbol is placed at safety instructions of special importance. Following of
these instructions is essential. Disregard of instructions may result in injuries to
user.
It concerns your own safety!
Attention
This warning symbol is placed at safety instructions of special importance. It
means that the relevant instructions should be strictly followed in order to pre-
vent damages to the machine.
Note
This symbol is placed to important product notes. It means that they give rele-
vant notes or additional information about the system.
Series 90
21.06.2010 Page 4
1.5 Quality assurance
Egro Coffee Systems AG applies the QA-system based on EN 29001/ISO 9001.
1.6 Sources of danger (example)
Danger
Product temperature at dispenser nozzle is about 82°C for coffee, 98°C for hot
water and 120°C for steam.
Danger of scalding!
1.7 Important safety instructions (example)
Attention
Do not dry towels on the machine; air perforation slots must be free. It may hin-
der the internal air circulation and lead to damages through overheating.
1.8 Conventional use
The Series 90 is a full automatic coffee machine. Coffee drinks are made of fresh coffee beans and
fresh water heated in the machine.
The machine is designed for use in professional gastronomy environment.
The machine is intended to be used as well in household and similar applications such as:
- staff kitchen areas in shops, offices and other working environments
- farm houses
- by clients in hotels, motels and other residential type environments
- bed and breakfast type environments
A precondition for faultless functioning of the machine is professional connection to water and
power supply and sewage system.
Note
These operating instructions must be read prior to commissioning the coffee ma-
chine together with additional devices!
1.9 User
This appliance is not intended for use by persons (including children) with reduced physical, sensory
or mental capabilities, or lack of experience and knowledge, unless they have been given supervi-
sion or instruction concerning use of the appliance by a person responsible for their safety.
Children should be supervised to ensure that they do not play with the appliance.

Series 90
21.06.2010 Page 5
2 Control elements
2.1 Overall view
Pos. Element Pos. Element
1 Bean hopper 1,2kg 7 Main switch
2 Key switch 8 Steam adjustment valve
3 Keyboard 9 Steam dispenser
4 Hot water output 10 Steam temperature sensor
5 Coffee dispenser 11 Waste container cover
6 Manual dosage (instant coffee / cleaning tabs) 12 Drip grid
1
8
10
11 12
5
4
2
3
6
9
7

Series 90
21.06.2010 Page 6
2.2 Main switch
The main switch (1) is located behind the sloped cover behind the cup tray on the left.
At the models (9031 9032 9034 9035) the main switch is a key switch (2).
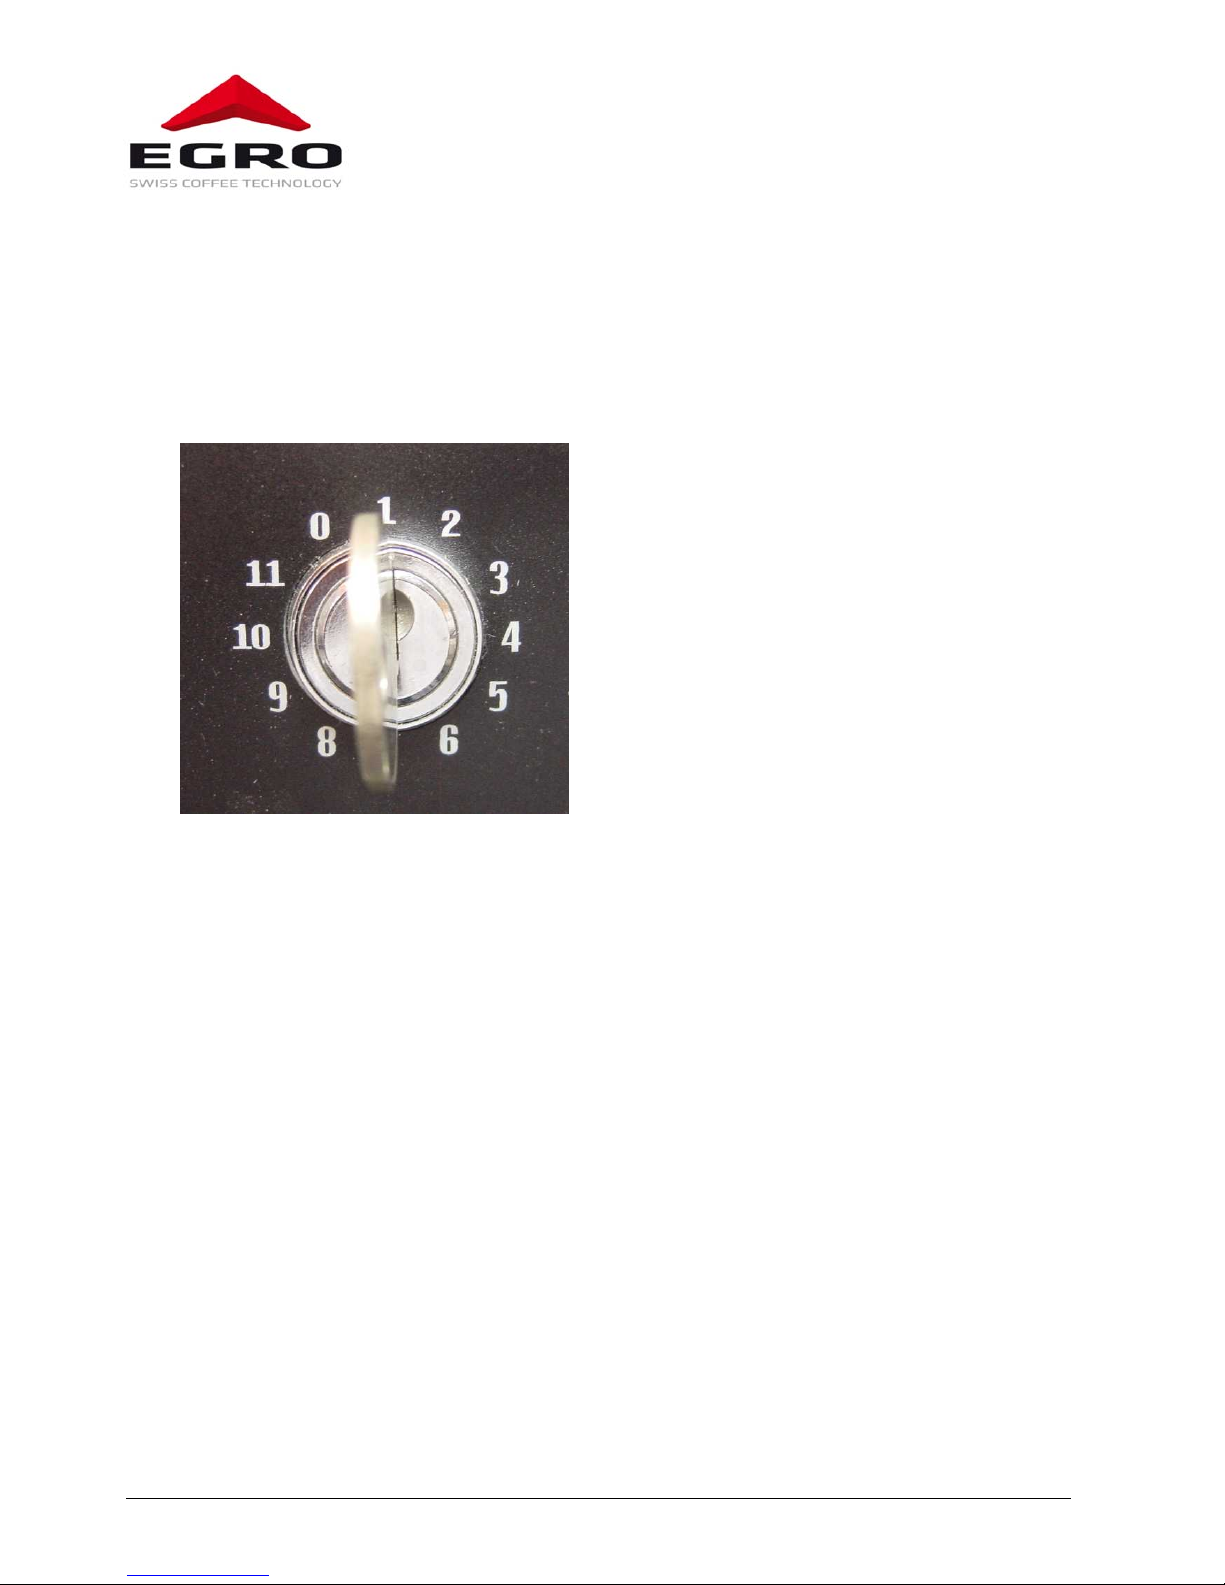
2.3 Mode switch
A key switch with 12 positions for changing
the mode is located on the right of the key-
pad.
Usage of different keys enables to allow ac-
cess of a user to all or only some functions.
Series 90
21.06.2010 Page 7
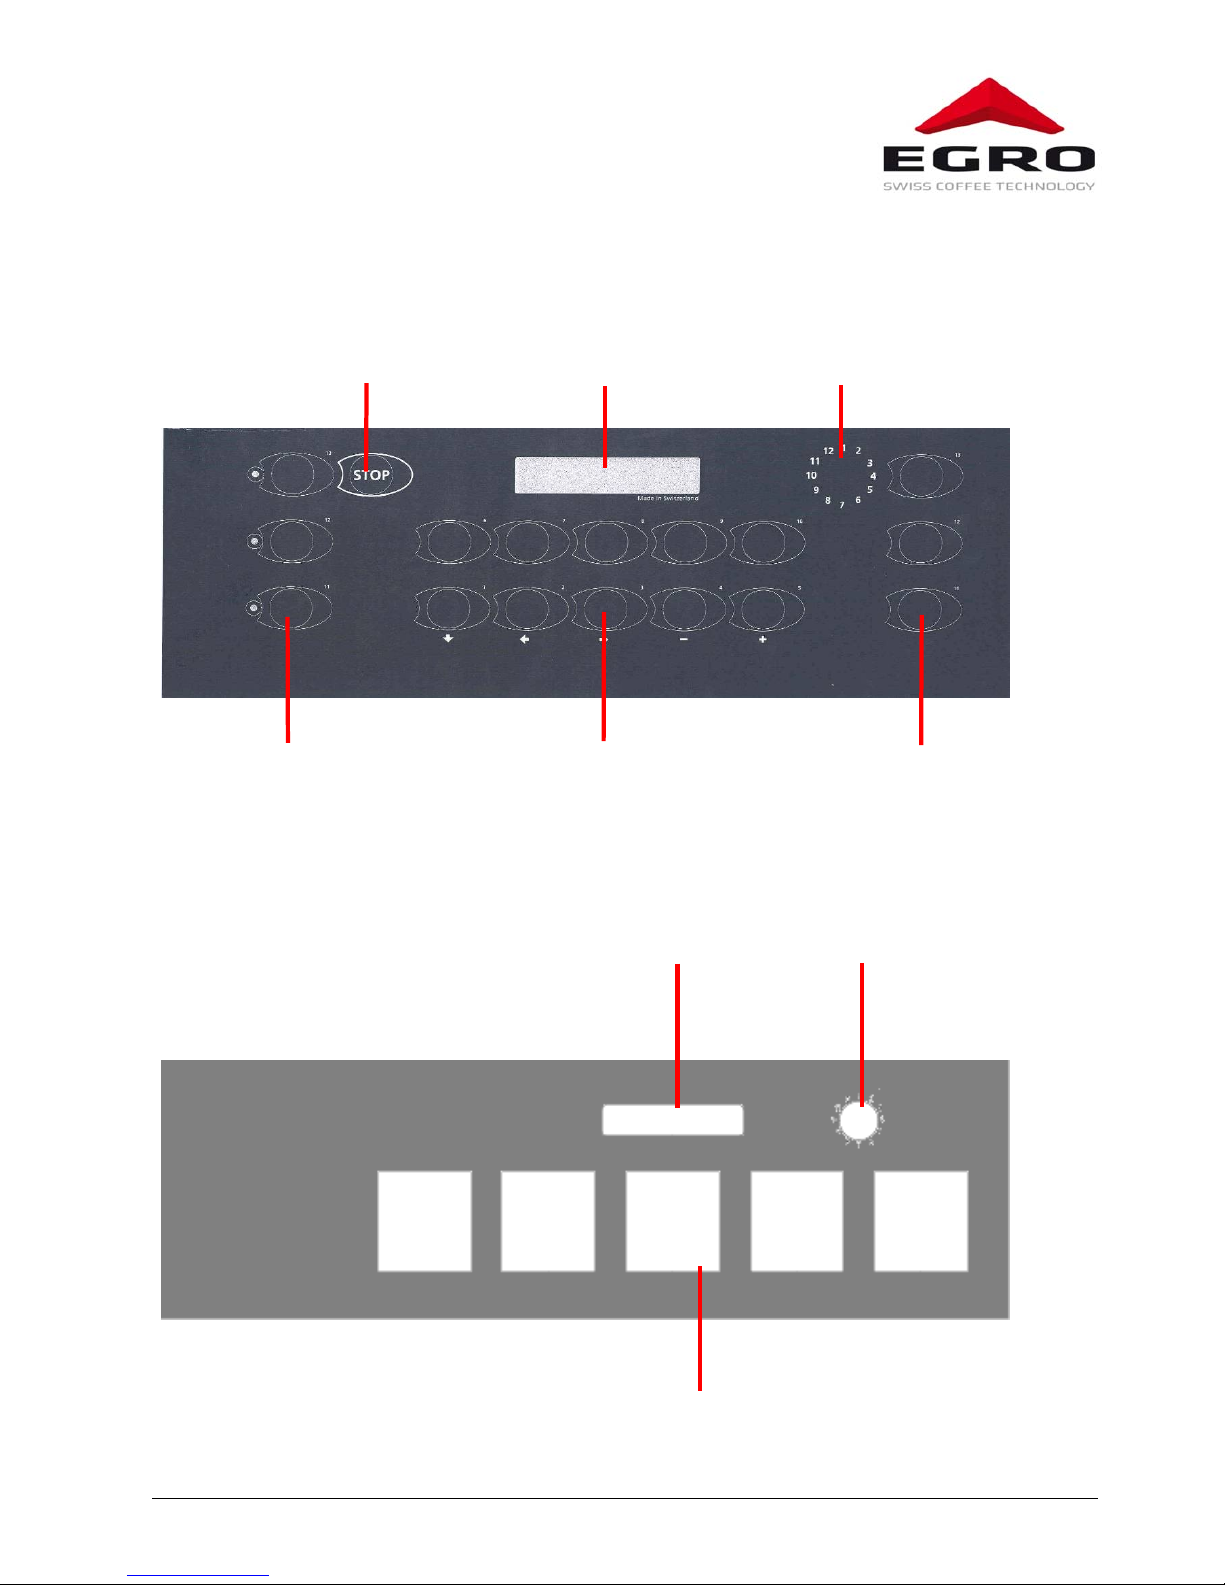
2.4 Keyboard
2.4.1 Series 90
2.4.2 Series 90 Self Package (9031 9032 9034 9035)
1
Stop key
Product keys
Coffee
Display Mode switch
Product keys
Hot water
Product keys
Steam
Product keys
Coffee
Mode switch
Display

Series 90
21.06.2010 Page 8
2.5 Keyboard elements
2.5.1 Display
The display is the LCD-window on the right above the keypad. During operation texts and notes are
displayed explaining the process flow. Also failures can be identified with the help of relevant mes-
sages.
In these instructions display texts and messages are presented as follows
Example:
Machine is ready for operation
2.5.2 Stop key
This key is also called key 0. The stop key is used for following functions:
•Cancelling of a product being dispensed
•Deleting of a pre-selection
•Programming
•Starting of various cleaning programs
2.5.3 Product keys
Note
Every product key can be programmed individually. During installation the Egro
technician assigns every key a specific product according to your requirements
and wishes.
•Keys 1 to 10 Coffee products
•Keys 11 to 13 Different steam programs
•Keys 14 to 16 Hot water program
Note
The symbols below the keys 1, 2, 3, 4, and 5 refer to use of these keys in the key
position 3 (Programming).
Please refer to section 7 "Programming".
Please select
10.05.03 12:34

Series 90
21.06.2010 Page 9
3 Operation Cooling Box and Milker
3.1 Cooling box
1 Cooling box On/Off only from the power plug
2 Rectifier 230 V 12 V
3 Switch for cooling is locked!
4 LED green is on during normal operation
Note
In order to switch out the cooling unit pull the plug from the power supply sys-
tem (or from the cooling unit).

Series 90
21.06.2010 Page 10
3.2 Milker
1Main switch
I = On 0 = Off
2Product dispenser
3Drip tray
4Keypad for 4 products
5Status indicator
Meaning of status indicator:
Title Colour burning blinking
Ready green Operating temperature reached Milk temperature below 65°C
Cleaning yellow Autom. cleaning Cleaning finished
Milk red
FT-sensor not available, not plugged or de-
fective Add milk
(milk level too low)
Water red Add 0,5 dl water in the heating tray
3
2
1
5
4
Series 90
21.06.2010 Page 11
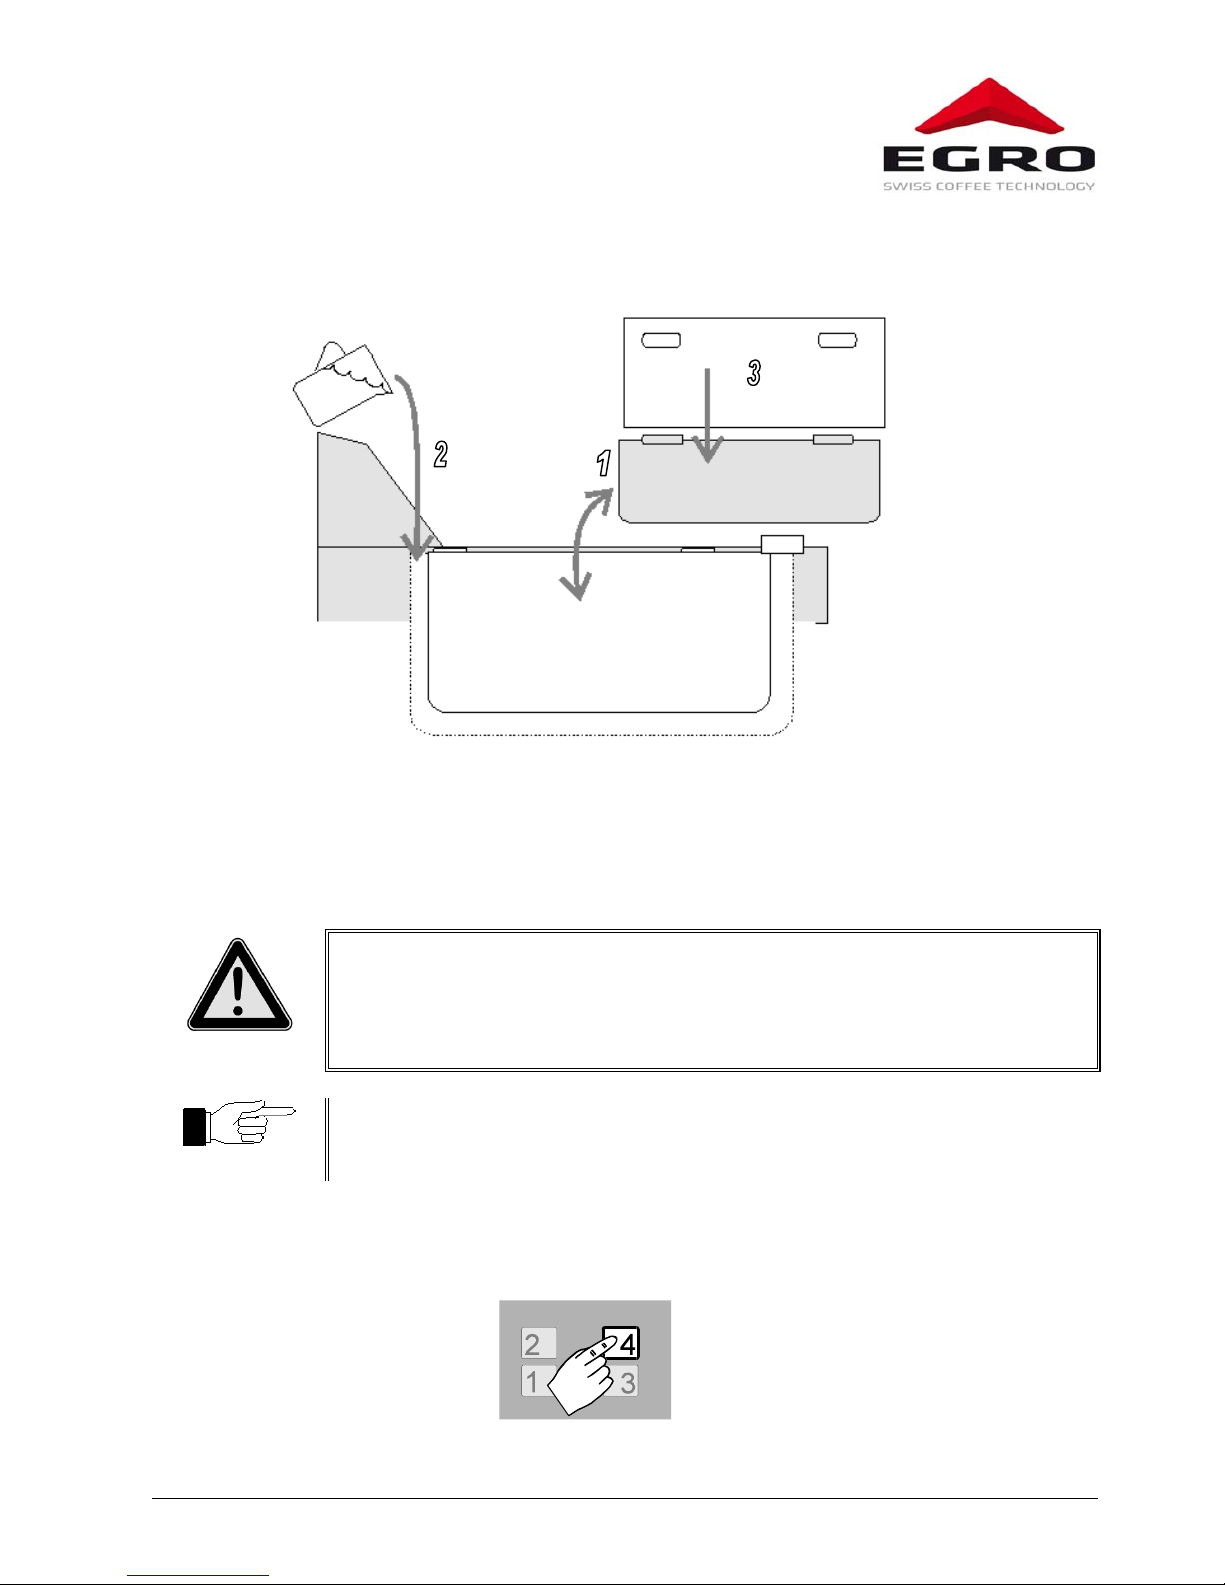
3.2.1 Adding milk
Add water in the heating tray and milk in the milk container prior to initial operation.
3.2.1.1 Procedure:
Open the cover and remove the milk container (1), add ca. 0,5dl water in the heating tray (2).
Place a plastic bag (3) in the milk container; fasten the four bag holes to cover holders on the sides.
Place back the milk container and add milk max 5 l. Reinstall and close the cover.
Danger
Do not exceed the specified water amount!
If heating tray is overfilled the water will overflow when milk container is
inserted.
Danger of short circuit!
Note
The water in the heating tray is necessary for heat transmission. When there is
no or not enough water in the heating tray the milk may possibly not heated or
not heated enough.
3.3 Product selection
Shortly press the desired product key.
Wait until the product is supplied. No pre-selection is available.
Series 90
21.06.2010 Page 12
4 Operation Coffee machine
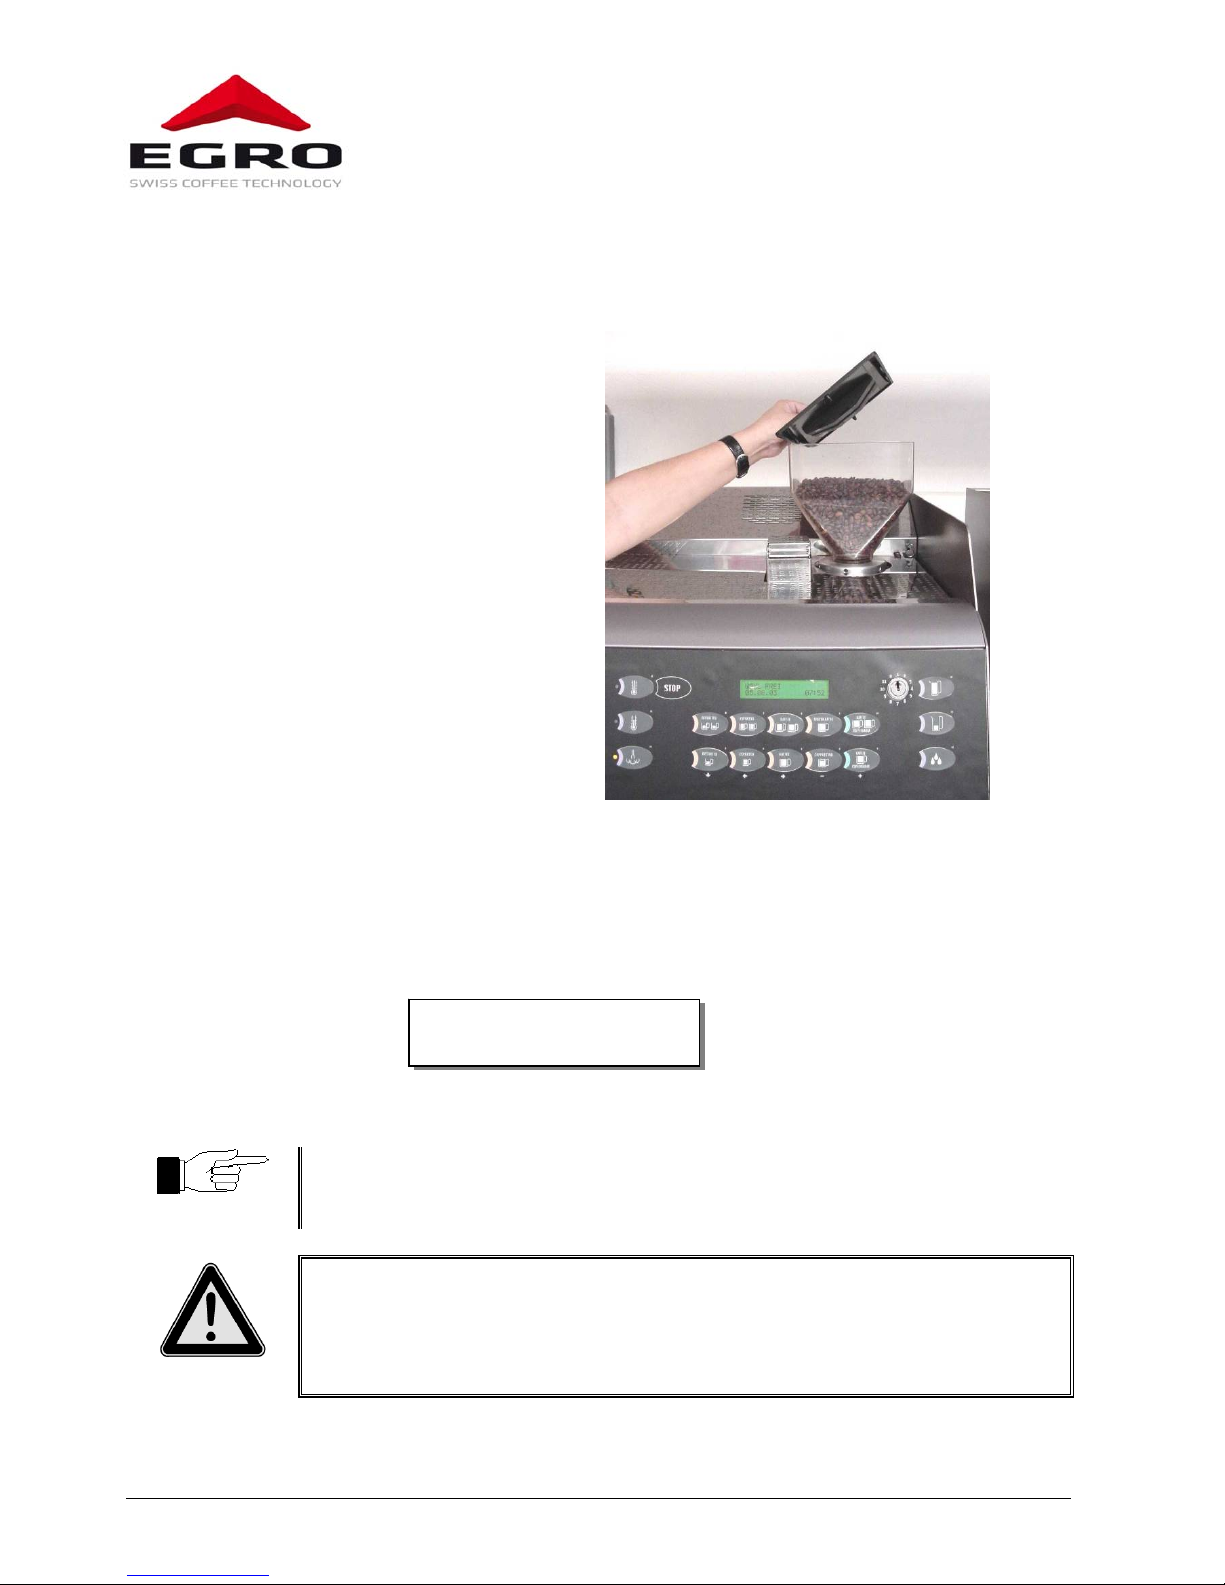
4.1 Preparations
•Open the water supply shut-off valve
•Switch on the main switch
•Check the content of the beans hopper
•Fill in the beans hopper remove the cover
•Add beans
•Close the cover
4.2 Switch on
•Switch on the main switch
•The coffee machine starts the switch-on program during which the system is heated up.
Heating/Flushing is displayed.Heating up takes about 10 minutes.
•As soon as the system has reached the necessary temperature the following will be displayed:
•The coffee machine is now ready for operation.
Note
The products available in mode 1 or mode 2 have been adjusted by the service
technician.
Danger
After switching on hot water is dispensed from coffee or hot water dispenser
nozzles.
Danger of scalding!
Please select
10.05.03 12:34
Series 90
21.06.2010 Page 13
4.3 Product delivery
Machine is ready for operation when Please select is displayed.
In order to obtain a drink (coffee, milk drink or hot water) shortly press a relevant product key.
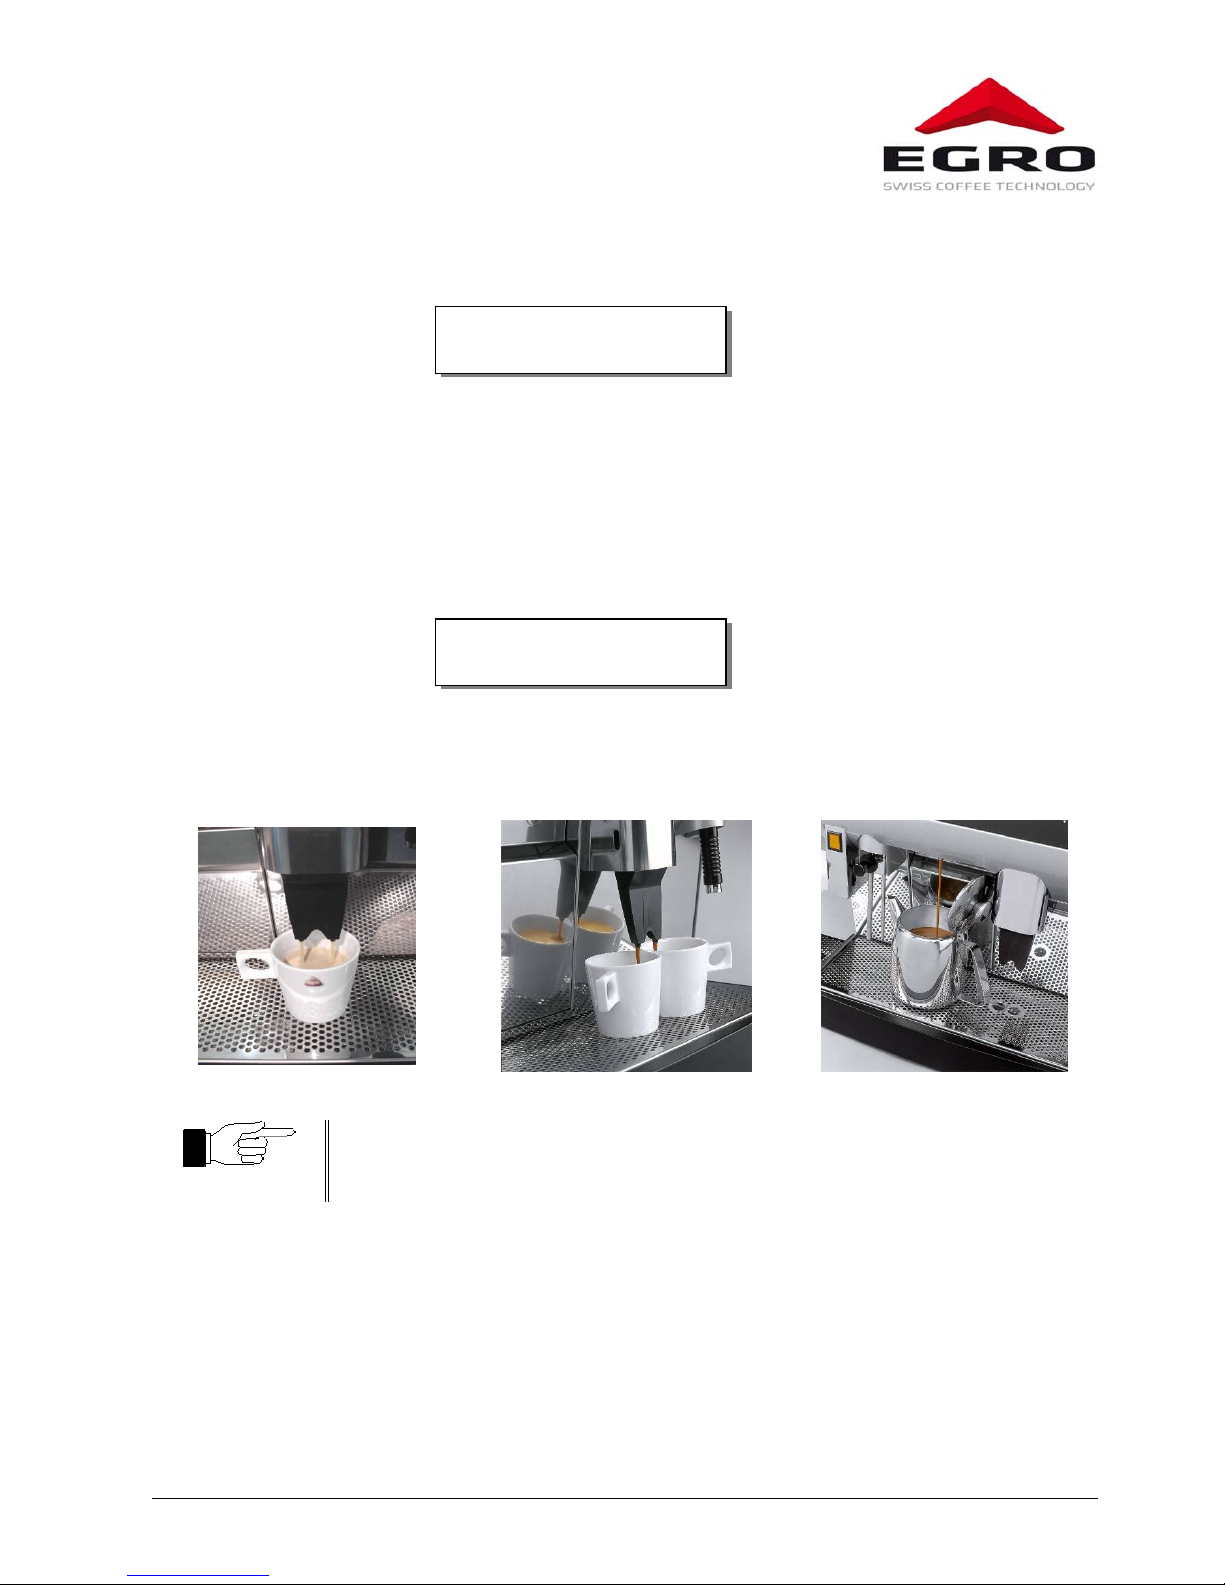
4.3.1 Bean coffee
•Place a cup(s) under the dispenser nozzle
•Shortly press the desired product key
•The following is displayed.
•The beans are grinded, the coffee is brewed
•Product supply
1 cup of coffee 2 cups of coffee 1 jug of coffee
Note
Grinding and brewing times vary from product to product. Place cup(s) early un-
der the dispenser nozzle!
Please select
10.05.03 12:34
Coffee 4 .....................

Series 90
21.06.2010 Page 14
4.3.2 Grinded coffee (manual dosage)
Alternatively the product keys may be programmed for use with grinded coffee (e.g. caffeine free).
Such drinks can be obtained semi-automatically as follows:
•Press product key
•“Insert coffee powder” is displayed.
•Open the flap; fill in grinded coffee
•Close the flap
•Coffee is brewed
•Product Supply
4.3.3 Milk products
The machine enables to obtain various milk-coffee products. A precondition is a machine with rele-
vant equipment.
We differ following products:
•Hot milk with and without coffee (available with Milker only)
•Milk foam with and without coffee (available with Milker or Cappuccinatore)
•Supply of milk foam by keystroke (possible manually with Milker or Cappuccinatore)
Note Use only milk (UHT or pasteurised milk) with a fat content of 1,5% to 3,5%.
4.3.3.1 Milk Supply (only Milker)
•Place a cup(s) or glasses under the milk Sup-
ply nozzles
•Shortly press the desired product key on the
Milker.
•Depending on the product hot milk is dis-
pensed

Series 90
21.06.2010 Page 15
4.3.3.2 Supply of milk products
•Place a cup(s) or glasses under the coffee-milk Supply nozzles (Milker or Cappuccinatore)
•Shortly press the desired product key
•The beans are grinded, the coffee is brewed
•The order of Supply of milk and coffee can be programmed variously
1 cup of cappuccino (Cappuccinatore) 2 cups of cappuccino (Milker)
4.3.4 Hot water
To the three hot water keys 3 different Supply durations can be assigned (time-limited dosage). If
supply duration = 0 is assigned to one of the keys such key works as an On/Off key.
•Place a tea glass or cup under the hot
water supply nozzle
•Press the relevant key
•The following is displayed
•Supply of hot water
Tee 2 ...........................
Series 90
21.06.2010 Page 16
4.3.5 Steam (if applicable)
To the three steam keys three different product temperatures can be assigned. If the end tempera-
ture = 0 is assigned to one of the keys the steam will not be automatically switched off.
The steam function is activated by pressing the relevant steam program and with the help of the
steam cock. With the steam cock the steam amount can be adjusted as well. When steam is flowing
the relevant LED is blinking. Additionally, the program number, the desired and the actual tem-
perature of the product are displayed if enough space is available.
The steam program can be changed anytime by pressing another steam key.
•Immerse the steam nozzle in the container
•Press the required steam program 2 times if LED is not burning or 1 time if the LED is burning.
•Turn the steam cock until the required amount of steam is reached
•The product is heated up to the adjusted temperature
Note
Steam supply can be stopped by closing the steam cock.
The steam program can also be stopped by pressing the relevant key.
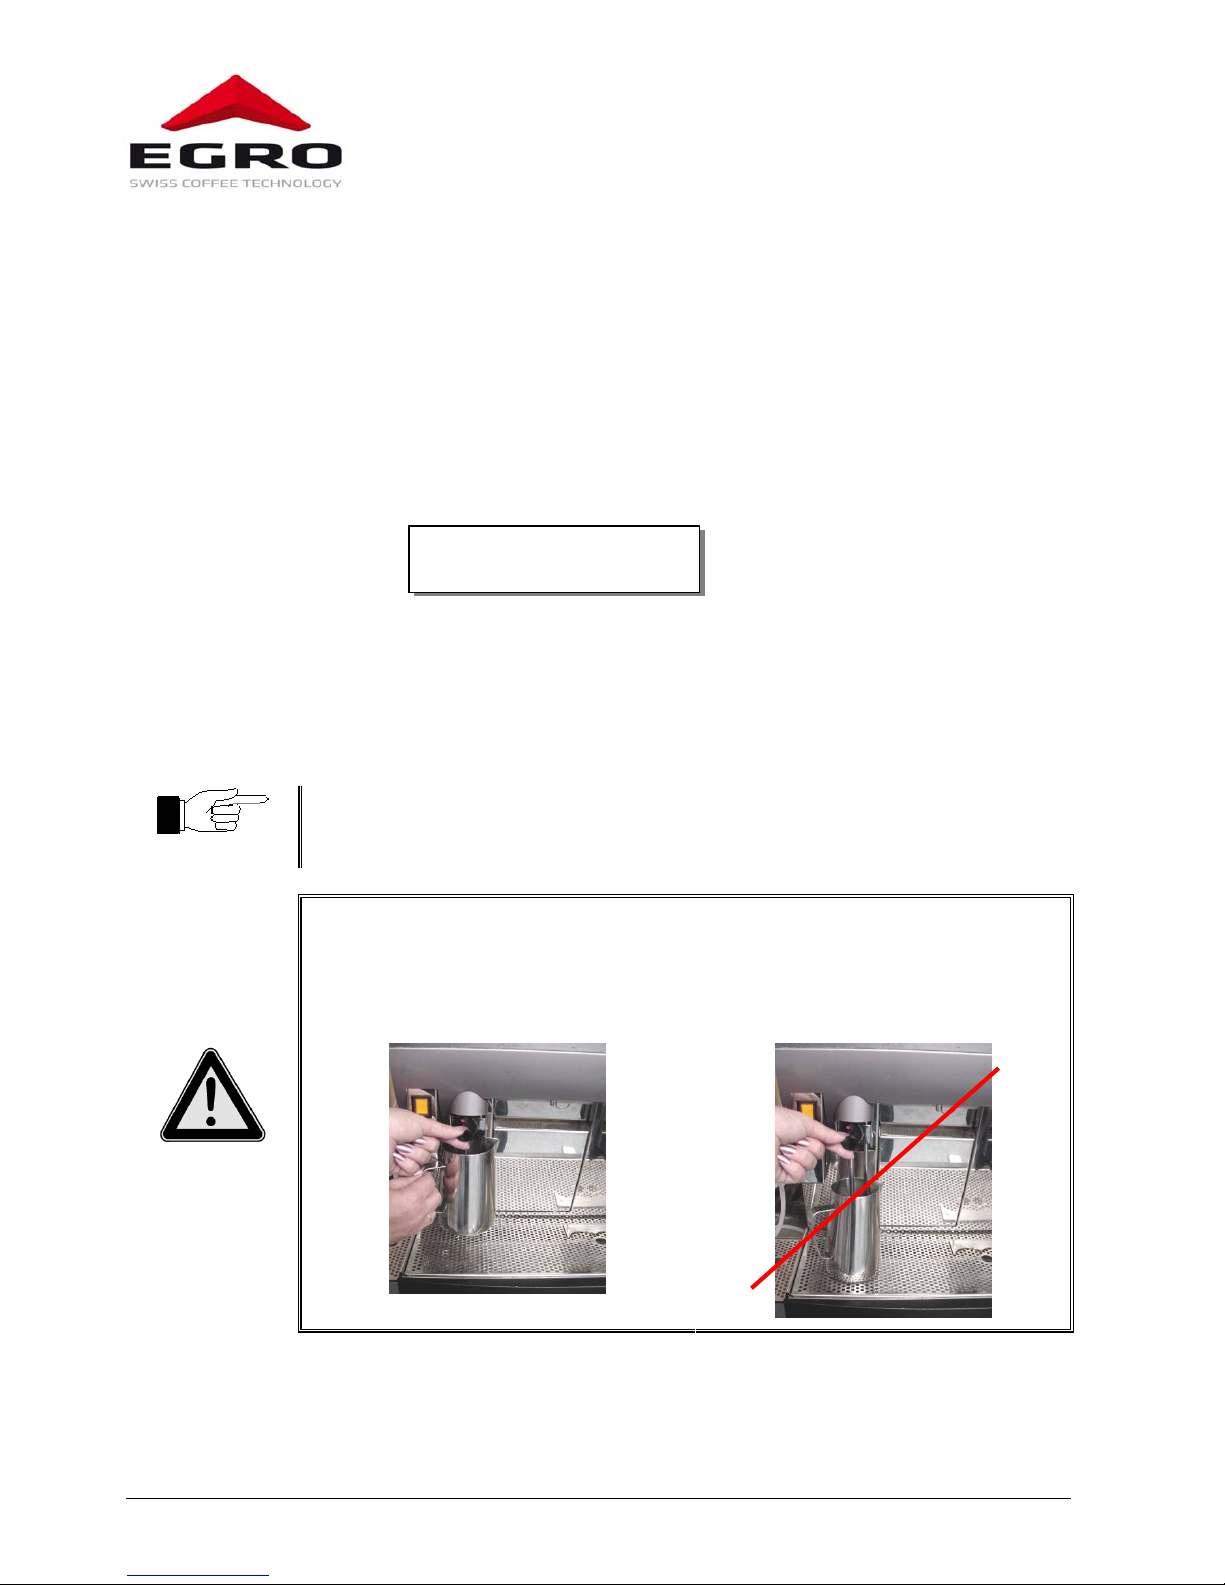
When heating up a liquid with steam make sure that the steam Supply nozzle is
fully immersed in the liquid.
Danger of scalding through spouting of hot liquids!
Correct
Nozzle fully immersed Wrong
Nozzle not immersed
Danger
Steam 2 70 25

Series 90
21.06.2010 Page 17
5 Special functions
5.1 Pre-selection
During supply of a coffee drink, other coffee products can be pre-selected.
Pre-selection can be adjusted between 1 and 16 in the product menu, thereby pre-selection = 1
means that only one coffee per keystroke can be selected.
For self-service as well as for advance payment (e.g. coins) the pre-selection is set on 1.
Coffee beans are grinded for a pre-selected coffee as soon as the previous brewing process is run-
ning and the grinding position is free.
Example of the display:
Coffee No 4 has been prepared by 40 %, coffee No 2 has been pre-selected 3 times:
5.2 Cancelling of a selected product
Product Supply can be cancelled anytime through activation of the stop key.
When a coffee has been pre-selected the pre-selection is cancelled first and then after pressing the
stop key one more time, the product being dispensed is deleted.
5.3 Switching off
Note
It is recommended to switch off the machine for longer operation pauses (nights,
weekends etc.).
5.3.1 Switching off the machine through main switch
•Switch off the main switch or the key switch.
5.3.2 Switching off through keyboard
•Insert key
•Turn the key in Pos 1
•Standby is displayed
5.4 Automatic start
If this function has been programmed by your service partner during commissioning, your machine
will start automatically after the adjusted time period, provided that following conditions are ful-
filled.
Daily cleaning in accordance with the description (see 8.1) must be completed by the moment of
the machine switching off automatically (Standby). Only then the machine can start automatically
next day at the adjusted time.
Coffee 4 ████. . . . . . .
Presel. Coffee 2: 3
Series 90
21.06.2010 Page 18
6 Operation modes
Mode is an operation mode of the machine. The machine behaves differently in every mode or has
different functions.
The machine has 11 different key positions in total. The modes 4 -11 are available for the service
technician only and can be reached only with a special key.
6.1 Mode switch
Key switch with 12 settings (0 to 11).
It is installed in the top-right corner of the
keyboard.
Various key configurations allow one user to
access all the functions or only some of them.
Settings 0: The machine is switched off but is still heated. Display: “STAND-BY”.
Settings 1: The machine is in the standard mode. This means that coffee, tea and steam
are available regardless of any token, coin, or external registration systems
which might be connected.
Settings 2: The machine can be operated via interfaced token, coin or external registra-
tion systems. The machine can be operated without restriction if no such
system is connected.
Settings 3: Counter reading/programming by owner. The owner can read the daily total
or the grand-total counter and can adjust the coffee powder, cup volumes,
etc.

Series 90
21.06.2010 Page 19
7 Programming
In mode 3 (Programming) the following functions are available for the operator:
Counter: •Reading off the daily total data (pieces and amount)
•Deleting daily total data
•Reading off overall total (pieces and amount)
Note Deleting of counters cannot be undone!
Adjustments: •Product price
•Water volume (cup filling amount)
•Grinded coffee amount
•Pre-Infusion
•Tea time (filling amount) and price
•Steam temperature (product end temperature)
•Price and time for external products (Milker)
•Date and time.
•Waiter pen assignment
7.1 Meaning of the Buttons in Programming
In mode 3 (Programming) the key 0 (STOP) as well as product keys 1, 2, 3, 4 and 5 are used for mov-
ing in menu tree and insertion of adjustments.
Below the keys symbols are located that refer to relevant programming functions.
This manual suits for next models
4
Table of contents
Other Egro Coffee Maker manuals


Popular Coffee Maker manuals by other brands


Waeco
Waeco PerfectCoffee MC01 Installation and operating manual

Scarlett
Scarlett SC-037 instruction manual

Team International
Team International UST CM 1 operating instructions

inventum
inventum KZ612 instruction manual

Healthy Choice
Healthy Choice CB707 manual

Saeco
Saeco Gran Baristo HD8966 Quick instruction guide