Evelo Delta User manual

DELTA
OWNER’S MANUAL
Important Safety and Product Information
EVELO.COM
delta_manual_final_single.indd 1 12/06/2017 14:11

2
EVELO.COM
TABLE OF CONTENTS
Welcome!
Contact Information
Unboxing
Registration
Warranty
Battery Care and Maintenance
Assembly
Riding Your EVELO Electric Bicycle
Maintenance
Troubleshooting
3
3
4
5
6
8
10
14
20
21
delta_manual_final_single.indd 2 12/06/2017 14:11

3
EVELO.COM
Congratulations on the purchase of your new, power-
assisted electric bike from EVELO Electric Bicycles!
This manual is designed to give you an understanding of the basic operation and
maintenance of this bike. We believe that great customer service is part of your
purchase, so please reach out to us if you ever need guidance or assistance.
The latest version of this Owner’s Manual is always available at
http://support.evelo.com/support/solutions
We suggest that you read this manual in its entirety before using your bicycle.
Continuous Improvement is a key operational philosophy at EVELO Electric Bicycles,
so some images and descriptions in this manual may differ slightly from your bike.
Riding a bicycle is an inherently dangerous activity, and it is your responsibility to ride
safely and within your abilities. Proper assembly is vital to the safe operation of your
bicycle, so seek professional assistance if you are unable to complete the assembly of
your bicycle as outlined in this manual.
The Delta model is recommended for use by riders weighing 350 pounds (159
kilograms) or less.
WELCOME!
Your enjoyment of — and satisfaction with — your new bike is important to us.
our toll-free tech support at 1-877-991-7272.
CONTACT INFORMATION
delta_manual_final_single.indd 3 12/06/2017 14:11

4
EVELO.COM
UNBOXING
It is recommended to retain the original packaging for a short period of
time and keep it as intact as possible.
Since the bikes are heavy, we have a couple of suggestions for removing the bike
from the box: If you intend to lift the bike up and out of the box, a second person is
recommended. An alternative method is to lie the box on its side and slide the bike out.
There are some plastic pieces used as protective packaging: a few examples are a
spacer placed between the front fork, and an axle protector on the front wheel. These are
not needed for the assembly of the bicycle.
Take your time cutting the zip ties used to hold packaging to the bike. There are some
similar looking zip ties that are used to secure wires to the frame—do not cut ties that are
holding wires in place.
Some smaller parts are shipped in the box containing the charger—be sure to open that
box prior to beginning assembly.
Included with your bike are the following:
• EVELO Owner’s Manual
• Keys
• Left + Right Pedals
• Charger
• Assembly tool kit
• Front Axle
delta_manual_final_single.indd 4 12/06/2017 14:11

5
EVELO.COM
Please ll out the warranty form located on our website at www.evelo.com/warranty/
to register your bicycle.
Registration is required before we can process a warranty claim. Registration is also a
great security feature. Authorities can use this to identify your bike if it is stolen.
The frame’s serial number is located on the head tube, just above the front fork.
Please note that your keys are unique to
your bicycle and EVELO cannot provide
exact replacements. We recommend
using one key for day to day use, and
storing the other.
Please note that your keys are unique to
your bicycle and EVELO cannot provide
exact replacements. We recommend
using one key for day to day use, and
storing the other.
Please take a moment to write your serial numbers here and keep a record in a safe place:
FRAME SERIAL NUMBER: ................................................................
REGISTERING
YOUR EVELO ELECTRIC BICYCLE
delta_manual_final_single.indd 5 12/06/2017 14:11

6
EVELO.COM
Warranty Overview
Every EVELO Electric Bicycle comes with a 4 year warranty against manufacturing
defects in materials or workmanship on its frame, battery, controller, and motor
assembly.
This warranty applies only to the original registered owner of the EVELO bicycle and
is not transferable. This limited warranty does not apply to normal wear and tear,
malfunctions, or failures due to abuse, neglect, improper repair, improper maintenance,
alteration, modication, accidents, or other improper use.
It is important that you register your new bicycle within 30 days after purchase in order
to activate the warranty.
Terms of the Warranty
For your reference, we’ve outlined the comprehensive terms of the warranty below:
• Frame, Display, Controller, and Motor Assembly – are warranted to be free from
defects in material or workmanship for a period of forty-eight (48) months or
20,000 miles (whichever comes rst) from purchase. After any warranty period
has elapsed, you may purchase spare and replacement parts by contacting us.
• Original Batteries – are warranted to be free from defects in material or
workmanship for a period of 48 months from the date of purchase as follows:
full replacement during the rst 24 months, while replacements needed during
months 25-48 are prorated as per our prorated schedule (details on website).
• Replacement Batteries (if provided) – are warranted to be free from defects in
material or workmanship for a period of six (6) months from delivery.
Please note that while every effort is made to provide our customers with a superb
shopping experience, issues sometimes can arise during shipping. If any parts happen
to be damaged during shipping, EVELO will send a replacement part at our expense
and will work with you or the bike shop of your choice to x the issue.
WARRANTY
delta_manual_final_single.indd 6 12/06/2017 14:11

7
EVELO.COM
For warranty issues, EVELO will cover the cost of labor involved handling the warranty
service within the 30-day period after purchase. To receive this service, the customer
should contact EVELO directly, and we will make the necessary arrangements. If a part
or component is faulty, email contact is preferred, along with a video or photo of the
faulty part.
After the 30-day free repair labor period, the owner will be responsible for labor costs
associated with warranty replacements.
For any parts under warranty that will need to be replaced within the 48-month time
frame, EVELO will cover the cost of regular ground freight to the customer.
Limited Remedy: Unless otherwise provided, the sole remedy under the above
warranty, or any implied warranty, is limited to the replacement of defective
components and parts with those of equal or greater value at the sole discretion of
EVELO. Unless this falls within the 30-day free labor repair period, the customer is
responsible for labor costs associated with warranty replacements.
In no event shall EVELO be responsible for direct, incidental or consequential damages,
including, without limitation, damages for personal injury, property damage, or
economic losses, whether based on contract, warranty, negligence, product liability, or
any other theory. Some states do not allow the exclusion or limitation of damages, so
the above limitation or exclusion may not apply to you.
Exclusions: The above warranty, or any implied warranty, does not cover normal wear
and tear. All warranties are void if the electric vehicle is used for other than normal
activities, including, but not limited to, failing to follow the owner’s manual or using the
electric vehicle for commercial activities or in competitive events, and training for such
activities or events.
EVELO makes no other warranties, express or implied. All implied warranties, including
the warranties of merchantability and fitness for a particular purpose, are limited in
duration to that of the express warranties stated above. Some states do not allow
limitations on how long an implied warranty lasts, so the above limitation may not apply
to you. This warranty gives you specific legal rights, and you may also have other rights
which vary from state to state.
delta_manual_final_single.indd 7 12/06/2017 14:11
8
EVELO.COM
The battery provided with your EVELO Electric Bicycle is a high-quality unit that
requires very little from the user in terms of care. However, a few things are worth
noting with respect to any Lithium Ion battery.
To maximize the lifespan of your battery, we suggest an initial conditioning
charge of 12 hours. After that, connect it to the charger as needed. While there is no
need to recharge the battery following short trips, we recommend not leaving a battery
partially discharged — and especially not completely discharged — for extended
periods of time.
A typical charge takes 4-6 hours (longer in very cold temperatures) to complete. The
battery will perform best if you do NOT leave it plugged in constantly, since charging/
discharging keeps the electrons in the unit moving, which improves longevity.
Battery Storage
If you store your battery for 30 days or longer, it is suggested that you keep it in a place
that is within the above temperatures and give it a full 12-hour conditioning charge every
30 days.
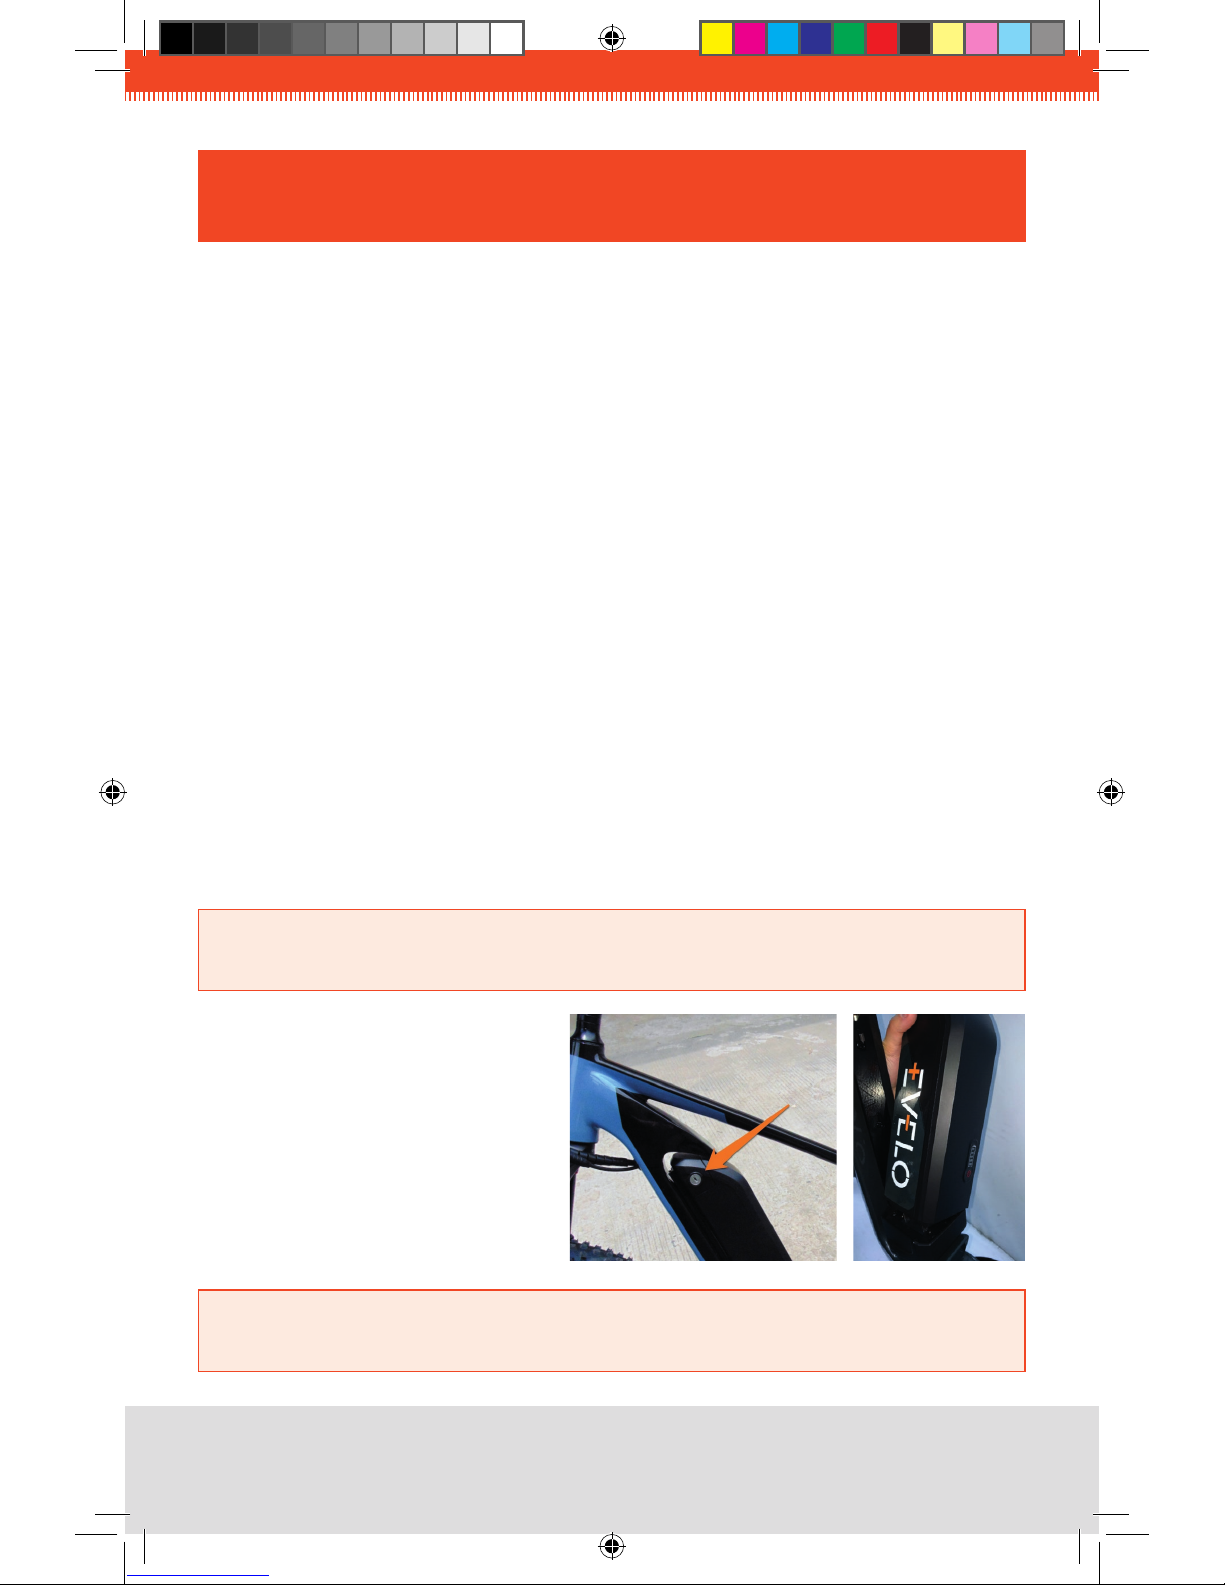
Removing the Battery from the Bike
BATTERY CARE & MAINTENANCE
NOTE The battery can be left on the bike for assembly and charging, but if you need to remove it
from the bike, follow the instructions below
You can easily remove the
battery from the bike if desired.
First, unlock the battery using
one of the keys provided.
With the battery unlocked, simply
tip it to the right to remove it.
NOTE The lock is a theft deterrent, but not an electrical switch. Powering the bike on is
accomplished with the controls on the handlebars.
delta_manual_final_single.indd 8 12/06/2017 14:11

9
EVELO.COM
Using Your Charger
The charger that comes with your
bike has internal controls that prevent
overcharging of the battery. First, plug
the charger into the battery:
Then connect the wire connections
at the charger block to and make sure
the cord is fully seated. Next, plug it
into a 120v AC outlet. The light on the
charger should be RED, and that light
will change to GREEN when the battery
is fully charged. We do not recommend
leaving the unit plugged in for extended
periods of time or using the charger
unit in poorly ventilated spaces such as
closets or drawers, as it may overheat.
In addition to the battery gauge on the
display panel, there is also a battery gauge on the unit itself. Simply press the red button
to see the current level of charge (useful when the battery is not installed on the bike.)
Installation of the battery is the opposite of removal.
Environmental Conditions
Temperature extremes can affect your battery. Please keep it within the following
temperature ranges, as suggested by the battery manufacturer:
Charging: 32 degrees to 113 degrees F (0 degrees to 45 degrees C)
Discharging and Storage: -4 degrees to 140 degrees F (-20 degrees to 60 degrees C)
delta_manual_final_single.indd 9 12/06/2017 14:11

10
EVELO.COM
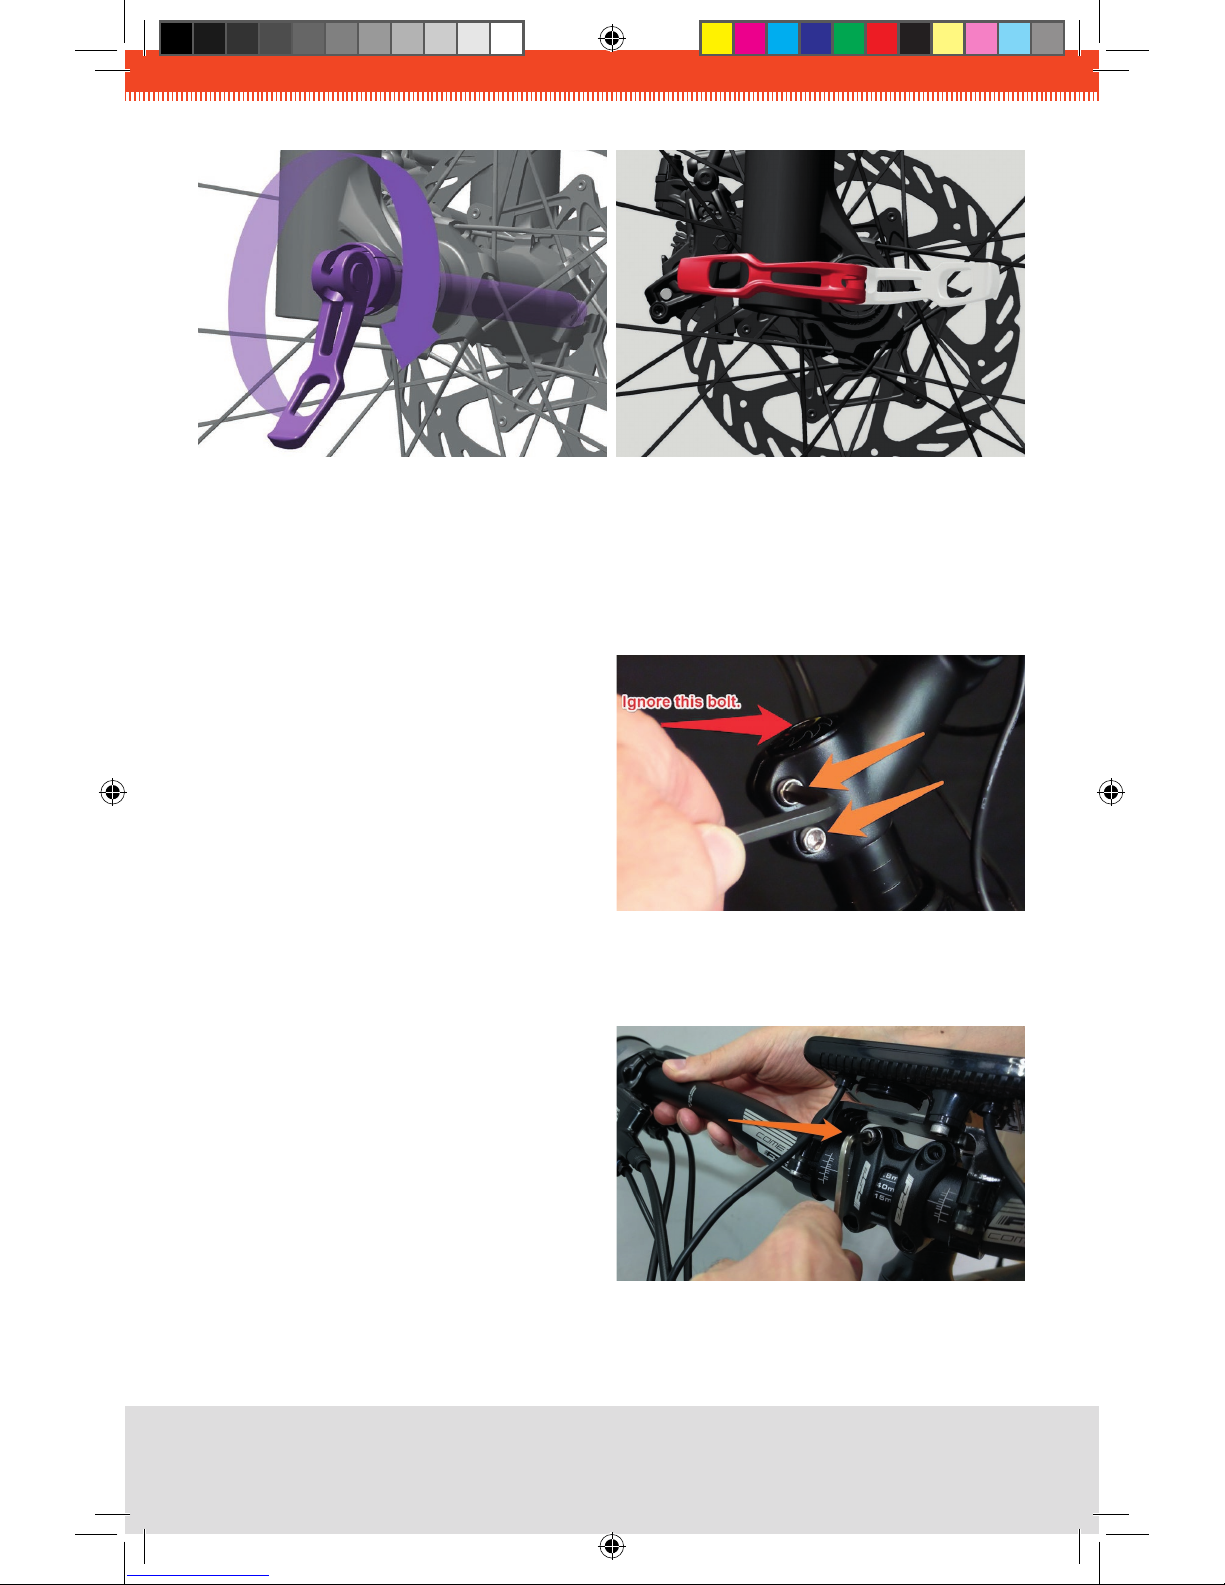
STEP 1
Install Front Wheel
1. The front wheel is attached to the
bike with a 15mm diameter thru axle
that provides unparalleled rigidity and
control.
2. Seat the front wheel in the fork, being
sure to guide the brake disc into the rotor on the left side of the bike.
3. Slide the thru axle through the fork and wheel from the right side of the bike until
you meet resistance.
4. Pivot the lever into the open position
so that the lever engages the notch.
This allows the lever to be used
like a wrench to screw the axle into
position. Rotate the axle clockwise
until resistance is felt.
ASSEMBLY
Our Customer Service Team can help you with the process if needed. Tools to
complete the job are included, and some of the smaller pieces are packed inside the
charger box to prevent loss.
Proper assembly is extremely important for the safe and smooth operation of your
electric bicycle. Please read through the entire assembly instructions before beginning.
ASSEMBLY
OF YOUR EVELO ELECTRIC BICYCLE
NOTE If you do not have the ability or skill to assemble the bicycle yourself, please take it to a
local bike shop for professional assembly.
delta_manual_final_single.indd 10 12/06/2017 14:11
11
EVELO.COM
STEP 2
Align the stem
1. The stem is turned 90 degrees
from the riding position during
shipping. Rotate it so that it is in
line with the front wheel as follows.
2. Loosen the two bolts shown,
rotate the stem into position, and
securely retighten the bolts.
5. Close the lever 180 degrees and place into a horizontal position. Tension is correct
if the lever leaves a slight indentation in your hand. Tension is set at the factory,
but if you feel it is insufcient, contact us at 877-991-7272, or search “Maxel” on
our website: http://support.evelo.com/support/solutions
STEP 3
Attach Handlebars
1. Remove the four bolts that hold the
handlebar clamping bracket on.
2. While taking care to keep the wires
and cables as straight as possible,
place the center of the handlebars
into the bracket and replace the
clamping bracket.
delta_manual_final_single.indd 11 12/06/2017 14:11

12
EVELO.COM
3. Tighten the bolts evenly so there is equal space at the front and rear of the
bracket. Firmly tighten all 4 bolts.
STEP 4
Install Pedals
Keep in mind that the left and right pedals are threaded differently, and it is crucial that
they are installed on the correct side of the bicycle. For this reason, they are marked
“L” and “R” with stickers at the factory.
1. Locate the right-side pedal (marked with an “R”).
2. Thread the “R” pedal clockwise onto the drive-side crank (side of the bike with the belt).
3. Tighten the “R” pedal clockwise with a 15mm wrench or the wrench provided.
4. Locate the left-side pedal (marked with an “L”).
5. Thread the “L” pedal COUNTER-CLOCKWISE* onto the non-drive-side crank (side of the
bike without the belt).
6. Tighten the “L” pedal COUNTER-CLOCKWISE with a 15mm wrench or the wrench provided.
FIT ADJUSTMENTS
Many parts of your new EVELO Electric Bicycle can be customized for a personalized t.
Seat Adjustment
The seat is easily adjusted up or down by ipping the quick-release lever that clamps
the post into the bike. Note that there is a “minimum insertion line” stamped on the
seat post that must be adhered to for safety’s sake. (If you need your seat to be higher
than permitted with the stock seat post, please contact us.)
The seat can also be moved forward and backward by loosening the single bolt on the
underside of the seat. Since it slides on its rails, there is no need to remove the bolt —
just loosen it, adjust, and rmly re-tighten.
delta_manual_final_single.indd 12 12/06/2017 14:11

13
EVELO.COM
Loosening this bolt also lets you change the angle of the seat up or down a bit. Again,
be sure to re-tighten it rmly if you loosen it to change the seat position in any way.
Front Shock
The Delta is offered with 2 different front shock options. Adjustments can be made to
ne tune performance for your needs.
Downloadable manuals are available at http://support.evelo.com/support/solutions
and search “Delta Shock”.
Please consult the manual provided by the manufacturer for additional information.
Tire Inflation
The tires have a range of recommended ination indicated on the sidewall of the
tire. Lower pressure will give a softer , more comfortable ride. A higher pressure will
provide a rmer ride, but will give the best range per charge as well as better puncture
resistance.
The Delta model is “tubeless ready”, meaning converting the tires to a tubeless set
up is quite simple. This does require a bike shop, as the initial ination must happen
almost instantly, requiring an air compressor. A tubeless tire is less prone to ats, is
lighter, and generally performs better. See our website http://support.evelo.com/
support/solutions and search for “Tubeless” for more information
delta_manual_final_single.indd 13 12/06/2017 14:11

14
EVELO.COM
PRE-RIDE CHECKLIST
RIDING
YOUR EVELO ELECTRIC BICYCLE
Carry out this pre-ride checklist before EVERY RIDE!
Make sure the tires are properly inated. All bicycle tires gradually lose air over
time, and this can affect handling, range, and puncture-resistance.
Are the “Quick Release” levers on the front wheel and seat tight?
Check both wheels for broken spokes. If you nd any, seek service before riding
the bike.
Are the handlebars tight? If there is any noticeable movement, tighten properly
before riding.
Visually inspect your tires for cuts, embedded glass, or other signs of possible
failure.
Make sure that the pedals are screwed in tightly, as damage is possible if they
come loose.
Are the brakes working properly? Squeeze the levers before riding to ensure
they apply the brakes, and then test them at a very low speed. Turn on the
pedal-assist and while riding at a very low speed, make sure the motor turns off
when either brake lever is squeezed.
delta_manual_final_single.indd 14 12/06/2017 14:11

15
EVELO.COM
Initially, we recommend you take a ride on the bike with the motor turned off. The bike
handles differently than traditional bikes you may be used to riding, so it may take a
little getting used to.
A ride or two without the motor engaged will help you adjust to the differences from a
traditional bike, making for an easier transition when you do use the electric assist..
When you rst use the bike with the motor on, please familiarize yourself with the
functions and performance of your bike by riding at slower speeds on at ground in a
safe area.
Make sure you are comfortable with the bike in these conditions before increasing
speed or riding in more difcult conditions such as bumpy or hilly ground, in trafc, or
in less-than-ideal weather.
YOUR FIRST RIDE
QUICK-START GUIDE TO OPERATING THE DISPLAY PANEL
Full instructions for your display panel are on our website http://support.evelo.com/
support/solutions (Search “Delta Display”) , but some of the most basic functions are
listed here for your convenience.
• To turn the bike on and off, press and hold the MODE button for about 2 seconds.
• To energize the USB port (located on the left edge of the panel), press and hold
the MODE button, the UP ARROW and the DOWN ARROW. Any device connected
to this USB port should be mounted to the handle bars, not placed anywhere on
the rider as that creates an un-safe situation.
• Pressing the UP arrow increases the amount of assistance coming fromt the
motor (this is the “PAS” level indicated on the screen) 0 provides no assistance
and simply provides power to the display. Level 1 adds a small amount of motor
assistance to your pedaling effort, and Level 5 adds the maximum boost from the
motor. Experiment to nd the PAS level that is right for you.
delta_manual_final_single.indd 15 12/06/2017 14:11

16
EVELO.COM
If your bike is equipped with disc brakes, you can prevent brake squeal by properly
“embedding” the brakes. It is important to do this when the brake pads are new.
1. Select an area in which to ride that allows you to reach a moderate speed safely.
2. Accelerate to a moderate speed and apply the brakes evenly, slowing the bike to
a walking pace. Do NOT come to a complete stop. Repeat this acceleration and
braking sequence 20 times. Braking power will increase during this process.
3. Next, accelerate to a slightly higher speed and apply the brakes, slowing to a
walking pace. Again, do not come to a complete stop. Repeat this sequence 10
times.
4. Allow the brakes to fully cool before riding again.
After you complete this “embedding” process, the brakes should operate at full power
without noise.
A NOTE ABOUT DISC BRAKES
Multiple levels of power assist are provided by the motor. The level of assist provided
at any given time can be adjusted using the display panel on the handlebars.
A sensor at the crank activates the motor when the pedals have travelled about half
of a turn of the crank. The motor continues to run at the preselected level as long
as the crank continues to turn as the rider pedals. When rst using the power-assist
mode, we recommend you start off with a low level of assist until you get used to the
power function and the bike in general.
The throttle is on the right side of the handlebars and is actuated by depressing
the lever. When the bike is powered on, pressing the throttle provides power to the
PEDAL-ASSIST, THROTTLE, AND STOPPING
delta_manual_final_single.indd 16 12/06/2017 14:11

17
EVELO.COM
motor even when the rider is not pedaling. The bike must be moving forward for the
throttle to work.
Brake cut-off switches are built into the brake levers so that power to the motor is
turned off when either brake is applied. This is a safety feature.
BEST PERFORMANCE
FROM YOUR EVELO ELECTRIC BICYCLE
ACHIEVING THE
One of the special features of your new bicycle is its mid-drive motor. This design allows
the motor, as well as the rider, to take advantage of gear changes in the shifting system,
improving efciency. To get the most out of the mid-drive motor, you need to shift the
gears.
In general, when starting from a dead stop, you should be in a low gear. On NuVinci®
— equipped bikes, the orange cyclist on the shifter should appear to be riding up a hill.
As the bike gains speed, progressively shift up through the gears. For the NuVinci®,
twist the grip so that the orange hill gradually attens out.
If you encounter a hill, shift back down into lower gears. You should also shift to lower
gears as you approach a stop, so you are already in the proper gear when you start again.
THE MID-DRIVE MOTOR
RANGE
Travelling as far as possible on a single battery charge is dependent upon many
variables. Some ways to maximize range include:
• Contribute by pedaling;
• Select the lower pedal-assist settings;
delta_manual_final_single.indd 17 12/06/2017 14:11

18
EVELO.COM
RIDING IN THE RAIN
EVELO Electric Bicycles are designed so that you can operate them in rainy weather.
Factory-level design elements keep the electrical components well-protected and
nearly all the electrical connections are located within the frame.
However, if you do choose to ride in the rain, be aware that necessary braking
distances can be increased signicantly, and keep in mind that the road surface can be
slick. Use caution in wet conditions — even if it is not actively raining.
Although rain and wet weather is acceptable use, we do recommend that you avoid
circumstances where your bike will be immersed in water, such as riding through a
deep stream. The bike is water-resistant, but not waterproof.
After riding in the rain, disconnect the battery and air-dry the electrical connection
points to avoid corrosion. We also recommend that you dry your bike with a soft towel
if you having been riding in the rain.
• Use higher ination pressures for your tires;
• Ride at moderate speeds (higher speeds bring greater wind resistance, putting a
greater load on the motor); and
• Avoid riding in stop-and-go trafc.
In many ways, considerations similar to those one takes to improve gas mileage for a
car are likely to be helpful in increasing the range of your new electric bike.
Different riders in different conditions can expect different performance. For example, a
130 pound rider who is pedaling on at terrain will go signicantly further on a charge
than a 230 pound rider in hilly terrain who is not pedaling. This is why distance –per-
charges are estimated in such a broad spectrum.
delta_manual_final_single.indd 18 12/06/2017 14:11

19
EVELO.COM
SAFETY TIPS
We recommend the following safety-related procedures:
• Wear a helmet.
• Ride in control at all times.
• Use lights and reective gear in low light situations.
• Inspect your bike often — especially the brakes.
• Seek maintenance if there are any notable changes in bike performance.
• Know and observe the rules of the road before cycling. Bike users must follow all
road rules.
• Ride defensively. To motorists, pedestrians, or even other cyclists, you are not as
visible as you might think. Always watch for hazardous situations, and be ready
to stop or take evasive action at all times. With the assistance of the electric
motor, you may be travelling faster than drivers expect—beware of cars pulling
out in front of you.
• Avoid road hazards. Watch for and avoid potholes, drain grates, railroad tracks,
loose road material, and other hazards.
• Use both the front and the rear brakes together for best performance. Using
ONLY the rear will signicantly increase your stopping distance.
delta_manual_final_single.indd 19 12/06/2017 14:11

20
EVELO.COM
As with any mechanical device or machine, you will get longer life and better
performance from your electric bicycle if you adhere to a basic maintenance schedule.
In addition to the items in the “Pre-Ride Checklist” section, we recommend the
following:
• Tires — Check tire pressure weekly. All bike tires lose air naturally over time.
• Chain — Lubricate the chain whenever it appears dry, and also every 200-400
miles depending on conditions. If you often ride in wet conditions, lubricate the
chain more often. Always wipe off excess lubrication, as it tends to attract dirt.
Replacing your chain every 2000 miles is recommended. Available at any bike
shop, “8 speed” chains are the correct replacements (the number of “speeds” a
chain is specied for actually denes the width of the chain.)
• Cables — Each month, visually inspect cable ends for fraying and replace if it is
present. Replace all cables and housings annually.
• Nuts and bolts — Check all nuts and bolts each month for tightness.
• Cleaning — Clean the bike whenever excess dirt is apparent. Avoid high-pressure
washing, especially near the motor, at places where wires enter/exit the frame, or
of the battery and wheel/crank bearings.
• Wheels — Check for straightness on a monthly basis, and more often if you have
experienced a rough ride or sudden impact. Have the wheels serviced if there is
notable side-to-side wobble or if any spokes are broken.
• Brakes — Inspect your brakes at least once per month. If a brake lever can be
squeezed all the way to the handlebar grip, there is a basic adjustment that can
be made. If your brakes are worn beyond this adjustment, either take the bike
to a local bike shop for professional service, or contact EVELO for additional
instructions.
• Tune-Up — We recommend a full-service tune-up annually by a professional
bicycle mechanic.
MAINTENANCE
OF YOUR EVELO ELECTRIC BICYCLE
delta_manual_final_single.indd 20 12/06/2017 14:11
Other manuals for Delta
1
Table of contents
Other Evelo Bicycle manuals


Evelo
Evelo Aurora User manual

Evelo
Evelo Atlas User manual

Evelo
Evelo QUEST User manual

Evelo
Evelo Omega User manual

Evelo
Evelo Omega User manual

Evelo
Evelo Delta User manual

Evelo
Evelo Aurora Limited Edition User manual

Evelo
Evelo Atlas User manual

Evelo
Evelo Compass User manual

Evelo
Evelo Galaxy SL User manual


