manuals.online logo
Brands
  1. Home
  2. •
  3. Brands
  4. •
  5. FV
  6. •
  7. Toilet
  8. •
  9. FV Ginebra E152 User manual

FV Ginebra E152 User manual

FV se reserva el derecho de modificar,
cambiar, mejorar y/o anular materiales,
productos y/o diseños sin previo aviso.
MEDIDAS SUGERIDAS PARA LA INSTALACIÓN (en cm):
Código:
Asegúrese que la persona que vaya a instalar el
producto
sea un profesional en la materia, para
prevenir
errores que afecten las instalaciones o
el correcto funcionamiento del producto
.
Realice
los ajuste del sanitario UTILIZANDO
una
herramienta adecuada para que la
s
uperficie y el acabado del producto no se raye
o lastime.
Recuerde
que todos los productos tienen un
mecanismo
de control que debe ser revisado y
cambiado
de ser necesario, ya que este puede
deteriorarse debido a la frecuencia de uso.
To
prevent any error that may affect the facilities
or
the correct functioning of the product, make
sure
that the person who is going to install the
p
roduct is a professional. Install the product
u
sing suitable tools, so that it is not scratched.
Remember
that all products have a control
mechanism that must be reviewed and changed
if
necessary, since it can deteriorate due to the
frequency of use.
RECOMENDACIONES:
RECOMMENDA
TIONS:
MEDIDAS / MEASURES:
Dimensiones en milímetros / Dimensions in millimeters
Dimensiones en pulgadas / Dimensions in inches
E150.2-COLOR
1
2
1
2
3
1
2
3
1
2
3
version anteiror
3
version anterior version anterior
E150.1-COLOR
E101.04-COLOR
330
305
12”
395
725
15” 9/16
28” 9/16
430
16” 15/16
710
27” 15/16
330
305
12”
395
725
15” 9/16
28” 9/16
430
16” 15/16
710
27” 15/16
150
13”
13”
5” 7/8
150
5” 7/8
330
305
12”
395
725
15” 9/16
28” 9/16
430
16” 15/16
710
27” 15/16
13”
150
5” 7/8
anterior septiembre 2011
anterior enero 2013
330
305
12”
395
725
15” 9/16
28” 9/16
430
16” 15/16
710
27” 15/16
330
305
12”
395
725
15” 9/16
28” 9/16
430
16” 15/16
710
27” 15/16
150
13”
13”
5” 7/8
150
5” 7/8
330
305
12”
395
725
15” 9/16
28” 9/16
430
16” 15/16
710
27” 15/16
13”
150
5” 7/8
anterior septiembre 2011
anterior enero 2013
1. Ubique el inodoro en la posición en la que irá, verifique la alineación del inodoro
respecto a la pared y posicione de acuerdo a las dimensiones indicadas en el
gráfico.
Verify the alignment of toilet regarding the wall and place it according to the dimen-
sions (see graphic). For drilling mark on the floor the hole's position.
LEA LAS INSTRUCCIONES COMPLETAMENTE ANTES DE INSTALAR / READ ALL INSTRUCTIONS BEFORE INSTALLING
3.
Retire el inodoro para perforar y colocar los tacos de jación EPER-DH (no
incluidos) para jar el inodoro al piso.
 Remove the toilet to drill and t the EPER-DH tting plugs (not included) to
attachthetoilettotheoor.
4- Voltee el inodoro sobre una superficie suave para no rasparlo y coloque el anillo de
cera en la salida del desagüe.
 Turnthetoiletaround(onitsring)overasoftsurfacesothatitwillnotbescraped
andinstallthewaxringinthedrainoutlet.
2. Marque en el piso los orificios para su fijación.
 Marktheholesinthefloortomounttheproductcorrectly.
INSTRUCCIONES DE INSTALACIÓN / INSTALLATION INSTRUCTIONS:
COLORES DISPONIBLES /
COLORS AVAILABLE:
• Azul Cielo / Skylight : AC
• Azul Mediterráneo /
MediterraneBlue : AM
• Blanco / White : BL
• Bone / Bone : BO
• Caribbean Shell : CS
• Ciprés / Cypress : CI
• Gris /Gray : GR
• Merlot : ME
• Negro / black : NE
• Verde Primavera /
Sea Foam : VP
llave angular F.V. /
F. V. angle valve
agujeros
para fijación /
fixation holes
1 cm
piso terminado /
nished oor
pared terminada / nished wall
30,5 cm
desagüe
del inodoro /
toilet draining
acometida de agua /
water connection
10 cm
10 cm
15,5 cm
30,5 cm
15 cm
15,5 cm
30,5 cm
15 cm
15,5 cm
30,5 cm
1 cm
piso terminado /
nished oor
pared terminada / nished wall
30,5 cm
desagüe
del inodoro /
toilet draining
acometida de agua /
water connection
10 cm
llave angular F.V. /
F. V. angle stop set
agujeros
para fijación /
fixation holes
15 cm
15,5 cm
30,5 cm
15 cm
15,5 cm
30,5 cm
1 cm
piso terminado /
nished oor
pared terminada / nished wall
30,5 cm
desagüe
del inodoro /
toilet draining
acometida de agua /
water connection
10 cm
llave angular F.V. /
F. V. angle stop set
agujeros
para fijación /
fixation holes
15 cm
15,5 cm
30,5 cm
15 cm
15,5 cm
30,5 cm
1 cm
piso terminado /
nished oor
pared terminada / nished wall
30,5 cm
desagüe
del inodoro /
toilet draining
acometida de agua /
water connection
10 cm
llave angular F.V. /
F. V. angle stop set
agujeros
para fijación /
fixation holes
E150.2.2
E150.2.1
E102.13
E152
Inodoro Ginebra / Toilet Ginebra
Fecha: 2017 - 09 - 11
FV - ÁREA ANDINA S.A. se reserva el derecho de modificar, cambiar, mejorar y/o anular materiales, productos y/o diseños sin previo aviso.
ECUADOR 1-800 FV FV FV (1-800 38 38 38)
Bogotá (57) 318 827 2964 / 315 335 0065
(51-1) 717 8744 / 715 3256
fvresponde@fvecuador.com
[email protected]
[email protected]
COLOMBIA
PERÚ
FV Responde
Centro de atención al usuario
Encuentre
Repuestos Legítimos FV y
la Garantía Total FV en:
www.fvandina.com
Encuentre
Repuestos Legítimos FV y
la Garantía Total FV en:
www.fvandina.com
NTE INEN 968
Sello de Calidad
Instituto Ecuatoriano de Normalización
NTE INEN 1571
Sello de Calidad
Sanitarios
Instituto Ecuatoriano de Normalización
Ajuste /
Tight up
Ajuste /
Tight up
Ajuste /
Tight up
2
3
ltro /
lter
4
Limpie /
Clean
8
Limpie el borde /
Clean the rim
flapper /
flapper
válvula de descarga /
flush valve
6
5
7
Calibre-Verifique el nivel
del agua / Calibrate-Verify
the water level
1
verifique que el cordel
de caucho no este
muy tenso / Verify that the
rubber string is not tight
Nota: En caso que no pase el agua al tanque, retire el
filtro, limpielo y vuelva a colocar en su sitio / Note: if
water dose not go into the tank remove the filter, clean it
up and put the filter back.
Asegure el tanque
al inodoro con los pernos
de anclaje / Fasten the tank
to the touilet bowl with the
screws.
empaque /
gasket
Verifique que la base
del flapper este en
buenas condiciones /
Verify that the base of
the flapper is in good
conditions
b
15 cm
15,5 cm
30,5 cm
15 cm
15,5 cm
30,5 cm
1 cm
piso terminado /
nished oor
pared terminada / nished wall
30,5 cm
desagüe
del inodoro /
toilet draining
acometida de agua /
water connection
10 cm
llave angular F.V. /
F. V. angle stop set
agujeros
para fijación /
fixation holes
15 cm
15,5 cm
30,5 cm
15 cm
15,5 cm
30,5 cm
1 cm
piso terminado /
nished oor
pared terminada / nished wall
30,5 cm
desagüe
del inodoro /
toilet draining
acometida de agua /
water connection
10 cm
llave angular F.V. /
F. V. angle stop set
agujeros
para fijación /
fixation holes
15 cm
15,5 cm
30,5 cm
15 cm
15,5 cm
30,5 cm
1 cm
piso terminado /
nished oor
pared terminada / nished wall
30,5 cm
desagüe
del inodoro /
toilet draining
acometida de agua /
water connection
10 cm
llave angular F.V. /
F. V. angle stop set
agujeros
para fijación /
fixation holes
Ref.: E266.02 DH CR
15 cm
15,5 cm
30,5 cm
15 cm
15,5 cm
30,5 cm
1 cm
piso terminado /
nished oor
pared terminada / nished wall
30,5 cm
desagüe
del inodoro /
toilet draining
acometida de agua /
water connection
10 cm
llave angular F.V. /
F. V. angle stop set
agujeros
para fijación /
fixation holes
Código: HT- 1030F
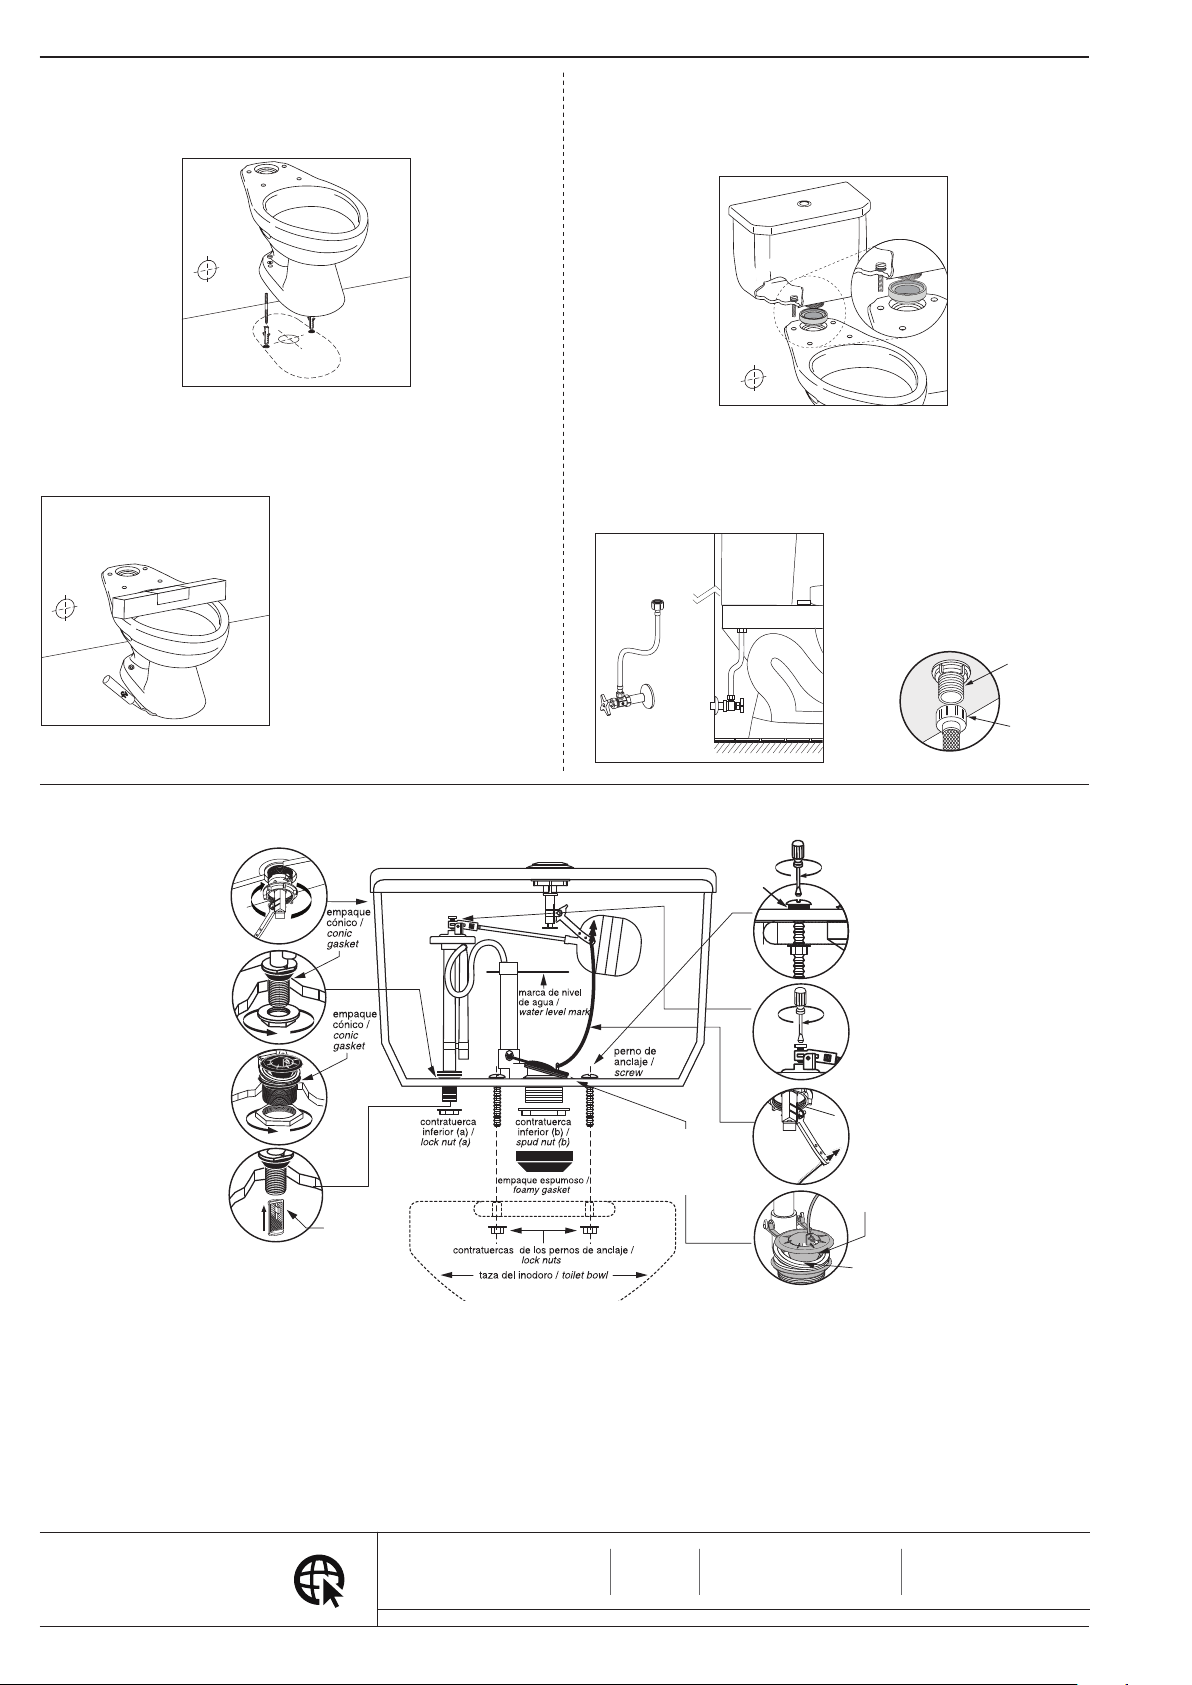
5. Coloque nuevamente el inodoro sobre el codo del desagüe, nivélelo y fíjelo al
piso con los tirafondos.
Placethetoiletoverthedrainagain,levelandsecureittotheoorwithscrews.
7. Instale el herraje al tanque (ver instrucciones en su embalaje). Coloque el em-
paque espumoso en la salida del herraje. Alinee el tanque sobre el inodoro y
fíjelo con los pernos de sujeción.
 Installthetankttings(seeinstructionsinthepackaging).Placethefoampack-
inginthetting’send.Alignthetankoverthetoiletandsecurewiththebolts.
8. Conecte la válvula de ingreso del tanque a la acometida de agua mediante una
llave angular FV con manguera exible, ref.: E266.02 DH CR (no incluida).Por
último, coloque el asiento en el inodoro.
 ConnectwatersupplytothetoiletvalveusingaF.V.angle valve with exible
hose ref. E266.02 DH CR, (notincluded).
6. Selle la unión entre el inodoro y el piso con un cordón de silicona.
Sealtheconnectionbetweenthetoiletandoorwithabeadofsiliconadhesive..
CONSEJOS DE MANTENIMIENTO / ADVICES MAINTAINANCE:
En caso de tener algún problema con el herraje verifique los siguientes puntos / Ifyouhaveanyproblemwiththefitting,pleaseverifythefollowingpoints:
Nota: el exceso de ajuste de la tuerca B
puede causar la ruptura de la válvula de
ingreso A.
Note: Over tightening screw B, can cause
rupture of the inlet valve A.
A
B
CONSEJOS DE MANTENIMIENTO
Los sanitarios F.V. son fabricados con porcelana sanitaria vitricada, cumpliendo
normas internacionales, garantizando así su larga vida útil. Por las características
propias de los materiales utilizados y la tecnología empleada en su desarrollo, se
limpian fácilmente evitando el desarrollo de gérmenes y hongos.
Realice la limpieza utilizando productos limpiadores y desinfectantes para baños
de marcas reconocidas. Ayúdese de una esponja o un paño húmedo. En lo posible
evite productos de limpieza fuertemente abrasivos. La porcelana sanitaria vitrica-
da no permite adherencias y las grasas se eliminan con facilidad.
La porcelana sanitaria mantiene el brillo propio de su esmalte sin necesidad de
pulimentos.
MAINTENANCE
F.V. productsaremadeofvitreoussanitaryware,meetinginternationalstandards
and ensuring durability. The characteristics of the materials and the technology
usedtomaketheproductshelpbypreventingthedevelopmentofgermsandfungi.
Cleantheproductusingcleaningagentsandbathroomantiseptics.Useasponge
ordampcloth.Ifpossibleavoidhighlyabrasivecleaningproducts.Sanitaryware
doesn´tallowadhesionsanditcanbeeasilywashed.
Thereisnoneedtopolishsanitarywarebecauseitwillalwaysmaintainitsshine.
Nota: No es recomendable usar cemento
mortero en la base del inodoro. La
Garantía FV no cubre inodoros instala-
dos con mortero.
Antes de instalar el tanque verifique que
la tubería de alimentación este limpia y
libre de impurezas y residuos de construc-
ción.
Note: Itis notadvisable to usecement in
the base of the toilet. The warranty
doesn't cover toilets installed with
cement.
TofixitBeforeinstallingthetank,verifythat
thefeedingpipeiscleanandfreeofsludge
andconstructionresiduals.

Other FV Toilet manuals

FV E112-E User manual

FV

FV E112-E User manual

FV Parma E157 User manual

FV

FV Parma E157 User manual

FV E113 User manual

FV

FV E113 User manual

FV Ginebra E152 User manual

FV

FV Ginebra E152 User manual

FV Ginebra E149 User manual

FV

FV Ginebra E149 User manual

FV E165 User manual

FV

FV E165 User manual

FV E181 User manual

FV

FV E181 User manual

FV Catania E194 User manual

FV

FV Catania E194 User manual

FV E158-E User manual

FV

FV E158-E User manual

FV Apolo E182 User manual

FV

FV Apolo E182 User manual

FV E470 User manual

FV

FV E470 User manual

FV Milan E116-E User manual

FV

FV Milan E116-E User manual

FV Ischia Plus E181 User manual

FV

FV Ischia Plus E181 User manual

FV Bellini E184 User manual

FV

FV Bellini E184 User manual

FV Victoria E170 User manual

FV

FV Victoria E170 User manual

FV E149 User manual

FV

FV E149 User manual

FV Trento E176 User manual

FV

FV Trento E176 User manual

FV Greco Touchless 4.8 L User manual

FV

FV Greco Touchless 4.8 L User manual

FV E183 User manual

FV

FV E183 User manual

FV E158-E User manual

FV

FV E158-E User manual

FV E181-S User manual

FV

FV E181-S User manual

FV A115-S User manual

FV

FV A115-S User manual

FV PARMA E157 User manual

FV

FV PARMA E157 User manual

FV Parma E157 User manual

FV

FV Parma E157 User manual

Popular Toilet manuals by other brands

Reece LAUFEN PALOMBA 9504210 quick start guide

Reece

Reece LAUFEN PALOMBA 9504210 quick start guide

SFA Sanifloor+ 3 installation instructions

SFA

SFA Sanifloor+ 3 installation instructions

CORONA Ecoclean Single O26011001 installation instructions

CORONA

CORONA Ecoclean Single O26011001 installation instructions

Delabie 110390 manual

Delabie

Delabie 110390 manual

Thetford Campa Potti Excellence user manual

Thetford

Thetford Campa Potti Excellence user manual

Roca IN-WASH INSPIRA SMART CC BTW A80306100R installation manual

Roca

Roca IN-WASH INSPIRA SMART CC BTW A80306100R installation manual

noken ACRO COMPACT 100251873-N380000059 manual

noken

noken ACRO COMPACT 100251873-N380000059 manual

Sustainable Solutions fluid installation instructions

Sustainable Solutions

Sustainable Solutions fluid installation instructions

Fresca VOLNA FTL2133 installation guide

Fresca

Fresca VOLNA FTL2133 installation guide

ICONICO WC 2 Installation and user manual

ICONICO

ICONICO WC 2 Installation and user manual

essential Lily EC1014 manual

essential

essential Lily EC1014 manual

nella MERA NBTA-52HSW installation instructions

nella

nella MERA NBTA-52HSW installation instructions

BEMIS bioBidet Prodigy P700 owner's manual

BEMIS

BEMIS bioBidet Prodigy P700 owner's manual

Laufen Antero H841150 manual

Laufen

Laufen Antero H841150 manual

Kohler K-4026T-2A-0 installation instructions

Kohler

Kohler K-4026T-2A-0 installation instructions

Toto CS761 Series installation manual

Toto

Toto CS761 Series installation manual

noken ACRO COMPACT I-SMART 100278528 manual

noken

noken ACRO COMPACT I-SMART 100278528 manual

BATHCO Oropesa 4565 manual

BATHCO

BATHCO Oropesa 4565 manual

manuals.online logo
manuals.online logoBrands
  • About & Mission
  • Contact us
  • Privacy Policy
  • Terms and Conditions

Copyright 2025 Manuals.Online. All Rights Reserved.