manuals.online logo
Brands
  1. Home
  2. •
  3. Brands
  4. •
  5. Gira
  6. •
  7. Accessories
  8. •
  9. Gira System 106 User manual

Gira System 106 User manual

Installation
instructions
1 x 1
Dimensions
1 x 3
1 x 4 1 x 5
220 mm
220 mm
330 mm
a
b
1 x 1 = 106,5 x 106,5 mm
1 x 2 = 106,5 x 213,0 mm
2 x 2 = 213,0 x 213,0 mm
1 x 3 = 106,5 x 319,5 mm
1 x 4 = 106,5 x 426,0 mm
1 x 5 = 106,5 x 532,5 mm
1 x 2 2 x 2
110 mm
110 mm
110 mm
a b
Scope of supply
01
02
03
04
05
06
07
08
1 x
1 x
1 x
2 x
1 x
1 x
1 x
1 x
Drilling template
Function carrier
Housing
Screw and dowel set
(ø 6 mm)
Safety bond
Bit holder and bit
Installation instructions
08
4020 05
06
Gehäuse Aufputz 1 bis 5fach
de
Gehäuse Aufputz 1 bis 5fach
fr
en
nl
03
07
01
Mounting examples
22 22
22 22
10 86 43 62 23/17
System 106
Surface-mounted housing
1- to 5-gang
5501 9..
5502 9..
5503 9..
5504 9..
5505 9..
5508 9..
For your safety
These instructions are part of the product and
must remain with the end customer.
Read the instructions before use and
observe the information.
Mounting example: surface-mounted housing,
2-gang.
Electrical devices may only be installed and
connected by a qualified electrician.
System cables and
terminating resistors
(from 2-gang housing)
en
Mounting preparation
1
1
1
1,5 m
item no. 5561 00 / 5567 00
1.
Mounting
Observe installation height and
cable length
2.
A
B
180°
3.
4.
5.
4x
System
TOP
System
„TOP“
System
TOP
System
Check the plug coding!
6.
2x2
7.
B
A
180°
ZV BUS
The video on installation can be found
here:
Observe rcommended mounting height for
camera (item no. 5561 00) or display module
(item no. 5567 00). Do not plan the
cable bushing for the connection cable at
the height of these modules!
Recommendation: Use lower bushing with
vertical mounting.
The connection cable should not be longer
than max. 1.5 x the length of the used
surface-mounted housing.
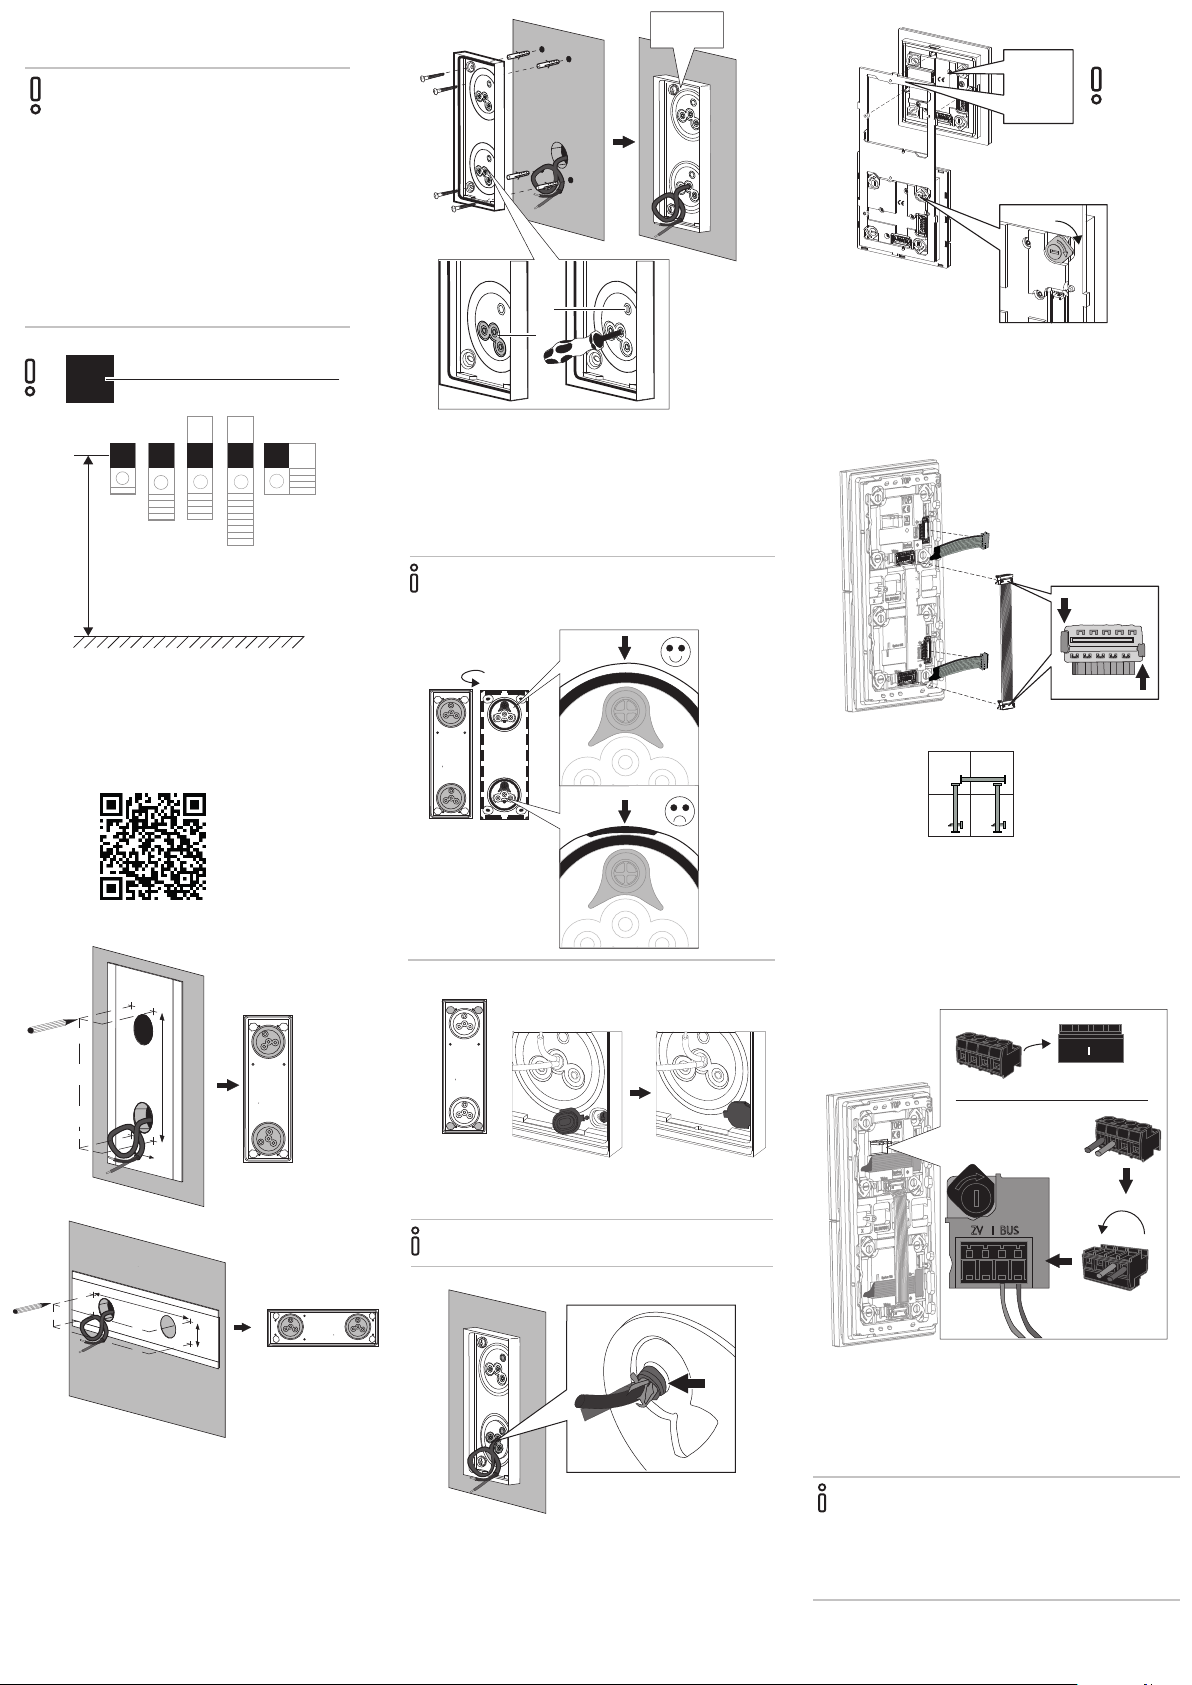
1. Align the drilling template with the markings
for cable entry according to the mounting
type (horizontal/vertical) and mark the drill
holes (ø 6mm). The included mounting
material is not suitable for thermal insulation
compound systems!
2. Don‘t remove the cable entry seals!
Select an opening (A) for cable entry and puncture
with a round object (do not cut crosswise).
Never use the membrane (B) for cable entry!
Completely feed the connection line through the
selected opening and install the surface-mounted
housing.
If the seal cap becomes detached during
installation: reinsert the seal cap and check
for proper seating to ensure tightness.
Firmly push wall fitting plug into the groove and
check for proper seating.
When using other screw types:
the screw heads may not protrude.
Strip insulation of the connection cable as close as
possible to the seal cap (see arrow).
The stripped part of the connection cable may not
be behind the seal cap as this does not guarantee
a functional seal.
Trim connection cable to length and connect to
plug terminal (A). Rotate plug terminal by
180° (B) and attach to the connector of the voice
module or door station module.
Attach the terminating resistors first, followed by
the system cable. Always connect a terminating
resistors to the first and last module on the
system cable.
Insert the modules into the function carrier
(observe TOP marking) and lock (slot screwdriver
4 x 0.8 mm). For detailed information on the
module please refer to the operating instructions
of the individual modules.
„TOP“
No bridges may be laid between BUS and ZV on
the module. The module automatically detects
whether an additional power supply is
connected.
No jumpers between BUS and ZV
8.
CLICK
9.
B
A
GIRA
Girsiepen GmbH & Co KG
Elektro-Installations-Systeme
Industriegebiet Mermbach
Dahlienstraße
42477 Radevormwald
Postfach 1220
42461 Radevormwald
Tel.: +49 2195 602 - 0
Fax: +49 2195 602 - 191
www.gira.de
[email protected]
Attach safety bond (l: 120 mm).
10.
Close surface-mounting housing using the
included bit and bit holder (keep for future use).
The bit holder shaft is slightly flexible and will
twist once the tightening torque of the lock screw
is reached.
After completed installation check all gap sizes for
tightness. The lock screw may not protrude.
Swivel the function carriers into the
surface-mounted housings (A). Do not pinch
any cables.
Pay attention to the position of the line material
and the safety bound!
With 4-gang and 5-gang surface-mounted
housings, observe additional snap lock (B).

Other Gira Accessories manuals

Gira 5472 02 User manual

Gira

Gira 5472 02 User manual

Gira 5466 02 User manual

Gira

Gira 5466 02 User manual

Gira 0551 4 Series User manual

Gira

Gira 0551 4 Series User manual

Gira KNX 5011 00 User manual

Gira

Gira KNX 5011 00 User manual

Gira 1170 Series User manual

Gira

Gira 1170 Series User manual

Gira KNX/EIB User manual

Gira

Gira KNX/EIB User manual

Gira 5069 00 User manual

Gira

Gira 5069 00 User manual

Gira 0873 00 User manual

Gira

Gira 0873 00 User manual

Gira Observer 70 User manual

Gira

Gira Observer 70 User manual

Gira Touch sensor 2 User manual

Gira

Gira Touch sensor 2 User manual

Gira EDA 3902 F User manual

Gira

Gira EDA 3902 F User manual

Gira CO2-Sensor User manual

Gira

Gira CO2-Sensor User manual

Gira 5112 00 Operator's manual

Gira

Gira 5112 00 Operator's manual

Gira 5472 02 User manual

Gira

Gira 5472 02 User manual

Gira 234902 User manual

Gira

Gira 234902 User manual

Gira 5466 02 User manual

Gira

Gira 5466 02 User manual

Gira Observer 110 User manual

Gira

Gira Observer 110 User manual

Gira 5111 00 User manual

Gira

Gira 5111 00 User manual

Gira 5142 00 Operator's manual

Gira

Gira 5142 00 Operator's manual

Gira 1025 00 User manual

Gira

Gira 1025 00 User manual

Gira 1493 00 User manual

Gira

Gira 1493 00 User manual

Gira System 55 Pushbutton sensor 4 Standard User manual

Gira

Gira System 55 Pushbutton sensor 4 Standard User manual

Gira 1117 00 User manual

Gira

Gira 1117 00 User manual

Gira 5461 02 User manual

Gira

Gira 5461 02 User manual

Popular Accessories manuals by other brands

ATN Night Cougar Specifications

ATN

ATN Night Cougar Specifications

Samsung SmartThings STS-PRS-250 quick start guide

Samsung

Samsung SmartThings STS-PRS-250 quick start guide

SOMFY animeo IB + installation guide

SOMFY

SOMFY animeo IB + installation guide

TGW NBS BR Installation, operation & maintenance manual

TGW

TGW NBS BR Installation, operation & maintenance manual

ATEN VS92A quick start guide

ATEN

ATEN VS92A quick start guide

Omnicomm LLS 5 manual

Omnicomm

Omnicomm LLS 5 manual

Baumer OADM 20I2472/S14C manual

Baumer

Baumer OADM 20I2472/S14C manual

HYTROL 199-CREZD Installation and maintenance manual

HYTROL

HYTROL 199-CREZD Installation and maintenance manual

Waterpik WF-20 Series user manual

Waterpik

Waterpik WF-20 Series user manual

Acer SP100 user guide

Acer

Acer SP100 user guide

PEWA Steinel SN-617011 operating instructions

PEWA

PEWA Steinel SN-617011 operating instructions

Ezviz T1 quick start guide

Ezviz

Ezviz T1 quick start guide

Veris Industries AG01E installation guide

Veris Industries

Veris Industries AG01E installation guide

Digital reasures PowerNow! 10000+ user guide

Digital reasures

Digital reasures PowerNow! 10000+ user guide

Panlux H-138-SL/M instructions

Panlux

Panlux H-138-SL/M instructions

KMC Controls STW-6010 installation guide

KMC Controls

KMC Controls STW-6010 installation guide

Baumer OBDM 12N6910/S35A manual

Baumer

Baumer OBDM 12N6910/S35A manual

Deponti Pigato User manual & assembly instructions

Deponti

Deponti Pigato User manual & assembly instructions

manuals.online logo
manuals.online logoBrands
  • About & Mission
  • Contact us
  • Privacy Policy
  • Terms and Conditions

Copyright 2025 Manuals.Online. All Rights Reserved.