Hanil M 13 User manual

Operation Manual
Micro Centrifuge
Date of purchase
Serial No.
M 13

Research Use Only
Contact Us
Copyrightⓒ2020 Hanil Scientic Inc. All rightsreserved.
If youhaveany questions,contact HanilScientic Inc. or placeof purchase.
techsupport@ihanil.com/sales@ihanil.com
UM-M13(E)(Rev.1), 20210122

Index
1. General Considerations -------------------------------------------------------- 4
1.1 Safety - 4
1.2 Transport & Storage - 5
1.3 Safety label - 5
1.4 Electric safety information - 5
2. Product Description ------------------------------------------------------------- 6
2.1 Appearance - 6
2.2 Delivery Package - 6
2.3 Technical Specications - 7
3. Installation ------------------------------------------------------------------------- 8
3.1 Packing Inspection - 8
3.2 Installation - 8
3.3 Connect Power - 9
3.4 Opeing/Closing the lid - 9
3.5 Loading and Removal of the Rotor - 10
3.6 Loading Tubes - 11
4. Operation -------------------------------------------------------------------------- 12
4.1 Control Panel - 12
4.2 Setting RPM - 13
4.3 Setting Run Time - 13
4.4 Starting/End the Centrifugation - 13
4.5 Pulse - 13
5. Maintenance ----------------------------------------------------------------------- 14
6. Troubleshooting - 15
6.1 General Errors - 15
7. Rotors and Accessories --------------------------------------------------------- 16

1. General Considerations
1.1 Safety
4 /20 www.ihanil.com
Follow precautionsand all the safetyrequirementsdescribed on this user manual to preventany
damages,failureof equipment and injury
1. The centrifugeshould be installedon atsurfaceto maintainlevel.
Abnormal vibrationis causedwhen the deviceis installedon an inclined surface.
2. Check the voltageto be used, beforeconnectingthe centrifugeto the powersource.
3. Only use rotors,parts,and accessoriesprovidedby Hanil Scientic Inc. Hanil Scientic Inc. is notresponsible
fordamagesof the deviceand accidentscausedby using partsand accessories
notrecommended.
4. Do notexceedthe maximum ratedspeed of the rotoror bucketsor accessoriesin use.
5. Makesureto preparenecessary safetymeasuresbeforeusing samples thataretoxicor radioactivesamples
or pathogenicor samples or infectiousblood.
6. If the centrifugeis contaminatedby toxicor radioactivesamples or infectiousblood samples, remove
contaminantscompletelyand takeneedful actionssuch as ventilationor isolationof centrifuge.
7. Substancesthatmay generatevolatileor explosivevaporcannotbe centrifuged.
8. The balancingworkof samples shoud be done in advancebeforeoperation.
9. Beforeoperation,rotorand chamber should be dry.
10. Do notattemptto slowor stopthe spinning rotorby hand.
11. Roter must be firmly tightned with a flat head screwdriver.
12. Do notblock vents.
13. Do notinsert foreignobjectsintothe holes of the device.
14. Repairsmustbe carriedout by atechnologistauthorizedby Hanil scientic Inc.
15. Accordingto IEC61010-2-020 maintaina30cm“clearanceenvelope”aroundthe centrifugewhile
the rotoris spinning.
16. Pleasecontactthe placeof purchase or Hanil Scientic Inc. (techsupport@ihanil.com/sales@ihanil.com)
forproductrepairs.
17. Turnthe powerswitcho afterusing the device.
18. Unplug the powerplug beforecleaningor left unused foralong period of time.

1. General Considerations
1.4 Electric safety information
Ambient temperature 5℃ ~ 35℃
Maximum relative humidity 30% ~ 85%
Air pressure 500 ~ 1060 hpa
1.3 Safety label
Risk of electric shock Rotation direction of the rotor.
5 /20
1. Useapowercordonly providedwith the device.
2. Usesocketswith aprotectiveearthconductorand suitablepowercord.
3. If extension cord is needed, make sure it its suitable for the device.
4. Do notplaceanything on the powercable
5. Do notblock vents.
6. If youhavethe followingemergencies,shut o the powersupply and unplug the powercordfromoutlet
and contactyourplaceof purchase or Hanil Scientic Inc.
-Unusual noises or smell fromthe device.
-Damageor wearof apowercord.
-Breakdownof circuitbreaker,fuse or safetydevice.
-If youspill liquid on the device.
-If centrifuge has been damaged.
1.2 Usage condition
Technical Enquires :+82-2-3452-8966/techsupport@ihanil.com
2. Product Description
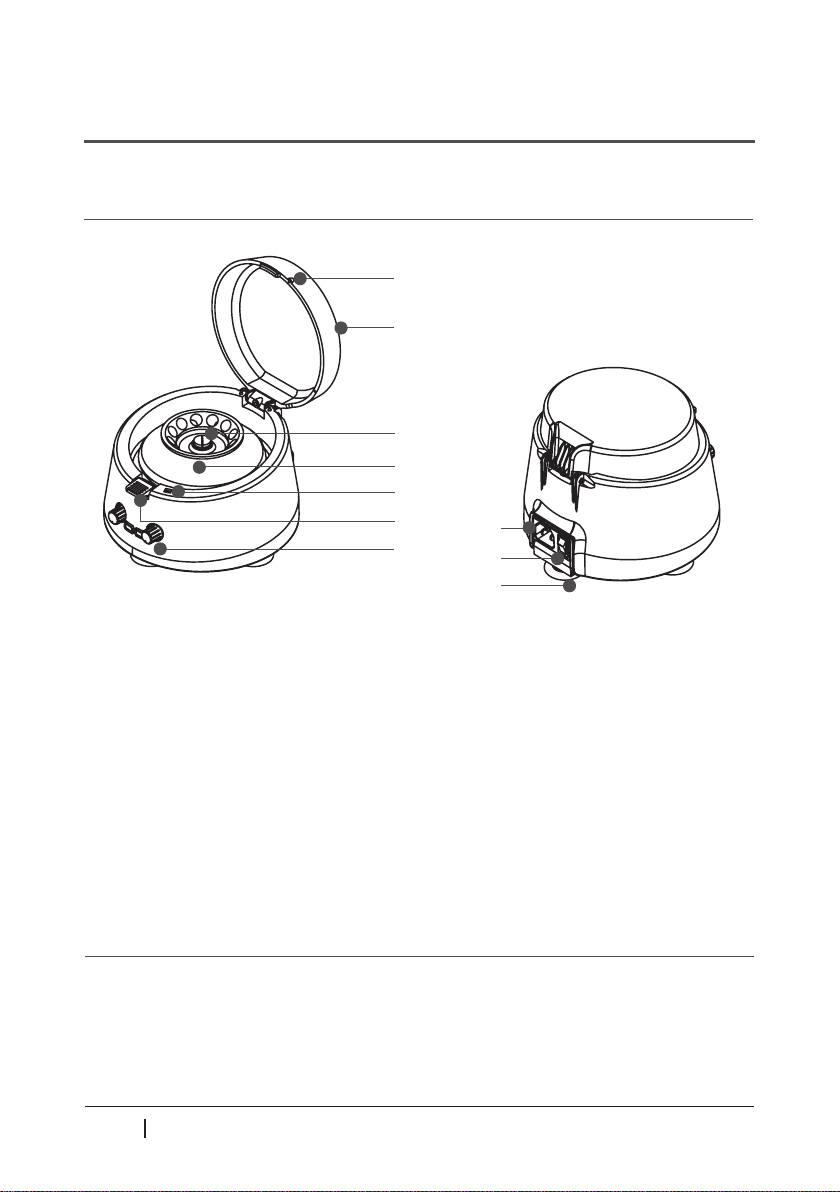
2.1 Appearance
①
②
⑥
⑤ ⑦
⑧
⑨
③
④
④
6 /20 www.ihanil.com
2.2 DeliveryPackage
① Lid : Lid protects samples inside the chamber,and protects rotor
from breaking away when danger.
②Rotorlocking screw : Screwconnectsthe rotorto the motorshaft.
③Rotor:Rotorholds the sample tubes.
④Lid sensor :Lid sensor detectswhetherlid is cloesd
⑤Lid open button:Pressthe buttonto open lid.
⑥ControlPanel:Keysand knobs foroperatingthe centrifuge.
⑦Powersocket:Socketis wherethe powercableconnected.
⑧Powerswitch:Switchallowsthe deviceto be turned on or o
⑨Absorbent rubber : Four rubber feet x the deviceon the laboratorybench.
①Standardoering
- M 13 main body
-Powercable
-Usermanual
②Optionalproducts[See Page 16 (7. Rotors&Acc.)]
- (A0.2-32) 32 x PCR tube or 4 x strip angle rotor
- (A 5.0 - 6) 6 x 5mL fixed angle rotor
- (A 2.0 - 12) 12 x 2mL fixed angle rotor
-0.5 ml tube adaptor for (A2.0- 12 rotor)
-0.2 ml tube adaptor for (A2.0- 12 rotor)

2. Product Description
Max. RCF 12,032 xg
Time ≤ 15 min, Pulse
Acc. time to max. speed ≤15 sec
Dec. time from max. speed ≤8 sec
Tube Capacity 1.5/2.0ml x 12
Power supply
Dimension (W x D x H, mm)
1.5
※ RCF Table
189 x202 x129
7 /20
*RCF value was calculatedbasedon the bottomof the rotorhole.
* RCF value can differ from the length of the tube inserted in the rotor.
AC110/220V,50/60Hz
Weight without rotor (kg)
2.3 TechnicalSpecications
6,000RPM - (A0.2 - 32), (A5.0 - 6)
13,500 RPM - (A2.0 - 12)
Max. RPM - (rotor)
※This devicedoes notprovideautomaticrecognitionof the rotor.
So do not exceed6,000 RPM when using the (A0.2 - 32, A5.0 - 6) rotor.
Technical Enquires : +82-2-3452-8966 /techsupport@ihanil.com

3. Installation
3.1 Packing Inspection
3.2 Installation
· Check packing conditions very carefully before unpacking.
· Contact Hanil Scientic Inc. immediately if damages found.
· Check the delivery for completeness.
Installation on hard and at ground.
• Centrifuge should be installed on hard and at place.
• If the centrifuge is installed in an inclined place, the shaft may be bent due to
the weight of the rotor.
Good ventailation.
• For air circulation and safety, maintain a 30cm“clearance envelope”around
the centrifuge while the rotor is spinning.
Constant temperature/humidity
• Centrifuge equipped with the sensitive electronic software which is fragile with
humidity and temperature.
• Must avoid direct ray or heater and be put in the ambience of controlled temp. and
air.
• Install the centrifuge in a place where corrosive gas is not generated.
• Sulfur dioxide gas and chlorine gas may cause corrosion.
Leveling
8 /20 www.ihanil.com
·Youcangetcontactdetailson packingboxor the bottom of the manual.
•The shaft should be put exactlyverticalon the horizontaliyatgroundby
the leveling tool.
Avoidcorrosivegas

3. Installation
3.3 Connect Power
3.4 Opeing/Closing the lid
· Connect the device to voltage sources which correspond to the electrical
requirements on the label attached to the device.
· Use sockets with a protective earth conductor and provided power cord.
Press the lid down until it clicks.
When lid is not closed completely, the device does not operate.
(O) (X)
1. Connect the power cable to the power socket on the back side of the device and
plug the cord into the power outlet.
2. Switch the centrifuge on using the power switch on the back side of the device.
1. Press the lid button to open the lid.
▶
Closing the lid : Press the lid down until it clicks.
9 /20
Technical Enquires : +82-2-3452-8966 /techsupport@ihanil.com
3. Installation
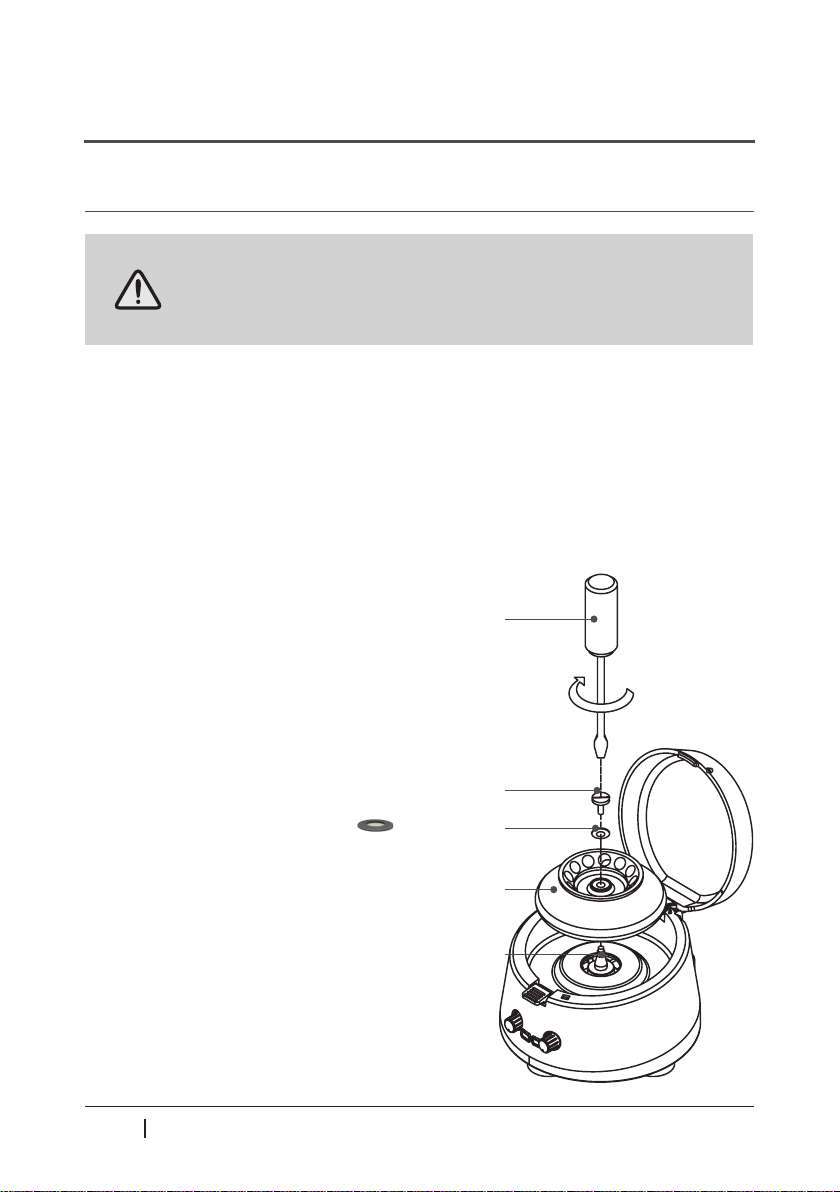
3.5 Loading and Removal of the Rotor
Follow the steps below to remove or replace the rotor.
Flat head screwdriver
Rotor lock screw
Rotor
Rotor Hub
10/20 www.ihanil.com
Tapered washer
1. Usingaatheadscrewdriver, turn the rotorlocking screwcounter-clockwiseand
pull it completelyout with the washerunder the screw.
2. Lift up the rotorfromthe motorshaft.
3. Loadthe rotorintothe motorshaft.
4. Align the washerwith the hole at the topof the rotor.
5. Insert the rotorlock screwintothe screwhole in the centerof the rotorand turn it
clockwise using aatheadscrewdriverto completelylock it.
6. Check thatthe rotoris completelylocked.
·This deviceis equipped with a rotor.
·Only use rotors,parts,and accessoriesprovided or validated by
Hanil Sciedntific Inc.
· Do not use defective rotor.

3. Installation
Correct
Arrangement
Wrong
Arrangement
11/20
3.6 Loadingtubes
1. Check the inside of the rotorhole formoistureor foreignmatters.
2. Tubesmustbe loadedsymmetrically.
·Alwaysuse the same type of tube .
·Tubesshould be loadedsymmetrically.
·Do notexceedthe maximum ratedspeed of the tube .
·Same volumeand density of sample should be put on tubes .
·Check symmetricloadingby balancingtubes with scales.
Technical Enquires : +82-2-3452-8966 /techsupport@ihanil.com
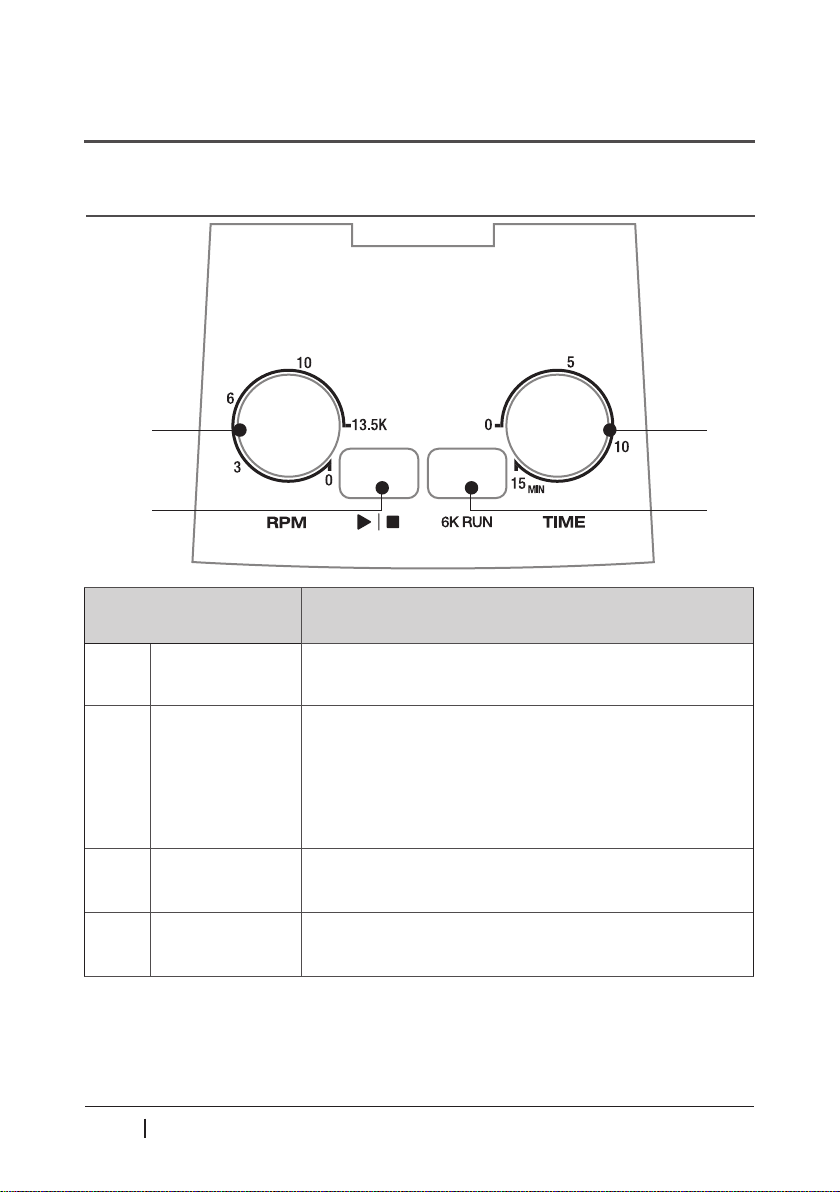
4.1 Control Panel
4. Operation
Button Description
①RPM setting knob
②Time setting knob
③Start /Stop button Start or stop the centrifugation.
④6K Run button
① ②
④
③
12/20 www.ihanil.com
M13
Rotateclockwise or counter-clockwiseto setthe run time.
(Touse pulse function,setthe time to '0' and pressthe start
key.)
Rotateclockwise or counter-clockwiseto setthe RPM value.
Afterloadingthe rotor,pressthis buttonto startoperationat
6,000 RPM
※When using aA0.2 -32(PCR striprotor) or A5.0 - 6 rotor do notexceed6,000RPM.

4.2 Setting RPM
[A2.0-12 rotor]
[Start]
[Stop]
[A0.2-32 rotor/A5.0-6 rotor]
4.3 Setting Run Time
4.4 Starting/End the Centrifugation
4.5 Pulse
4. Operation
13/20
1. Aftersettingthe RPM and run time, close the lid and pressthe startbutton.
▶If the lid is notcompletelyclosed, it will notoperate.
▶When the settime is over,the device will decelerate and stop with beeping sound.
1. While operation,pressthe Start/Stopbuttonto stopoperation.
▶While operation,rotatethe RPM settingknob to '0' to stopoperation.
▶When the lid opens during operation,operation will stop.
1. Rotate'Time settingknob' clockwise or counter-clockwiseto setthe run time.
▶ 0~15 min
1. Starting the centrifuge with setting the time knob to '0' will reach the RPM that is set
and decelerate to stop.
▶ Turning the RPM setting to '0' while centrifuge is operating, deceleration will progress to stop.
▶ Opening the lid while centrifuge is operating, deceleration will progress to stop with beeping sound.
1. Rotatethe 'RPM settingknob' clockwise or counter-clockwiseto setthe RPM value.
▶ 0~13,500 RPM
1. Pressthe 6K RUN buttonto startoperationat 6,000 RPM
▶Do notexceed6,000 RPM.
Technical Enquires : +82-2-3452-8966 /techsupport@ihanil.com

5. Maintenance
14/20 www.ihanil.com
1. Regularlyinspectthe rotorchamber and the motorshaft.
2. Rotatethe shaft with yourhand to makesureit rotates smoothly.
3. Usethe stopwatchto check the time settingfor accuracy
4. If yound any damages,do notuse the device.ContactHanil Scientic Inc.
5. Be carefulnotto getany foreignsubstanceson the sensor.
6. Check the rotorhole regularyforany foreignmaterials.
7. Useadamp clothand neutraldetergentto cleanand disinfectthe device and the rotor.

Problem Recommended Action
Power failure Check the power cord connection.
Error sound doesn't stop When opening the lid, error sound activated.
Press the 6K Run button to stop the error sound.
Lid cannot be opened Press the ‘Lid open button’.
Lid cannot be closed
Unusual noise and
vibration
Check the device whether it is installed on the hard and at place.
6. Troubleshooting
6.1 General Errors
15/20
Remove the dirt on the lid latchand close the lid again.
Check the lid latchfor damage.
Reloadthe rotorsymmetrically.
Reloadthe tubes symmetrically.
Tightenthe clamping of the rotor with flat head screw driver by
turning clockwise
Technical Enquires : +82-2-3452-8966 /techsupport@ihanil.com

7. Rotors and Accessories
12
x
1
.
5
/
2
.
0
ml
45o
Hole
diameter
(
m
m) :
11.5
Max
.
height
for
tube
t
(
mm
) :
48
Fixed Angle Rotor, A2.0-12
Tube
Tube capacity 0.2 ml 0.5 ml 1.5/2.0 ml
Adaptor None
Cat. No. TR0.2 TR0.5 -
Adaptor bore
(Фx L, mm) 6 x 21 8 x 37 -
Radius (mm) 44 54 59
Max. RPM 13,500
Max. RCF
(
xg)
8,965 11,003 12,032
Tube
Tube
capacity 0
.
2 ml 8
-
tube
PCR strip
Radius
(m
m)
Inner line : 31.13 ~ 44.06
Outer line : 46.13 ~ 55.68
Max
.
RPM 6
,
000
Max
.
RCF
(
xg)
Inner line : 1,773 / Outer line : 2,241
Tube
Tube
capacity 5.0 mL
Radius
(m
m)
52
Max
.
RPM 6,000
Max
.
RCF
(
xg)
2,616
4
x
8
-
tube
P
CR
s
trips, 32 x 0.2 ml
45o
Hole
diameter
(
m
m) :
6
.
5
6
x
5.0
ml
50o
Hole
diameter
(
m
m) :
16.5
Max
.
height
for
tube
t
(
mm
) :
60
PCR Rotor,
A0.2-32
Fixed Angle Rotor, A5.0-6
16/20 www.ihanil.com

MEMO
MEMO


RECYCLABLE
Doc.No. : UM-M13(E)(Rev.0)
Table of contents
Other Hanil Laboratory Equipment manuals

Hanil
Hanil Supra R30 User manual

Hanil
Hanil T04B User manual

Hanil
Hanil HyperVAC HVC-2124 User manual

Hanil
Hanil Component R12 User manual

Hanil
Hanil Fleta 5 User manual

Hanil
Hanil SeroSpin II User manual

Hanil
Hanil Smart R17 User manual

Hanil
Hanil J1250 User manual

Hanil
Hanil Component wR User manual

Hanil
Hanil Smart 13 User manual


