Hanil Smart R17 User manual
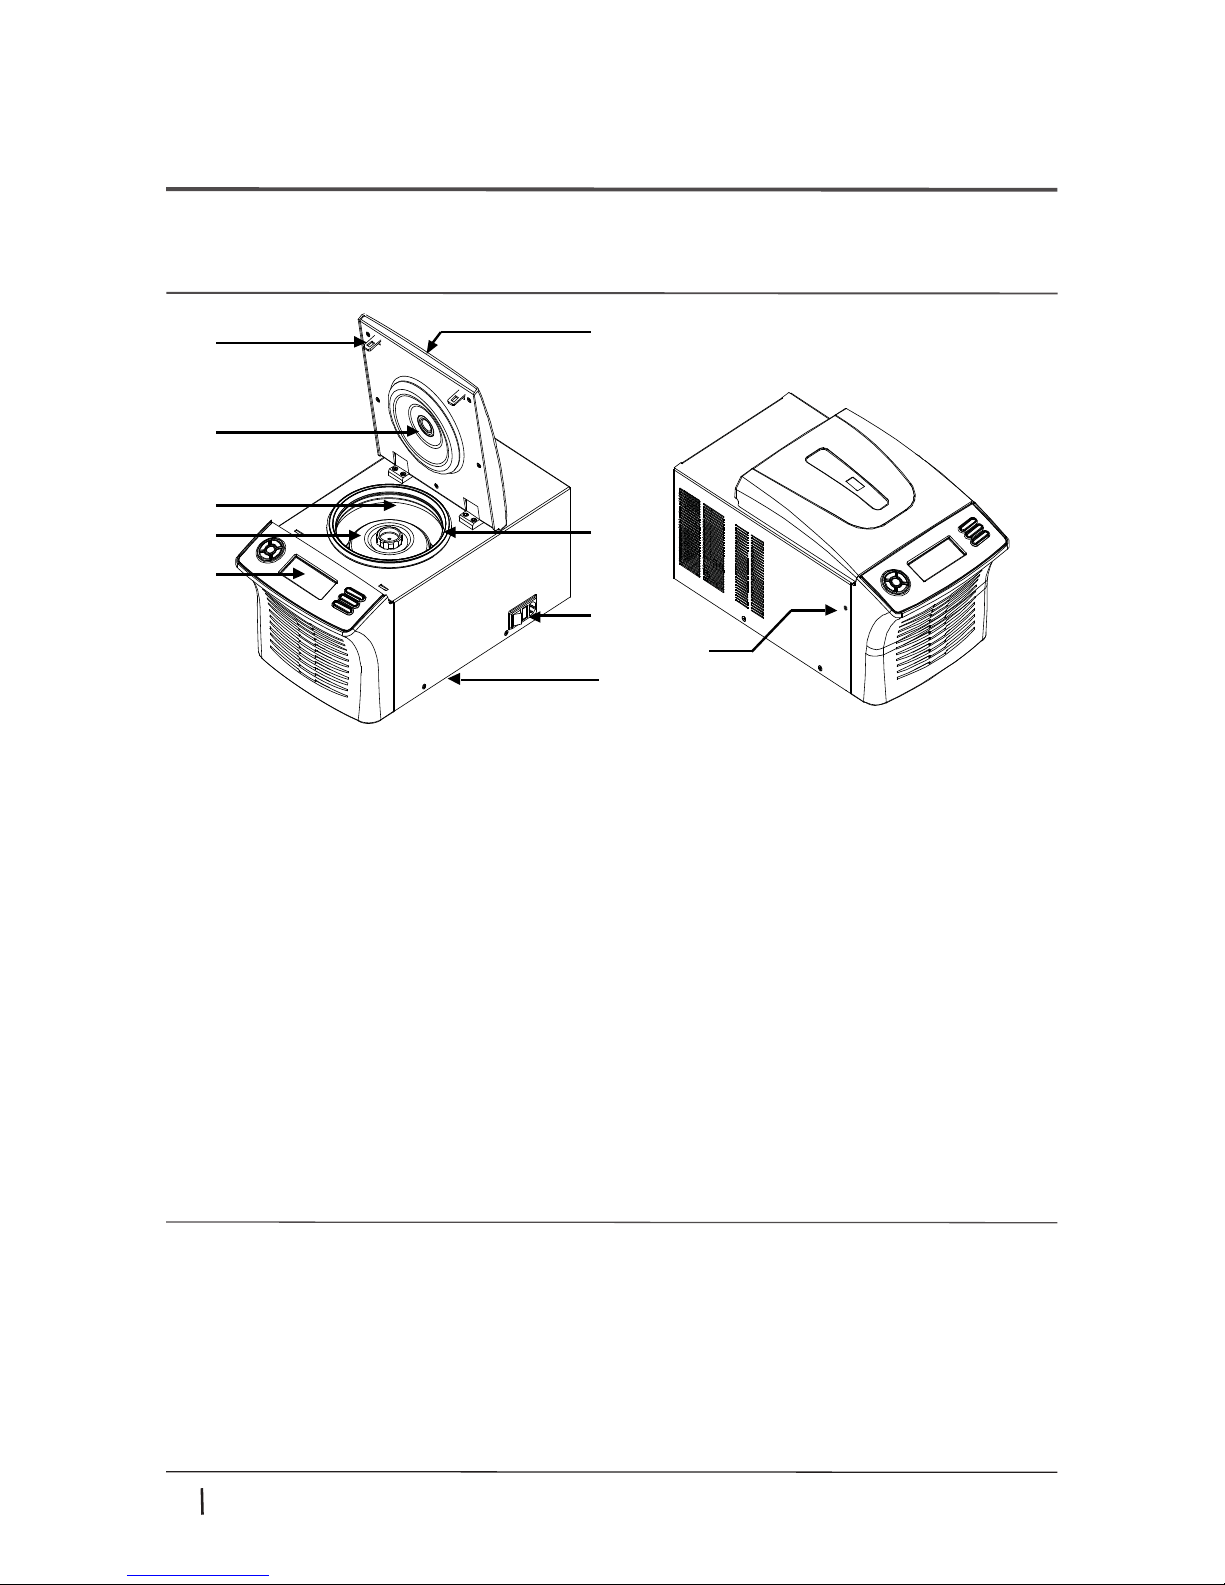
Operation Manual
Smart R17
Micro Centrifuge

CONTENTS
1. Safety Precautions -------------------------------------------------------
1.1 Safety requirements--------------------------------------------------
1.2 Using & Storage condition ------------------------------------------
1.3 Safety Label attached to products --------------------------------
2. Installation Directions ---------------------------------------------------
2.1 Packing Inspection ---------------------------------------------------
2.2 Installation directions -----------------------------------------------
2.3 Rotor --------------------------------------------------------------------
3. Inspection of Operation ------------------------------------------------
3.1 Appearance ------------------------------------------------------------
3.2 Components -----------------------------------------------------------
3.3 Specifications-----------------------------------------------------------
3.4 Controller ---------------------------------------------------------------
3.5 RPM/RCF Input --------------------------------------------------------
3.6 Time Input --------------------------------------------------------------
4. Cleaning and Maintenance -------------------------------------------
4.1 General check points --------- --------------------------------------
4.2 Cleaning ----------------------------------------------------------------
1.4 Electric safety information -----------------------------------------
3.7 Accel/Decel Setting --------------------------------------------------
5. Troubleshooting ----------------------------------------------------------
5.1 Warning signal --------------------------------------------------------
5.2 Emergency lid open system-----------------------------------------
6. Rotor and Accessories Guide -----------------------------------------
3
3
4
4
4
5
5
6
8
8
8
9
11
11
11
14
14
14
16
16
17
18
5
10
3.8 Temperature Setting ------------------------------------------------- 12
3.9 Short spin mode ------------------------------------------------------ 12
3.10 Fast Cool -------------------------------------------------------------- 12
3.11 Saving and Recalling Program ------------------------------------ 13

1. Safety Precautions
1.1 Safety requirements
Centrifuge involveselements of risk all the time as it utilizes a high speed body of rotation. Follow precautions and all the safety
Follow precautions and all the safety requirements described on this user manualto prevent any damage and failureof equipment
and loss of lives.
1.Centrifugeshould beplacedon flatplace to maintainlevel.Bigvibrationis caused by operation of equipment in thecondition
of spindleinclined.
2.Check voltageto be used before centrifugeisconnected to power supply.
Wrong voltagecan damage equipment.
3.Userotors provided by Hanil Science Industrial Co Ltdand use parts and accessories recommended.
HanilScience Industrial Co Ltd is not responsible for damages of equipment and accidentscaused by using partsand accessories
not recommended.
4.Understand property of matter fullyand take needful safety actions in case you perform centrifugation of dangerous materials
such as pathogenic, toxicand radioactive substances.
5.Remove contaminantscompletely andtake needful actionssuch asventilationor isolationof centrifuge in case centrifugeis
contaminated withdangerous materialssuch as pathogenic,toxic and radioactive substances.
6.Do not perform centrifugationof materialscapable of producingvolatileand explosible steam.
7.Do not operate equipment more thanmaximumRPM allowedby rotor installed.
8.Do not decelerate or stop rotor rotatingwithhands.
9.Rotor should be used after balancing of symmetry between weightof samples to be used.
10.Rotor shouldbe fixedintoshaft and itslidshouldbe tightenedcompletely.
Otherwise, the lid canbe taken off during rotation.
11.A trained and qualifiedtechnician should perform repairing directionsnot mentioning on thisuser manual.
12.User shouldremove contaminantscompletely in advancein case user requests repairs toa qualifiedtechnician.
13.Rotor and chamber should be kept dry allthe time before use of centrifugeto make long perioduse of centrifugeand maintain
thebest operatingconditions.
14.Payattentionthat aluminumrotor has a chemical reaction and starts to becorrosive ifaluminumrotor contacts laboratory
cleaning liquid, cesium, silver, and (especially chloride ion) of strong acid, strongly alkalineor strong alkali.
15.According to IEC61010-2-020, 30cmof a safe distance around centrifuge should be assured during operation.
Nothing shouldbe puton thissafe distance in case it is destroyed.
www.ihanil.com 3

1. Safety Precautions
Using condition
Room temperature within 5℃~ 35℃
Maximum relative humidity 30% ~ 85%
Air pressure 500 ~ 1060 hpa
Storage & transportation condition
Surrounding temperature -10℃~ 40℃
Relative humidity 10% ~ 90%
Air pressure 500 ~ 1060 hpa
1.2 Using & Storage condition
1.3 Safety Label attached to products
1.4 Electric safety information
2. Do not use an extension cord.
3. You canreceive an electric shock if you connect an earth wire of equipment wrong
4. Install equipment not to be stepped on a power cord.
5. Do not insert anything into a slot or hole of equipment
6. Do not block a ventilating opening
7. Ifyou have thefollowing emergencies, shut off thepower supply and pick out the power cord from outlet and contact our
customer services.
- Abnormal sound or smell from equipment
-Damage or wear of a power cord
-Breakdown of circuit breaker, fuse or safety device
-If you spill liquid on equipment
-If equipment is exposed to water
4www.ihanil.com
Contact an experienced electrician incase you check earthed system of electric outlet.
-If Some of equipment has been damaged
1. Use a power cord only provided with equipment
Mark indicating danger and warning
Mark indicating a place in danger of electric shock

2. Installation Directions
2.1 Packing Inspection
·Check packing conditions very carefully after arrival of centrifuge.
·Contact Hanil Science Industrial Co Ltd immediately if damages found .
· You can get contact details on packing boxes and outer cover of manual.
2.2 Installation directions
· Installation on hard and flat ground : Centrifuge should be installed on hard and flat
ground. In case centrifuge is located on incline place, spindle can be bent due to
heavy weight of rotor as centrifuge is rotating in condition of spindle inclined for long
period of time.
· Smooth air circulation : Centrifuge should be located in leaving 30cm of room from
both sides and the back for smooth air circulation. Especially, air circulation is not going smoothly
if air vent on the case is covered with cloth or blocked by other equipment.
Avoid dusty place to install centrifuge.
· Constant temperature and humidity : Centrifuge is influenced by external environment
such as temperature or humidity as it is controlled by a high degree of electromagnetic
controller. Do not install centrifuge close to direct light or heater.
Keep centrifuge in proper temperature and humidity.
· Place unable to produce corrosivegas : Install centrifugeon the place unable to produce
corrosivegas. Rotor and spindle can be corrosiveand metal parts can be damaged if
centrifuge contacts pyrosulfuricgas and chloric gas.
· Balancing : Centrifuge should be leveling for spindle of equipment to be vertical to the
ground. Balance a centrifuge by using a water level if required.
www.ihanil.com 5

2. Installation Directions
6www.ihanil.com
2.3 Rotor
·Rotor, tube rack(adapter), tube and adapter set recommended by manufacturer
should be used.
· Do not use rotor and bucket with a visible corrosion or mechanical fault.
·Waring! In danger of injury due to asymmetric installation of a rotor.
·Make sure a rotor is tightened up before start.
·Make sure a lid of rotor is tightened up before start.
·Make sure of tubes arrangement before start
- Same tube buckets and plates should be placed on a rotor symmetrically.
- Make sure of use of adapters with suitable tubes or plates.
- Make sure of use of same type (weight, material/density, volume) of tube or plate
all the time.
- Make sure you check balance of adapters, tubes or plates by using a scale and
they become symmetric.
• Clean a motor spindle and rotor holes with a dry cloth before you install a rotor.
• When you tighten a rotor on a motor spindle, temperature of a rotor and a motor spindle should be
between 10℃ and 30 ℃.
• Tighten a rotor screw turning clockwise with a hexagon wrench after you install a rotor on a
motor spindle.
• When you take a rotor out, turn a rotor screw counterclockwise with a hexagon wrench
Applying load to a rotor
• Tubes and adapter should be placed on a rotor symmetrically.
Recommended tubes should be only placed on a rotor.
• Weight difference between tubes containing samples should be as small as possible to minimize
noise and extend life of drive.
• Same type of tubes should be placed on a rotor due to a reason of mechanical stability.
• Clean rotor holes before you insert tubes.

Tubes arrangement
Same volume of sample should be put on tubes after you measure it exactly.
Tubes should be placed on a rotor symmetrically.
At this moment, if volume of symmetrical tube is different, a rotor and an axis of rotation can be
damaged due to severe vibration during rotation.
Location of centrifuge tubes facing each other should be symmetrical even though tube’s quantities
are same.
If tubes are not symmetrical in quantity, new tubes should be inserted to keep balance.
User is encouraged to use a scale to minimize the difference of volume between tubes containing
Samples.
In case you open tube’s lid for centrifugation by using a spin column, please lean tube’s lid against
the edge of a rotor for exact centrifugation and make sure type of tubes are same and close the lid
of rotor.
2. Installation Directions
This instruction should be applicable just in case you use tubes provided according to purpose of kit
manufacturer.
www.ihanil.com 7

3.Inspection of Operation
3.1 Appearance
①Lid: Lid protects the inside of the chamber and a rotor from coming out in danger
②Lid lock: This is a fixed part to keep the lid shut
③RPM measuring window: This is a part measuring speed of rotor by a digital tachometer
④Chamber: This is where a rotor is installed and it rotates
⑤Lid packing : This packing is to prevent dew condensation from the outside for refrigeration
⑥Rotor: This is connected to a spindle and rotates after you arrange tubes containing samples
⑦Controller: This is where you can set up data such as RPM, TIME, Temperature and etc.
⑧Power switch: This is where you can switch ON/OFF after you plug in
⑨Emergency Lid Open system: This is where you can open a lid manually in case of emergency
3.2 Components
①Smart R17 Main body
②Power cable
③User manual
④Rotor Locking Tool (T wrench)
⑤Extra fuse
⑥Optional Components : Rotor and Accessory ※ ① ~ ⑤: Built-in components
※ ⑥ : Optional Components, Purchase separately
⑩Drain : This is where sample or water flowed into the chamber is discharged
such as power failure
⑩
①
③
⑤
⑨
②
④
⑥
⑦
⑧
8 www.ihanil.com

3.Inspection of Operation
3.3 Specifications
17,000 rpm
Max. RPM
Max. RCF
Max. Capacity
Time
DEC ramps
Power supply
Dimension (W x D x H, mm)
Weight (kg)
Cat. No.
ACC ramps
1.5/2.0ml x 24 (Fixed Angle)
0.2ml x 32 (PCR Rotor)
23,005xg
99min 59sec
6 steps
6 steps
AC 220V, 60Hz
281 x 595 x 285 mm
30 (Without rotor)
Smart R17
www.ihanil.com 9

3. Inspection of operation
3.4 Controller
①
②
③
④
⑤
⑥
⑦
⑧
⑨
①
No. Button Function
②
③
⑤
④
⑥
⑦
⑧
⑨
Display
Up
Left
Right
Down
Fast Cool
Enter
Call/Save
Door
Start/Stop/
Short
Set-up information, operating condition is displayed.
This is to select program and to increase set value of program as the upper button of
direction key.
This isto select setting menu as left and right button of direction key.
1. This is to reduce set value of program and select programs as the lower button of
direction key.
2.This is for Fast Cool function.
This to practice the menus of various program.
This is to recall the stored programs and store programs according to
user‘s requests.
When you press Door button, a lid opens in its paused state.
This is to start or stop rotating and practice instantaneous rotation.
10 www.ihanil.com

3. Inspection of operation
3.5 RPM/RCF Input
1.In standby mode, press Setup/Enter ( ) button.
2. Press Left ( ) or Right ( ) button to change to rpm or rcf mode
4. Press the Setup/Enter ( ) button to save the settings.
3.6 Time Input
3. Press Up ( ) or Down ( ) button to input the setting value.
1.In standby mode, press Setup/Enter ( ) button.
2. Press Left ( ) or Right ( ) button to move to TIME position.
3. Press Up ( ) or Down ( ) button to change a set value.
4. Press the Setup/Enter ( ) button to complete.
▶You can set up time up to 99min 59sec.
3.7 Accel/Decel Setting
1.In standby mode, press Setup/Enter ( ) button.
2. Press Left ( ) or Right ( ) button to move to Accel/Decel position
3. Press Up ( ) or Down ( ) button to select a set value.
4. Press the Setup/Enter ( ) button to complete.
▶Accel/Decel step is 1 ~ 5.
▶Step 1 is the slowest and step 5 is the fastest.
▶Decel step as 0 means natural brake.
www.ihanil.com 11

3. Inspection of operation
3.8 Temperature Setting
1.In standby mode, press Setup/Enter ( ) button.
2. Press Left ( ) or Right ( ) button to move to TEMP position.
4. Press the Setup/Enter ( ) button to save the settings.
3.9 Short spin mode
12 www.ihanil.com
3. Press Up ( ) or Down ( ) button to input the setting value.
1.In standby mode, long press Start/Stop ( ) button.
3.10 Fast Cool
1.In standby mode, press down ( ) button for about 2 seconds.
▶A rotor rotates with 1,500RPM and if equipment reaches to the previously set temperature,
a rotor decelerates with very fast speed.
▶If a rotor stops, standby mode comes up.
▶Setting temperature is available from -10℃ to +40℃.
▶Centrifuge operates according to the previously set RPM.
▶It decelerates according to the previously set Decel value after it reaches to the set RPM
and it rotates for about 2 seconds.
This function is usually used for sample which is sensitive to temperature and this also performs
Reducing the temperature of a rotor before operation.

3. Inspection of operation
3.11 Saving and Recalling Program
Saving programs
1. Press Call/Save ( ) button.
2. Select program No. by pressing Up ( ), down ( ) button firstly and then,
press Call/Save ( ) button.
Recalling/inputting programs
1. In standby mode, press Call/Save ( ) button.
2. Press Up ( ), Down ( ) button to select No to recall.
3. Lastly press Call/Save ( ) button.
3. Press the Setup/Enter ( ) button to set menus.
▶The initial menu is to set RPM in set-up mode.
4. Input the desired RPM by pressing up ( ), down ( ) button.
▶If you press up/down button for about 2 seconds, it is changed to turbo function and numbers
goes up or down fast.
5. Press Left ( ) or Right ( ) button to enter Time, Temp, Accel, Decel, Rotor position and then,
press up ( ) and down ( ) button in put set values.
6. After inputting all the values, Press the Setup/Enter ( ) button to complete storing programs.
www.ihanil.com 13

4. Cleaning and Maintenance
4.1 General check points
Please check it out for followings
1. Shaft : Do not bend a shaft. Check whether they are worn out.
2. Motor bearing : check whether it makes noise or rotates smoothly.
3. Electrical connection : Check whether its connection is loosened.
4. Rotor : check whether it is cracked, cleaned and worn out.
4.2 Cleaning
Be sure to remove the plug from the outlet before cleaning.
Equipment outside
1. Clean the outside of equipment with a soft and dry cloth.
If the outside of equipment is contaminated, clean it with a soft soapy cloth.
Then, clean the outside of equipment with a dry cloth to remove water.
2. Do not use chemicals such as alcohol, benzene and thinner that can damage products.
Clean the damaged part with a cloth soaked with a good quality of a neutral detergent.
3. Make sure do not scratch the surface of equipment when cleaning it.
Do not use a metal sponge.
Make sure do not scratch the surface of equipment when moving it.
Equipment can be rusty if the surface of equipment is scratched.
4. If equipment becomes rusty as it is left with water for long after use, remove rust with a neutral
Detergent and clean it with a dry cloth.
Equipment inside
periodically for effective refrigeration function.
1. Rotor & chamber installed into a refrigerated centrifuge should be defrosted and cleaned
2. To defrost the chamber, firstly switch power off and clean the inside of the chamber with dry cloth.
3. After complete defrosting, clean the chamber with wet sponge or cloth.
Then, clean the chamber with water again and dry it completely.
14 www.ihanil.com

4. Cleaning and Maintenance
Rotor
If a rotor is exposed to acid or basic liquid, it gets damaged. In case rotor weight is imbalanced due
to corrosion, serious vibration and noise can happen when high speed rotating. Furthermore, it can
damage a drive shaft.
Rotor has good corrosion resistance in the atmosphere but its corrosion can be influenced by humidity,
salt content and impurities volume in the atmosphere.
Rotor is resistant to neutral aqueous solution such as carbonate, chromate, acetate and sulfide,
but it is not well resistant to chloride solution.
Also, its corrosion is getting faster due to increase in hydrogen ion concentration and it is eroded by
sulfuric acid and phosphoric acid and especially it is eroded faster by hydrochloric acid.
1. Corrosion of rotor and surface treatment
2. Rotor maintenance
Cleaning : In case a rotor is exposed to sample coming out of tube, clean it with a soft cloth soaked with
warm water immediately. At this moment, make sure do not scratch the surface treated specially.
Drying : Keep a narrow groove of a rotor dry with care. Hair dryer will be more effective for drying.
Keeping : Keep a rotor on a clean and dry place. Especially, a lid of angle rotor should be separated and
keep its body upside down.
Check sealing condition before use.
In case a lid screw of aerosol-tight rotor and sealing ring in pit parts are worn out, replace a rotor lid.
Check a sealing ring periodically to protect a rotor.
Keep aerosol-tight rotor with its lid loosened.
3. Aerosol-tightness
Rotor, its lid and bucket can be autoclaved (121℃, 20mins).
4. Rotor sterilization and disinfection
Drive shaft
1. To keep efficiency of refrigeration system, radiator should be protected from dust or other contaminant.
Otherwise, it can cause decline in refrigeration function.
You should clean radiator once every three months.
Waste disposal
1. This centrifuge should not be scraped for household and you are forced to comply with local wastes law.
www.ihanil.com 15

5. Troubleshooting
5.1 Warning signal
16 www.ihanil.com
Error Error message Cause Troubleshooting
E1 Imbalance
error
• Dissymmetrical placement of tubes.
• Irregular volume of sample in tubes.
• Loosened rotor to the shaft.
• Swaying or operation the unstable
ground.
• Check the tightness of rotor loading.
• Check the proper loading of tubes.
• Check the stable ground or worktable.
E2 Over speed • 2% over the set RPM.
• Incorrect tuning of motor and controller.
• Check controller and motor.
• Switch power on/off and re-start.
E3 Motor
overheat • Temp. hike inside of motor. • Check the stator of motor.
• Switch power off, restart after 1 hour.
E4 Low speed • Deficiency, not reaching 200RPM
within 2 secs.
• Check controller and motor.
• Switch power off and re-start.
E5 Door
open(Start) • Door open during operation. • Check door-in switch.
E6 Under
speed • 2% under the set RPM during operation. • Switch power off and re-start.
E7 System
error
• Error of controlling system.
• Overload of motor, damage of IPM
module.
• Switch power off and re-start.
• contact Hanil A/S center.
E8 Door
Open(Stop) • Door not open in the stop status. • Check door-in switch.
E9 Door Close
error • Door not close in the stop status. • Check door-in switch.
E10 Over Temp. • Over the pre set limit. • Re-set the preset value of the limit.
(The value of L-Cal of the preset menu)
E11 Temp.
Sensor
error
• Temp sensor connector has not
connected.
• Check the connection of mainboard
connector.
* Not satisfied with the above troubleshooting, contact Hanil customer service center.

5. Troubleshooting
5.2 Emergency lid open system
In case a lid closed due to power failure, activate emergency lid open system manually.
1.Switch off main power. Wait till a rotor stops through RPM measuring window.
2.As the below picture, Insert a flathead screwdriver into emergency lib open system on the left side of
the equipment.
3. Turn the flathead screwdriver clockwise to open the lid.
www.ihanil.com 17

6. Rotor and Accessories Guide
18 www.ihanil.com

7. 로터 및 액세서리 정보
www.ihanil.com 19

7. 로터 및 액세서리 정보
20 www.ihanil.com
Table of contents
Other Hanil Laboratory Equipment manuals

Hanil
Hanil Ultra 5.0 User manual

Hanil
Hanil J1250 User manual

Hanil
Hanil Cellspin II User manual

Hanil
Hanil Smart 15 Plus User manual

Hanil
Hanil Fleta5 User manual

Hanil
Hanil SeroSpin II User manual

Hanil
Hanil Smart 15 Plus User manual

Hanil
Hanil M 13 User manual

Hanil
Hanil Component R6 User manual

Hanil
Hanil Supra R17 User manual
Popular Laboratory Equipment manuals by other brands

Thermo Scientific
Thermo Scientific Heraeus Fresco 21 Instructions for use

Daihan Scientific
Daihan Scientific MaXtable H20 user manual

THORLABS
THORLABS TLX1 user guide

Peak Scientific
Peak Scientific MS Bench Series user manual

Thermo Scientific
Thermo Scientific 88882017 operating manual

Qiagen
Qiagen EZ1 Advanced XL quick start