manuals.online logo
Brands
  1. Home
  2. •
  3. Brands
  4. •
  5. HEIDENHAIN
  6. •
  7. Media Converter
  8. •
  9. HEIDENHAIN ECN 1325 EnDat22 User manual

HEIDENHAIN ECN 1325 EnDat22 User manual

Other manuals for ECN 1325 EnDat22

1

This manual suits for next models

1

Other HEIDENHAIN Media Converter manuals

HEIDENHAIN ERA 7480 User manual

HEIDENHAIN

HEIDENHAIN ERA 7480 User manual

HEIDENHAIN RON 785 User manual

HEIDENHAIN

HEIDENHAIN RON 785 User manual

HEIDENHAIN EIB 5000 User manual

HEIDENHAIN

HEIDENHAIN EIB 5000 User manual

HEIDENHAIN RON 785 User manual

HEIDENHAIN

HEIDENHAIN RON 785 User manual

HEIDENHAIN ERN 1385 User manual

HEIDENHAIN

HEIDENHAIN ERN 1385 User manual

HEIDENHAIN ERO 6070 User manual

HEIDENHAIN

HEIDENHAIN ERO 6070 User manual

HEIDENHAIN LC 2x1 User manual

HEIDENHAIN

HEIDENHAIN LC 2x1 User manual

HEIDENHAIN ECI 119 EnDat01 User manual

HEIDENHAIN

HEIDENHAIN ECI 119 EnDat01 User manual

HEIDENHAIN EnDat 2.2 Manual

HEIDENHAIN

HEIDENHAIN EnDat 2.2 Manual

HEIDENHAIN ECI 13 Series User manual

HEIDENHAIN

HEIDENHAIN ECI 13 Series User manual

HEIDENHAIN AK ECA 4410 User manual

HEIDENHAIN

HEIDENHAIN AK ECA 4410 User manual

HEIDENHAIN LIDA 475 User manual

HEIDENHAIN

HEIDENHAIN LIDA 475 User manual

HEIDENHAIN LS 1 7 Series User manual

HEIDENHAIN

HEIDENHAIN LS 1 7 Series User manual

HEIDENHAIN LIC 3107 User manual

HEIDENHAIN

HEIDENHAIN LIC 3107 User manual

HEIDENHAIN ROC 424 S User manual

HEIDENHAIN

HEIDENHAIN ROC 424 S User manual

HEIDENHAIN ND 220 User manual

HEIDENHAIN

HEIDENHAIN ND 220 User manual

HEIDENHAIN EIB 741 User manual

HEIDENHAIN

HEIDENHAIN EIB 741 User manual

HEIDENHAIN SRP 5000 User manual

HEIDENHAIN

HEIDENHAIN SRP 5000 User manual

HEIDENHAIN LC 2 1 Series User manual

HEIDENHAIN

HEIDENHAIN LC 2 1 Series User manual

HEIDENHAIN ECN 424S User manual

HEIDENHAIN

HEIDENHAIN ECN 424S User manual

HEIDENHAIN ECN 125 User manual

HEIDENHAIN

HEIDENHAIN ECN 125 User manual

HEIDENHAIN IK 5000 QUADRA-CHEK User manual

HEIDENHAIN

HEIDENHAIN IK 5000 QUADRA-CHEK User manual

HEIDENHAIN TTR ERM 2405 User manual

HEIDENHAIN

HEIDENHAIN TTR ERM 2405 User manual

HEIDENHAIN LIP 401R User manual

HEIDENHAIN

HEIDENHAIN LIP 401R User manual

Popular Media Converter manuals by other brands

SoundTraxx Blunami BLU-2200 user guide

SoundTraxx

SoundTraxx Blunami BLU-2200 user guide

SPROLINK VA1 user manual

SPROLINK

SPROLINK VA1 user manual

Acclaim Lighting DDC-1-AC user guide

Acclaim Lighting

Acclaim Lighting DDC-1-AC user guide

Nikon AF-S TC-20E III user manual

Nikon

Nikon AF-S TC-20E III user manual

Axis AXIS Q7406 user manual

Axis

Axis AXIS Q7406 user manual

Omega TAC80B-J instruction sheet

Omega

Omega TAC80B-J instruction sheet

Zoom Thunderbolt TAC-2R Operation manual

Zoom

Zoom Thunderbolt TAC-2R Operation manual

OST iConverter 10/100M quick start guide

OST

OST iConverter 10/100M quick start guide

Vertiv Netsure user manual

Vertiv

Vertiv Netsure user manual

birddog MINI user guide

birddog

birddog MINI user guide

Roland GI-10 owner's manual

Roland

Roland GI-10 owner's manual

Wallenstein WX310 Operator's manual

Wallenstein

Wallenstein WX310 Operator's manual

Pace MSS 200-1 Service manual

Pace

Pace MSS 200-1 Service manual

Solar Converters EQ 12/24-50 manual

Solar Converters

Solar Converters EQ 12/24-50 manual

CYP EL-7400V Operation manual

CYP

CYP EL-7400V Operation manual

TIE MIDI 1i1o user manual

TIE

TIE MIDI 1i1o user manual

DCS Vivaldi Upsampler user manual

DCS

DCS Vivaldi Upsampler user manual

Westermo MCW-211 SERIES user guide

Westermo

Westermo MCW-211 SERIES user guide

manuals.online logo
manuals.online logoBrands
  • About & Mission
  • Contact us
  • Privacy Policy
  • Terms and Conditions

Copyright 2025 Manuals.Online. All Rights Reserved.

DR. JOHANNES HEIDENHAIN GmbH
Technical support, measuring systems { +49 8669 31-3104 . E-mail [email protected]
572706-94 · Ver03 · Printed in Germany · 11/2012 · H
ECN 1325 EnDat22
EQN 1337 EnDat22
WELLA1 65B
KUPPA1 06
FOKAA1 37A, 37D
ANELA1 5MS16
BELEA1 C9
Absolute Drehgeber mit Eigenlagerung zum Einbau
in Motoren
Absolute rotary encoders with integral bearing
forintegration in motors
Capteur rotatif absolu avec roulement pour intégration
dans moteurs
Trasduttore rotativo assoluto con cuscinetto proprio
per il montaggio nei motori
Generador de impulsos rotativo absoluto para
instalación en motores
Lieferumfan :
Items supplied:
Objet de la fourniture:
Standard di fornitura:
Suministro:
Selbstsichernde Schraube
Self-locking screw
Vis de freinage interne
Vite autofilettante
Tornillo autofijante DIN 6912

M5x50

8.8
11/2012
Montageanleitung
Mounting Instructions
Instructions de montage
Istru ioni di montaggio
Instrucciones de montaje
*I_572706-94*
T = Temperatursensor
Temperature sensor
Sonde de température
Sensore di temperatura
Sensor de temperatura
KTY 84-130
2b 5a
6a
1b
U
P
Sensor
0V
0 V
6b 1a
Sensor
U
P
4b
DATA DATA CLOCK CLOCK
3a
X1 X2
2b
2a
/
/
1b
1a
T
T+
Nichtverwendete Pins oder Litzen dürfen nicht belegt werden!
Vacant pins or wires must not be used!
Les plots ou fils non utilisés ne doivent pas être raccordés!
I pin o i fili inutili ati non devono essere occupati!
¡No conectar los pins o hilos no utilizados!
Anschlussbele un
Pin Layout
Raccordements
Piedinatura
Distribución del conector
Nullposition Welle - Kappe
Zero position for shaft/cap alignment
Position zéro arbre - capot
Zero posi ione albero-cappellotto
Posición cero eje - cubierta
Störquellen
Noise sources
Sources parasites
Sorgenti didisturbo
Fuentes de interferencias
> 100 mm
M
> 100 mm > 200 mm
Zwei Varianten für elektrischen Anschluss
Two variants for electrical connection
Deux variantes pour la connexion électrique
Due varianti per collegamento elettrico
Dos variantes para la conexión eléctrica
Eindrücken und auf Anschlag schieben
Press in and slide to the fixed stop
Enfoncer et pousser jusquà la butée
Premere e far scivolare fino alla battuta
Romper y desplazar hasta el tope
2.
a)
1.
3.
Md = 5+0.5 Nm
a), b)
*)
a) b)
*)*)
Demontage in umgekehrter Reihenfolge
Disassembly in reverse order
Demontage dans l'ordre inverse
Smontaggio in sequen a inversa
Desmontaje en orden contrario
2.
b)
20°...30°
Crimphülse einschieben
Insert the crimp sleeve
Intercaler la douille à sertir
Far scorrere la bussola crimpare
Encajar el casquillo de engarzar
Kabel mit leichter Kraft eindrücken
Gently press in the cable
Enfoncer légèrement le câble
Inserire il cavo con delicate a
¡Apretar el cable sin forzar
Außenschirm auf Gehäuse
External shield on housing
Blindage externe sur boîtìer
Schermo esterno sulla carcassa
Blindaje externo a carcasa
All emeine Hinweise
General Information
Informations énérales
Informazioni generali
Información eneral
Separat bestellen Montagezubehör
Order separately: Mounting accessories
Commander séparément Accessoires de montage
Ordinare separatamente: Accessori per il montaggio
Pedir por separado Accesorios de montaje
SW4
ID 350378-14
SW2
ID 350378-03
123456
a
b
a
d
12
X1 X2
Die Sensorleitung ist intern im Messgerät mit der Versorgungsleitung verbunden.
The sensor line is connected inside the encoder to the supply line.
La ligne de palpeur est reliée de manière interne dans le système de mesure à la ligne d'alimentation.
La linea del sensore è collegata internamente allo strumento di misura con la linea di alimenta ione.
La línea de sensor está unida internamente en el aparato de medida con la línea de alimentación.
Schraubensicherung nicht entfernen, Schraube muss sauber und fettfrei sein.
Do not remove thread-locking compound. Screw must be clean and free of grease.
Ne pas enlever la sécurité frein de la vis, La vis doit être propre et sans graisse.
Non rimuovere la sicura delle viti. La vite deve essere pulita e priva di grasso.
No extraer el seguro del tornillo, el tornillo debe estar limpio y sin grasa.
Warnhinweise
Warnings
Recommandtions
vvertenze
Advertencias
Monta e
ssembly
Monta e
Montaggio
Montaje
Demonta e in um ekehrter Reihenfol e
Disassembly in reverse order
Demonta e dans l'ordre inverse
Smontaggio in sequenza inversa
Desmontaje en orden contrario
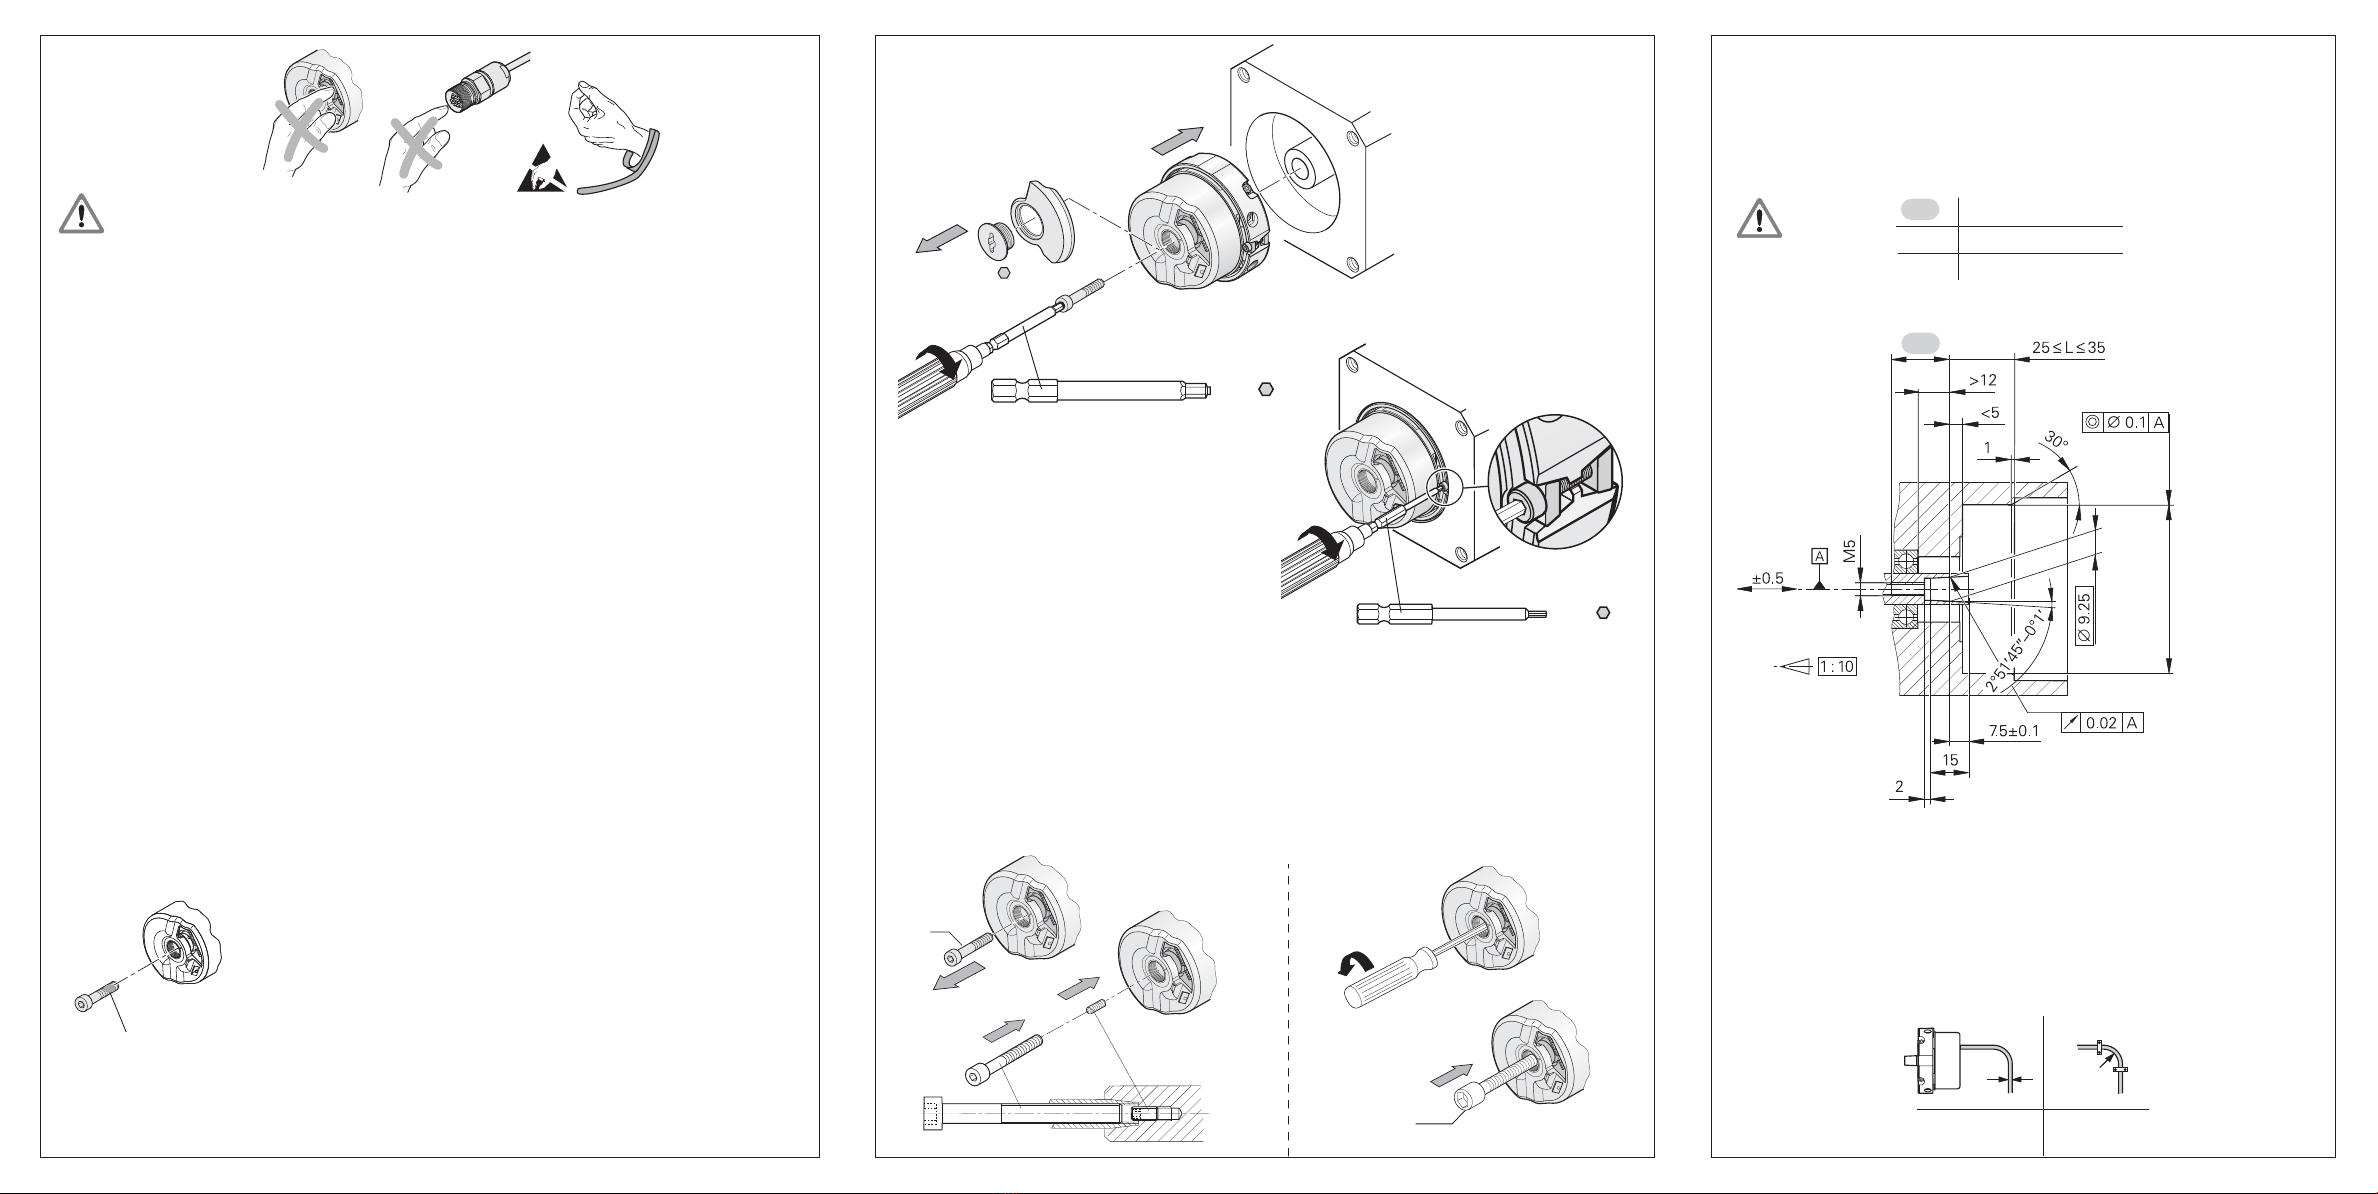
Zwei Möglichkeiten zum Abdrücken während der Demontage des Drehgebers
Two ways of pressing the encoder out during dismounting
Deux possibilités de démontage du capteur rotatif
Due possibilità di smontaggio dellencoder
Dos posibilidades de aflojar durante el desmontaje del encoder
b)
M5x10
M6x70
a)
M5
M10
360° .... 720°
b)
a)
SW4
ID 350378-14
DIN 6912

M5

8.8
Md = 5+0.5 Nm
2.
1.
SW3/SW4
3.
Biegeradius R
Bending radius R
Rayon de courbure R
Piegatura R
Radio de curvatura RØ 4.5 mm R1  18 mm
ØR1
Kundenseiti e Anschlussmaße (mm)
Required mating dimensions (mm)
Conditions requises pour le monta e (mm)
Quote per il montaggio (mm)
Cotas de montaje requeridas (mm)
A =Lagerung
Bearing
Roulement
Cuscinetto
Rodamiento
M5
x
50 DIN 6912-8.8
M5
x
47 DIN 6912-8.8
 22
19... 22
Vorsicht
ttention
Attention
ttenzione
Atención
L
¬ 65
+0.1
0
L
e
4.
Md = 1.250.2 Nm
SW2
ID 350378-03
Achtun : Die Montage und Inbetriebnahme ist von einer qualifizierten Fachkraft unter Beachtung der
örtlichen Sicherheitsvorschriften vorzunehmen.
Zusätzlich muss der Maschinenhersteller/-konstrukteur die erforderlichen weiteren Angaben zur End-
montage (z.B. Losdrehsicherung für Schrauben ja/nein) für die jeweilige Anwendung selbst festlegen.
Die Steckverbindung darf nur spannungsfrei verbunden oder gelöst werden.
Die Anlage muss spannungsfrei geschaltet sein!
Note: Mounting and commissioning is to be conducted by a qualified specialist under compliance with
local safety regulations.
In addition to this, the machine manufacturer or designer himself must define the other data required for
final assembly (e.g. anti-rotation lock for screws required or not) for the respective application.
Do not engage or disengage any connections while under power.
The system must be disconnected from power.
Attention: le montage et la mise en service doivent être assurés par un personnel qualifié dans le
respect des consignes de sécurité locales.
Dautre part, le fabricant/constructeur de la machine doit définir dautres données nécessaires au
montage final (p.ex. sécurité frein de vis oui/non) pour l´application respective.
Le connecteur ne doit être connecté ou déconnecté quhors potentiel.
Léquipement doit être connecté hors potentiel!
ttenzione: Il montaggio e la messa in fun ione devono essere eseguite da personale qualifucato nel
rispetto delle norme di sicure a locali.
Inoltre, il costruttore della macchina deve definire le ulteriori procedure necessarie per completare il
montaggio (ad esempio: sicure a allentamento viti sì/no) di ogni specifica applica ione.
I cavi posso essere collegati o scollegati solo in assen a di tensione.
Limpianto deve essere spento!
Atención: El montaje y la puesta en marcha deben ser realizados por un especialista cualificado,
observando las prescripciones locales de seguridad.
Adicionalmente, el fabricante/constructor de la máquina debe determinar él mismo el resto de indicaciones
requeridas para el montaje final para cada aplicación en particular (p.ej., seguro antigiro para tornillos sí/no).
Conectar o desconectar el conector sólo en ausencia de tensión.
¡La instalación debe ser conectada en ausencia de tensión!