Warranty
Warranty malfunctions occurring under conditions of nor-
mal use in conformity with the Instruction Manual and
Product Precautionary Markings will be repaired free of
charge.Thiswarrantyis validfora periodof three(3)years
from the date of purchase. Please contact the distributor
from which you purchased the product for further informa-
tion on warranty provisions.
Introduction
Thank you for purchasing the HIOKI 9699 SMD TEST FIX-
TURE. To obtain maximum performance from the product,
please read this manual first, and keep it handy for future
reference.
This HIOKI 9699 SMD TEST FIXTURE can be directly
connected to the measurement terminals (UNKNOWN) of
the HIOKI LCR HiTESTERs for testing a SMD compo-
nent.
Please check a HIOKI catalog for instruments to which this
product can be connected.
Initial Inspection
When you receive the product, inspect it carefully to en-
sure that no damage occurred during shipping. If damage
is evident, or if it fails to operate according to the specifi-
cations, contact your dealer or HIOKI representative.
Preliminary Checks
• Before using the product the first time, verify that it oper-
ates normally to ensure that the no damage occurred
during storage or shipping. If you find any damage, con-
tact your dealer or Hioki representative.
Maintenance and Service
• To clean the product, wipe it gently with a soft cloth
moistened with water or mild detergent. Never use sol-
vents such as benzene, alcohol, acetone, ether,
ketones, thinners or gasoline, as they can deform and
discolor the case.
• If the product seems to be malfunctioning, contact your
dealer or Hioki representative. Pack the product care-
fully so that it will not be damaged during shipment, and
include a detailed written description of the problem.
Hioki cannot be responsible for damage that occurs dur-
ing shipment.
Follow these precautions to ensure safe operation and to
obtain the full benefits of the various functions.
Safety Symbol
The following symbols in this manual indicate the relative
importance of cautions and warnings.
Plug the fixture into the measurement terminals (UN-
KNOWN) of the tester, with the product name up. Fasten
it in place with the left and right fixing levers.
• Samples you can clamp must be 1 to 4 mm in width and
1.5 mm in height.
• Be careful to keep dirt away from the clamping portion.
To enhance the accuracy of measurement, perform the
open and short circuit compensation.
Procedures for connecting and using this product vary ac-
cording to the instrument with which it is used. Refer to the
instruction manual for the specific instrument.
Open circuit compensation
Remove the sample from the sample clamping portion to
open the high and low terminal circuits.
Short circuit compensation
Overview
Specifications
Measurement frequency
range DC to 120 MHz
Maximum apply voltage ±40 VDC
Dimensions of sample to
be tested Width:1 mm to 4 mm (0.04” to 0.16”)
Height: 1.5 mm (0.06”) or less
Residual resistance
Short-circuited 100 mΩ max. (at 100 Hz)
Floating capacitance
between terminals 2 pF max. (at 1 MHz)
Dimensions and Mass Approx.100.5W x 28.6H x 40D mm
(3.96”W x 1.13”H x 1.57”D)
(excluding protrusions),
Approx.125 g (4.4 oz.)
9699
SMD TEST FIXTURE
Instruction Manual
Aug. 2018 Revised edition 3 Printed in Japan
9699A980-03 18-08H
EN
Operating temperature
and humidity range 0 to 40°C (32 to 104
°F)
, 80% RH or
less (with no condensation)
Storage temperature and
humidity range -10°C to 55°C (14 to 131
°F)
, 80% RH
or less (with no condensation)
Operating environment Indoors, altitude up to 2000 m
(6562-ft.)
Accessories Instruction Manual, short bar
Product warranty period 3 years
Inspection and Maintenance
Safety
Mishandling during use could result in injury or
death, as well as damage to the product. Be certain
that you understand the instructions and precau-
tions in the manual before use. We disclaim any
responsibility for accidents or injuries not resulting
directly from product defects.
In the manual, the symbol indicates particu-
larly important information that the user should
read before using the product.
Indicates that incorrect operation presents a
significant hazard that could result in serious
injury or death to the user.
Indicates that incorrect operation presents a
possibility of injury to the user or damage to
the product.
Advisory items related to performance or cor-
rect operation of the product.
Usage Notes
• Do not store or use the product where it could be ex-
posed to direct sunlight, high temperature or humidity,
or condensation. Under such conditions, the product
may be damaged and insulation may deteriorate so
that it no longer meets specifications.
• Donotuse the product where it maybe exposed to cor-
rosive or combustible gases. The product may be dam-
aged.
• This product is not designed to be entirely water- or
dust-proof. To avoid damage, do not use it in a wet or
dusty environment.
• To avoid damage to the product, protect it from vibra-
tion or shock during transport and handling, and be es-
pecially careful to avoid dropping.
• If the fixture has gotten seriously wet, oily, or dusty,
stop using it and send it for service at an approved
HIOKI service facility.
• Please refer to the instruction manual for the instru-
ment to which this product is connected for how to use
the instrument and apply direct current voltage.
Parts Names
Connecting the Test Fixture
Knob
Positioning slider
Stopper
Connecting
terminals
Sample clamping
portion
Sample fixing
cover
Fixing
lever
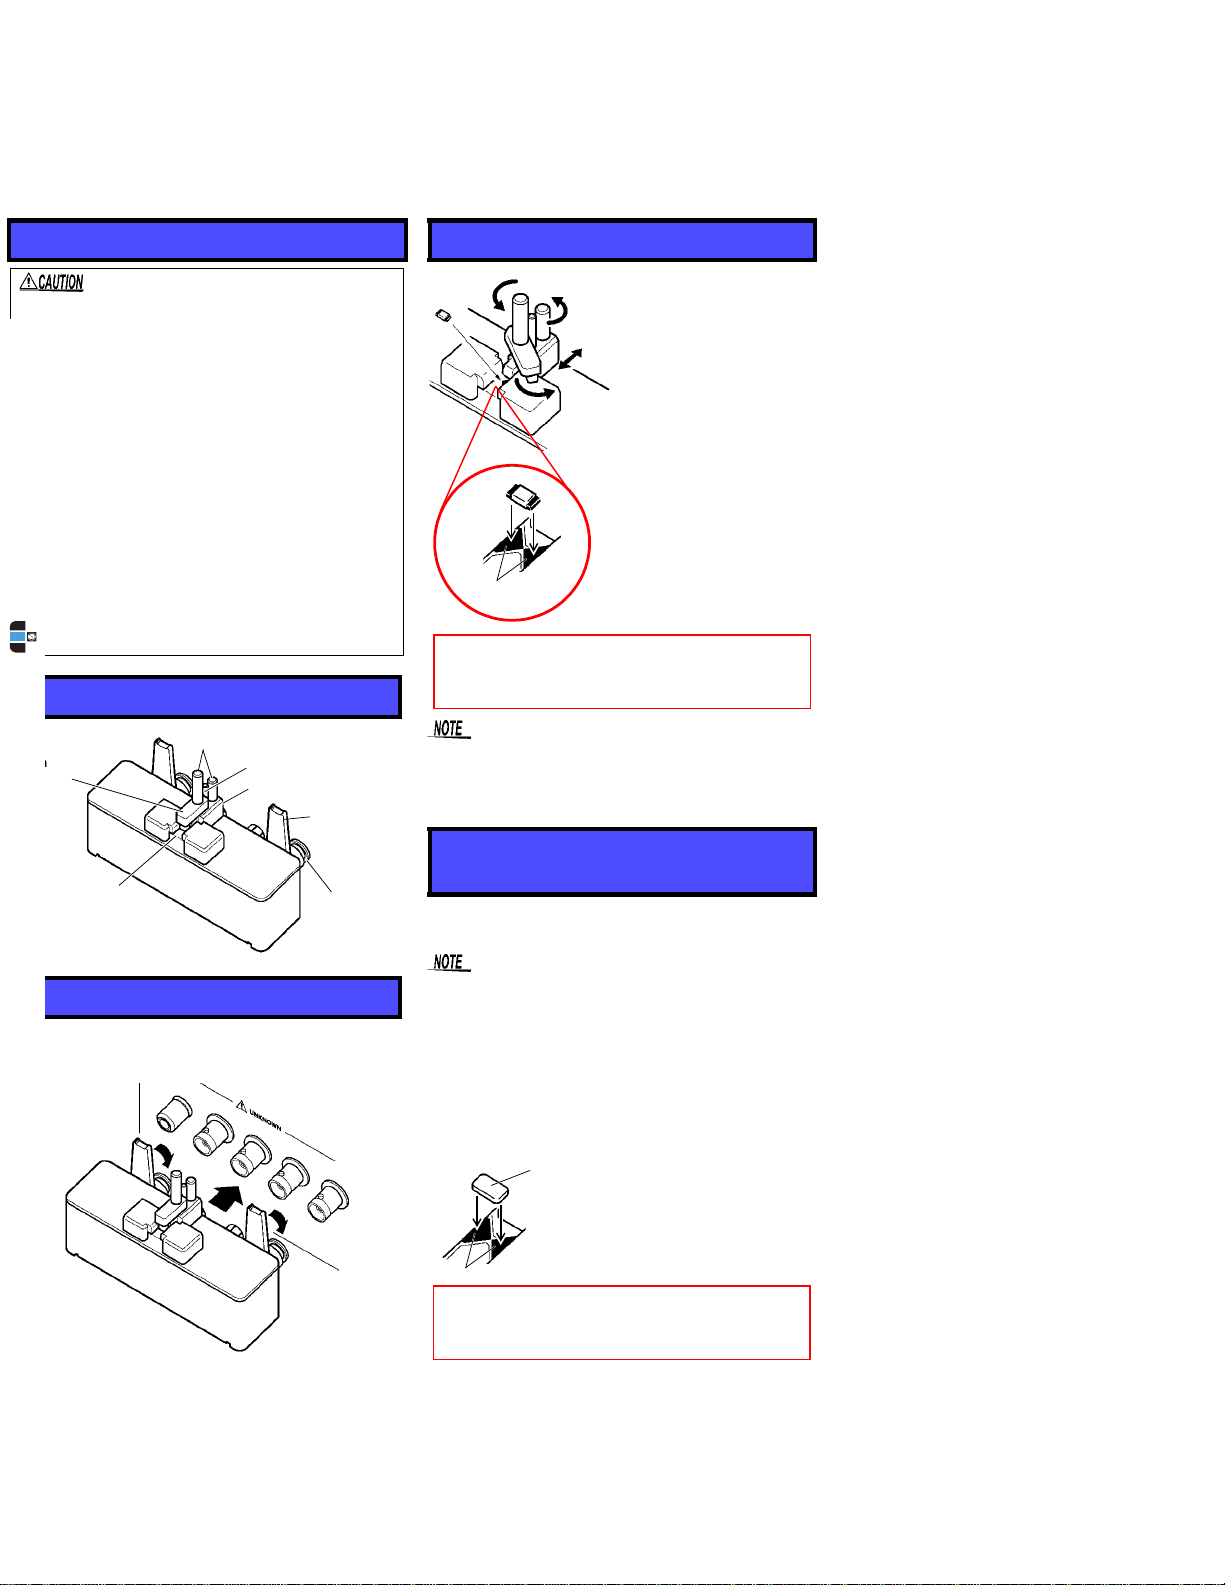
Fixing the Samples
Open and Short Circuit
Compensation
Sample 1. Rotate knob A to loosen it,
and then open the sample
fixing cover.
2. Adjust the depth of the
sample clamping portion, if
necessary.
(Adjusting Procedure)
Loosen knob B and move
the slider forward or back-
ward into position. Tighten
knob B to fix the slider.
3. Place a sample in the cen-
ter of the sample clamping
portion.
4. Replace the sample fixing
cover. Rotate knob A to fix
the sample.
Knob
Make sure that the terminals on both sides of the
sample are placed on both measurement terminals of
the clamping portion. Do not place the sample in con-
tact with any other metal portions of the test fixture.
3
AB2
1
Sample
clamping
portion
Measurement
terminals
Clamp the short bar (supplied with
the 9699 model) in place of a sample
to close the high and low terminal cir-
cuits.
Sample clamping
portion
Measurement terminals
Make sure that the short bar is placed on both mea-
surement terminals of the clamping portion. Do not
place the short bar in contact with any other metal
portions of the test fixture.
Short bar
www.calcert.com sales@calcert.com1.888.610.7664 0
5
10
15
20
25
30