InMotion SCV R1EX User manual

68
INMOTION SCV R1EX
INSTRUCTIONS MANUAL
INMOTION SCV R1EX

1.
Introduction
1.1. About This Manual
This User Manual is intended to help you set up and use your INMOTION SCV. You need to read this Manual carefully, watch
the Safety Videos and make sure that you follow the safety instructions when using your INMOTION SCV. It is important that
you adhere to all safety Warnings and Cautions that appear throughout this User Manual. This User Manual is suitable for
INMOTION R1XX series products. Certain functions are limited to specific models. If you have questions or require more
information beyond this User Manual, please contact INMOTION IBERIA.
1.2. The Risk of Injury
The INMOTION SCV is a self-balancing Sensor Controlled Vehicle (SCV). Balancing technology cannot prevent injury if you do
not ride the INMOTION SCV safely.
1.3. Before You Begin
Before you begin, it may be necessary to assemble your INMOTION SCV. The Battery Pack should be charged for at least 4
hours before the first use. To assemble the INMOTION SCV and charge the Battery Pack for the first time, please refer to
Whenever you ride the INMOTION SCV, you risk injury from loss of control, collisions, and falls. To reduce risk of injury, you
must read and follow all instructions in this User Manual and watch the Safety Videos.
69

Sections 2.5 Assembling the INMOTION SCV and 4.3 Charging the INMNOTION SCV in this Manual.
1.4. Related User Materials
INMOTION provides an electronic copy of the User Manual, Safety Videos, and help documents for your convenience. You can
download these electronic files as well as the INMOTIONS SCV Smartphone App from www.imscv.com.
1.5. Conventions
The following conventions are used throughout this manual:
Warns you about actions that may result in personal injury.
Cautions you about actions that may result in operational issues or
physical damage to the INMOTION SCV.
Identifies important points, helpful hints, special circumstances, or
alternative methods.
70

2.
General Information
2.1. Product Dimensions
71

2.2. INMOTION SCV Serial Number
The serial number is unique to your INMOTION SCV.Please write it down and store it in a safe place. The serial number is a 16-digit
number printed along with the barcode on your INMOTIONSCV.
The serial number is required for after-sales service, warranty, insurance, or confirmation of loss claims. Locations of the
INMOTION SCV Serial Number:
●
On the outside box packaging
●
On the Warranty Card
●
Battery Slot—remove the Battery Pack to reveal the serial number located inside the Battery Slot
2.2.1.
Specifications
Item Value Note
Model INMOTION R1EX
①
Max Speed can be adjusted through the application. You may
get a higher instant speed but will stabilize at the set speed.
②
Distance per charge was calculated under the following test
conditions: 25℃, 70 Kg payload and smooth terrain. The
cruising distance varies under different riding conditions.
Different SCV and battery models will cause a difference in
cruising distance.
③
The Machine Weight includes a 4 Ah Battery Pack. Different
models weigh differently because of different materials used.
The R1EX is about 16 Kg.
Max. Speed 15 Km/h
①
Distance per charge 16~30 Km
②
Max Climbing Angle 15°
Machine Weight 16 Kg
③
Load 25 ~ 100 Kg
Turning Radius 0 m
Dimensions (W * D * H) 460*490*1440 mm
④
Battery 72 V 4 Ah Lithium
Ion (Li-ion)
⑤
72

Power Requirements AC 110 ~ 240 V
50 ~ 60 Hz
④
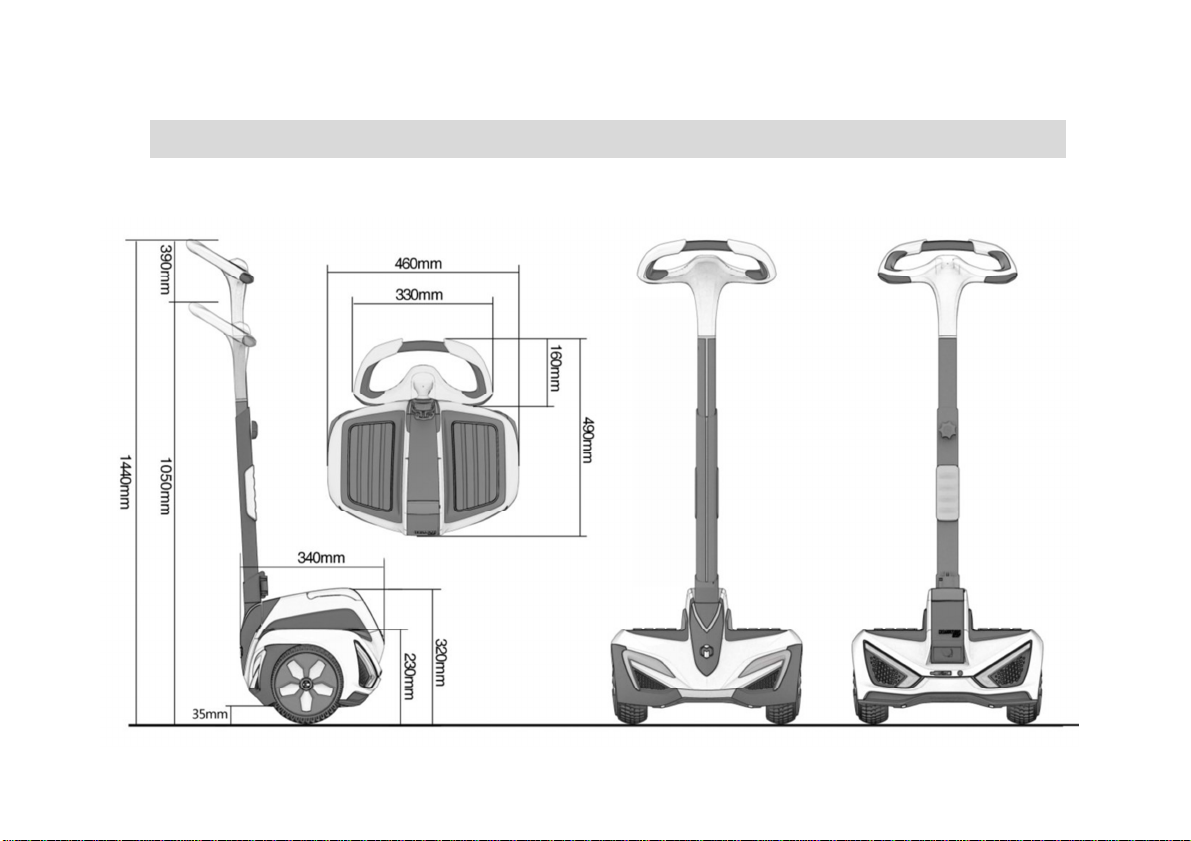
Dimensions were measured with the Turning Shaft fully
extended.
⑤
4 Ah battery is the standard configuration. You can also
Choose a 6 Ah Battery Pack to get a longer cruising distance,
but it will increase the total weight of the INMOTION SCV.
⑥
Charging time for the SCV varies depending on
Environmental temperature and Battery Pack capacity.
Full Charge Time About 3.5 Hours
⑥
Tire Type Vacuum Tires
Recommended Best
Operating Temperature
Range
15 ~ 30 ℃
2.3. How the INMOTION SCV Works
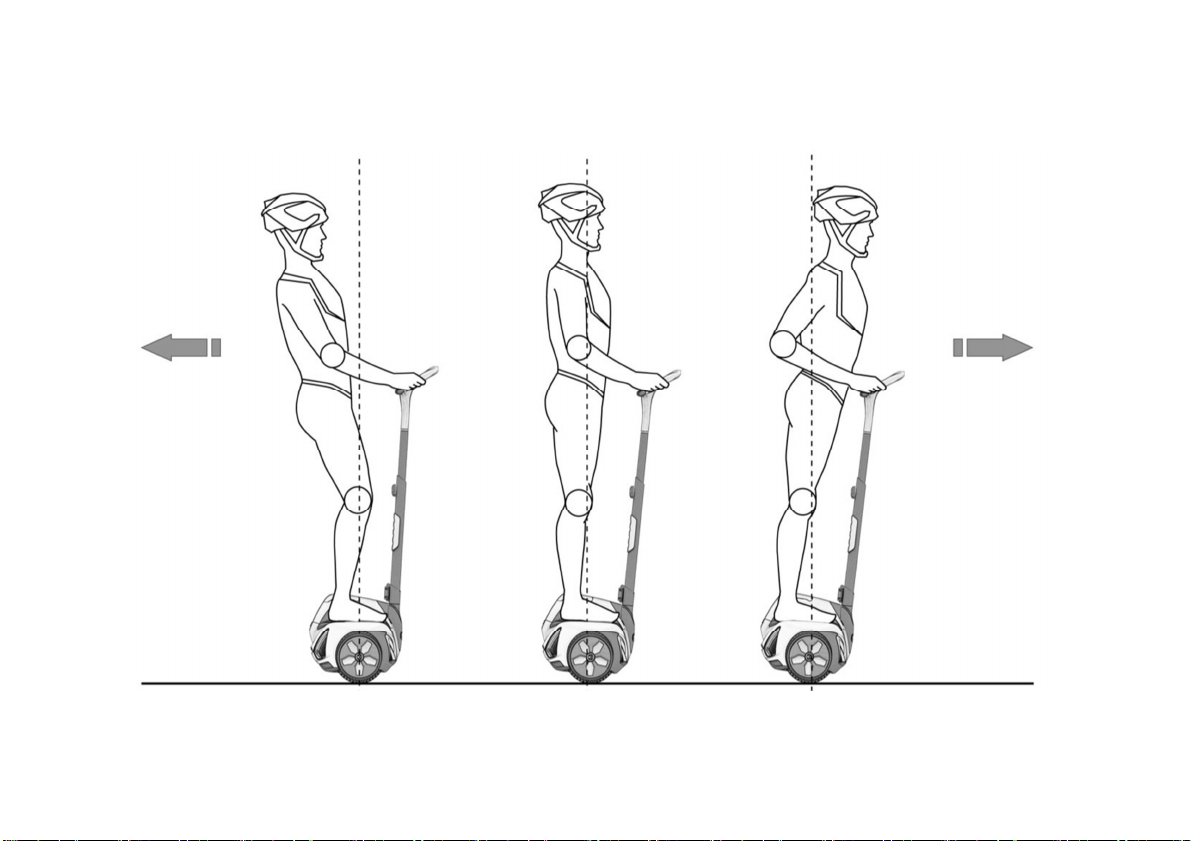
The INMOTION SCV works like the human body. When walking, if you lean forward, you take a step forward to keep your
balance. If you lean back, you step back. On an INMOTION SCV when you lean forward or back the machine powers the Wheels
in the direction that you lean.
The INMOTION SCV uses dynamic stabilization technology and applies a gyroscope, sensors, and a Permanent Magnet
Synchronous Motor (PMSM) to maintain its balance and move forward or backward.
When you pivot the Turning Shaft to the left, the INMOTION SCV turns left. When you pivot the Turning Shaft to the right,
the INMOTION SCV turns right. To turn the INMOTION SCV, point the Turning Shaft in the direction you want to go, keeping
the Handlebar in line with your body. When the Turning Shaft is centered, the INMOTION SCV travels straight ahead.
For additional information about Maximum Payload (Rider plus all cargo), turn to laterchapters.
For additional information about how to increase riding distance per change, turn to Section 3.8, Environmental Factors
Affecting the Vehicle’sPerformance.
73

74

2.4. INMOTION SCV Components
75

2.5. Assembling the INMOTION SCV
2.5.1.
Unpacking the box
Any missing or visibly damaged arts should be re orted to INMOTION IBERIA.
1. INMOTION SCV body 5. Installation Tool and a spare Screw
2. Handlebar (R1EX uses ABS materials, and Carbon Fiber
Handlebar is optional.)
6. SmartKey and a Micro USB cable
3. Turning Shaft and a Screw 7. User Manual, Warranty Card, Product Certification
and Useful Tips Manual
4. Charger Adapter
8. 4 Ah Lithium Battery Pack (a Useful Tips Manual is included.)
ll INMOTION SCV parts must be approved by INMOTION, and properly installed.
Never attempt to stand on an INMOTION SCV without the Turning Shaft properly attached.
Using your INMOTION SCV without all parts properly installed could damage your INMOTION SCV and result in serious injury
from loss of control, collisions, and falls.
76

2.5.2.
Assembling the INMOTION SCV
77

Assembling the INMOTION SCV:
1. Insert the Handlebar into the top of the Turning Shaft (the slimmer part), and tighten the Screw using the Installation
Tool. The Screw and Installation Tool are included in the box. Please pay attention to the front and back of the Handlebar.
2. Unlock the Quick Release Lock, insert the Turning Shaft into the Pivot Base ssembly until you feel resistance, and lock
the Quick Release Lock. Please note, if the Turning Shaft is not completely inserted, the Quick Release Lock cannot be locked
properly. ssembly of the Turning Shaft is now complete. When necessary, remove the Turning Shaft from the SCV by unlocking
the Quick Release Lock.
3. Remove the Battery Pack from the battery package, lean the INMOTION SCV body forward, and hold it steady. Slide the
Battery Pack into the Battery Slot. When you hear a click, gently try to pull the Battery Pack out. The Battery Pack is installed
properly if it cannot be removed without releasing the latch.
4. Press the Reset Button on the back of the SCV, and power on the INMOTION SCV using the SmartKey.
If necessary, especially when you need to put the INMOTION SCV in the trunk of your car, the Turning Shaft and the
Handlebar can be quickly removed by unlocking the Quick ReleaseLock.
Please confirm the Turning Shaft is installed properly. Try lifting the Turning Shaft with both hands to check if it is loose. If it
is loose, tighten the Screw.
If you need to remove the Turning Shaft, hold it tightly with one hand, unlock the Quick Release Lock, slightly shake it and
then pull it out.
78

2.6. SmartKey
The SmartKey is a chargeable and upgradable device with information display and remote control function. The INMOTION
SCV can be operated or monitored by remote control.
The SmartKey has three buttons and a display in the center, and its effective communication range is 5~10m (depending on
working environment and use methods). Press the third button (Mode Shift Button) to activate the SmartKey and to start pairing it
with the INMOTION SCV. There is a micro USB port at the bottom of the SmartKey. Use this port to connect to your PC to see
information about your SCV or to charge your SmartKey. The SmartKey can also be charged by connecting it to the USB port on
your SCV.
79

2.6.1.
SmartKey Buttons and Display
The display area shows the operational state of the
INMOTION SCV and information including your speed,
distance, and battery state.
SmartKey Button Functions:
Button Description
Power Button: Allows you to power the INMOTION SCV on and off.
Lock/Unlock Button: Allows you to lock or unlock the INMOTION SCV.
Shift Button: Allows you to shift among different modes.
The SmartKey is small and portable. Dock it on the INMOTION SCV to view riding data during yourjourney.
The SmartKey is paired with the INMOTION SCV when leaves the factory. If you need help with your SmartKey please
contact INMOTION IBERIA.
80

SmartKey Icon Functions:
Icon Description Icon Description
Battery Icon: Shows remaining
power in the INMOTION SCV
Battery Pack. There are 5 bars
when full.
Mileage Icon: Shows the mileage of the
INMOTION SCV, to an accuracy of 0.1
Km.
Shift Icon: Indicates that the
INMOTION SCV is in Shift Mode.
Speedometer icon: Shows the speed of the
INMOTION SCV, to an accuracy of 0.1
Km/h.
Unpair Icon: Indicates that the
SmartKey is not paired with an
INMOTION SCV.
No Signal Icon: Indicates that the SmartKey
has no signal. Appears when the SmartKey
cannot detect the INMOTION SCV.
INMOTION Logo Icon: Appears when the SmartKey is being powered on or off using the SmartKey
Manned Speed Mode Icon: Indicates
that the INMOTION SCV detects a
rider, and is in Speed Mode.
Assist Mode Icon: Indicates that the
INMOTION SCV is in Assist Mode.
Manned Training Mode Icon:
Indicates that the INMOTION SCV
detects a rider, and is in Training
Mode.
Remote Control Mode Icon: Indicates that the
INMOTION SCV is in Remote Control Mode.
81

USB icon: Indicates that the
INMOTION SCV is plugged in to a
USB port.
Speed Mode icon: Indicates that the
INMOTION SCV is in Speed Mode.
Wrench icon: Indicates a system fault
on the INMOTION SCV that requires
service.
Training Mode icon: Indicates that the
INMOTION SCV is in Training Mode.
SmartKey Link Signal icon: Indicates
that the SmartKey has detected the
INMOTION SCV.
Power Off icon: Indicates that the INMOTION
SCV is powered off.
SmartKey Unlink Signal icon:
Indicates that the SmartKey has not
detected or has lost its connection
to the INMOTION SCV.
Security icon: Indicates that the security
function is activated.
Low Battery icon: Indicates that he SmartKey battery needs to be charged. Charging the SmartKey takes
about 2 hours using the micro USB cable.
82

2.6.2.
SmartKey Functions
Power on the SmartKey by pressing Button C (Shift). The SmartKey will automatically pair with your INMOTION, as long as
they are within the effective communication range.
The SmartKey has the following functions: power on/off the INMOTION SCV, lock/unlock the INMOTION SCV, power on/off
the SmartKey, pair, enter/exit Shift Mode, and enable LED backlighting. Trigger these functions using the 3 SmartKey buttons.
Key combinations are used to activate/deactivate different functions. Press, press and hold for 2 seconds, or combine pressing the
keys to activate different functions. Shift Mode is designed to reduce the complexity of operating the SmartKey, and some less
frequently used functions have been merged into Shift Mode. The same key combination will trigger a different function in Shift
Mode.
SmartKey Button Functions:
Non-Shift Mode
Button State Unpair Power on Power off Standby
Press Power Button (A) Pair Power off Power on N/A
Press Lock/Unlock Button (B) N/A Lock/Unlock the SCV Lock/Unlock the SCV N/A
Press Shift button (C)
N/A Switch between Training Mode,
Speed Mode and Assist Mode;
Switch between Training Mode
and Speed Mode while riding the
SCV.
Switch between Training Mode and
Speed Mode (it won't take effect
until the next time you power on the
SCV.)
N/A
Press and hold Lock/Unlock
Button for 2 seconds (B)
N/A Shows total distance traveled of
the SCV.
Switch voice languages between
Chinese and English.
N/A
83

Press and hold Shift button for 2
seconds (C)
N/A Enter Shift Mode Enter Shift Mode N/A
Press and hold Power/Stand by
Button and Shift button together
for 2 seconds (A/C)
N/A
Illuminate the Backlight
N/A
Shift Mode
Button State Unpair Power on Power off Standby
Press Power Button (A) N/A Check the SCV model and Serial
Number
Check the SCV model and Serial
Number
N/A
Press Lock/Unlock Button (B) N/A Self-check Mode Check the firmware version and AP
information
N/A
Press Shift button (C) N/A Illuminate/turn off Front Light Illuminate/turn off Front Light N/A
Press and hold Lock/Unlock
Button for 2 seconds (B)
N/A Power off the SmartKey Power off the SmartKey N/A
Press and hold Shift button for 2
seconds (C)
N/A Exit Shift Mode Exit Shift Mode N/A
Press and hold Power Button and
Shift button
together for 2 seconds (A/C)
N/A Shut down the SCV Shut down the SCV N/A
84

NOTES:
●
“N/ ” indicates no function will be triggered.
●
The INMOTION SCV will only accept commands from the SmartKey when nobody is riding it. fter 30 seconds of non-
use, SmartKey, the SmartKey backlight will turn off.
●
The SmartKey will power off after different periods of time under the below conditions:
●
When the SmartKey is not paired with an INMOTION SCV: 1 minute
●
When the SmartKey and the INMOTION SCV are paired, but the SmartKey cannot communicate with the INMOTION
SCV, or nobody is riding it: 3 minutes
●
When the SmartKey and the INMOTION SCV are paired, and can communicate with each other: 10 minutes.
●
If the SmartKey is powered off, you can power it on by pressing the Shift Button (C).
●
Trigger a horn honk by pressing the Power Button ( ) when riding the SCV.
85

2.7. Info LED and Sound Prompt
2.7.1.
Info LED
The Info LED display screen shows the running states of the INMOTION SCV.
Here below shows the Wi-Fi version.
86

Here below shows the Bluetooth version.
87
Other manuals for SCV R1EX
1
Table of contents
Other InMotion Scooter manuals

InMotion
InMotion SCV V3 User manual

InMotion
InMotion L8 User manual

InMotion
InMotion RS User manual

InMotion
InMotion AIR Pro User manual

InMotion
InMotion e-scooter-l6 User manual

InMotion
InMotion P2 Series User manual

InMotion
InMotion SCV V5F User manual

InMotion
InMotion L9 User manual

InMotion
InMotion R2 User manual

InMotion
InMotion SCV H1 User manual