Inspur NF5488M5 User manual

PN
Warnings!
15kg
30kg
50kg
Please keep this document for future reference.
If the device is more than 15kg, at least 2 people are needed.
If the device is more than 30kg, at least 3 people are needed.
If the device is more than 50kg, at least 4 people are needed.
The cabinet, chassis or guide rails may cause serious
scratches, please be careful while handling.
When installing new servers into the cabinet in use, please
be aware of electric shock.
4U Server
Installation Guide
V1.0
● When installing 4U or bigger servers, at least 4 people are needed or use the auxiliary equipment.
● During the installation process, please do not block the vents on the server, especially the
vents on the front and rear of the server.
●Please remove the protective film from the server surface before using.
● Please leave a minimum of 15cm clearance on the front and rear sides of the server for proper
ventilation.
● Please install air baffles in place prior to device installation, to make sure that the server can
get enough air flow, and to avoid air turbulence in the server room.
● Servers are high-power electrical appliances, and they should be installed into dedicated
cabinets with vents or professional water-cooled cabinets, to prevent system failures
causedby overheating.
● If it needs to install more than one device, please load them from the bottom to the top, and
load the heaviest items first.
● Please note the cabinet’s load-bearing capacity, power supply capacity and heat dissipation
capacity, be sure not to install devices beyond the cabinet’s threshold capacity.
● For the convenience of using the front and rear ports of the server and cabling, leave a
minimumclearanceof 70mm between the front end of the server and the inner side of the
cabinet’sfront door, and 150mm between the rear end of the server andthe inner side of the
cabinet’s rear door.
4U Server Installation Guide V1.0
Installing Rail Kit and Server
Required parts for server installation
The rail is assembled by a rail and a stopper.
Screw: M5x8 Philips head screw (x4)
1
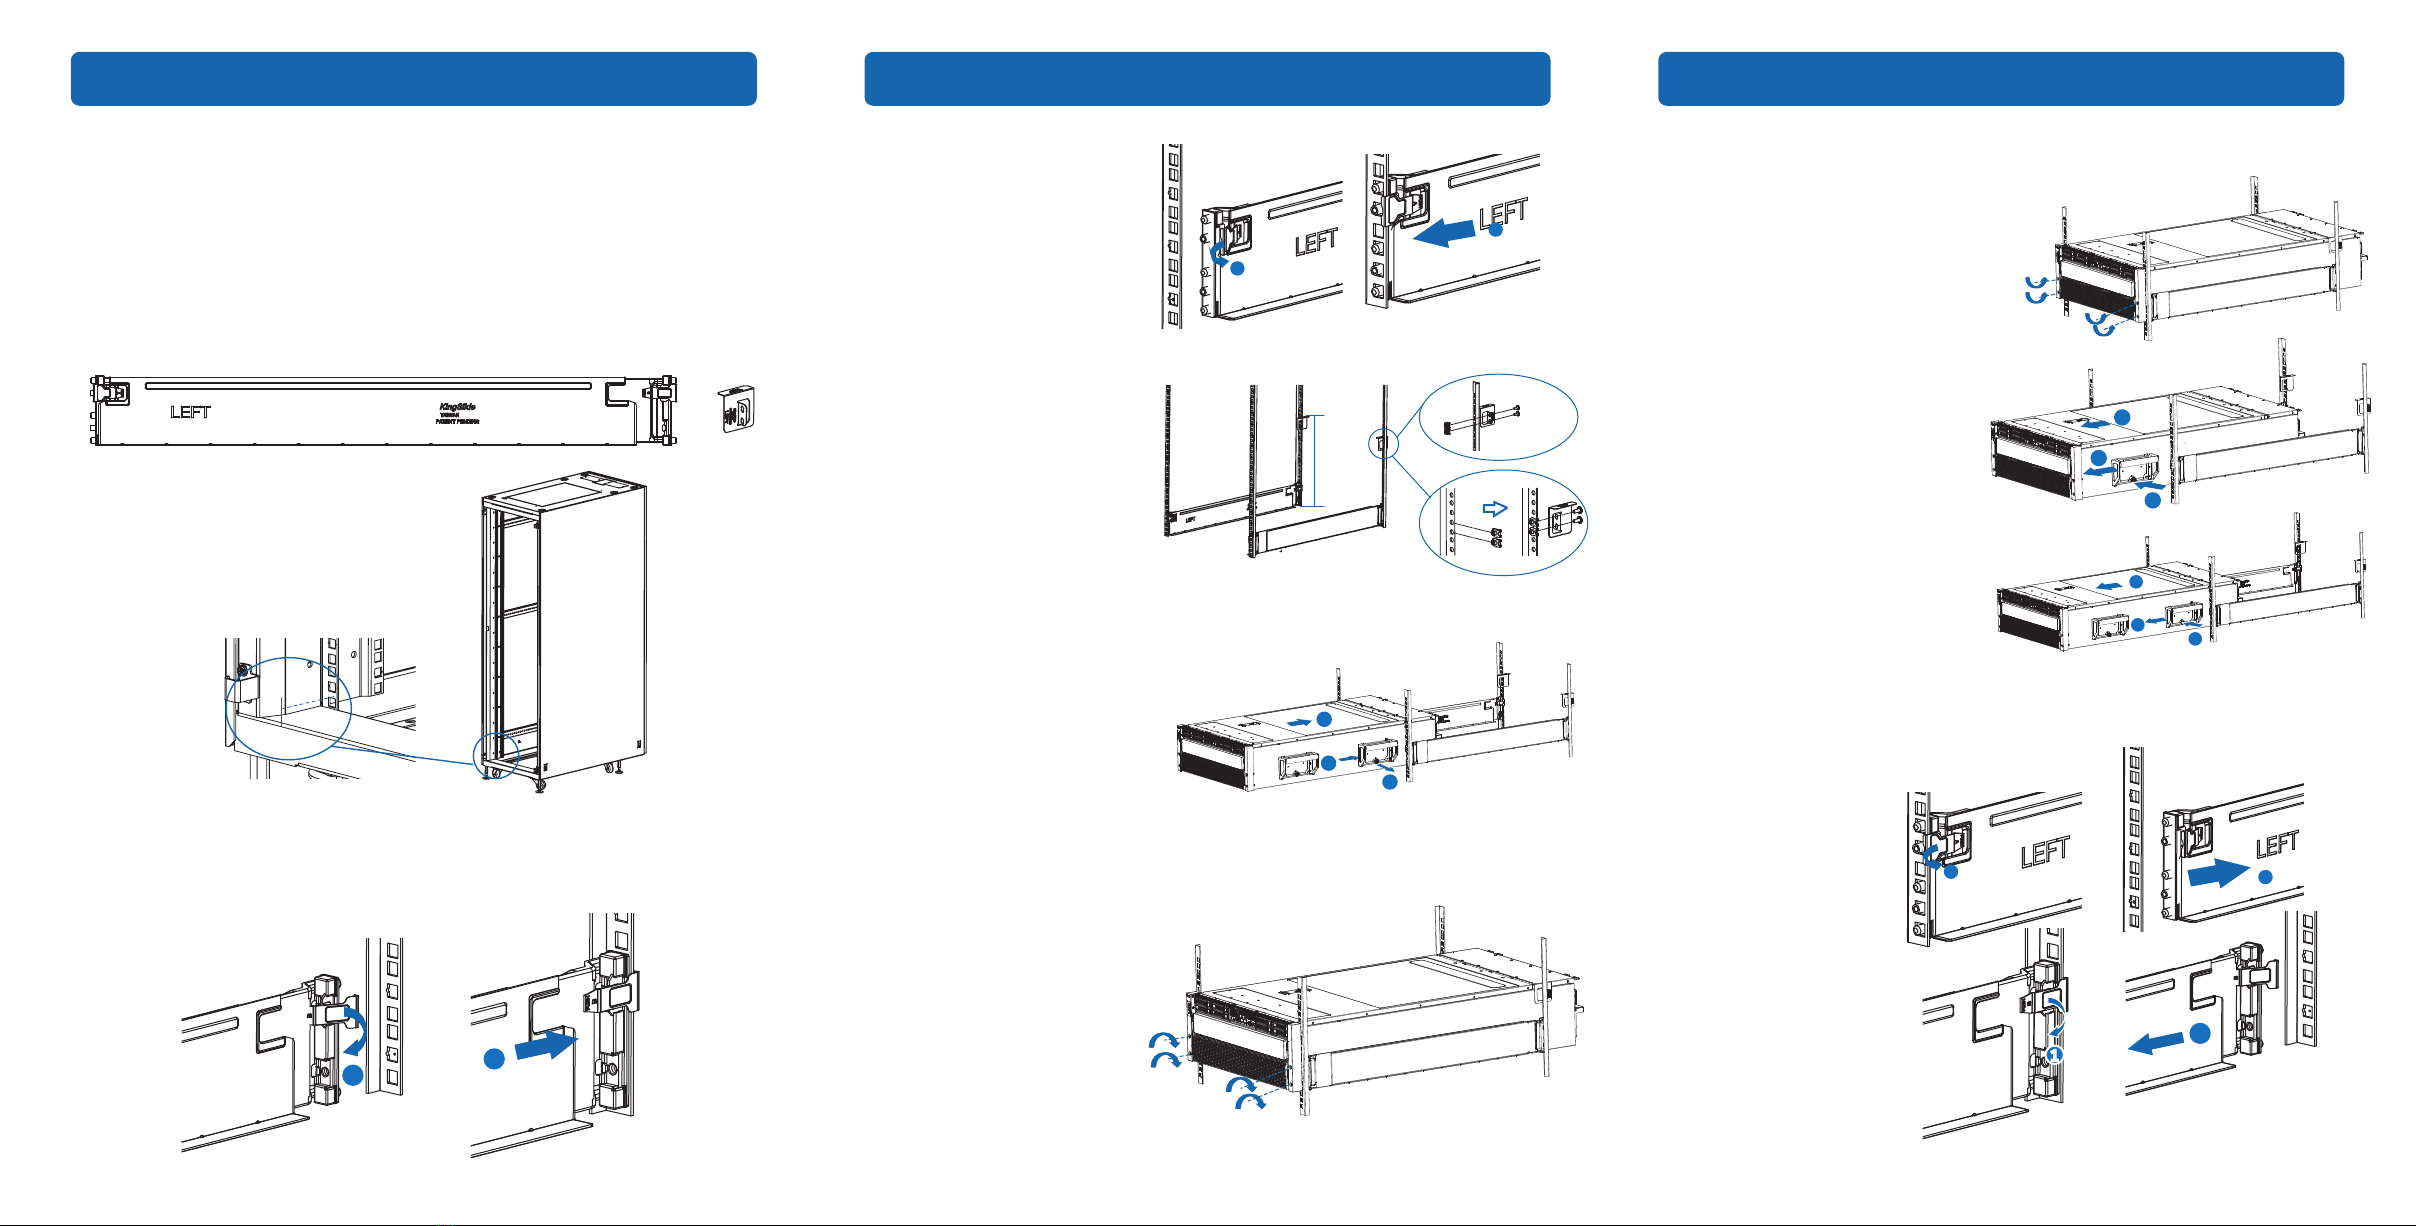
Adjust the distance from the front surface of the
cabinet to the post to 75mm before installation.
2
Installing the rear side of the rail into the cabinet:Position the rear bracket on the cabinet. ①
Open the latch. ②Align the guide pins with the rack holes, and push the rail into the cabinet.
Release the latch to lock it with the cabinet.
3
4
5
Installing the front side of the rail
into the cabinet:Position the front
bracket on the cabinet. Keep the
front and rear brackets in the same
2U space.①Open the latch. ②Align
the guide pins with the rack holes,
and push the rail into the cabinet.
Release the latch to lock it with the
cabinet.
Installing the stopper:Install a
stopper above the rear end of the rail
on the cabinet, and ensure 4U space
between the upper end of the
stopper and the L-shaped bracket of
the rail. Please select the nuts
according to different posts: select
two square nuts for the square-hole
post, and two U-type nuts for the
round-hole post.
Step2: Remove the two front
handles in the same
way.Horizontally push the
chassis to the end. Keep the
handles for future use.
Step3: Make sure that the
chassis has been pushed to the
end, and then tighten the four
floating screws to secure the
server.
6
Installing the server into the cabinet
Step1: Align the server chassis with
the rails and horizontally place it on
the rails.
Remove the two rear handles on
both sides:pull out the screw as
indicated by arrow①, and move the
handle as indicated by arrow②to
remove it.Push the chassis into the
cabinet.
Rail Stopper
1
2
1
Removing Server and Rail Kit
Removing the server
Step1: Loosen the four floating screws with a
screwdriver.
1
Removing the rails
Step 1: Open the latchas
indicated by arrow①, and
remove the front end of
the rail as indicated by
arrow②.
Step 2: Open the latch as
indicated by arrow①, and
remove the rear end of the rail
as indicated by arrow②.
Remove the other rail in the
same way.
Step 3: Use a screwdriver to loosen the fixing screws on the stoppers, and remove the
stoppers on both sides.
2
Step2: Pull the server outward. Install the
two front handles: first, install the handle to
the corresponding hole on the chassis as
indicated by arrow①, and push the handle
as indicated by arrow② until it is locked by
the screw.
Step3: Continue to pull the server
outward. Install the two rear handles in the
same way.
Step4: Remove the server from the rails, and place it on the anti-static platform.
75mm
2
4U
round-hole
square-hole
2
2
1
1
This rail is suitable for 9.2*9.2mm, 9.5*9.5mm square-hole cabinets and Ø7.1mm round-hole
cabinets.
2
3
1
1
2
3
1
2
3
Other Inspur Server manuals

Inspur
Inspur Yingxin User manual

Inspur
Inspur Yingxin User manual

Inspur
Inspur ON5263M5 User manual

Inspur
Inspur NF5486M5 User manual

Inspur
Inspur NP3060 User manual

Inspur
Inspur NF5280M5 Instruction Manual

Inspur
Inspur NP5540M3 User manual

Inspur
Inspur SA5212M4 User manual

Inspur
Inspur NF5280M5 User manual

Inspur
Inspur NE5260M5 User manual

Inspur
Inspur NF3120M5 User manual

Inspur
Inspur NF3120M5 User manual

Inspur
Inspur NF5180M4 User manual

Inspur
Inspur NF5266M6 User manual

Inspur
Inspur SA5112M4 User manual

Inspur
Inspur NF5468M6 User manual

Inspur
Inspur NF8480M5 User manual

Inspur
Inspur i48M6 User manual

Inspur
Inspur NP5570M4 User manual

Inspur
Inspur TS860M5 User manual


