JUKI KE-2050 Operating manual

KE-2050/KE-2060
KE-2050R/2055R/KE-2060R
High-Speed Modular Mounter
MAINTENANCE GUIDE
ELECTRONIC ASSEMBLY &
TEST SYSTEMS DIVISION
SMT TRAINING CENTER

(1) No part of this document may be copied or reproduced without the prior permission of
JUKI Corporation. (Including software and program)
(2) The contents of this document are subject to change without notice.
(3) This manual is prepared with extreme care. However, if you have any question or find any
error or omission in writing, contact our dealer or JUKI Corporation.
(4) JUKI Corporation shall disclaim all the responsibility for any trouble resulting from the
user's abnormal operation regardless of Item (3).
(5) Windows is a registered trademark of U.S. Micro Soft Corporation.
The company names and product names mentioned in this document are generally
registered trademarks or trademarks of the respective companies.
Important

KE-2050/KE-2060, KE-2050R/2055R/KE-2060R Maintenance Manual
i
Rev. 2.1
Contents
For the Safe Operation of Machinery!.................................................................. I
[1] X-Y UNIT..................................................................................................1-1
1-1. Replacing the Timing Belt and Adjusting the Belt Tension .......................................1-1
1-1-1. Timing Belt XM..................................................................................................................... 1-1
1-1-2. Timing Belt XB ..................................................................................................................... 1-3
1-1-3. Timing Belt YM..................................................................................................................... 1-6
1-1-4. Timing Belt YB ..................................................................................................................... 1-7
1-2. Replacing the Pulleys.............................................................................................1-10
1-3. Replacing the Servomotors ....................................................................................1-11
1-4. Replacing the Magnescale .....................................................................................1-12
1-4-1. Magnescale Affixing Position ............................................................................................. 1-12
1-4-2. Clearance of the Magnescale ............................................................................................ 1-14
1-4-3. Clearance between the Sensor Head and the Y-axis Linear Way (for Y-axis only) ........... 1-15
1-5. Replacing the Limit Sensor and the X-Axis Home Position Sensor........................1-16
1-5-1. Replacing the X-Axis Limit Sensor and the X-Axis Home Position Sensor ........................ 1-16
1-5-2. Replacing the Y-Axis Limit Sensor..................................................................................... 1-17
1-6. Replacing the Home Position Sensor.....................................................................1-18
1-6-1. X-Axis ................................................................................................................................ 1-18
1-6-2. Y-Axis ................................................................................................................................ 1-18
1-7. Replacing the Plastic Rail.......................................................................................1-19
1-7-1. Replacing the X-Axis Plastic Rail ....................................................................................... 1-19
1-7-2. Replacing the Y-Axis Plastic Rail ....................................................................................... 1-20
1-8. Replacing the Cables in the X/Y Cable Bearers.....................................................1-21
1-8-1. Removing the X Cable ....................................................................................................... 1-21
1-8-2. Placing a Mark on the Cable (X) ........................................................................................ 1-23
1-8-3. Assembling the Cable ........................................................................................................ 1-24
1-8-4. Separating the Fusion-bonded Parts of the Cables ........................................................... 1-26
1-8-5. Removing the Y Bear Cable............................................................................................... 1-27
1-8-6. Placing Marks on the Y Cable Bearer ................................................................................ 1-27
1-8-7. Assembling the Y Cable Bearer ......................................................................................... 1-28
1-8-8. Wiring around the Head ..................................................................................................... 1-33

KE-2050/KE-2060, KE-2050R/2055R/KE-2060R Maintenance Manual
ii
Rev. 2.1
[2] HEAD UNIT.............................................................................................. 2-1
2-1. Replacing and Adjusting the Head ...........................................................................2-1
2-1-1. MNLA Head ......................................................................................................................... 2-1
2-1-2. FMLA Head.......................................................................................................................... 2-3
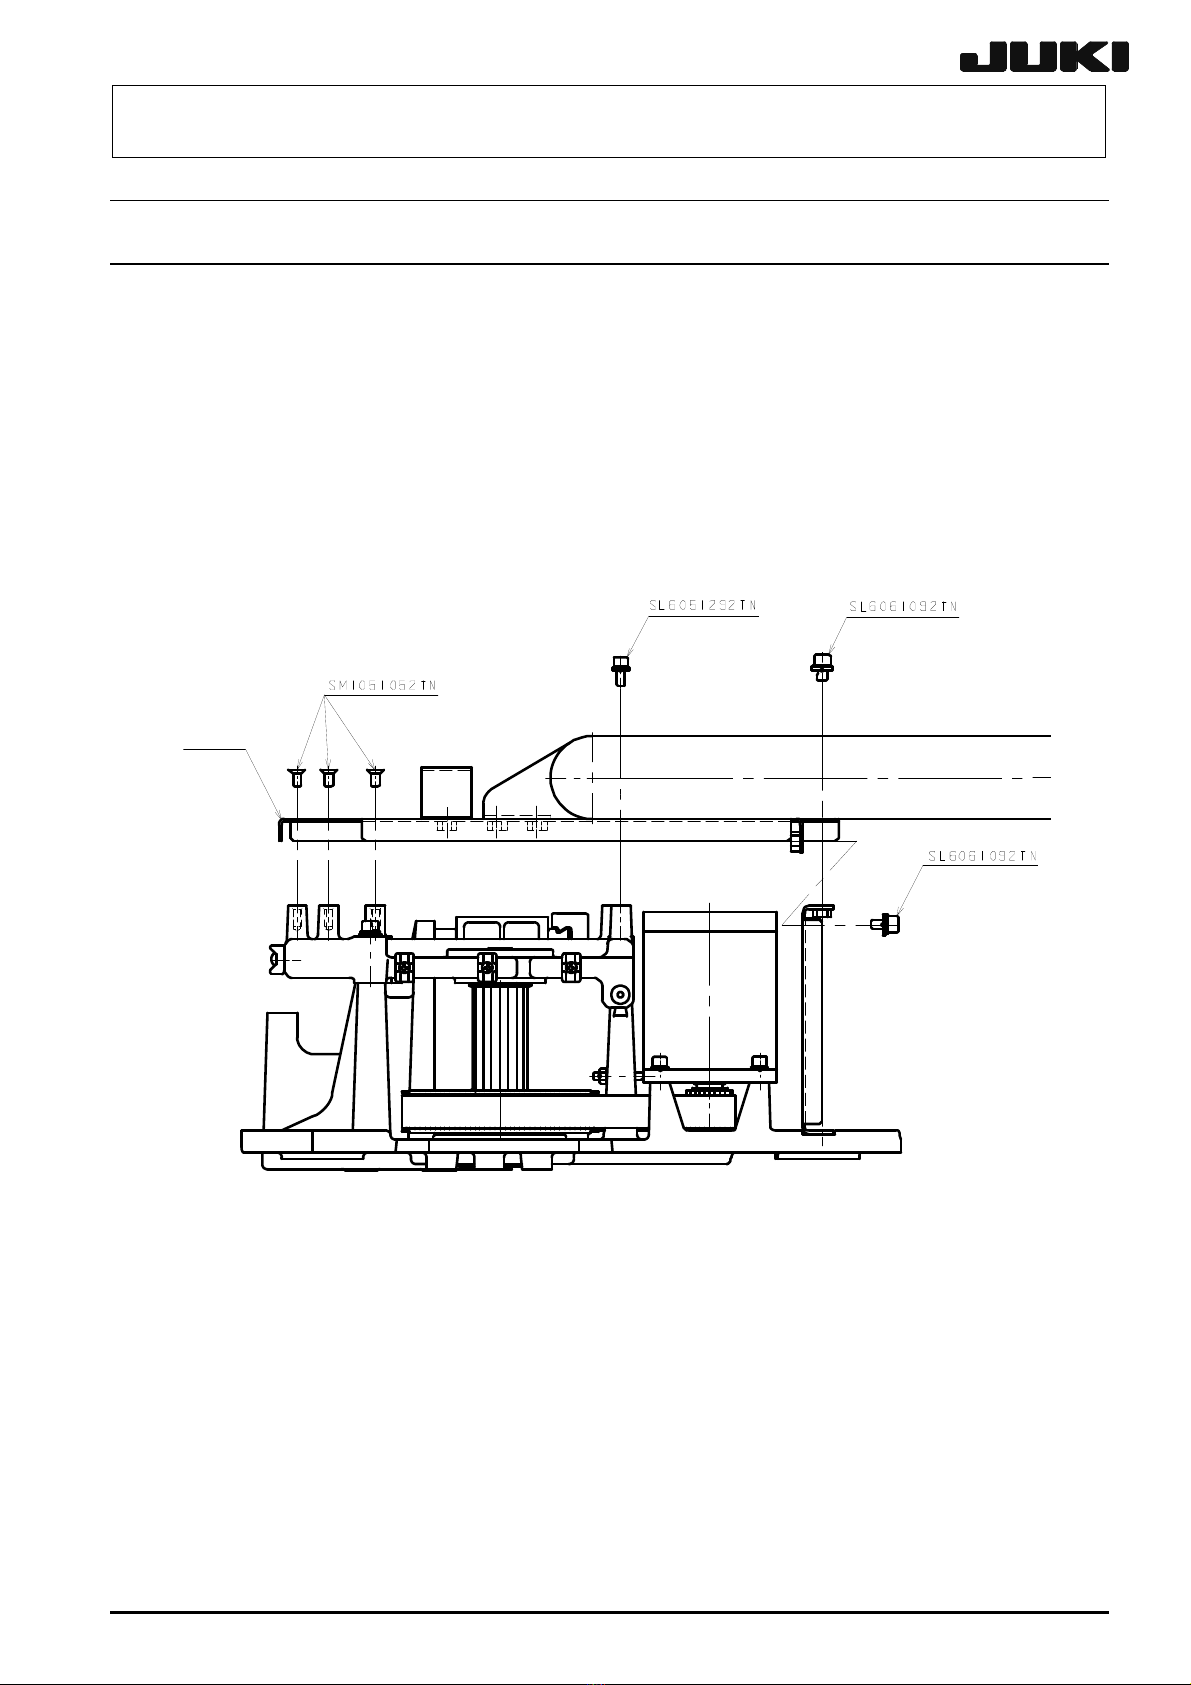
2-2. Replacing the Motor .................................................................................................2-6
2-3. Replacing the Z-Sensor..........................................................................................2-14
2-3-1. MNLA Head ....................................................................................................................... 2-14
2-3-2. FMLA Head........................................................................................................................ 2-15
2-4. Replacing the Laser Sensor ...................................................................................2-16
2-4-1. Replacing the MNLA .......................................................................................................... 2-16
2-4-2. Replacing the FMLA .......................................................................................................... 2-17
2-5. Replacing the Head Up Spring ...............................................................................2-18
2-5-1. MNLA Head ....................................................................................................................... 2-18
2-5-2. FMLA Head........................................................................................................................ 2-19
2-6. Replacing the Belts ................................................................................................2-20
2-6-1. MNLA Head ....................................................................................................................... 2-20
2-6-2. FMLA Head........................................................................................................................ 2-21
2-7. Replacing the Spline Housing ................................................................................2-22
2-8. Replacing the Nozzle Outer Shaft Assembly..........................................................2-23
2-9. List of Readjustment Items After Replacement ......................................................2-24
[3] PARTS AROUND THE HEAD..................................................................3-1
3-1. Replacing the Ejector Unit........................................................................................3-1
3-2. Replacing the Bad Mark Sensor...............................................................................3-2
3-2-1. Sensor Assembly ................................................................................................................. 3-2
3-2-2. Adjusting the Sensor Height................................................................................................. 3-2
3-2-3. Amplifier............................................................................................................................... 3-3
3-2-4. Assembling the Fiber Unit to the Amplifier ........................................................................... 3-3
3-2-5. Setting the Switches on the Bad Mark Sensor Assembly .................................................... 3-4
3-3. Replacing the HMS ..................................................................................................3-5
3-3-1. Replacing the HMS Head .................................................................................................... 3-5
3-3-2. Replacing the Amplifier ........................................................................................................ 3-5
3-3-3. Sticking the Label................................................................................................................. 3-6
3-3-4. Mounting the Board.............................................................................................................. 3-6
3-3-5. Adjusting the HMS Height .................................................................................................... 3-7
3-4. Replacing the Head Board .......................................................................................3-8
3-4-1. Replacing the Head Main Board .......................................................................................... 3-8
3-4-2. Replacing the OCC Relay Board Assembly......................................................................... 3-9
3-4-3. Replacing the Sensor Relay Board Assembly...................................................................... 3-9

KE-2050/KE-2060, KE-2050R/2055R/KE-2060R Maintenance Manual
iii
Rev. 2.1
[4] OCC Assembly.........................................................................................4-1
4-1. Replacing the OCC Assembly..................................................................................4-1
4-2. Replacing the CCD Camera and Lens Assembly.....................................................4-2
4-3. Replacing the OCC Vertical/Angle Light Board Assembly........................................4-3
4-4. Replacing the Lens Filter..........................................................................................4-4
4-5. Adjusting the Focus..................................................................................................4-6
4-6. Adjusting the OCC Light Quantity.............................................................................4-7
4-7. Offset Placement After Solder Screen-Printing Light................................................4-8
4-8. List of Readjustment Items After Replacement ........................................................4-9
[5] BOARD TRANSPORT UNIT....................................................................5-1
5-1. Replacing the Transport Belt....................................................................................5-1
5-2. Replacing the Transport Pulley ................................................................................5-2
5-3. Replacing the IN and OUT Motors ...........................................................................5-3
5-4. Replacing the CENTER Motor..................................................................................5-5
5-5. Replacing the IN and OUT Sensors .........................................................................5-6
5-6. Replacing the WAIT Sensor .....................................................................................5-7
5-6-1. Replacing the Fiber.............................................................................................................. 5-7
5-6-2. Replacing the Amplifier Unit................................................................................................. 5-8
5-7. Replacing the STOP and C. OUT Sensors ..............................................................5-9
5-8. Replacing the Stopper Cylinder..............................................................................5-10
5-9. Replacing the Support Table Home Position Sensor
(BU Home Position Sensor) ...................................................................................5-11
5-10. Replacing the T-PIN Sensor...................................................................................5-12
5-11. Replacing the Pusher Y Cylinder (Outer Shape Reference) ..................................5-13
5-12. Replacing the Pusher X Cylinder (Outer Shape Reference/Optional Unit).............5-14
5-13. Replacing the Pressure Reducing Valve ................................................................5-14
5-14. Replacing the Centering Pin...................................................................................5-15
5-15. Replacing the Support Table Motor (BU Motor) .....................................................5-16
5-15-1. Adjusting the Gap between Torque Supporter and Support Table Motor ........................... 5-16
5-15-2. Adjusting the Tension of the Support Table Driving Timing Belt ........................................ 5-17
5-15-3. Placing the Support Table Surface Horizontally................................................................. 5-18
5-16. Replacing the Support Table Encoder....................................................................5-19
5-17. Backup Stopper (for CE Type Only) .......................................................................5-20
[6] CAL BLOCK.............................................................................................6-1
6-1. Replacing the CAL Block Board Assembly...............................................................6-1
6-2. Replacing the Ejector ...............................................................................................6-2

KE-2050/KE-2060, KE-2050R/2055R/KE-2060R Maintenance Manual
iv
Rev. 2.1
[7] ATC ..........................................................................................................7-1
7-1. Replacing the Air Cylinder........................................................................................7-1
7-2. Replacing the ATC OPEN and CLOSE Sensors ......................................................7-4
7-3. Adjusting the Speed Controller.................................................................................7-4
[8] VCS..........................................................................................................8-1
8-1. Replacing the CCD Camera Lens ............................................................................8-1
8-2. Replacing the Standard VCS→Optional VCS Switching Cylinder............................8-3
8-3. Replacing the Light Boards ......................................................................................8-4
8-3-1. Transmission Light Board, Coaxial Light Board ................................................................... 8-4
8-3-2. Downward Light Board, Side Light Board ............................................................................ 8-5
[9] FEEDER BANK AND REPLACEMENT TABLE (OPTIONAL).................. 9-1
9-1. Overall Drawing........................................................................................................9-1
9-2. Replacing the Drive Cylinder....................................................................................9-2
9-3. Adjusting the Speed Controller of the Drive Cylinder ...............................................9-4
9-4. Replacing the Feeder Bank Board and Feeder I/F Board ........................................9-5
9-5. Replacing the Bank-Up Cylinder ..............................................................................9-6
9-6. Adjusting the Speed Controller of the Bank-Up Cylinder
(Optional Replacement Table)..................................................................................9-7
9-7. Replacing the Bank-Up Detection Sensor (Optional Replacement Table) ...............9-8
9-8. Replacing the Selector Switch (Optional Replacement Table) .................................9-9
9-9. Replacing the Roller Lever (Optional Replacement Table) ....................................9-10
[10] PNEUMATIC UNITS .............................................................................. 10-1
10-1. Replacing the Main Pressure Detection Cable Assembly ......................................10-1
10-2. Replacing the Filter Element ..................................................................................10-2
[11] SWITCHES ............................................................................................ 11-1
11-1. Replacing the Push-Button Switch .........................................................................11-1
11-2. Replacing the EMERGENCY STOP Switch ...........................................................11-2
11-3. Replacing the Cover Open Switch..........................................................................11-3
11-3-1. Switch Main Unit ................................................................................................................ 11-3
11-3-2. Operation Key .................................................................................................................... 11-4
11-4. Replacing the Push-Button Switch (CE Marking Machine).....................................11-5
[12] REPLACING AND ADJUSTING THE FEEDER FLOAT SENSOR.........12-1

KE-2050/KE-2060, KE-2050R/2055R/KE-2060R Maintenance Manual
v
Rev. 2.1
[13] OTHER UNITS.......................................................................................13-1
13-1. Replacing the CRT (Vision Monitor) .......................................................................13-1
13-2. Replacing the FDD (Floppy Disk Drive)..................................................................13-2
13-3. Replacing the CD-ROM Drive ................................................................................13-3
13-4. Replacing the LCD Monitor ....................................................................................13-4
13-5. Replacing the HDD (Hard Disk Drive) ..................................................................13-13
13-5-1. Required Components ..................................................................................................... 13-13
13-5-2. Replacing the HDD .......................................................................................................... 13-14
13-5-3. Setting Up the BIOS......................................................................................................... 13-15
13-5-4. Setting Up the Network (This setup is performed when communicating with the HLC) ... 13-18
13-5-5. Installing the KE2000-series System Programs and Flexline DB..................................... 13-37
13-5-6. Changing the Windows NT Product ID ............................................................................ 13-42
13-5-7. Setting Up the Touch Panel (Optional) ............................................................................ 13-44
[14] ELECTRICAL COMPONENTS ..............................................................14-1
14-1. Layout of Electrical Components............................................................................14-1
14-2. Layout of Top of Base Frame.................................................................................14-2
14-3. Power Supply Unit..................................................................................................14-3
14-4. Control Unit ..........................................................................................................14-11
14-4-1. Structure of Control Unit .................................................................................................. 14-11
14-4-2. CPU Board....................................................................................................................... 14-13
14-4-3. XMP Board (RMB Board)................................................................................................. 14-14
14-4-4. SYNQNET Relay Board................................................................................................... 14-15
14-4-5. Bus Bridge Board (40003313).......................................................................................... 14-16
14-4-6. MCM (Multi Nozzle Control Module) Board .................................................................... 14-17
14-4-7. SAFETY Board ................................................................................................................ 14-18
14-4-8. BASE FEEDER Board Assembly (40001941).................................................................. 14-24
14-4-9. I/O Control Board Assembly (40001943) ......................................................................... 14-26
14-4-10.Adjusting the Light Ctrl Board Assembly (40001904) and
Light Ctrl Board (50) Assembly (40001918) .................................................................... 14-27
14-4-11.IP-X3 Board Assembly A (40001920 for KE-2050/50R),
IP-X3 Board Assembly B (40001921 for KE-2060/55R/60R) .......................................... 14-28
14-5. X-Y Unit................................................................................................................14-29
14-5-1. Structure of X-Y Unit ........................................................................................................ 14-29
14-5-2 LED Indication.................................................................................................................. 14-30
14-5-3. DIP Switch Settings on the Magnescale .......................................................................... 14-30
14-6. Z-θUnit ................................................................................................................14-32
14-6-1. Structure of Z-θUnit......................................................................................................... 14-32
14-6-2. LED Indications................................................................................................................ 14-33

KE-2050/KE-2060, KE-2050R/2055R/KE-2060R Maintenance Manual
vi
Rev. 2.1
14-7. Transport Unit.......................................................................................................14-34
14-7-1. Structure of Transport Unit............................................................................................... 14-34
14-7-2. Adjusting the CARRY Relay Board .................................................................................. 14-41
14-7-3. Adjusting the Stepping Driver........................................................................................... 14-43
14-7-4. Checking the Encoder Connection................................................................................... 14-45
14-8. Head Unit .............................................................................................................14-46
14-8-1. Boards Used on the Head Unit ........................................................................................ 14-46
14-8-2. Adjusting the Boards of the Head Unit ............................................................................. 14-47
14-9. Covers..................................................................................................................14-49
14-9-1. Structure of Operation Unit .............................................................................................. 14-49
14-9-2. Jumper Switch Settings on the Operation Board Assembly (40001953) and
Operation Board Assembly [EN] (40001954) .................................................................. 14-49
14-9-3. Mounting Switches onto the Operation Switch Board ...................................................... 14-51
14-10. UPS (40003292) ...............................................................................................14-64
14-10-1.Checking the UPS Battery (E9659729A000) Voltage...................................................... 14-64
14-10-2.Replacing the UPS Battery.............................................................................................. 14-65
14-11. Replacing the Fuse of the AC Input Unit ...........................................................14-68
[15] AUTO BOARD WIDTH ADJUSTMENT..................................................15-1
15-1. Assembling the AWC Bracket ................................................................................15-1
15-2. Assembling to the Machine Main Unit ....................................................................15-2
15-2-1. Mounting the AWC Bracket Assembly ............................................................................... 15-2
15-2-2. Mounting the AWC Bracket Assembly ............................................................................... 15-3
15-3. Mounting the Origin Switch Dog .............................................................................15-4
15-4. B/U Pin Detection Sensor.......................................................................................15-5
15-4-1. Mounting the B/U Pin Detection Sensor............................................................................. 15-5
15-5. Bundling the B/U Pin Detection Sensor..................................................................15-7
15-5-1. Mounting the B/U Pin Detection Sensor (Bundling the Cables) ......................................... 15-7
15-5-2. Mounting the B/U Pin Detection Sensor (Bundling the Cables) ......................................... 15-8
15-6. Adjusting the Sensor ..............................................................................................15-9
15-7. Mounting the Driver Bracket.................................................................................15-10
15-8. Setting the Driver..................................................................................................15-11
15-9. Mounting the BU-Pin Sensor Dog ........................................................................15-12
[16] FEEDER POSITION INDICATOR..........................................................16-1
[17] KE2000/2000R JIG LISTS .....................................................................17-1

KE-2050/KE-2060, KE-2050R/2055R/KE-2060R Maintenance Manual
1-1
[1] X-Y UNIT
1-1. Replacing the Timing Belt and Adjusting the Belt Tension
If a tension of any belt drops below the criteria value, you must adjust it.
For the criteria value, see “Readjustment on market” of “Specification values” on page 1-4.
1-1-1. Timing Belt XM
To carry out the work efficiently, detach the side cover. Remove the cover fixing screws and slide the
cover toward the rear to detach the side cover.
(1) Remove the SM1051052TN (3 pcs.), SL6051292TN (1 pc.) and SL6061092TN (2 pcs.) fixing
the CB support. (No right side cover is equipped.)
CB su
pp
ort
Figure 1-1-1-1
Rev. 2.00

KE-2050/KE-2060, KE-2050R/2055R/KE-2060R Maintenance Manual
1-2
(2) Loosen the NM6050001SC, and then SM8053002TP that applies the tension to the timing belt
XM.
(3) Remove the timing belt XB. (See also section 1-1-2.)
(4) Remove the SL6064092TN fixing the XA-pulley bracket assembly, and SL6062092TN fixing
the XA-pulley base to detach the XA-pulley bracket assembly.
(5) Remove the SL6062092TN fixing the motor assembly to detach the X-motor assembly.
(6) Replace the timing belt XM.
(7) Reassemble the components in the reverse order of disassembly.
(8) Adjust the tensions of the timing belts XM and XB. (See also “Adjustment Procedure” on page
1-4.)
X-motor
assembly
XA-pulley
bracket assembly
Timing belt XM
X-frame end
* This figure shows the left side o
f
the unit when viewed from the
side. (The right side has the
same structure.)
Figure 1-1-1-2
Rev. 2.00

KE-2050/KE-2060, KE-2050R/2055R/KE-2060R Maintenance Manual
1-3
1-1-2. Timing Belt XB
(1) Remove the SL6053592TN (4 pcs.) and SL6052592TN (3 pcs.), then detach the head plate
and the X-belt support assembly.
(2) Loosen the SL6052592TN (4 pcs.) fixing the X-belt supports L and R, and loosen the X-belt
tension adjustment screw (SM6057552TP). After that, remove the SL6052592TN to separate
the X-belt support R.
(3) Remove the SL6042092TN sandwiching the timing belt to replace the belt.
(4) Sandwich the timing belt XB by the X-belt support (2) and X-belt support L or X-belt support R,
and secure them using the SL6042092TN. At this time, apply Loctite 277 to the SL6042092TN
and tighten the SL6042092TN evenly with a tightening torque of 5 N・m.
(5) Reassemble the components in the reverse order of disassembly.
(6) Adjust the tension of the timing belt XB. (See the adjustment procedure on page 1-4.)
X-belt support (2)
X-belt support L X-belt su
pp
ort R
Figure 1-1-2-1
Rev. 2.00

KE-2050/KE-2060, KE-2050R/2055R/KE-2060R Maintenance Manual
1-4
<Adjustment Procedure>
cMake measurements with a Yunitta's tension meter placed at the positions indicated by the
arrows in the figure below and check to make sure that the values are within the specification
value range.
When adjusting the X-motor belt, measure the tension at several positions (at least five
positions) while rotating the pulley and check that the averaged value is within the
specification value range.
•Tension meter input values
Belt type Model Belt unit weight
(g/m・mm)
Belt width
(mm)
Belt span
(mm)
Timing belt XM All models 2.5 20 119
Timing belt XB All models 3.8 60 1157
•Position of measurement
Y-motor bracket
Front
Y-belt
Y-belt
Rear
Y-axis
Front
X-motor
belt
X-belt
Rear
X-axis
•Specification values
1. Factory default setting
X-belt (timing belt XB): 1000 ±50N
X-motor belt (timing belt XM): 175 ±20N
2. Readjustment on market
X-belt (timing belt XB): If the belt tension is less than 650N, the adjustment is
needed.
X-motor belt (timing belt XM): If the belt tension is less than 100N, the adjustment is
needed.
Rev. 2.00

KE-2050/KE-2060, KE-2050R/2055R/KE-2060R Maintenance Manual
1-5
dAdjusting method
•Timing belt XM
cLoosen the SL6051692TN
fixing the X-motor.
dLoosen the NM605001YN
and adjust the tension
using the SM8053002TN.
eTighten the SL6051692TN
firmly. (Tightening torque:
15 N・m)
fLock the NM6050001TN.
X-frame end
L assembly
•Timing belt XB
cLoosen the SL6052592TN
fixing the X-belt support L
and X-belt support R.
dAdjust the tension using the
SM6057552TP.
eTighten the SL6052592TN
firmly. (Tightening torque:
8.5 N・m)
X-belt su
pp
ort R
X-belt su
pp
ort L
Rev. 2.00

KE-2050/KE-2060, KE-2050R/2055R/KE-2060R Maintenance Manual
1-6
1-1-3. Timing Belt YM
(1) Detach the pulley cover.
(2) Remove the timing belt YB. (See section 1-1-4.)
(3) Loosen the SL6061492TN fixing the Y-motor assembly.
(4) Loosen the SM6041202TN to loosen the tension of the timing belt YM.
(5) Loosen the SL6064092TN to detach the YM-bracket assembly.
(6) Loosen the SL6063592TN to replace the YA-pulley bracket assembly.
(Replacement of only the timing belt YM is not allowed. Always replace the YA-pulley bracket
assembly as a set.)
(7) Reassemble the components in the reverse order of disassembly. Then adjust the tensions of
the timing belts YM and YB. (See the adjustment procedure on page 1-8.)
YA-pulley bracket
assembly
Timing belt YM
(From the rear side)
Y-axis frame
YM-bracket
assembly
SM6041202TN
(From the rear side)
Y-motor
assembl
y
Figure 1-1-3-1
Rev. 2.00

KE-2050/KE-2060, KE-2050R/2055R/KE-2060R Maintenance Manual
1-7
1-1-4. Timing Belt YB
To carry out the work efficiently, detach the side covers. Remove the cover fixing screws and slide
the cover toward the rear to detach the side cover.
(1) Remove the SL6062092TN fixing the Y-belt support (1) to the X-frame end.
(2) Loosen the SL6062592TN fixing the YB-pulley bracket assembly.
(3) Loosen the SM6084002TN to detach the YB-pulley bracket assembly.
(4) Remove the SL6041292TN sandwiching the timing belt YB. Replace the timing belt YB.
(5) Reassemble the components in the reverse order of disassembly. Adjust the tension of the
timing belt YB. (See also “Adjustment Procedure” on page 1-8.)
Y-belt support (2)
Timing belt YB
To the X-frame end assembly
Y-belt support (1)
Figure 1-1-4-1
YB-pulley bracket
assembly
Timing belt YB
Y-axis
frame
(From the rear side)
Figure 1-1-4-2
Rev. 2.00

KE-2050/KE-2060, KE-2050R/2055R/KE-2060R Maintenance Manual
1-8
<Adjustment Procedure>
cMake measurements with a Yunitta's tension meter placed at the positions indicated by the
arrows in the figure below and check to make sure that the values are within the specification
value range.
(Note 1) When adjusting the Y-motor belt, measure the tension at several positions (at
least five positions) while rotating the pulley and check that the averaged value is
within the specification value range.
•Tension meter input values
Belt type Model Belt unit weight
(g/m・mm)
Belt width
(mm)
Belt span
(mm)
Timing belt YM All models 2.5 40 93
50M, 60M 3.8 70 1115
50L, 60L 3.8 70 1221
Timing belt YB
60E 3.8 70 1325
•Position of measurement
X-axis
Rear
X-belt
X-motor
belt
Front
Y-axis
Rear
Y-belt
Y-belt
Front
Y-motor bracket
•Specification values
1. Factory default setting
Y-belt (timing belt YB): 1230 ±50N
Y-motor belt (timing belt YM): 325 ±20N
2. Readjustment on market
Y-belt (timing belt YB): If the belt tension is less than 800N, the adjustment is
needed.
Y-motor belt (timing belt YM): If the belt tension is less than 190N, the adjustment is
needed.
Rev. 2.00

KE-2050/KE-2060, KE-2050R/2055R/KE-2060R Maintenance Manual
1-9
dAdjusting method
•Timing belt YM
cLoosen the SL6061492TN fixing
the Y-motor.
dAdjust the tension using the
SM6041602TN.
eTighten the SL6061492TN firmly.
(Tightening torque: 10 N・m)
Y-axis frame
•Timing belt YB
cLoosen the SL6062592TN fixing
the YB-pulley bracket.
dAdjust the tension using the
SM6084002TN.
eTighten the SL6062592TN firmly.
Timing belt YB
YB-pulley bracket
Rev. 2.00

KE-2050/KE-2060, KE-2050R/2055R/KE-2060R Maintenance Manual
1-10
Rev. 2.00
1-2. Replacing the Pulleys
1-2-1. Replacing the Pulley XA
Carry out the replacement work in the same manner as for the timing belt XM in 1-1-1.
1-2-2. Replacing the Pulley XM (X-motor assembly)
Carry out the replacement work in the same manner as for the timing belt XM in 1-1-1.
1-2-3. Replacing the Pulley YA
Carry out the replacement work in the same manner as for the timing belt YM in 1-1-3.
1-2-4. Replacing the Pulley YM (Y-motor assembly)
Carry out the replacement work in the same manner as for the timing belt YM in 1-1-3.
1-2-5. Replacing the Pulley YB
Carry out the replacement work in the same manner as for the timing belt YB in 1-1-4.

KE-2050/KE-2060, KE-2050R/2055R/KE-2060R Maintenance Manual
1-11
Rev. 2.00
1-3. Replacing the Servomotors
1-3-1. Replacing the X-Motor
Carry out the replacement work in the same manner as for the timing belt XM in 1-1-1.
1-3-2. Replacing the Y-Motor
Carry out the replacement work in the same manner as for the timing belt YM in 1-1-3.

KE-2050/KE-2060, KE-2050R/2055R/KE-2060R Maintenance Manual
1-12
1-4. Replacing the Magnescale
Before replacing the magnescale, leave a new magnescale near the machine for 1 hr. or
longer so that its temperature becomes the same as that of the machine.
(1) Detach the magnescale head from the bracket.
(2) tach the old magnescale.De
(3) Degrease the magnescale mounting surface and magnescale completely.
It is recommended to use "Mechafine Mate" for the degreasing agent.
1-4-1. Magnescale Affixing Position
•X-axis magnescale affixing procedure
cWith the X-axis affixing jig (part No. 40008104) made in contact with the front of the LX-guide
and the bottom of the X-axis frame, make the magnescale in contact with the X-axis affixing
jig to affix the magnescale.
X-axis magnescale affixing jig
Magnescale
X-axis frame
LM guide X
Magnescale affixing position (deviation in the horizontal direction): Specification value ±0.1 mm
Rev. 2.00
This manual suits for next models
4
Table of contents
Other JUKI Industrial Equipment manuals

JUKI
JUKI ACF-164-1903 Quick start guide

JUKI
JUKI KE-2070 User manual

JUKI
JUKI PS-900-13090 User manual

JUKI
JUKI FX-3R Operating manual

JUKI
JUKI KE-1070 Operating manual

JUKI
JUKI LBH-1790AB User manual

JUKI
JUKI JaNets JT Simple User manual

JUKI
JUKI PS-800SB-8045 User manual

JUKI
JUKI JX-100 User manual

JUKI
JUKI RS-1 User manual
Popular Industrial Equipment manuals by other brands

Jäger
Jäger Z62-K360.12 S5AW2 manual

PCB Piezotronics
PCB Piezotronics IMI SENSORS 691A51/01 Installation and operating manual

Rodix
Rodix FEEDER CUBE VF Series manual

Hydac
Hydac FluidAqua Mobil FAM 15 Operation instructions

Harris
Harris DataSmart 763 Installation & operation manual

Sav
Sav 243.01 operating instructions