JUKI JaNets JT Simple User manual

JaNets JT Simple
Instruction Manual for the setup and change
of the line
Congratulations on your purchase of a JUKI product.
To ensure safe use of the JaNets JT Simple, it is necessary to read this Instruction
Manual carefully and fully understand its contents before putting the JaNets JT
Simple into use. Keep this Instruction Manual at a prescribed position to make it
available whenever necessary.
Revision No.

CONTENTS
Introduction ..................................................................................................... 1
I. Prior arrangement ........................................................................................ 1
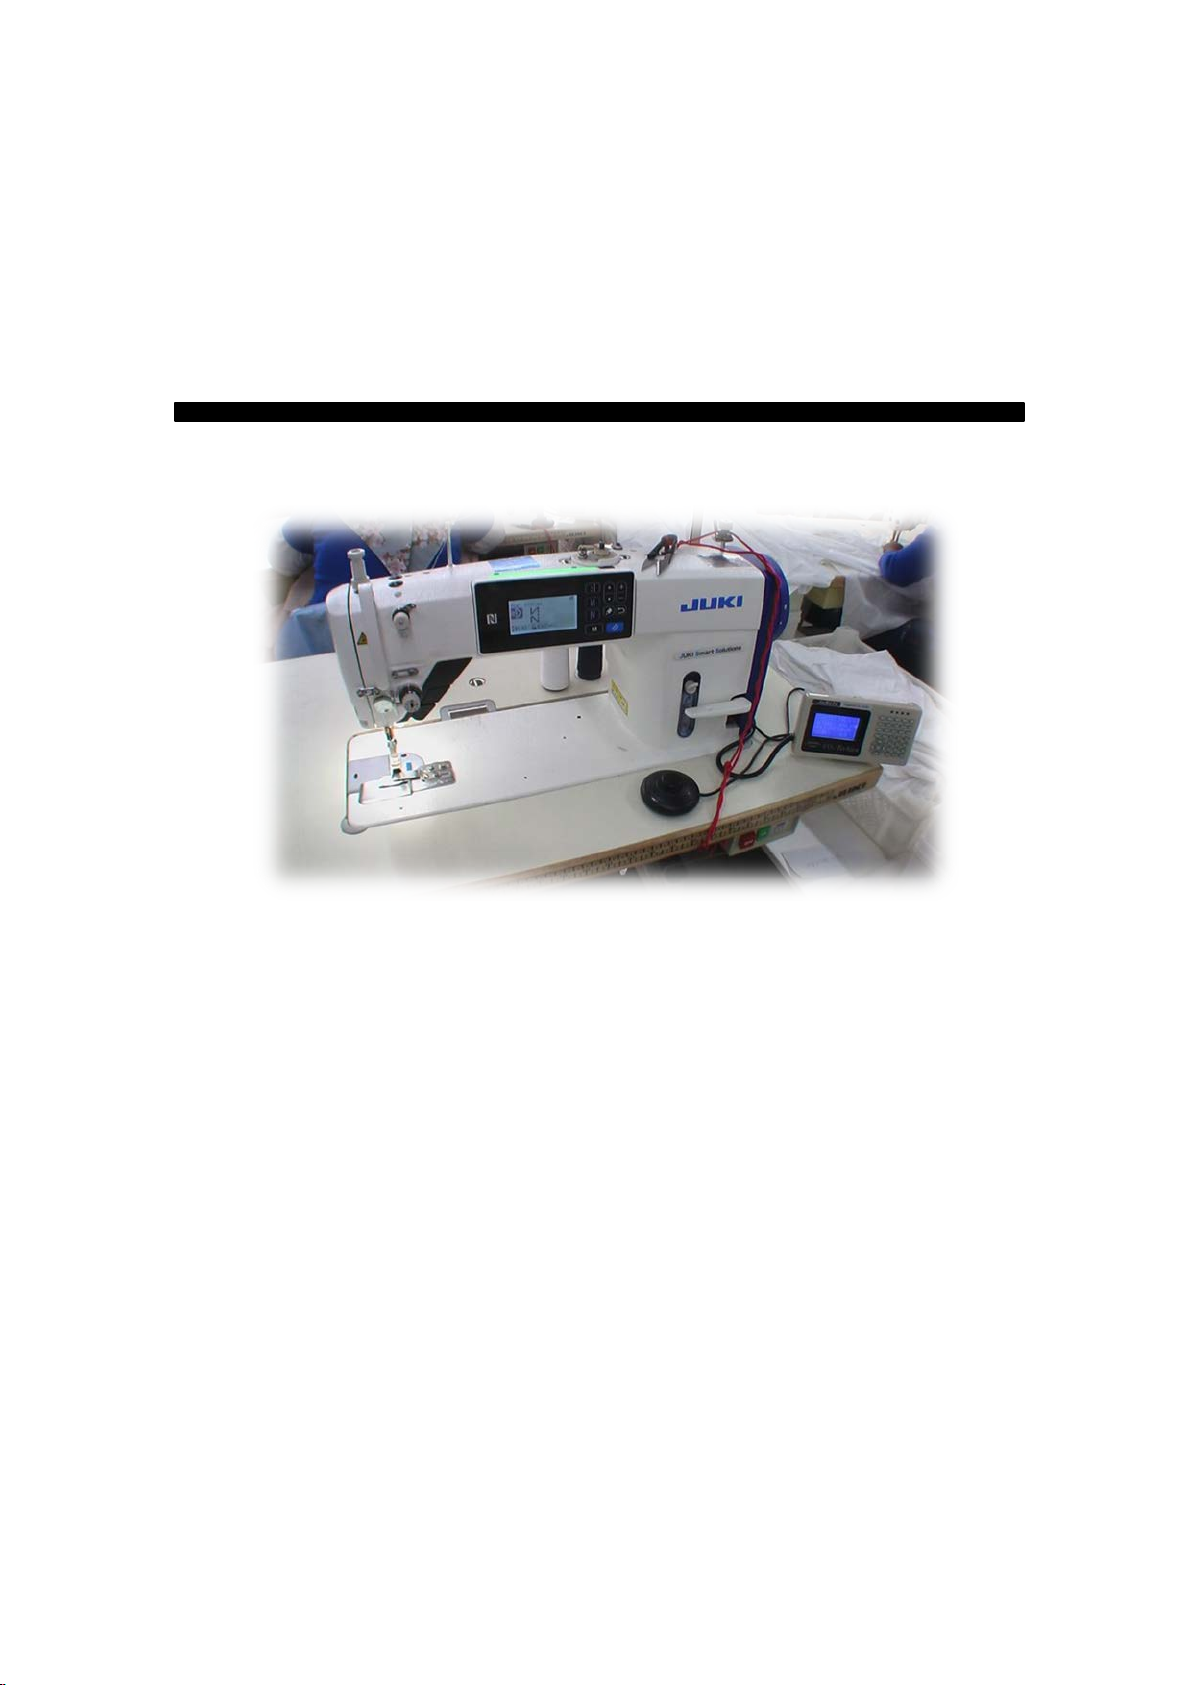
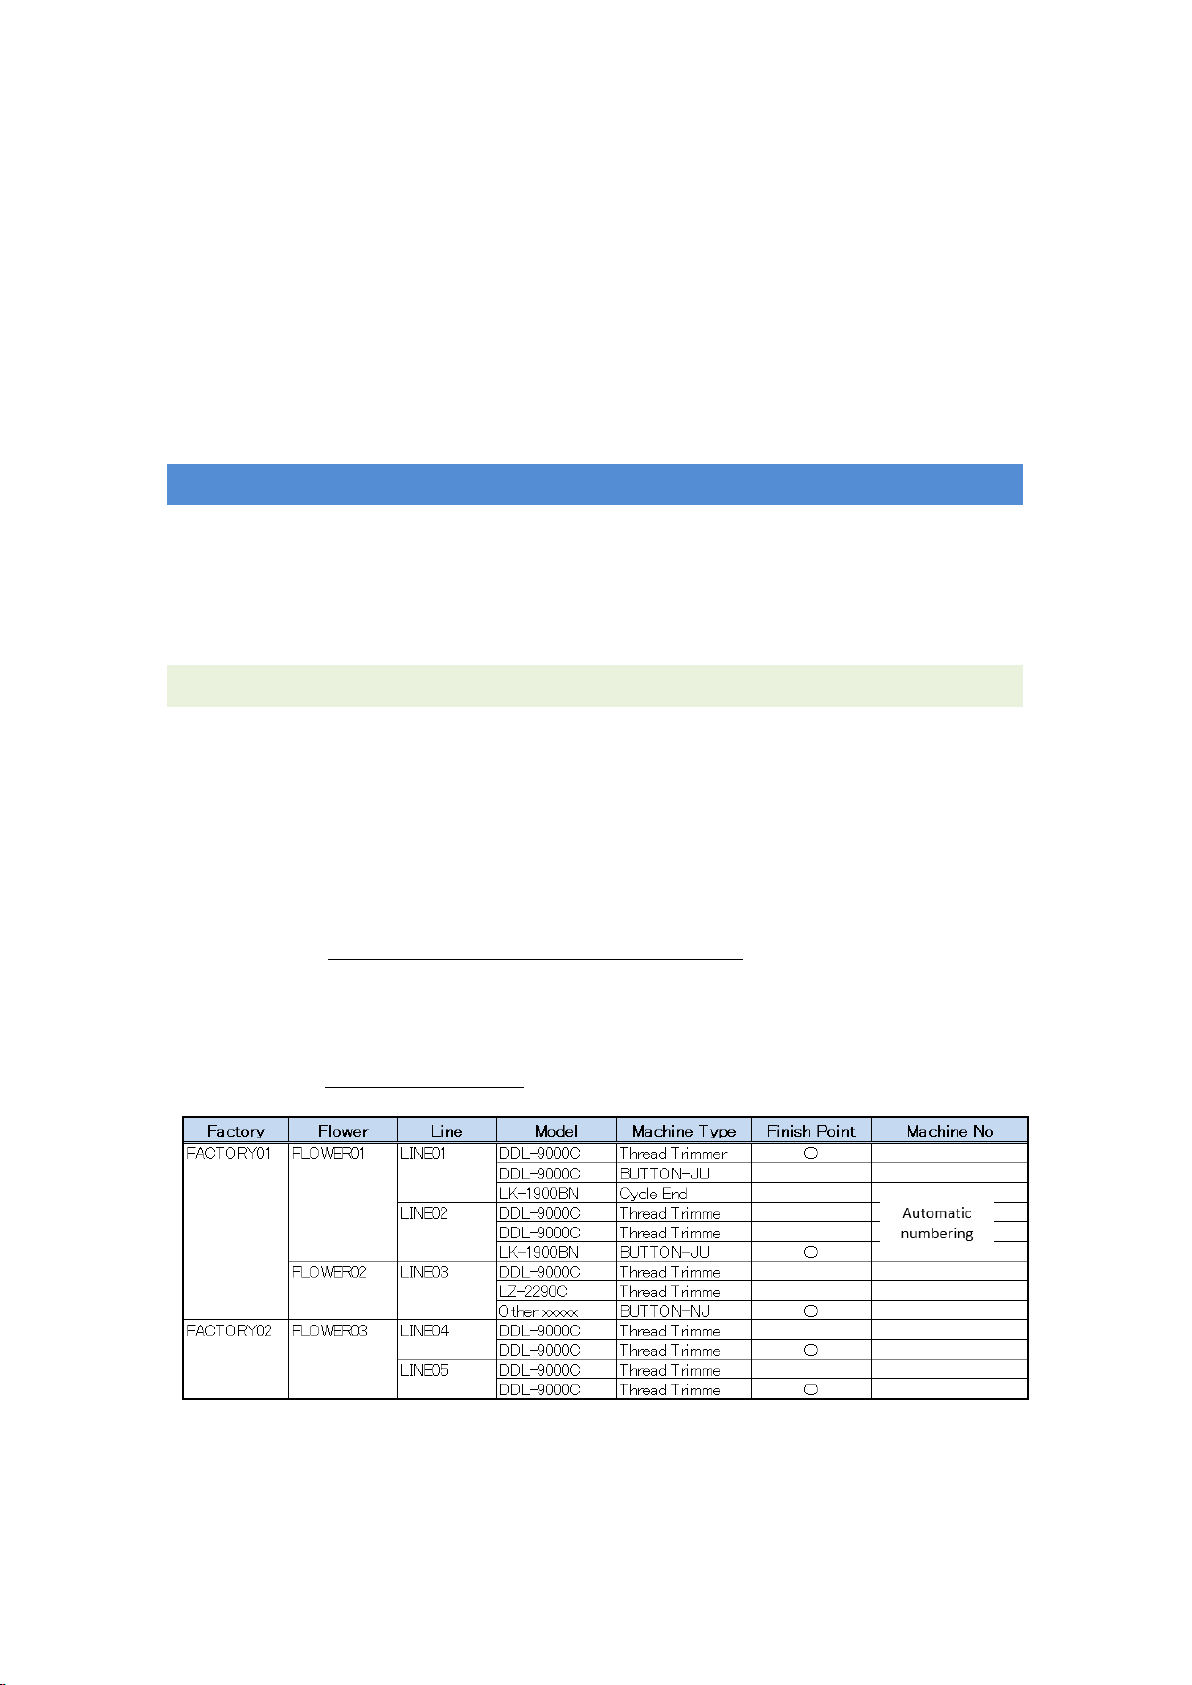
1. List of layout of terminals ......................................................................... 1
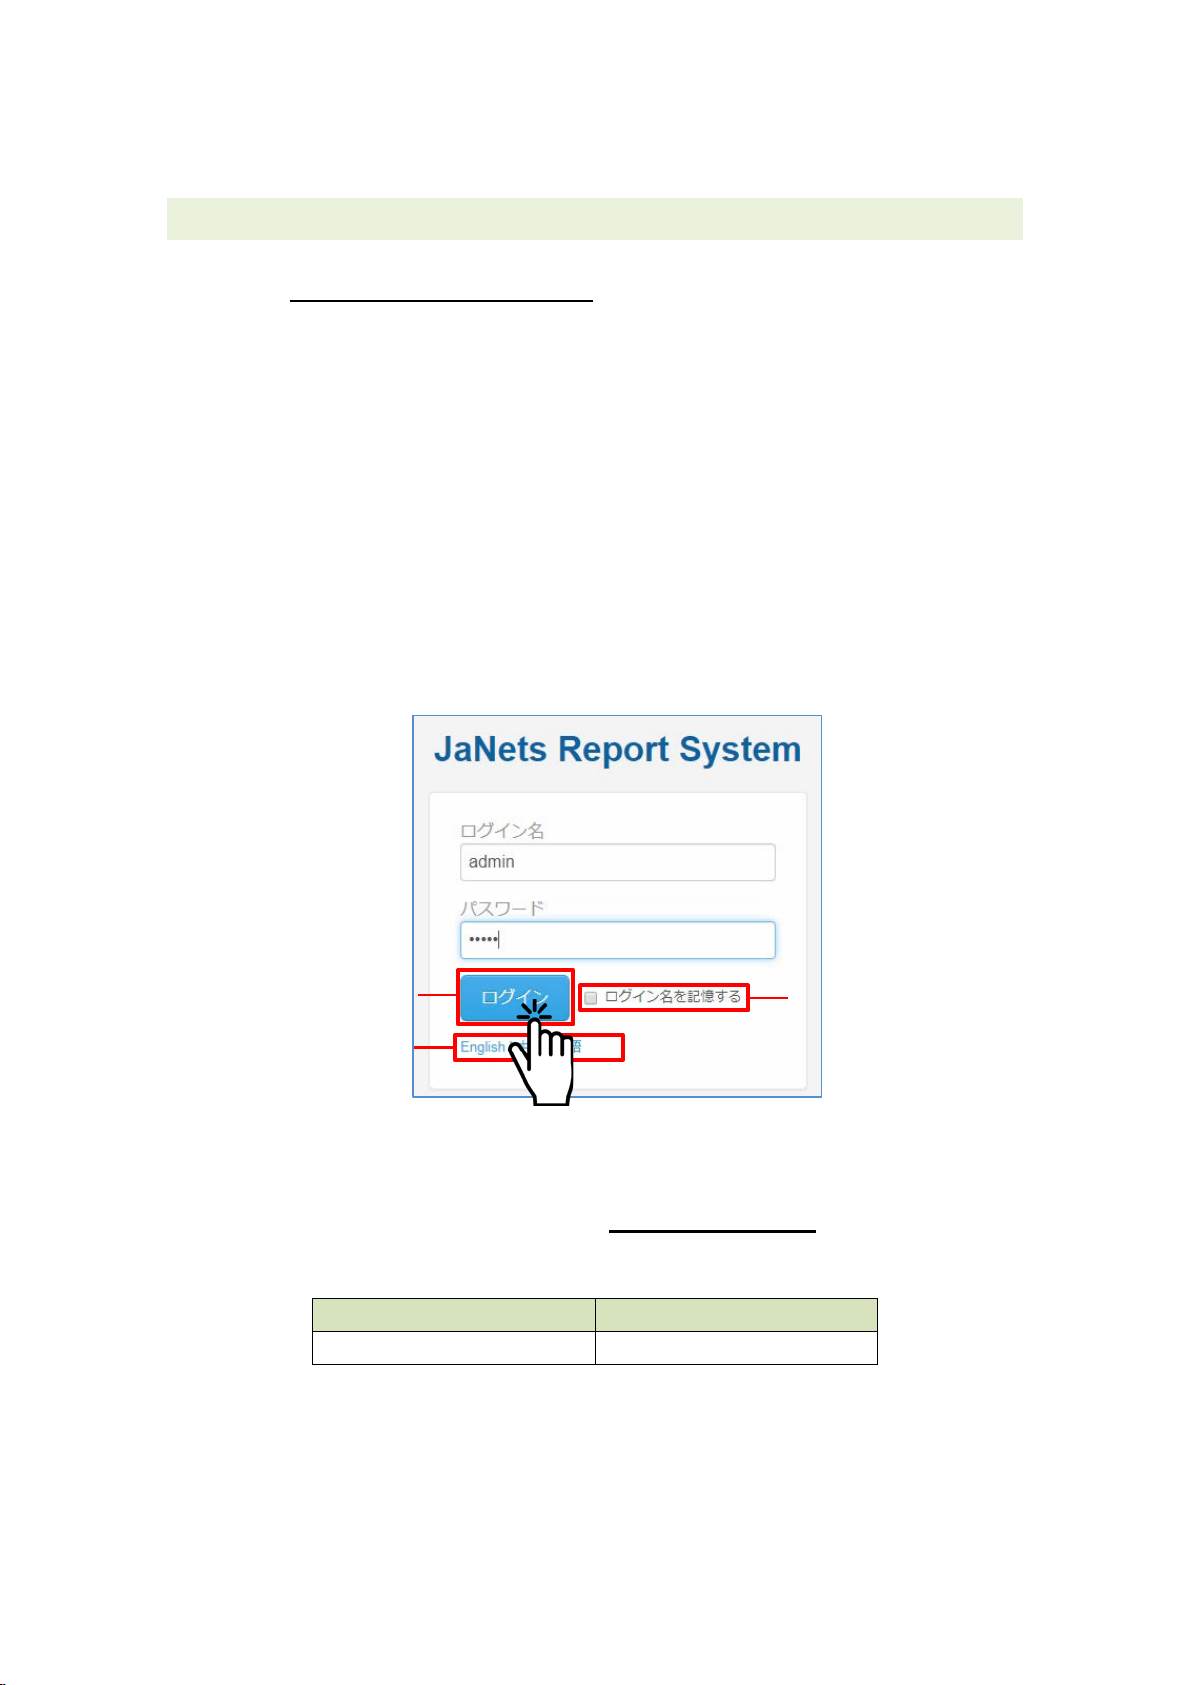
2. Login to the report system ....................................................................... 2
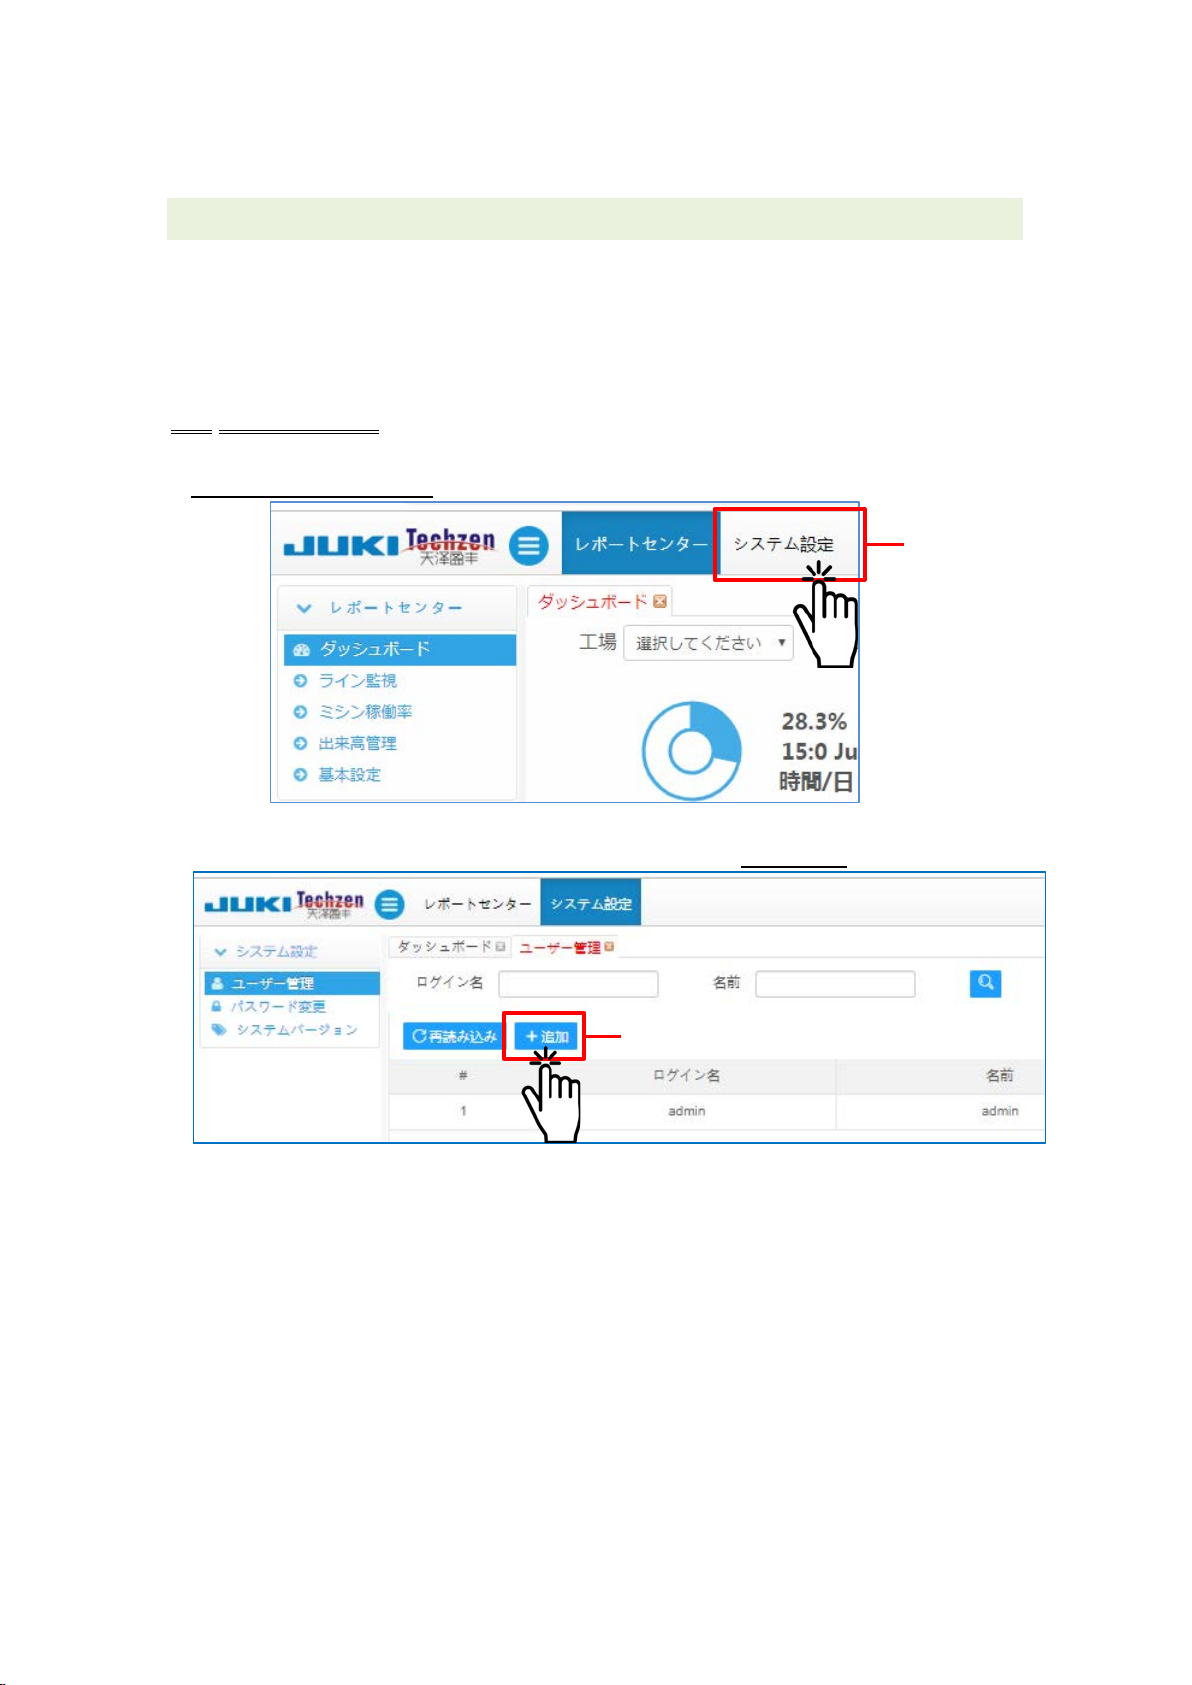
3. User registration ...................................................................................... 3
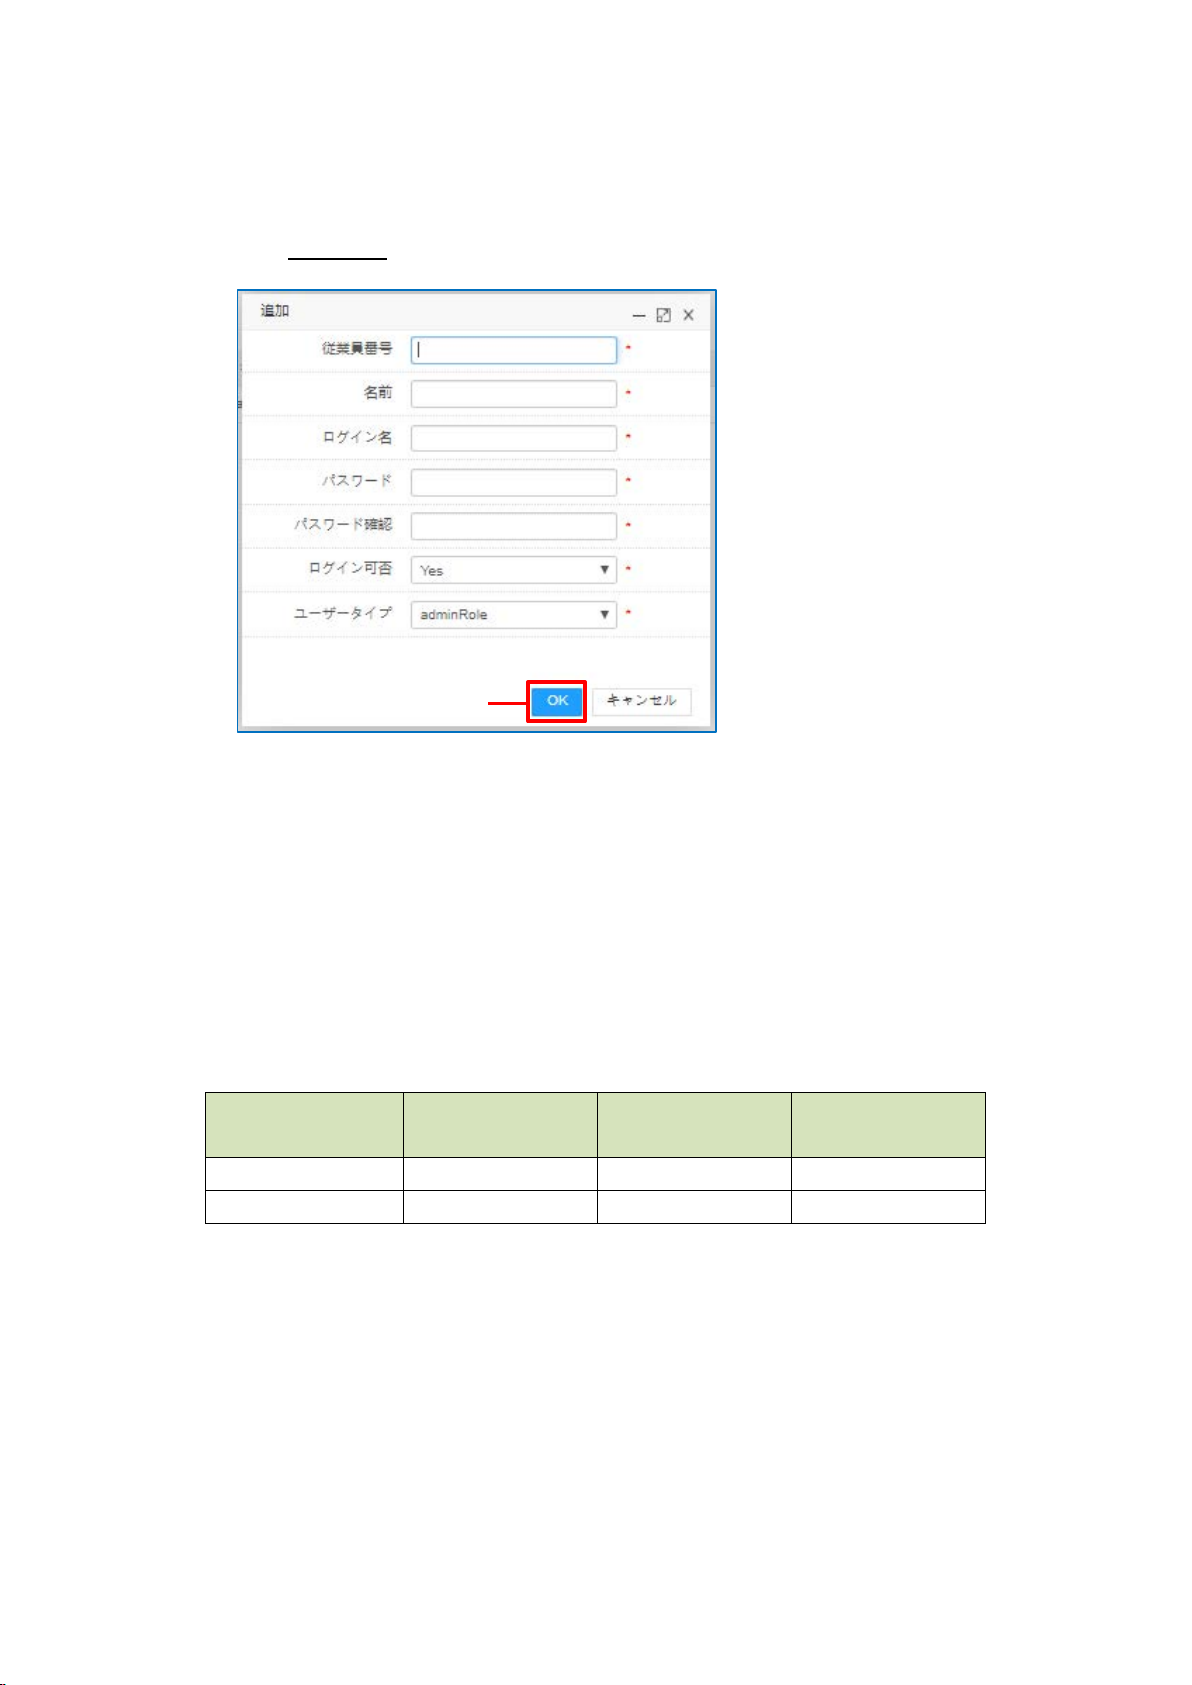
3-1. Adding a user .................................................................................... 3
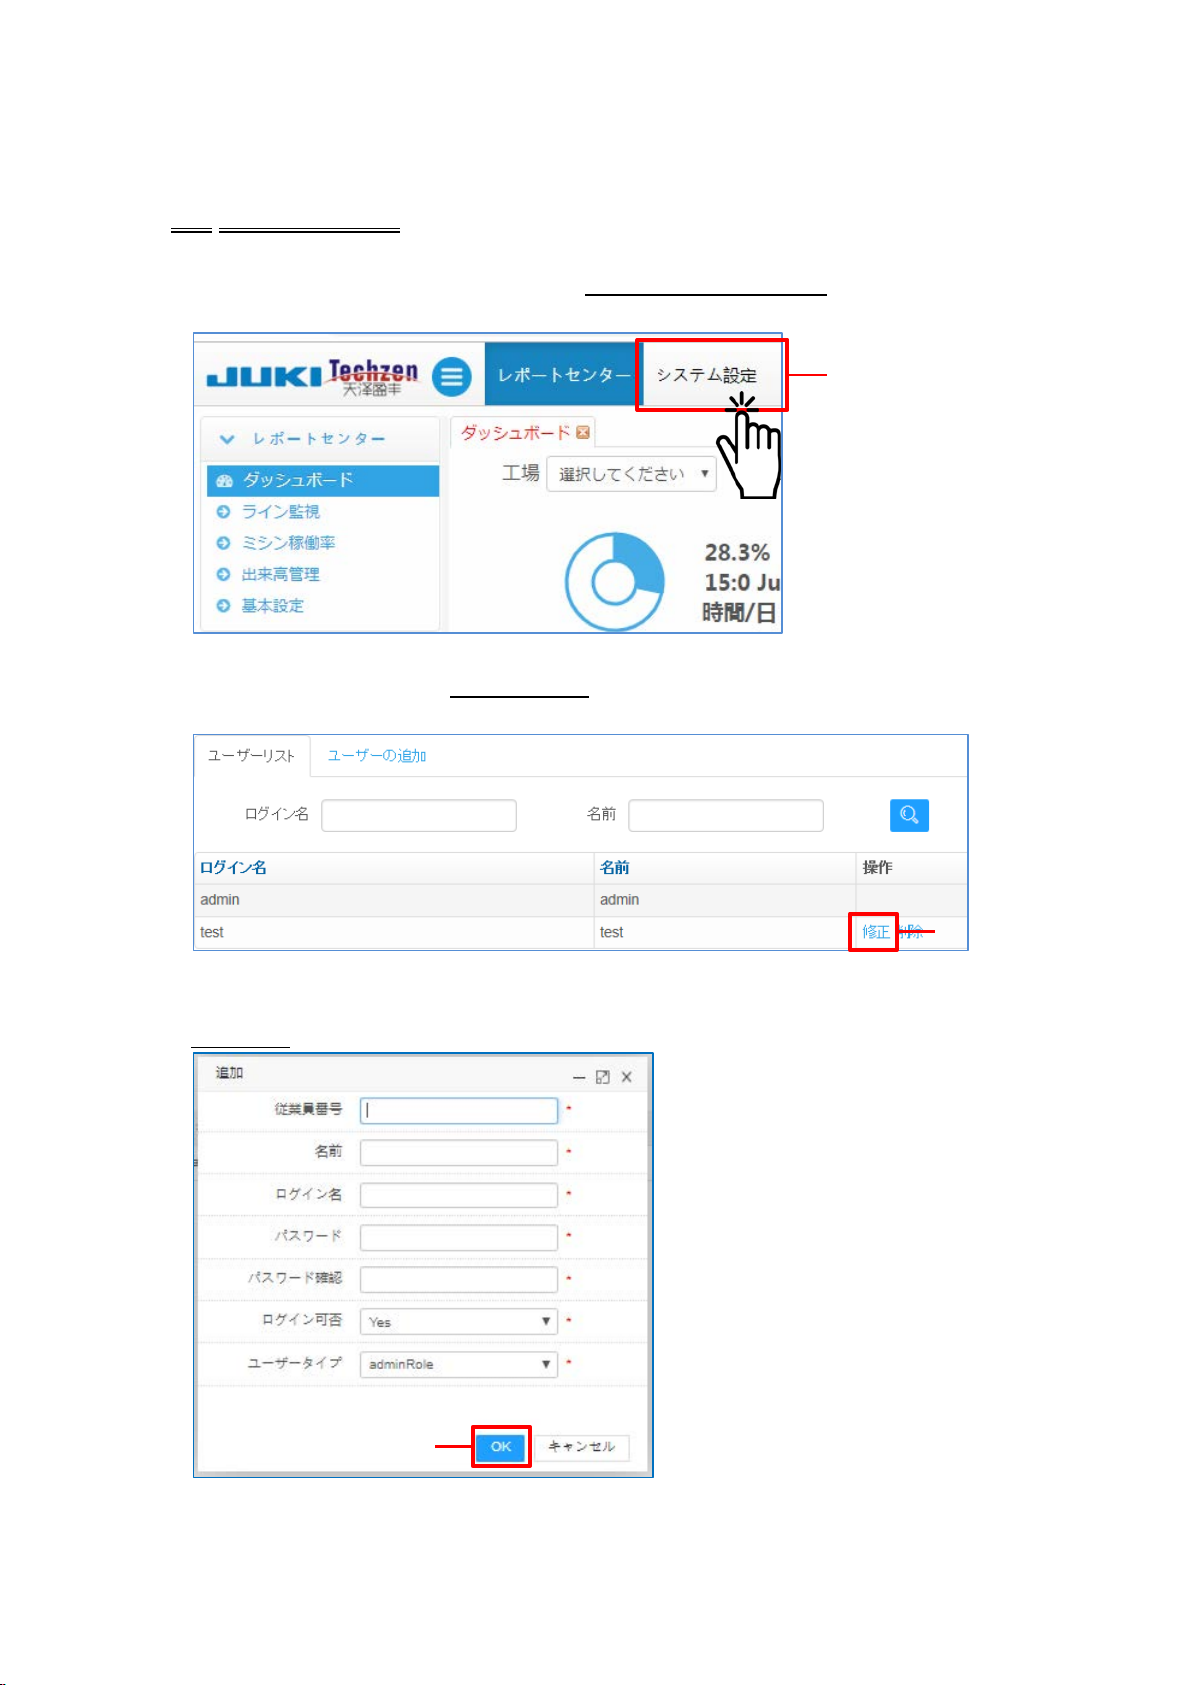
3-2. Editing the user ................................................................................. 5
II. System setup .............................................................................................. 7
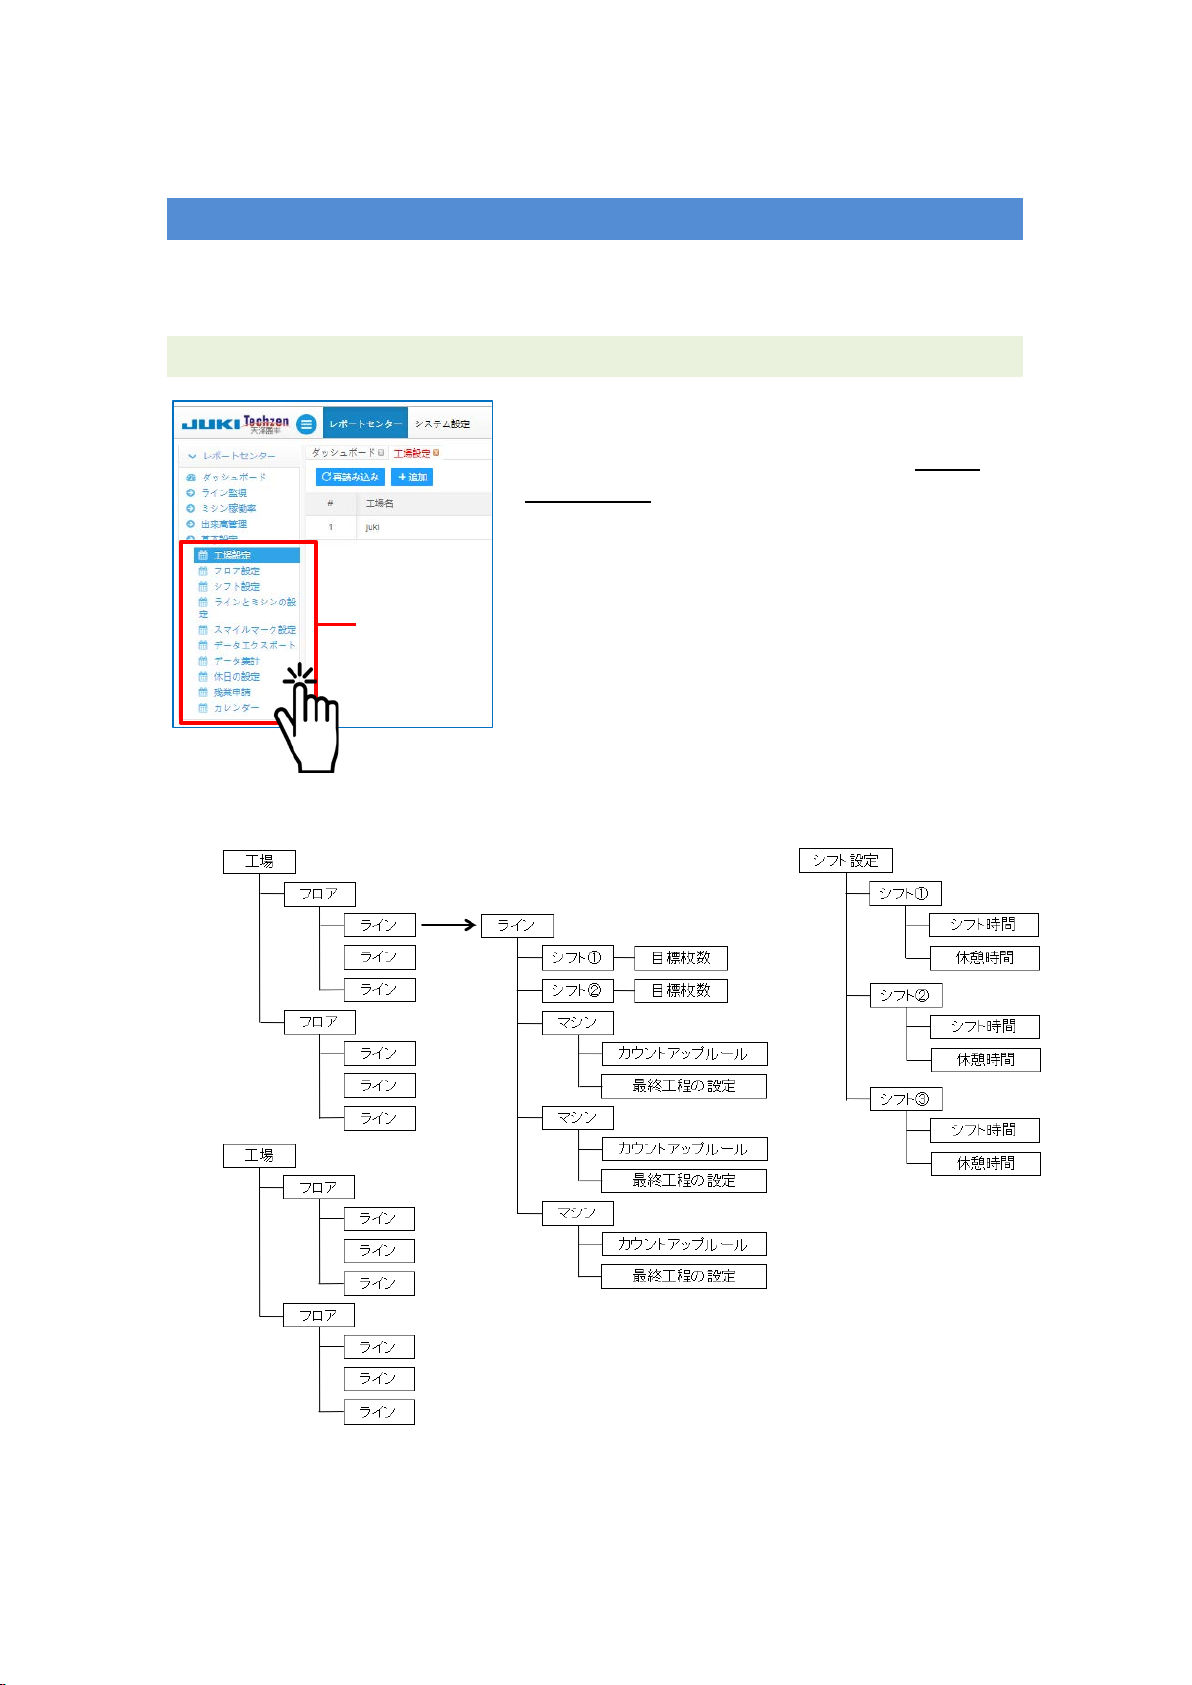
1. Configuration data relationship diagram .................................................. 7
2. Factory setting ......................................................................................... 8
2-1. Adding a plant.................................................................................... 8
2-2. Deleting the factory ........................................................................... 9
2-3. Deleting the factory ......................................................................... 10
3. Floor setting ............................................................................................11
3-1. Adding a floor ...................................................................................11
3-2. Editing the floor ............................................................................... 12
3-3. Deleting the floor ............................................................................. 13
4. Shift setting ............................................................................................ 14
4-1. Adding a shift................................................................................... 14
4-2. Editing the shift................................................................................ 15
4-3. Deleting the shift.............................................................................. 16
5. Line setting ............................................................................................ 17
5-1. Adding a line.................................................................................... 17
5-2. Editing the line................................................................................. 19
5-3. Deleting the line............................................................................... 21
5-4. Stopping the line.............................................................................. 22
6. Machine setting...................................................................................... 23
6-1. Adding a machine............................................................................ 23
6-2. Editing the machine......................................................................... 25
6-3. Deleting the machine....................................................................... 26

JaNets JT Simple Instruction Manual for the setup and change of the line
1 / 30
Introduction
This Instruction Manual describes the setup and operating procedure of the JUKI
JaNets JT Simple when it is put into use.
If you have not yet installed the operating environment for the JaNets JT Simple on
the relevant personal computers (PCs), install it referring to the Installation Manual.
Then, read this Instruction Manual.
This Instruction Manual is intended for system administrators.
I. Prior arrangement
Firstly, connect and configure the sewing machines, terminals, networking equipment
(Nport, Zigbee AP), server PC and client PCs (ETS, EF, report system) referring to
the Installation Manual.
This section describes the prior arrangement after the completion of installation.
1. List of layout of terminals
It is necessary to firstly determine factories, floors, lines and pieces of equipment to
be managed with the JaNets JT Simple system (hereinafter referred to the System)
and set them in the System.
When you register equipment in the System, a "machine number" is automatically
assigned to each piece of equipment. It is recommended to list the machine numbers
since the "machine number" is used to link up the machine to the terminal in the
System.
* Refer to II-7. Linking up the machine to the terminal.
In addition, since setting of the "count increasing method", "number of counts of
times of thread trimming" and "final process" for each machine is also necessary, it
will be useful to arrange them in a list.
* Refer to II-6. Machine setting.

JaNets JT Simple Instruction Manual for the setup and change of the line
2 / 30
2. Login to the report system
Start up the report system in accordance with the Installation Manual.
* Refer to V.7 Setting the report system in the Installation Manual.
Selecting the language … ①
The language you want to use can be selected from three languages, English,
Chinese and Japanese.
Recording the login name
If you place a checkmark …②to "Record the login name", the dashboard
screen will be directly displayed without displaying the login screen from the
next startup of the report system and beyond.
Login
Enter your login name and password. Press the Login button … ③. Then, the
dashboard screen is displayed to allow you to use the functions of the report
system.
* When you log in to the report system for the first time, only the below-stated
default login name and password are valid. Use them after registering the user
who uses the report system. Refer to I.3 User registration for the setting
procedure.
Login name
Password
admin
admin
③
②
①

JaNets JT Simple Instruction Manual for the setup and change of the line
3 / 30
3. User registration
This clause describes the user registration procedure. After you have registered a
new user with the report system, the added user is allowed to log in to the report
system. This clause also describes the procedure for editing the user information and
deleting the user.
3-1. Adding a user
After you have logged in to the report system with the "user name: admin", press the
System configuration tab … ①
The system configuration screen is displayed. Press the Add a user … ②.
①
②

JaNets JT Simple Instruction Manual for the setup and change of the line
4 / 30
The user information setting screen is displayed. Enter the following information and
press the OK button … ③to confirm the data you have entered.
Employee number, name and login name
Enter the information on the employee you want to register as a user.
Password (password confirmation)
Determine the user's password and enter it.
Enable / disable of login
Select "Yes".
* If you select "No", login to the report system will be disabled.
User type
Select from the two types; "adminRole" or "normalRole". Available menus
differ according to the type of user you select.
User type User
management
Password
change
Version
confirmation
adminRole
○
○
○
normalRole
○
User management: Addition and deletion of the user and editing of the
user information are possible.
Password change:
User password can be changed.
Version confirmation:
System version information can be confirmed.
③

JaNets JT Simple Instruction Manual for the setup and change of the line
5 / 30
3-2. Editing the user
Log in to the report system using the name of user who has administrative rights
(user type: adminRole). Then, press the System configuration tab … ○1.
The system configuration screen is displayed. Select the user you want to edit from
the user list and press the Correct button … ②.
The user information setting screen is displayed. Edit the information and press the
OK button … ③to confirm the data you have edited.
①
②
③

JaNets JT Simple Instruction Manual for the setup and change of the line
6 / 30
Deleting the user
Log in to the System using the name of user who has administrative rights (user
type: adminRole). Then, press the System configuration tab …①.
The system configuration screen is displayed. Select the user you want to delete
from the user list and press the Delete button …②.
The deletion confirmation screen is displayed. Press the OK button … ③.
The deleting procedure is completed when the message "Deletion is completed" is
displayed.
①
②
③

JaNets JT Simple Instruction Manual for the setup and change of the line
7 / 30
II. System setup
This section describes the setting items that are necessary to view various charts
such as the operation rate and quantity of output on the report center.
1. Configuration data relationship diagram
The relationship among the data that must be set
is displayed, as shown below, using the Basic
configuration … ○1 of the report center.
* Floors and lines are placed under the factory.
Shifts and machines are placed under the lines
and registered with them. As many as 10 factories
can be registered. Shifts are retained as
separately-configured data.
[ Configuration data relationship diagram ]
①

JaNets JT Simple Instruction Manual for the setup and change of the line
8 / 30
2. Factory setting
2-1. Adding a plant
Select the Basic configuration > Factory … ①. Press the +Add button … ②.
The factory name input dialog is displayed. Edit the Factory name … ③.
* As many as 20 half-width characters or 10 full-width characters can be entered
as a factory name.
* Avoid duplication of the factory name in the System.
After you have edited the factory name, press the OK button …④to confirm the
editing you have made.
②
①
③
④

JaNets JT Simple Instruction Manual for the setup and change of the line
9 / 30
2-2. Deleting the factory
Select the Basic configuration > Factory … ①. Select the factory you want to delete,
and press the Edit button … ②.
The factory name input dialog is displayed. Edit the Factory name … ③.
* As many as 20 half-width characters or 10 full-width characters can be entered
as a factory name.
* Avoid duplication of the factory name in the System.
After you have edited the factory name, press the OK button …④to confirm the
editing you have made.
②
①
④
③

JaNets JT Simple Instruction Manual for the setup and change of the line
10 / 30
2-3. Deleting the factory
Select the Basic configuration > Factory …①. Select the factory you want to delete,
and press the Delete button … ②.
The factory deletion confirmation message is displayed.
Press the OK button … ③to delete the factory from the factory list.
Caution)
If the factory you want to delete has been
registered with the floor, the message shown
at the left is displayed. In this case, the
factory cannot be deleted.
②
①
③

JaNets JT Simple Instruction Manual for the setup and change of the line
11 / 30
3. Floor setting
3-1. Adding a floor
Select the Basic configuration > Floor … ①and press the +Add button … ②.
The floor name input dialog is displayed. Enter a Floor name … ③and select the
Factory … ④.
* As many as 20 half-width characters or 10 full-width characters can be entered
as a floor name.
* Avoid duplication of the floor name in the System.
After you have entered the floor name, press the OK button …⑤to add the floor.
②
①
③
④
⑤

JaNets JT Simple Instruction Manual for the setup and change of the line
12 / 30
3-2. Editing the floor
Select the Basic configuration > Floor … ①. Press the Edit button … ②.
The factory name input dialog is displayed. Edit the Floor name … ③and the
Factory name … ④.
* As many as 20 half-width characters or 10 full-width characters can be entered
as a floor name.
* Avoid duplication of the floor name in the System.
After you have completed editing, press the OK button … ⑤to confirm the editing
you have made.
②
①
③
④
⑤

JaNets JT Simple Instruction Manual for the setup and change of the line
13 / 30
3-3. Deleting the floor
Select the Basic configuration > Floor … ①and press the Delete button … ②.
The floor deletion confirmation message is displayed.
Press the OK button … ③to delete the floor from the floor list.
Caution)
If the floor you want to delete has been registered
with the line, the message shown at the left is
displayed. In this case, the floor cannot be
deleted.
②
①
③

JaNets JT Simple Instruction Manual for the setup and change of the line
14 / 30
4. Shift setting
4-1. Adding a shift
Select the Basic configuration > Shift … ○1 and press the +Add button …②.
The shift name input dialog is displayed. Enter a Shift number … ③, Finishing time
… ④, Work break time … ⑤and Shift reset time setting (min) … ⑥.
* As many as 10 half-width characters can be entered as a shift name. (Full-width
characters cannot be entered.)
* The work break time will be disabled unless a checkmark is put to the work
break time checkbox.
* The work break time must be set within the working hours. If the work break
time falls out of the working hours, it will be cleared when the OK button … ⑦
is pressed.
* The Shift reset time setting (min) … ⑥is the setting that determines the time
(in terms of minutes ahead of the starting time) at which the data on the shift
such as the target quantity of output, operation rate and progress chart are
reset.
After you have entered the data on the shift, press the OK button … ⑦to add the
shift.
②
③
⑦
④
⑤
⑥
①

JaNets JT Simple Instruction Manual for the setup and change of the line
15 / 30
4-2. Editing the shift
Select the Basic configuration > Shift … ①and press the Edit button …②.
The shift name input dialog is displayed. Edit the Shift number … ③, Finishing time
… ④, Work break time … ⑤and Shift reset time setting (min) … ⑥.
* As many as 10 half-width characters can be entered as a shift name. (Full-width
characters cannot be entered.)
* The work break time will be disabled unless a checkmark is put to the work
break time checkbox.
* The work break time must be set within the working hours. If the work break
time falls out of the working hours, it will be cleared when the OK button … ⑦
is pressed.
*
The Shift reset time setting (min) …
⑥
is the setting that determines the time (in
terms of minutes ahead of the starting time) at which the data on the shift such as
the target quantity of output, operation rate and progress chart are reset.
After you have entered the data on the shift, press the OK button … ⑦to confirm
the editing you have made.
②
①
③
⑦
④
⑤
⑥

JaNets JT Simple Instruction Manual for the setup and change of the line
16 / 30
4-3. Deleting the shift
Select the Basic configuration > Shift … ①and press the Delete button … ②.
The shift deletion confirmation message is displayed.
Press the OK button … ③to delete the shift from the shift list.
②
①
③

JaNets JT Simple Instruction Manual for the setup and change of the line
17 / 30
5. Line setting
5-1. Adding a line
Select the Basic configuration > Line … ①and press the +Add button … ②.
The line setting screen is displayed. Enter a Line name … ③, Line number … ④,
Floor … ⑤, Shift … ⑥and Target output-quantity of shift … ⑦.
* As many as 30 half-width characters or 15 full-width characters can be entered
as a line name.
* Avoid duplication of the line name in the System.
* Avoid duplication of the line number in the floor.
* As many as two shifts can be entered.
After you have entered the line data, press the Save button …. ⑧to confirm the
data you have entered.
②
①
③
④
⑤
⑦
⑥
⑧
Other manuals for JaNets JT Simple
1
Table of contents
Other JUKI Industrial Equipment manuals

JUKI
JUKI PS-800SB-8045 User manual

JUKI
JUKI FX-1 Operating manual

JUKI
JUKI AMS-221F User manual

JUKI
JUKI FX-3R Operating manual

JUKI
JUKI PS-900-13090 User manual

JUKI
JUKI KE-2050 Operating manual

JUKI
JUKI KE-1070 Operating manual

JUKI
JUKI ACF-164-1903 Quick start guide

JUKI
JUKI TR6SNR Operating manual

JUKI
JUKI JX-100 User manual