manuals.online logo
Brands
  1. Home
  2. •
  3. Brands
  4. •
  5. KI
  6. •
  7. Indoor Furnishing
  8. •
  9. KI FX User manual

KI FX User manual

Assemble units as described herein only. To do otherwise
may result in instability. All screws, nuts and bolts must be
tightened securely and must be checked periodically after
assembly. Failure to assemble properly, or to secure parts
may result in assembly failure and personal injury.
Assembly Instructions
WorkUp Fixed-Height Table
Model FX
November 2016
Tools Required
• #3 Phillips Screwdriver
• 5mm Hex Key
Note: Before discarding any
packaging confirm all components
received against the packing list.
Table assembly should be done on
a clean flat floor.
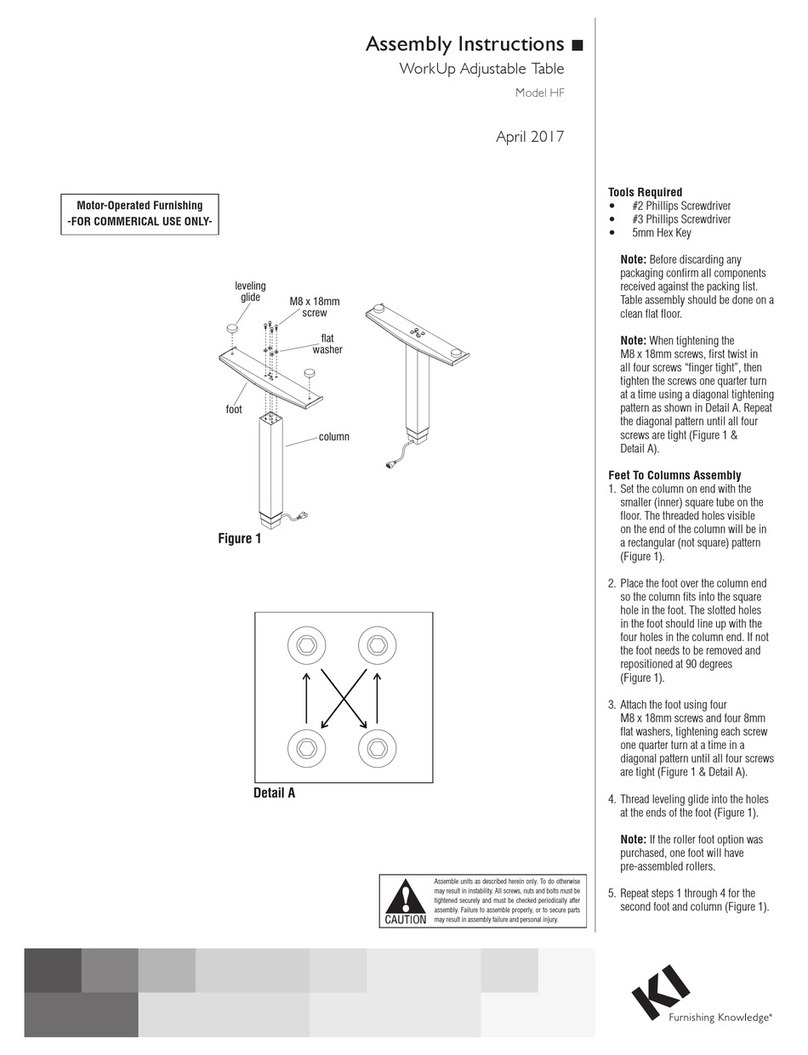
Note: When tightening the M8
screws, first twist all four screws
in “finger tight”. Then tighten the
screws one quarter turn at time
using a diagonal tightening pattern
as shown in Detail A. Repeat the
diagonal pattern until all four
screws are tight (Figure 1 &
Detail A).
Feet To Column Assembly
1. Set the column on end with the hole
pattern facing up (Figure 1).
2. Place the foot over the column
end so the column fits into the
square hole in the foot. The slotted
holes in the foot should line up
with the four holes in the column
end. If not the foot needs to be
removed and repositioned at 90
degrees (Figure 1).
3. Attach the foot using four
M8 x 20mm screws and four
8mm flat washers, tightening
each screw one quarter turn
at a time in a diagonal pattern
until all four screws are tight
(Figure 1 & Detail A).
4. Thread leveling glides into the holes
at the ends of the foot (Figure 1).
Note: If the roller foot option was
purchased, one foot will have
pre-assembled rollers.
5. Repeat steps 1 through 4 for the
second foot and column (Figure 1).
Assembly Instructions
Assembly of Table
Tools Required:
· #2 Phillips Screwdriver
· #3 Phillips Screwdriver
· 5mm Hex Key (provided)
Note: Before discarding any packaging
confirm all components received against the
packing list. Table assembly should be done
on a clean flat floor.
Note:When tightening the M8 screws, firsttwist
in all four screws“finger tight”.Then tighten the
screws one quarter turnattime usingadiagonal
tightening patternasshowninDetailA.Repeat
the diagonal pattern untilall four screwsare tight
(DetailA&Figure1).
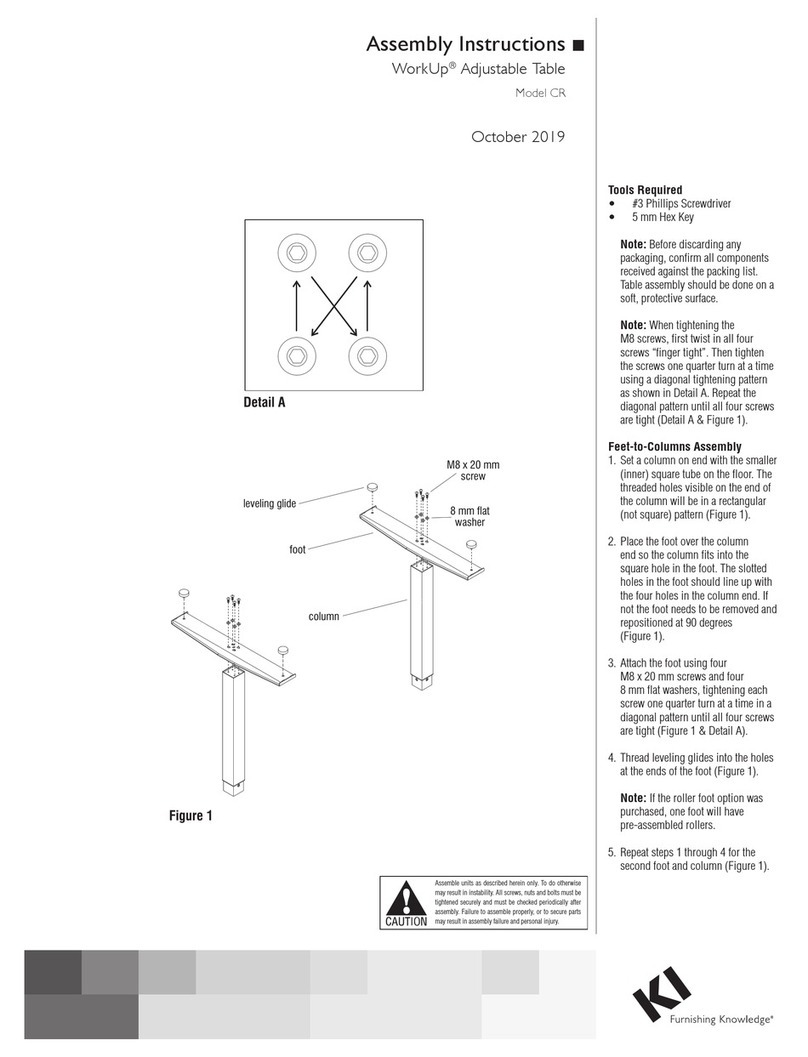
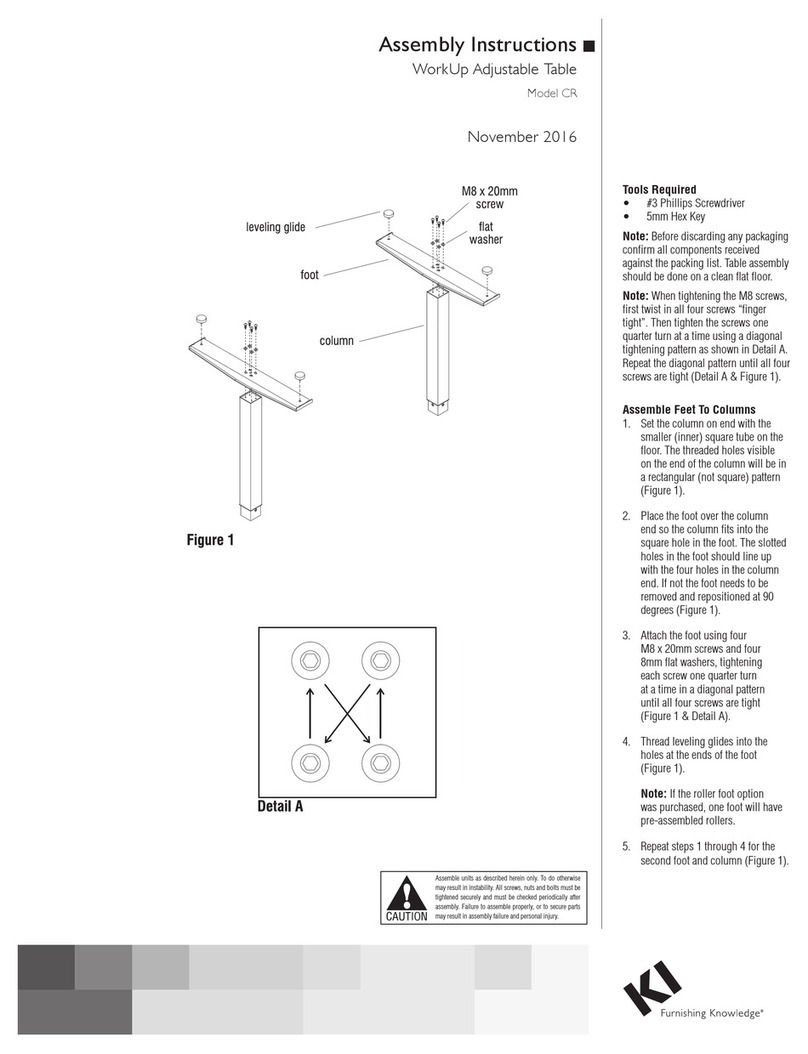
Assemble Feet To Columns
1. Set the column on end with the smaller
(inner)square tube on the floor.The threaded
holes visible on the end of the column will be in
arectangular (not square) pattern(Figure1).
2. Place the foot over the column end so the
column fits into the square holeinthe foot. The
slotted holes in the foot should lineupwith the
four holes in the column end. If not the foot
needs to be removed and repositioned at 90
degrees (Figure1).
3. Attach the foot using four M8 x20mm
screws and four 8mmflatwashers (Figure1).
4. Thread levelingglides into the holes at the
ends of the foot (Figure1).
5. Repeat steps 1through4for the second
foot and column (Figure1).
WorkUp Fixed Height Tables
Model FX
leveling glide
foot
column
M8 x 20mm
screw
flat washer
Figure 1
Detail A
Assemble units as described herein only. To do otherwise
may result in instability. All screws, nuts and bolts must be
tightened securely and must be checked periodically after
assembly. Failure to assemble properly, or to secure parts
may result in assembly failure and personal injury.
WorkUp Fixed-Height Table - Model FX
Assembly Instructions
1330 Bellevue Street • P.O. Box 8100 • Green Bay, WI 54308-8100 • Tel 1-800-424-2432 • www.ki.com
© 2016 Krueger International, Inc. All Rights Reserved • Code KI-62447R3/KI/PDF/1116
Worksurface Assembly
Note: The worksurface is
pre-drilled for installation of all
components.
1. To avoid scratching the
worksurface place it with the top
side down on a soft protective
material (Figure 2).
2. As illustrated, place the assembled
base over the pre-drilled holes on
the worksurface. Align the holes
in the worksurface with those
in the spider plate and attach to
the worksurface using #12 x 1”
tapping screws in each available
hole (Figure 2).
3. Carefully invert the table to its
upright position. Caution: The
table is very heavy. Two or more
people are required to turn the
table upright.
4. Adjust the leveling glides to level
the table.
Product Information
Maximum Load: The allowable
load is based on the size of the
worksurface and shall be evenly
distributed on the worksurface.
Allowable Load = Perimeter x 1.5 lbs.
Example: The allowable load for a
30” x 66” worksurface is
192 x 1.5 lbs. = 288 lbs.
Assemble Work Surface
Note: The worksurface is predrilled for
installation of all components.
1. To avoid scratching the worksurface place
it with the top side down on a soft protective
material (Figure 3).
2. As illustrated, place the assembled base
over the pre-drilled holes on the worksurface
so the heads of the M8 bolts set into the
pockets milled in the worksurface. The spider
plate should now be flush with the work-
surface. Align the holes in the worksurface
with those in the spider plate and attach to the
worksurface using #12 x 1” tapping screws in
each available hole (Figure 3).
3. Carefully invert the table to its upright
position. The table is very heavy.Caution:
Use two or more people to turn the table
upright.
4. Adjust the leveling glides to level the
table.
Product Information
Maximum Load: The allowable load is based
on the size of the worksurface and shall be
evenly distributed on the worksurface.
Allowable Load = Perimeter X 1.5 lbs.
Example: the allowable load for a 30x66
worksurface is 192 X 1.5 lbs. = 288 lbs.
Figure 2
#12 x 1”
screw
worksurface
spider plate
column
WorkUp Fixed Height Tables

Other KI Indoor Furnishing manuals

KI U Series User manual

KI

KI U Series User manual

KI Genesis Desking User manual

KI

KI Genesis Desking User manual

KI 700 Series User manual

KI

KI 700 Series User manual

KI Enlite Nesting Table User manual

KI

KI Enlite Nesting Table User manual

KI USPF2324 User manual

KI

KI USPF2324 User manual

KI CrossRoads Shelving Single Face Metal with Back... User manual

KI

KI CrossRoads Shelving Single Face Metal with Back... User manual

KI All Terrain Binder Tower User manual

KI

KI All Terrain Binder Tower User manual

KI InTandem Leg-Mounted CPU Holder User manual

KI

KI InTandem Leg-Mounted CPU Holder User manual

KI Oath Installation instructions

KI

KI Oath Installation instructions

KI Doni Guide

KI

KI Doni Guide

KI USPF2324 User manual

KI

KI USPF2324 User manual

KI Tattoo Pedestal User manual

KI

KI Tattoo Pedestal User manual

KI CafeWay ECRCP User manual

KI

KI CafeWay ECRCP User manual

KI Extol Auditorium Seating Installation instructions

KI

KI Extol Auditorium Seating Installation instructions

KI Pirouette User manual

KI

KI Pirouette User manual

KI Hiatus Sleeper Bench User manual

KI

KI Hiatus Sleeper Bench User manual

KI CafeWay ECELP User manual

KI

KI CafeWay ECELP User manual

KI WireWorks User manual

KI

KI WireWorks User manual

KI Intellect Book Box User manual

KI

KI Intellect Book Box User manual

KI Rapture Stack Chair Guide

KI

KI Rapture Stack Chair Guide

KI Pirouette User manual

KI

KI Pirouette User manual

KI Concerto Installation instructions

KI

KI Concerto Installation instructions

KI Soltice Metal User manual

KI

KI Soltice Metal User manual

KI WorkUp FX User manual

KI

KI WorkUp FX User manual

Popular Indoor Furnishing manuals by other brands

BLACK RED WHITE MALTA B136-REG2W1D Assembly instructions

BLACK RED WHITE

BLACK RED WHITE MALTA B136-REG2W1D Assembly instructions

RSI Systems Furniture EZcube installation guide

RSI Systems Furniture

RSI Systems Furniture EZcube installation guide

Safavieh Furniture Tage BST1400 quick start guide

Safavieh Furniture

Safavieh Furniture Tage BST1400 quick start guide

Seconique SILVER VENTURA Assembly instructions

Seconique

Seconique SILVER VENTURA Assembly instructions

DHP 5139096 manual

DHP

DHP 5139096 manual

HPFI Nexstep 759 Assembly instructions

HPFI

HPFI Nexstep 759 Assembly instructions

Furniture of America Vaugh CM-AC680 Assembly instructions

Furniture of America

Furniture of America Vaugh CM-AC680 Assembly instructions

VINNOVA Caparroso 705384 quick start guide

VINNOVA

VINNOVA Caparroso 705384 quick start guide

Office Star Products Avenue Six Enzo quick start guide

Office Star Products

Office Star Products Avenue Six Enzo quick start guide

CATSKILL 1526 Assembly instructions

CATSKILL

CATSKILL 1526 Assembly instructions

rst brands SL-MCON-10 Assembly instructions

rst brands

rst brands SL-MCON-10 Assembly instructions

Furniture of America CM6064LV Assembly instructions

Furniture of America

Furniture of America CM6064LV Assembly instructions

De Eekhoorn Bona TV Unit manual

De Eekhoorn

De Eekhoorn Bona TV Unit manual

Walker Edison LEEBD Assembly instructions

Walker Edison

Walker Edison LEEBD Assembly instructions

Arthur Berndt Liam 510 Assembly instructions

Arthur Berndt

Arthur Berndt Liam 510 Assembly instructions

Evan furniture COBO SK28 Assembly instruction

Evan furniture

Evan furniture COBO SK28 Assembly instruction

Better Homes and Gardens Maddox Crossing BHW-10002 manual

Better Homes and Gardens

Better Homes and Gardens Maddox Crossing BHW-10002 manual

Costway HW61715 user manual

Costway

Costway HW61715 user manual

manuals.online logo
manuals.online logoBrands
  • About & Mission
  • Contact us
  • Privacy Policy
  • Terms and Conditions

Copyright 2025 Manuals.Online. All Rights Reserved.