Lionelo Levi One User manual

Levi One
Baby car seat
Fotelik samochodowy
Kindersitz
Детское автокресло
Seggiolino auto
Siège auto bébé
Silla de coche
Autostoeltje
Kūdikio automobilinė kėdutė
Dětská autosedačka
Baba autósülés
Scaun auto pentru bebeluși
www.lionelo.com
Manual de usuario
Handleiding
Naudojimo instrukcija
Návod k obsluze
Használa utasítás
Manual u lizare
User manual
Instrukcja obsługi
Bedienungsanleitung
Инструкция по эксплуатации
Manuale d’uso
Manuel de l’U lisateur
Kūdikio automobilinė kėdutė
Scaun auto pentru bebeluși

‑ 2 ‑
1
3
2

‑ 3 ‑
4 5
6

‑ 4 ‑
1210
11
9
8
7

‑ 5 ‑
13
14
15
16

‑ 6 ‑EN
EN
Informaon
The child restraint system has been categorized as „universal”. Approved in
accordance with UN Regulaon No. 44, series of amendments 04, for general
vehicle use and suitable for mounng on most car seats.
A proper installaon is possible if the vehicle manufacturer declared in the vehicle
manual that the vehicle is adapted to installaon of the child restraint system in
„universal” category for this age group.
This child restraint system has been categorized as „universal” in more demanding
condions when compared to previous designs which were not supplied with
this informaon.
Should you have any doubts, please consult the manufacturer or retailer of the product.
Suitable for installaon only if type-approved vehicles are equipped with three-
point seat belts ed with a retractor that has been approved in accordance
with UN Regulaon No. 16 or other equivalent standards.
Dear customer!
Should you have any remarks or quesons concerning the product, please do not
Before you use the child safety seat for the rst me, please read this manual carefully.
Producer:
BrandLine Group Sp. z o. o.
ul. A. Kręglewskiego 1, 61-248 Poznań, Poland

‑ 7 ‑ EN
Important
Please read this manual before use and keep for future reference. The manual
can help you assemble the child safety seat properly. A wrong assembly may
pose a threat to the child’s health. The manufacturer is not held responsible for
potenal hazards arising from wrong assembly of the product.
This child safety seat is intended for weight groups I, II and III, which means it
can be used by children whose weight ranges from 9 to 36 kg.
Weight group I: 9-18 kg,
Weight group II: 15-25 kg,
Weight group III: 22-36 kg.
• Hard elements and plasc parts of the child restraint system must be placed
and installed in a way that they do not get trapped by sliding seat or vehicle
door under regulaon condions of use.
•
All xing belts which aach the device to the vehicle must be ght, child xing
belts must be adapted to the child’s body and must not be twisted.
• Make sure the hip belts go low enough so that the pelvis is secured rmly.
•
If the product has been subject to sudden loads during the accident, replace it.
•
Do not alter the seat or install any addional elements without competent
authories’ approval. To provide your child with top safety, the product must be
mounted and used in accordance with guidelines in the manufacturer’s manual.
• Plasc components of this child safety seat may heat up in the sunlight and
cause the child’s skin to burn.
• Protect the child safety seat against sunlight. Otherwise the product may be
too hot for your child’s skin.
• Never leave the child in the child restraint system unaended.
• Luggage and other items which may cause bodily injuries in case of accident
should be secured properly.
• Do not use the product without upholstery. It is forbidden to replace the seat
upholstery with other than recommended by the manufacturer because it is
an integral part of the device and inuences its funconing.
• Keep the child safety seat manual when using the device. Store it in the car
in which you have installed the product.

‑ 8 ‑EN
•
It is forbidden to use other points of contact than those specied in the manual
and marked on the child restraint system.
•
Should you have any doubts about posion of the adult safety belt buckle
in relaon to main points of contact, consult the manufacturer of the child
restraint system.
Safety in the car:
To provide top safety to yourself and your passengers during the travel, make sure:
• Folding elbow-rests are folded (vercal posion).
• All items which may cause damage in the car in case of collision have been
secured properly.
• All passengers have fastened their seat belts.
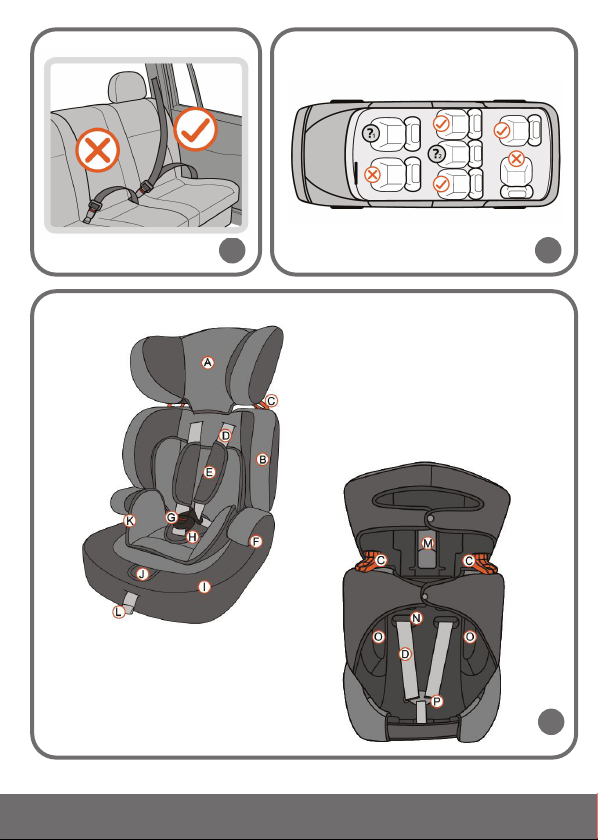
The child safety seat is intended for assembly solely on car seats installed in
a forward-facing posion. It is forbidden to assemble the product on seats/couches
installed in a rear-facing posion. These can be found in vans or minibuses.
Do not install the child safety seat on seats equipped with two-point safety
belts! (see: g. 1).
See: g. 2
Installaon in this place is possible
Installaon in this place is forbidden
Installaon in this place is allowed only if the airbag is inacve
Installaon in this place is allowed only if the seat is equipped with three-
point safety belts
Descripon (g. 3)
A. Headrest
B. Backrest
C. Shoulder belt guide
D. Safety belts of the product
E. Belt protecve cushions
F. Hip belt guide
G. Buckle
H. Belt protecve cushion

‑ 9 ‑ EN
I. Child safety seat cover
J. Belt tension adjustment buon
K. Seat liner
L. Belt tension adjustment
M. Headrest height adjustment
N.
Product belt height adjustment
holes
O. Car seat guide
P. Child safety seat belt connector
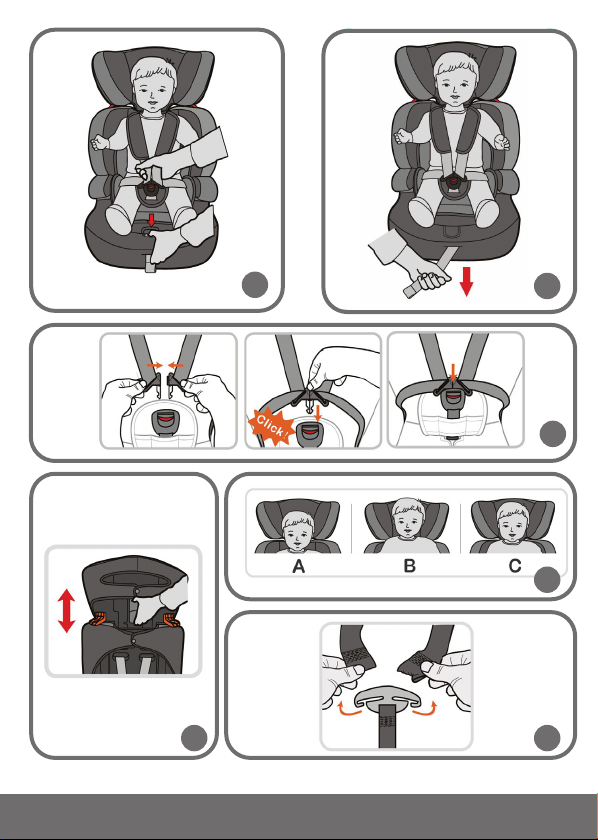
How to adjust the product
Child safety seat belts
A. Height of child safety seat belts
The children from group I (9-18 kg) must be secured with safety belts of the child
safety seat. For other groups, these belts must be detached.
The height of the child safety seat belts must be adapted to the child’s height:
see g. 4.
a– too low b– too high c– correct height
The height of the child safety seat belts can be set in three posions. To change
height:
1.
Loosen the child safety seat belts (see below: How to adjust the belt tension).
2. Remove the belts from the connector (P, g. 5).
3. Take the belts out through the hole in the backrest and through the child
safety seat cover (N).
4. Set the belts at the desired height by carrying them through one of three
holes in the cover and backrest.
5. Insert the belt ends into the connector (P).
6.
Make sure the belts have been inserted into the connector correctly and
are not twisted.
B. How to adjust belts tension
To loosen the child safety seat belts: press the adjustment buon (J) and pull the
shoulder belts (g. 7).
To ghten the child safety seat belts up: pull the adjustment belt (L).
Note! Make sure the child safety seat belts t ght the child’s body and are not
twisted. Make sure the hip belts go low and secure the child’s pelvis. The belts
must t ght the child’s body but must not be too ght and cause discomfort.

‑ 10 ‑EN
C. How to fasten and undo belts
Before you fasten the child safety seat belts, make sure the belts are at the proper
height (see above: Height of the child safety seat belts).
1. Place the child in the child safety seat.
2. Pull child’s arms through shoulder belts.
3.
Connect shoulder belts and insert their ps in the buckle (G). If you can hear
a “click”, it means the belts have been fastened properly (g. 9).
To undo the belts, press the red buon on the buckle (G).
D. How to disassemble belts
The child safety seat belts must be disassembled if children from group II and
III are the users.
1. Loosen the child safety seat belts.
2. Remove the belts from the connector (g. 12).
3.
Put the child safety seat down. Pull three metal belt fasteners through holes
in the body (g. 13b).
4. Pull the belts up to detach them (g. 13c).
To assemble the belts, repeat the procedures in a reversed order.
Hide the child safety seat belts in a safe place.
Headrest
The height of the headrest must be adapted to the child’s height (see: g. 11).
A– Too high B– Too low C– OK
To change the height of the headrest, grab the adjustment lever (M) and then
set the desired height. Aer you have nished, make sure the headrest has been
secured in place properly, try to move it up and down.
Seat liner
If the child needs more space in the child safety seat, remove the seat liner.
How to assemble
Group I Group II Group III
The child secured with
child safety seat belts
Child secured with car
safety belts
Child secured with car
safety belts

‑ 11 ‑ EN
Child safety seat with
backrest
Child safety seat with
backrest or without it
(depending on child’s
height)
Child safety seat
without backrest (base
only)
Group I
The child from this group must be secured with child safety seat belts.
1. Place the child safety seat on the car seat (g. 6a).
2.
Pull the buckle of the car safety seat through the guide (O) to the back of the
seat, and then pull forward through the second guide (O) (see: g. 6e, 6f).
3. Make sure the shoulder belt does not go through the guide in the headrest
(C) (g. 6c, 6d).
4. The pelvis belt must go under the elbow rest (g. 6b).
5. Fasten car safety belts (g. 6g).
6. Press the child safety seat against the car seat rmly.
7. The car seat belts which hold the child safety seat must be ght. Pull the
belts to ghten them up (gures 6h-6j).
8.
Place the child in the child safety seat (g. 6k) and fasten 5-point safety
belts (g. 6l).
Should you have any doubts about this point, contact the product manufacturer.
Group II – assembly with seat backrest
The child from this group must not be secured with the child safety seat belts.
The child must be secured with 3-point car safety belts.
1.
Disassemble child safety seat belts (see: child safety seat belts – how to
disassemble belts).
2. Place the child safety seat on the car seat. Push it against the seat backrest
as far as you can (g. 14a).
3. Put the child into the child safety seat (g. 14b).
4. Pull the car safety belt out. Carry:
a. the shoulder belt through the guide in the headrest (g. 14c).
b. the pelvis belt under the elbow rest of the child safety seat (g. 14d).
5. Make sure the belts are not twisted (g. 14e).
6. Fasten the car safety belts (g. 14f).

‑ 12 ‑EN
Groups II and III – assembly without child safety seat backrest
If the height of the child’s head is above the headrest (at maximum height), it is
necessary to disassemble the backrest of the child safety seat.
1. Push the backrest of the child safety seat as presented in the g. 15a.
2. Detach the backrest of the child safety seat from the base (g. 15b).
3. Place the base on the car seat (g. 15c).
4. Put the child on the child safety seat base.
5. Pull the car safety belt out. Carry it through elbow rests (g. 16a and 16b).
6. Fasten the car safety belts (g. 16c).
How to maintain and clean
The cover can be cleaned in warm water with the use of soap or so detergent.
Do not dry the cover in the sunlight. The buckle, child safety seat belts and plasc
elements must be washed with warm water. Do not use strong detergents. If you
do not use the product, please store it in a dark and dry place, away from sunlight.
The pictures are for reference only. The real design of the products
may dier from the pictures presented.
The product meets the requirements of the ECE R44.04 standard

‑ 13 ‑ PL
PL
Informacja
Urządzenie przytrzymujące dla dzieci należy do kategorii „uniwersalne”. Uzyskało homologację
zgodnie z regulaminem ONZ nr 44, seria poprawek 04, do ogólnego zastosowania w
pojazdach i nadaje się do instalacji na większości miejsc siedzących w samochodzie.
Prawidłowa instalacja jest możliwa, jeśli producent pojazdu oświadczył w instrukcji
obsługi pojazdu, że pojazd nadaje się do instalacji urządzenia przytrzymującego
dla dzieci kategorii „uniwersalne” dla tej grupy wiekowej.
To urządzenie przytrzymujące dla dzieci zostało zaklasykowane do kategorii
„uniwersalne” w bardziej wymagających warunkach w odniesieniu do warunków
stosujących się do wcześniejszych projektów, które nie są opatrzone tą informacją.
W przypadku wątpliwości należy skonsultować się z producentem lub sprzedawcą
detalicznym urządzenia.
Nadaje się do instalacji jedynie wówczas, gdy homologowane pojazdy wyposażone są w
trzypunktowe pasy bezpieczeństwa wyposażone w zwijacz, które uzyskały homologację
zgodnie z regulaminem ONZ nr 16 lub innymi równoważnymi normami.
Drogi Kliencie!
Jeśli masz jakiekolwiek uwagi lub pytania do zakupionego produktu, skontaktuj
się z nami: [email protected]
Przed pierwszym użyciem fotelika prosimy o uważne przeczytanie niniejszej instrukcji użytkowania.
Producent:
BrandLine Group Sp. z o. o.
ul. A. Kręglewskiego 1, 61-248 Poznań, Polska

‑ 14 ‑PL
Ważne informacje
Należy przeczytać tę instrukcję obsługi przed użyciem i zachować. Instrukcja
pomoże prawidłowo zamontować fotelik. Nieprawidłowy montaż może stanowić
zagrożenie dla zdrowia dziecka. Producent nie ponosi odpowiedzialności za
ewentualne zagrożenia spowodowane niewłaściwym montażem fotelika.
Niniejszy fotelik przeznaczony jest dla grup wagowych I, II i III, co oznacza, że
mogą z niego korzystać dzieci o wadze od 9 do 36 kg.
I grupa wagowa: 9-18 kg,
II grupa wagowa: 15-25 kg,
III grupa wagowa: 22-36 kg.
•
Twarde elementy oraz plaskowe części urządzenia przytrzymującego dla dzieci
należy umieścić i zainstalować w taki sposób, by w normalnych warunkach
eksploatacji pojazdu nie mogły zostać uwięzione przez przesuwane siedzenie
lub drzwi pojazdu.
• Wszelkie taśmy mocujące urządzenie przytrzymujące do pojazdu muszą być
napięte, taśmy mocujące dziecko muszą być dopasowane do budowy jego
ciała i nie mogą być poskręcane.
•
Upewnij się, że taśmy biodrowe przebiegają nisko, tak aby miednica była
mocno przytrzymywana.
•
Jeżeli urządzenie zostało poddane gwałtownym obciążeniom podczas wypadku
należy je wymienić.
• Nie należy dokonywać żadnych przeróbek w foteliku lub instalować żadnych
dodatkowych elementów bez zgody właściwych organów. Aby zapewnić
dziecku maksymalne bezpieczeństwo, sprzęt należy zamocować i użytkować
zgodnie z zaleceniami w instrukcji dostarczonej przez producenta.
•
Plaskowe elementy tego fotelika mogą nagrzewać się w słońcu i powodować
oparzenia na skórze dziecka.
•
Chroń fotelik przed słońcem. W przeciwnym przypadku fotelik może być zbyt
gorący dla skóry Twojego dziecka.
• Nigdy nie zostawiaj dziecka bez opieki w urządzeniu przytrzymującym.
• Bagaż i inne przedmioty mogące spowodować obrażenia ciała w przypadku
zderzenia powinny być odpowiednio zabezpieczone.

‑ 15 ‑ PL
•
Nie powinno się używać urządzenia przytrzymującego dla dzieci bez
tapicerki. Nie wolno zastępować tapicerki siedzenia innym niż zalecone przez
producenta, gdyż stanowi ono integralną część urządzenia mająca wpływ na
jego funkcjonowanie.
•
Zachowaj instrukcję obsługi fotelika podczas użytkowania urządzenia. Trzymaj
ją w aucie, w którym zainstalowany jest fotelik.
•
Nie wolno używać innych nośnych punktów styczności niż te, opisane
w instrukcji i oznaczone na urządzeniu przytrzymującym dla dzieci.
•
Jeśli masz wątpliwości co do pozycji klamry pasów bezpieczeństwa dla dorosłych
względem głównych nośnych punktów styczności, skontaktuj się z producentem
urządzenia przytrzymującego dla dzieci.
Bezpieczeństwo w pojeździe:
Aby zapewnić jak największe bezpieczeństwo sobie i pasażerom w trakcie jazdy,
upewnij się, że:
• Składane oparcia pod łokcie są złożone (pozycja pionowa).
•
Wszelkie obiekty, które mogłyby spowodować uszkodzenia w samochodzie
w sytuacji kolizji są odpowiednio zabezpieczone.
• Wszyscy pasażerowie mają zapięte pasy bezpieczeństwa.
Fotelik samochodowy jest przeznaczony do montażu wyłącznie na fotelach
samochodowych zamontowanych przodem do kierunku jazdy. Fotelika nie wolno
montować na fotelach / kanapach samochodowych zamontowanych tyłem do
kierunku jazdy. Spotyka się je np. w vanach lub minibusach.
Nie instaluj fotelika na siedzeniach wyposażonych w dwupunktowe pasy
bezpieczeństwa! (patrz: rys. 1).
Patrz: rys. 2
Instalacja w tym miejscu możliwa
Instalacja w tym miejscu zabroniona
Instalacja w tym miejscu możliwa tylko jeśli poduszka powietrzna jest
wyłączona

‑ 16 ‑PL
Instalacja w tym miejscu możliwa tylko jeśli siedzenie wyposażone jest
w trzypunktowe pasy bezpieczeństwa
Opis (rys. 3)
A. Zagłówek
B. Oparcie
C. Prowadnica pasa naramiennego
D. Pasy bezpieczeństwa fotelika
E. Poduszki ochronne na pasy
F. Prowadnica pasa biodrowego
G. Klamra
H. Poduszka ochronna pasów
I. Poszycie fotelika
J. Przycisk regulacji napięcia pasów
K. Wkładka redukcyjna
L. Regulator napięcia pasów
M. Regulator wysokości zagłówka
N. Otwory do regulacji wysokości
pasów fotelika
O. Prowadnica pasów
samochodowych
P. Złącze pasów fotelika
Regulacja produktu
Pasy fotelika
A. Wysokość pasów fotelika
Dzieci z grupy I (9 – 18 kg) muszą być zapięte fotelikowymi pasami bezpieczeństwa.
Dla innych grup pasy te muszą być zdemontowane.
Wysokość pasów fotelika musi być dopasowana do wzrostu dziecka: patrz rys. 4.
a– za nisko b– za wysoko c – odpowiednia wysokość
Wysokość pasów fotelika można ustawić na trzech pozycjach. Aby zmienić wysokość:
1. Poluzuj pasy fotelika (patrz niżej: Regulacja napięcia pasów).
2. Zdejmij pasy ze złącza (P, rys. 5).
3. Wyciągnij pasy poprzez otwór w oparciu oraz przez poszycie fotelika (N).
4. Ustaw pasy na pożądaną wysokość poprzez ponowne przełożenie ich przez
jeden z trzech otworów w poszyciu i oparciu.
5. Wsuń końcówki pasów na złącze (P).
6.
Upewnij się, że pasy włożone są na złącze w sposób poprawny i nie są poskręcane.
B. Regulacja napięcia pasów
Aby poluzować pasy fotelika: wciśnij przycisk regulacji (J) i pociągnij za pasy
naramienne (rys. 7).
Aby ścieśnić pasy fotelika: pociągnij za pas regulujący (L).

‑ 17 ‑ PL
Uwaga! Upewnij się, że pasy fotelika przylegają ściśle do ciała dziecka i że nie są
poskręcane. Upewnij się, że pasy biodrowe przebiegają nisko i chronią miednicę
dziecka. Pasy powinny być ciasne względem ciała dziecka, nie powinny jednak
być zbyt ciasne i wywoływać dyskomfortu.
C. Zapinanie i rozpinanie pasów
Zanim zapniesz dziecko pasami bezpieczeństwa fotelika, upewnij się że pasy
ustawione są na poprawną wysokość (patrz wyżej: Wysokość pasów fotelika).
1. Umieść dziecko w foteliku.
2. Przełóż rączki dziecka przez pasy naramienne.
3.
Połącz pasy naramienne i wsuń ich końce do klamry (G). Słyszalne „kliknięcie”
będzie oznaczało poprawne zapięcie pasów (rys. 9).
Aby rozpiąć pasy, wciśnij czerwony przycisk na klamrze (G).
D. Demontaż pasów
Pasy bezpieczeństwa fotelika należy zdemontować przy użytkowaniu dla grup
II oraz III.
1. Poluzuj pasy fotelika.
2. Zsuń pasy ze złącza (rys. 12).
3.
Połóż fotelik. Przeciągnij trzy metalowe zaczepy na pasy przez otwory
w korpusie (rys. 13b).
4. Pociągnij pasy w górę aby je zdemontować (rys. 13c).
Montaż pasów należy przeprowadzić w odwrotnej kolejności.
Schowaj pasy fotelika w bezpiecznym miejscu.
Zagłówek
Wysokość zagłówka należy dopasować do wysokości dziecka (patrz: rys. 11).
A – Zbyt wysoko B – Zbyt nisko C – OK
Aby zmienić wysokość zagłówka, chwyć za dźwignię regulacji (M) a następnie
ustaw pożądaną wysokość. Po zakończonym procesie upewnij się, że zagłówek
poprawnie zakotwiczył się w swojej pozycji, spróbuj nim poruszyć w górę i dół.
Wkładka redukcyjna
Jeśli dziecko będzie potrzebowało więcej miejsca w foteliku wyciągnij wkładkę
redukcyjną.

‑ 18 ‑PL
Montaż
Grupa I Grupa II Grupa III
Dziecko zabezpieczone
fotelikowymi pasami
bezpieczeństwa
Dziecko zabezpieczone
pasami bezpieczeństwa
samochodu
Dziecko zabezpieczone
pasami bezpieczeństwa
samochodu
Fotelik z oparciem Fotelik z oparciem lub
bez (w zależności od
wzrostu dziecka)
Fotelik bez oparcia
(sama podstawa)
Grupa I
Dziecko z tej grupy musi być przypięte fotelikowymi pasami bezpieczeństwa.
1. Umieść fotelik na kanapie samochodu (rys. 6a).
2.
Przeciągnij klamrę samochodowych pasów bezpieczeństwa przez prowadnicę
(O) do tyłu siedziska, a następnie wyciągnij do przodu przez druga prowadnicę
(O) (patrz: rys. 6e, 6f).
3.
Upewnij się, że pas naramienny nie przechodzi przez prowadnicę w zagłówku
(C) (rys. 6c, 6d).
4. Pas miednicowy musi przebiegać pod podłokietnikiem (rys. 6b).
5. Zapnij samochodowe pasy bezpieczeństwa (rys. 6g).
6. Dociśnij mocno fotelik w kierunku kanapy auta.
7.
Pasy samochodowe, trzymające fotelik muszą być napięte. Pociągnij za pasy
aby je ścieśnić (rysunki 6h – 6j).
8.
Umieść dziecko w foteliku (rys. 6k) i zapnij je 5 – punktowymi pasami
bezpieczeństwa (rys. 6l).
Jeżeli masz jakiekolwiek wątpliwości co do tego punktu, skontaktuj się
z producentem urządzenia.
Grupa II – montaż z oparciem fotelika
Dziecko z tej grupy nie może być przypięte fotelikowymi pasami bezpieczeństwa.
Dziecko należy zabezpieczyć 3 – punktowymi pasami bezpieczeństwa samochodu.
1.
Zdemontuj fotelikowe pasy bezpieczeństwa (patrz: Pasy fotelika – Demontaż
pasów).

‑ 19 ‑ PL
2.
Ułóż fotelik na kanapie samochodu. Dosuń go maksymalnie do oparcia
kanapy (rys. 14a).
3. Włóż dziecko do fotelika (rys. 14b).
4. Wyciągnij samochodowy pas bezpieczeństwa. Przeprowadź:
a. naramienny pas przez prowadnicę w zagłówku (rys. 14c),
b. pas miednicowy pod podłokietnikiem fotelika (rys. 14d).
5. Upewnij się, że pasy nie są poskręcane (rys. 14e).
6. Zapnij samochodowe pasy bezpieczeństwa (rys. 14f).
Grupy II i III – montaż bez oparcia fotelika
Jeżeli wysokość głowy dziecka wykracza poza zagłówek (ustawiony na maksymalnej
wysokości) należy zdemontować oparcie fotelika.
1. Pchnij oparcie fotelika w kierunku wskazanym na rys. 15a.
2. Odepnij oparcie fotelika od bazy (rys. 15b).
3. Umieść bazę na kanapie auta (rys. 15c).
4. Wsadź dziecko na bazę fotelika.
5.
Wyciągnij samochodowy pas bezpieczeństwa. Przeprowadź go przez
podłokietniki (rys. 16a oraz 16b).
6. Zapnij samochodowe pasy bezpieczeństwa (rys. 16c).
Konserwacja i czyszczenie
Pokrycie może być czyszczone w ciepłej wodzie z użyciem mydła lub delikatnego
detergentu. Nie susz pokrycia na słońcu. Klamrę, pasy fotelika oraz plaskowe
elementy czyść ciepłą wodą. Nie używaj żadnych silnych detergentów. Jeśli
produkt nie jest używany, należy przechowywać go w zaciemnionym, suchym
miejscu, z dala od promieni słonecznych.
Zdjęcia mają charakter poglądowy, rzeczywisty wygląd produktów
może różnić się od prezentowanego na zdjęciach.
Produkt spełnia wymagania normy ECE R44.04

‑ 20 ‑DE
DE
Informaon
Die Rückhalteeinrichtung für Kinder gehört zu der Kategorie „universal“.
Zugelassen gemäß UN-Regelung Nr. 44, Änderungsserie 04, für den allgemeinen
Fahrzeuggebrauch und zum Einbau in die meisten Autositze geeignet.
Die richge Installierung ist möglich, wenn der Produzent des Fahrzeugs in
der Bedienungsanleitung des Fahrzeugs erklärt hat, dass der Fahrzeug sich zur
Installierung der Rückhalteeinrichtung für Kinder in der Kategorie „universal“ für
diese Altersgruppe eignet.
Diese Rückhalteeinrichtung für Kinder wurde der Kategorie „universal” in den
strengsten Bedingungen zugeordnet, im Vergleich zu den Bedingungen in früheren
Projekten, die mit dieser Informaon nicht versehen sind.
Bei Fragen setzen Sie sich bie mit dem Produzenten oder dem Einzelhändler
in Verbindung.
Nur zum Einbau geeignet, wenn typgenehmigte Fahrzeuge mit Dreipunkt-
Sicherheitsgurten ausgestaet sind, die mit einem gemäß der UN-Regelung Nr. 16
oder anderen gleichwergen Normen genehmigten Aufroller ausgestaet sind.
Sehr geehrter Kunde!
Falls Sie Fragen oder Anmerkungen zu dem gekauen Produkt haben, setzen Sie
sich mit uns in Verbindung: [email protected]om
Bevor Sie das Produkt benutzen, lesen Sie bitte genau die vorliegende
Bedienungsanleitung.
Hersteller:
BrandLine Group Sp. z o. o.
ul. A. Kręglewskiego 1, 61-248 Poznań, Polen
Table of contents
Languages:
Other Lionelo Car Seat manuals

Lionelo
Lionelo Luuk FIX User manual

Lionelo
Lionelo jasper User manual

Lionelo
Lionelo Bastiaan User manual

Lionelo
Lionelo Aart User manual

Lionelo
Lionelo Lars User manual

Lionelo
Lionelo Liam User manual

Lionelo
Lionelo Bastiaan User manual

Lionelo
Lionelo Bastiaan i-Size User manual

Lionelo
Lionelo Liam User manual

Lionelo
Lionelo Liam User manual

Lionelo
Lionelo NOA User manual

Lionelo
Lionelo sander User manual

Lionelo
Lionelo Neal User manual

Lionelo
Lionelo sander User manual

Lionelo
Lionelo Bastiaan User manual

Lionelo
Lionelo SEM User manual

Lionelo
Lionelo Nico User manual

Lionelo
Lionelo Hugo User manual

Lionelo
Lionelo Lars i-Size User manual

Lionelo
Lionelo Braam User manual