Lionelo SEM User manual


02
03
GROUP I
Suitable for children
weighing from 9 to 18kg
Baby 9-18
kg 3
FIXING POINTS
Top belt
Forward facing
FIXING POINTS
Use the three-point safety belt and the ISOFIX connector to install
the seat.
ISOFIX connector installation diagram
Use the three-point safety belt and the ISOFIX
connector to install the seat.
SAFETY BELT installation diagram
The ISOFIX connector
must be connected with
the top belt. You mustn’t
use it separately.
Warning:
Do not useother fixing points
thanthe indicatedones.
Top belt
Click
connector
Warning:
Do not useother fixing points
thanthe indicatedones.

04
05
GROUP II
Suitable for children
weighing from 15 to 25kg
Toddler
15-25
kg
GROUP III
Suitable for children
weighing from 22 to 36kg
Child
22-36
kg
Warning:
Forward facing Forward facing
Warning:
Do not use other fixingpoints
thantheindicated ones. 3
FIXING POINTS
Do not use other fixing points
than the indicated ones.
3
FIXING POINTS
Use the three-point safety belt and the ISOFIX connector to install
the seat.
SAFETY BELT installation diagram
Adjust the headrest up
or down to the suitable
position.
Use the three-point safety belt and the ISOFIX connector to install the seat.
SAFETY BELT installation diagram
Detailed installation instruction

06
07
Detailed installation instruction
Important
information
Note:
Please read this manual carefully before
using the car safety seat and keep it for
future reference. Improper installation may
lead to a serious threat to the life of your
child!
Warning:
Do not use only 2 points of the
safety harness. To provide
maximum safety, always use all
the 3 points.
Please use the safety seats in strict accordance with
local laws and regulations.
The vehicle safety belt must be approved by ECE R16
or other equivalent standard.
Do not mount the safety seat in a front car seat with an airbag, unless it is
disable.
Otherwise it can cause death or a serious injury of the child.
Please check the manual of your vehicle to find the information
regarding the installation of a child safety seat. As far as children
aged 0-12 are concerned, vehicle’s back seats are the safest place to
mount the safety seat.
This safety seat has to be installed in a forward-facing position. Do
not mount it sideways or in a rear-facing way.
In case of any doubts regarding the installation of the safety seat, please
contact your vehicle dealer.
Proper and improper installation of the safety seat:
This is the ISOFIX car safety seat compliant with ECE
R44/04.
It can only be mounted in the cars equipped with ISOFIX
connectors.
The product must be installed in a car (according to
the vehicle’s manual) in a place and position suitable
for a given group and an ISOFIX type.
This safety seat is designed for the I, II and III ISOFIX
age group, that is for children weighing from 9 to 36
kg.
A
Wrong position
B A It cannot be installed
A in a vehicle with an active airbag
B It can be used with a 3-
point safety harness.

08
09
Safety notes before usage
To ensure maximum safety of your child, please read this manual
carefully before using the car safety seat!
The safety seat is suitable for children weighing from 9 to 36 kg.
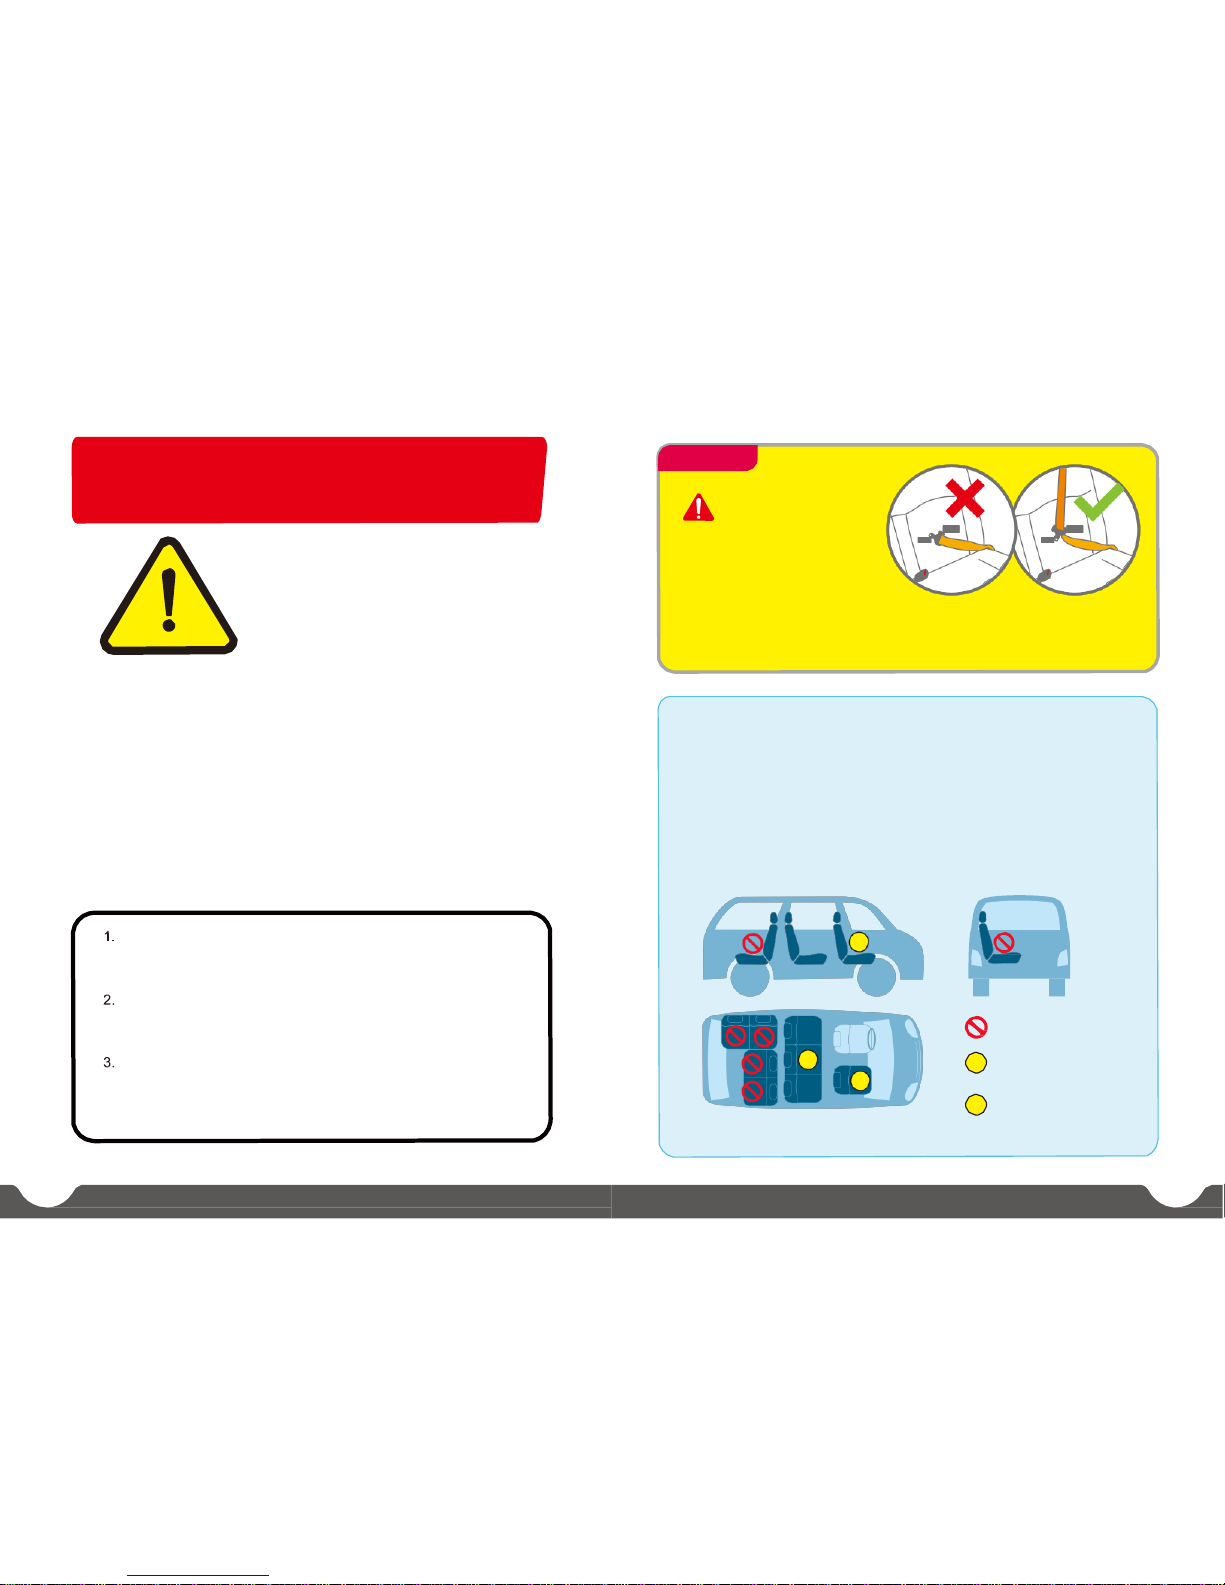
The safety seat can only be used in vehicles equipped with a 3-point
safety belt and an ISOFIX connector with an upper clasp.
Please install the safety seat according to the backseat stickers or the
instructions given in this manual.
This safety seat must only be installed in a forward-facing
position.
Only the correct use of the safety belts ensures maximum protection of the
child during an accident.
Please do not forget to properly secure the safety seat even when it is
empty. The unsecured safety seat can cause injury to the people in the car
during an accident or heavy braking.
It is forbidden to use unsuitable cushions or any other unfit accessories
with the safety seat.
During an accident the safety seat is subjected to large forces that may
seriously damage its construction. Therefore, it is not recommended to
continue using the safety seat after the accident. In that case it is
recommended to replace the safety seat with a new one.
During a serious accident the safety of the passengers depends mainly on
the structure of the vehicle. The safety seat alone cannot fully protect
the child from all harm. Nevertheless, the correct installation and use
of the safety seat provides a better chance of their survival. Make sure
that all the users can properly install and use the safety seat.
Do not use the safety seat without the cover. Do not replace the cover with
the one that is not recommended by the manufacturer. It is an integral part
of the product and it contributes to the safety of the child.
When the car is parked in sunlight, please cover the safety seat. It is
recommended not to expose the safety seat to direct sunlight. Otherwise
it may become hot and cause harm to the child’s skin.
If it is not used, please store the safety seat in a safe place. Do not place
any heavy objects on the safety seat. It can be dangerous to use any
uncertified or modified products. It is also not recommended to use
products without installation manual.
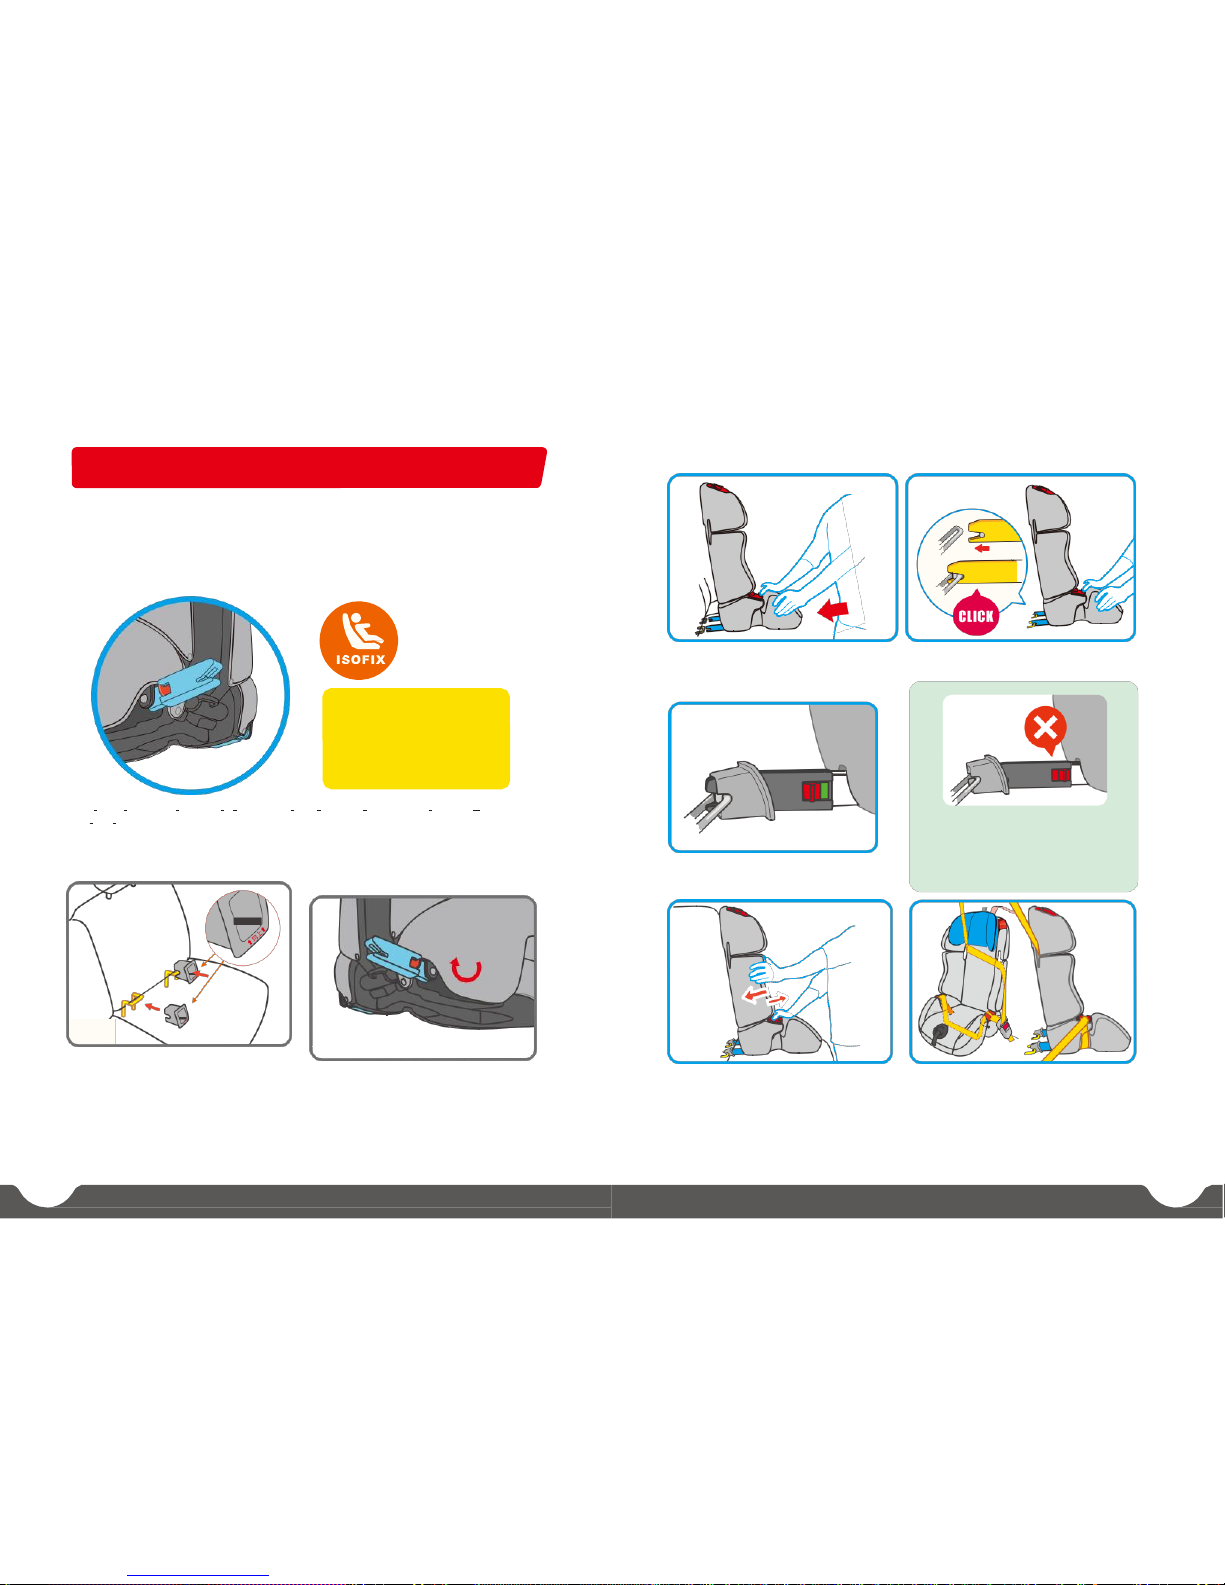
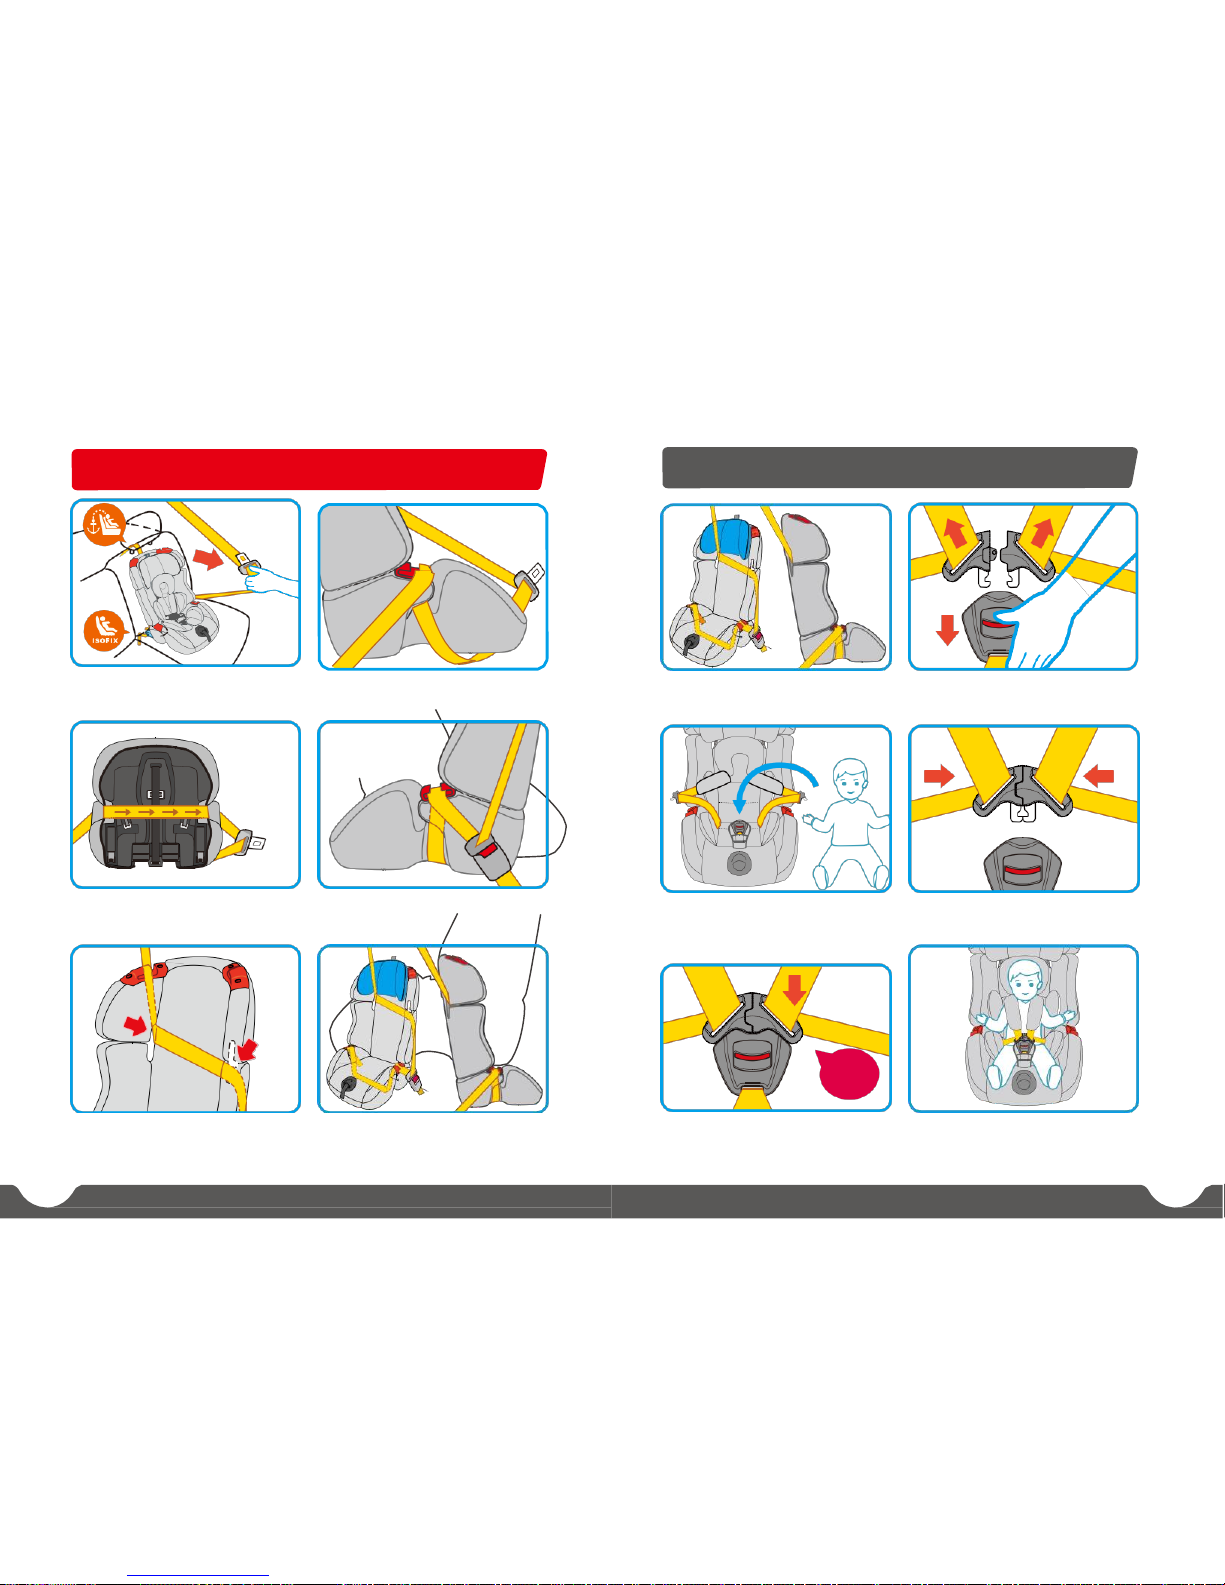
During the installation of the safety seat always follow the instructions
provided by the manufacturer.
Do not try to disassemble the components of the safety seat or modify the way
of connection of the safety belts, unless such a method is described in the
manual.
Do not use other fixing points than the ones indicated in the manual.
Do not place any objects, such as bags, books etc. on the safety seat.
Otherwise, they may cause injury to the people in the vehicle during an
accident or heavy breaking.
Do not install the safety seat on an unlocked folding car seat. Unlocked car
seats may affect the safety of the child during an accident or heavy breaking.
Do not leave your child unattended in the safety seat, even for a short period
of time.
If the child unfastens the safety belt, please stop immediately and fasten it
back.
It is recommended to teach children safety habits. Therefore always
fasten your seat belt to set a good example. Do not violate the safety
rules when your child is crying.

10
11
Shoulder belt
hook
(For Group III only)
Adjustable
headrest
Headrest
adjuster
5-point
harness
Harness
guiding hole
Top safetystrap
Baby headrest
5-point
harness
Rotating
ISOFIX
Connector
Back pad
Shoulder pad
Crotch pad
Lap belt hook
Safety buckle
5-point harness
adjustment
strap
Harness fixer
ISOFIX release
handle
Harness adjustment
button

12
13
ISOFIX usage during the installation
ISOFIX ANCHORAGE SYSTEM
ISOFIX is the system of connectors enabling the installation of safety seats
in a vehicle. It comprises of two connectors located between the seats and
the backrest. They are an integral part of the vehicle’s structure and
therefore provide stable and more reliable mounting.
Warning:
Always use both ISOFIX
connectors together. Do not
use them separately.
Hold the base of the safety seat
and push it toward the vehicle’s
seat until the ISOFIX connectors
snap into place.
Two audible “clicks” indicate that
the connectors are properly locked.
The safety seat is equipped with ISOFIX anchorage system. It includes two ISOFIX
connectors on the bottom and a top safety strap.The system is used to strengthen
the connection between the safety seat and the vehicle seat, in terms of the
installation for Group I, II or III. It must be used together with a 3-point safety
belt. Do not use the ISOFIX system alone.
Make sure that the indicators of both
ISOFIX connectors turned green
If they are red, it means that the
safety seat has been installed
improperly. Please install the
safety seat again.
Find the vehicle’s ISOFIX connectors
and mount the guides. You do not
need to install the guides if it is not
necessary in a given vehicle.
Spin out both ISOFIX connectors at
the rear bottom of the safety seat
base so that they face backward.
Pull out the safety seat hard to make sure
it is properly secured.
Install the 3-point safety belt (for more
information, please see page 18).

14
15
ISOFIX top strap installation
ISOFIX
·
TOP STRAP
Attaching the top strap
to the fixing points:
In most vehicles the fixing
point is located on the rear
windscreen panel, behind
the back seats.
This fixing point is located on
the boot floor, behind the back
seats.
The connector is located right
under the vehicle’s seats.
You need to fold down the
seats to find it.
The fixing point is located
at the rear side of the
vehicle’s back seats.
Make sure that the ISOFIX connectors
are installed correctly.
Press the top strap adjuster button and pull
the top strap in or out to adjust it.
The top strap adjustment can increase
the fixing strength. However, it’s not
suitable in case of some vehicles
(including those equipped with ISOFIX
connectors). The position of the fixing
points may vary depending on a given
vehicle.
In order to install the safety seat as
firmly and properly as possible,
please refer to the information in the
vehicle’s manual.
Make sure that the strap is not twisted and
lock it in the vehicle’s ISOFIX
connector.
Pull out the adjustment end of the top
strap in order to tighten the safety
seat firmly to the vehicle’s seat.
Vehicle’s icons indicating the fixing point and the connector
The top strap is properly installed
when the indicator on the adjuster
turns green.
If there is no green indicator on the
top adjuster, or it is covered, it means
that the safety seat mount is not firm
enough, or it has been installed
improperly. In that case you need to
install the top strap again.

16
17
ISOFIX connectors disassembly Top strap unfastening
Hold the both sides of the safety seat’s
base and push it toward the vehicle’s
seat.
Pull the ISOFIX release handle
and use the other hand to unclip
the connector.
Press the top strap adjuster button
and loosen the strap. Press down the elastic end of the top
strap.
Other way
CLICK
(or) release the green button on the
ISOFIX connector.
The “click” sound indicates that the
ISOFIX connectors have been
unfastened.
Take out the end of the top strap.
Repeat the steps above to unlock
the other ISOFIX connector. Now,
the disassembly is finished.

18
19
Installation for Group I (9-18kg) - after the ISOFIX assembly Group I: Securing a child with a 5-point safety harness
Pull out the vehicle’s 3-point safety belt. The vehicle’s lap belt should be
carried through the guide hook and
under the armrest.
Make sure the safety seat is properly
secured on the car seat. Press the red button on the 5-point
safety belt buckle to unfasten it.
Carry the vehicle’s lap belt under the safety
seat and run it through the guide hook on
the other side.
Run the vehicle’s shoulder belt
through the holes on the backrest of
the seat, as shown in the picture.
Lock the metal end of the vehicle’s
seat belt in the car buckle.
Tighten the belt and check whether the
safety seat is firmly mounted. If it is
loose, tighten the belt again.
Put the two parts of the bucket and
their straps on the armrests so that
they don’t block the seat. Then,
place your child in the safety seat.
CLICK
Insert the two metal connectors into
the bucket. The “click” sound
indicates that the safety harness has
been properly fastened. Make sure
that the harness is properly secured.
Put the two metal connectors together.
5-point safety harness
adjustment
Please, find more details on the
next page.

20
21
How to tighten / loosen the 5-point safety harness 5-point safety harness height adjustment
Pull out the adjustment strap to
tighten the 5-point safety harness.
Use one hand to press the
adjustment button.
You can disassembly and remove the
5-point safety harness if the child
weights more than 15 kg or is taller
than 1 meter.
The harness should be adjusted so
that there is a two-finger gap between
it and the child. It must be neither too
tight nor too loose.
If it is necessary, press the
adjustment button and pull the
harness to loosen it.
Unfasten the 5-point safety
harness.
Pull the straps out of the safety
seat.
Insert the two shoulder straps into the
connector at the back of the safety
seat and finish the adjustment.
Remove the two shoulder straps from
the harness connector at the back of
the safety seat.
Choose a desirable height and slide the
straps through the corresponding holes.

22
23
Removing the 5-point safety
harness Installation of the 5-point safety harness
Make the straps as loose as possible and
open the harness buckle.
Remove one of the connectors
from the safety strap.
Check the position of the three
harness connectors under the safety
seat.
Then, pull out the strap from the safety
seat. Repeat the step above for the other
connectors.
Make sure that the safety seat cover
is properly installed. Run the straps
through the proper holes and lock
them with the metal connectors.
Ensure that all the connectors and
straps have been properly installed
and secured.
Ensure that the straps are not
twisted.
Put one shoulder pad on each of the
two shoulder straps, anti-slip side
facing inwards.
Remove the two shoulder straps from the
harness connector at the back of the
safety seat.
Pull the straps out of the safety
seat. Choose a desirable height and slide
the straps through the corresponding
holes.
Insert the two shoulder straps into
the connector at the back of the
safety seat. After all these steps the
installation is finished.

24
25
Installation for Group II (15-25kg) Installation for Group III (22-36kg)
Remove the 5-point safety harness.
Mount the safety seat using the
ISOFIX connectors.
Carry the vehicle’s belt under the
armrest, over the child’s body and
under the other armrest.
Carry the vehicle’s shoulder belt
according to the instruction in the
picture.
Place your child in the safety
seat.
Run the vehicle’s shoulder belt
across the child’s chest.
CLICK
Fasten the vehicle’s belt locking the
metal connector into the vehicle’s
buckle. Then, tighten the belt slightly
to finish the installation.
Remove the 5-point safety harness.
Mount the safety seat using the
ISOFIX connectors.
Carry the vehicle’s belt under the
armrest, over the child’s body and
under the other armrest.
Run the vehicle’s belt through the red
guide hook at the top of the safety
seat.
Adjust the height of the headrest so
that it is the most suitable for your
child.
Run the vehicle’s shoulder belt across
the child’s chest.
CLICK
Fasten the vehicle’s bel t locking the metal
connect or int o the vehicl e’s buckle. Then,
tighten the belt slightly to finish the
installation.

26
27
Cover removal
Remove the cover from between the
safety harness.
Take off the rest of the cover from the
headrest. Ensure not to damage the
EPS foam.
Cleaning the cover
Use natural detergents and warm
water (below 30°C). Do not machine
wash. Do not tumble dry. Do not
wring.
Unfasten the safety harness plastic
buckle and remove the backrest
cover.
Remove the crotch pad.
and warm water to wash. Do not wash
Caution: Excessive scrubbing can
damage the surface of the cover or
the sponge.
Push the safety harness buckle
through the belt hole in the cushion
cover.
Remove the cushion cover.

28
29
GRUPA 1
Odpowiedni dla dzieci o
wadze od 9 do 18kg
Bobas
9-18
kg 3
PUNKTY
MOCOWANIA
Górny pasek
Przodem do
kierunku jazdy
PUNKTY MOCOWANIA
Użycie 3-punktowego połączenia pasa bezpieczeństwa + złącze
ISOFIX do przymocowania fotelika
Schemat podłączenia złącza ISOFIX
Użyj 3-punktowego połączenia pasa bezpieczeństwa + złącze ISOFIX do
przymocowania fotelika
Schemat mocowania PASÓW BEZPIECZEŃSTWA
Ikona górnego paska
Złącze ISOFIX musi być
połączone z górnym
paskiem. Nie można
podłączać go osobno.
Ostrzeżenie
Nie należy używać innych
punktów mocowania za
wyjątkiem wskazanych.
Górny-pas
Klik
połączenie
Ostrzeżenie
Nie należy używać innych
punktów mocowania za
wyjątkiem wskazanych.

30
31
GRUPA 2
Odpowiedni dla dzieci o
wadze od 15 do 25kg
Maluch
15-25
kg
GRUPA 3
Odpowiedni dla dzieci o
wadze od 22 do 36kg
Dziecko
22-36
kg
Ostrzeżenie
Przodem do kierunku jazdy Przodem do kierunku jazdy
Ostrzeżenie
Nie należy używać innych
punktów mocowania za
wyjątkiem wskazanych
.
3
PUNKTY MOCOWANIA
Nie należy używać innych
punktów mocowania za
wyjątkiem wskazanych.
3
PUNKTY MOCOWANIA
Użycie 3-punktowego połączenia pasa bezpieczeństwa + złącze
ISOFIX do przymocowania fotelika
Schemat mocowania PASÓW BEZPIECZEŃSTWA
Regulacja zagłówk a w
górę lub w dół. Ustaw
odpowiednią pozycję.
Użycie 3-punktowego połączenia pasa bezpieczeństwa + złącze ISOFIX do
przymocowania fotelika
Schemat mocowania PASÓW BEZPIECZEŃSTWA

32
33
Detail installation way
Istotne informacje
Uwaga:
Proszę przeczytać tą instrukcję przed
użyciem fotelika samochodowego.
Instrukcję obsługi należy zachować na
czas użyteczności produktu.
Nieprawidłowy montaż może spowodować
zagrożenie życia Twojego dziecka!
Ostrzeżenie
Nie w o l n o u ż y w a ć 2 -
p u n k t ó w p a s ó w
b e z p i e c z e ń s t w a
p o j a z d u . N a l e ż y
u ż y w a ć 3 - p u n k to w eg o
s y s t e m u p a s ó w
b e z p i e c z e ń s t w a .
Proszę korzystać z fotelików w ścisłej zgodzie z prawem
I przepisami krajowymi.
Pas bezpieczeństwa pojazdu musi być zatwierdzony
przez standard ECE R16 lub inny równoważny standard.
Nie wolno montować fotelika na przednim siedzeniu pasażera z poduszką
powietrzną, chyba że jest wyłączona.
Poduszka powietrzna może spowodować śmierć lub poważne obrażenia .
Proszę sprawdzić instrukcję dotyczącą korzystania z system
mocowania fotelika w instrukcji obsługi pojazdu . Siedzenia z tyłu
pojazdu są najbezpieczniejszym miejscem, dla dzieci w wieku do 12 lat.
Ten fotelik samochodowy musi być zamontowany przodem do
kierunku jazdy, nie może być instalowany bokiem lub tyłem do
kierunku jazdy.
Jeśli masz wątpliwości co do montażu fotelika z twoim pojeździe, skontaktuj
się z dostawcą pojazdu..
Prawidłowy I nieprawidłowy montaż fotelika:
To jest URZĄDZENIE PRZ YTRZYMUJĄCE DLA DZIECI
ISOFIX. Posiada ono homologację zgodną z regulaminem nr
44, seria poprawek 04 do ogólnego z astosowania w po jazdach
wyposażonych w systemy mocowania ISOFIX
Pasuje ono do pojazdów z pozycjami zatwierdzonymi jako
pozycje ISOFIX (zgodnie z instrukcją obsługi pojazdu) w
zależności od kategorii fotelika dla dziecka i mocowania.
Grupa wagowa i klasa wielkości ISOFIX, dla której przeznaczone jest
urządzenie: grupa I, II, III, rozmiar ISOFIX I.
A
Zła pozycja
B A Nie może być zamontowany
A w pojeździe z aktywną
poduszką powietrzną.
B Może być stosowany
z 3-punktowym
systemem pasów.

34
35
Wskazówki bezpieczeństwa przed użyciem
Proszę przeczytać tą instrukcję uważnie przed użyciem fotelika.
Aby zapewnić Twojemu dziecku najwyższy stopień bezpieczeństwa!
Fotelik powinien być stosowany dla dzieci o wadze od 9 do 36 kg.
Fotelik musi być stosowany w pojazdach posiadających 3-punktowy pas
bezpieczeństwa oraz złącze ISOFIX z górnym zapięciem.
Proszę zainstalować fotelik dziecięcy, zgodnie z naklejkami na tylnych
siedzeniach lub instrukcją obsługi.
Fotelik może być zainstalowany tylko przodem do kierunku
jazdy..
Tylko prawidłowe korzystanie z pasów bezpieczeństwa zapewni dziecku
maksymalną ochronę podczas wypadku.
Proszę również pamiętać o zabezpieczeniu pustego fotelika,
niezabezpieczony fotelik może spowodować obrażenia innych osób
podczas wypadku lub mocnego hamowania..
Zabrania się łączenia fotelika z innymi nieprzystosowanymi siedziskami.
Nie zaleca się dalszego używania fotelika po wypadku, gdzie urządzenie
zostało poddane dużym siłom I na prężeniom. W takiej sytuacji zaleca się
wymianę fotelika.
Podczas groźnego wypadku, bezpieczeństwo pasażerów zależy głównie od
konstrukcji pojazdu. Fotelika bezpieczeństwa sam nie uchroni dziecka
przed wszelkimi obrażeniami. Jednak prawidłowy montaż I korzystanie z
fotelika zapewnia większe szansę na przeżycia dziecka. Upewnij się że
wszyscy użytkownicy fotelika potrafią z niego prawidłowo korzystać.
Fotelik nie może być używany bez pokrowca, pokrycie nie może być
zastąpione innymi nie zalecanymi przez producenta, ponieważ jest
integralną częścią urządzenie I ma wpływ ma bezpieczeństwo dziecka.
Podczas postoju w słońcu, należy nakryć pokrowiec fotelika, zalecane jest aby
fotelik był przechowywany z dala od promieni słonecznych. Fotelik nie jest
wyposażony w pokrycie tekstylne, ponieważ może to być zbyt niebezpieczne dla
skóry dziecka.
Prosimy przechowywać fotelik w bezpiecznym miejscu, gdy nie jest używany.
Nie umieszczaj ciężkich przedmiotów na górze fotelika, Produkt bez certyfikatu
oraz po modyfikacji jest niebezpieczny. Produkty bez instrukcji montażu
producenta są również niebezpieczne..
Proszę przestrzegać metody montażu która znajduje się w instrukcji obsługi
producenta, aby uniknąć blokady siedzeń oraz drzwi.
Nie próbuj rozmontowywać fotelika na części lub zmieniać sposób podłączenia
pasów bezpieczeństwa, chyba że ten sposób jest opisany w instrukcji obsługi.
Nie należy używać innych punktów instalacji, oprócz tych które zostały
zdefiniowane..
Zabrania się umieszczać na foteliku przedmiotów tj.: torby, książki podobnych. W
przypadku hamowania, może spowodować to obrażenia osób znajdujących się w
pojeździe.
Zabrania się montaż fotelika na składanym siedzeniu samochodowym beż
zablokowania. Niezablokowane siedzenia lub kanapy mogą wpłynąć negatywnie na
bezpieczeństwo dziecka, podczas hamowania lub wypadku.
Nigdy nie zostawiaj dziecka w foteliku bez opieki, nawet w krótkim czasie.
Jeśli dziecko odepnie pas bezpieczeństwa, należy niezwłocznie się zatrzymać i
zapiąć pas bezpieczeństwa.
Należy uczyć dzieci koncepcji bezpieczeństwa, zawsze zapinaj pasy jako
dobry przykład. Nie naruszaj zasad bezpieczeństwa, kiedy dziecko płacze.
Uwaga:
Nie stawiaj fotelika przodem do kierunku jazdy z włączoną poduszką powietrzną, może to
spowodować śmierć lub trwały uszczerbek na zdrowiu.
Twarde elementy oraz plastikowe części urządzenia przytrzymującego dla dzieci należy umieścić
i zainstalować w taki sposób, by w normalnych warunkach eksploatacji pojazdu nie mogły zostać
uwięzione przez przesuwane siedzenie lub drzwi pojazdu.
Ostrzeżenia

36
37
Hak pasa barku
(tylko dla grupy 3)
Regulowany
zagłówek
Regulacja
zagłówka
5-punktowy
Syst em uprzęży
Otwór na
uprząż
Górny – pas
bezpieczeństwa
Mały zagłówek
5-punktowy
System uprzęży
Obracane
złącze ISOF IX
Złącze
Oparcie
Nakładka
Nakładka
Hak pasa
biodrowego
Klamra
bezpieczeństwa
5-punktowa
uprząż regulacji
pasa
Mocowanie
ISOFIX uchwyt
zwalniający
Uprząż regulowana
przyciskiem

38
39
Wykorzystanie złącz ISOFIX do montażu
ISOFIX SYSTEM MOCOWANIA
ISOFIX jest systemem mocowania fotelików dzieci ęcych na siedzeniach w
samochodzie. System ISOFIX składa się z dwóch uchwytów, które znajdują
się między siedzeniami a oparciem fotela. Uchwyty te są przymocowane
bezpośrednio do konstrukcji pojazdu. W stosunku do pa sów ISOFIX
zapewnia sztywniejsze zamocowanie, co przekłada się na wyższe
bezpieczeństwo.
Ostrzeżenie
Złącza ISOFIX muszą być
podłączone oba razem. Złącza
nie mogą być podłączone
osobno, pojedynczo.
Przytrzymując podstawę fotelika,
wciskaj ją powoli do wewnątrz
siedzeń. Aż do momentu gdy złącza
ISOFIX się zatrzasną,
Dwa kliknięcia, będą oznaczały
poprawne zamocowanie fotelika.
Fotelik jest wyposażon y w system mocowania ISOFIX (w tym dwa złącza
ISOFIX na dole I górny pasek bezpieczeństwa). Jest on używany w celu
wzmocnienia połączenia między fotelikiem dziecięcym a siedzeniem pojazdu,
w zakresie instalacji dla grupy I, II lub III. Powinien być stosowany z 3-punktowym
systemem pasów bezpieczeństwa, stosowanie osobno jest zabronione.
Upewnij się że oba wskaźnik na
złączu ISOFIX zmieniły się na
zielone
Jeśli wskaźniki na złączu ISOFIX
będą czerwone, znaczy to że
foteli k został źle zamocowany .
Zainstaluj fotelik ponownie.
Znajdź złącza ISOFIX w pojeździe I
zamontuj prowadniki, nie trzeba
instalować prowadników, jeśli nie są
wymagane w danym pojeździe.
Przykręć dwa złącza ISOFIX do tylnej
dolnej podstawy fotelika.
Pociągnij fotelik mocno, aby upewnić
się że jest prawidłowo zamocowany.
Instalacja 3-puktowych p a s ó w
b e z p i e c z e ń s t w a (szczegóły na
stronie 44.)
Table of contents
Languages:
Other Lionelo Car Seat manuals

Lionelo
Lionelo Bastiaan RWF User manual

Lionelo
Lionelo Liam User manual

Lionelo
Lionelo Hugo User manual

Lionelo
Lionelo jasper User manual

Lionelo
Lionelo Braam User manual

Lionelo
Lionelo NOA User manual

Lionelo
Lionelo Hugo User manual

Lionelo
Lionelo Levi Simple User manual

Lionelo
Lionelo Levi One User manual

Lionelo
Lionelo Nico User manual

Lionelo
Lionelo Neal User manual

Lionelo
Lionelo LEVI PLUS User manual

Lionelo
Lionelo Liam User manual

Lionelo
Lionelo Aart User manual

Lionelo
Lionelo NOA PLUS User manual

Lionelo
Lionelo Lars User manual

Lionelo
Lionelo Lennart Guide

Lionelo
Lionelo Hugo User manual

Lionelo
Lionelo Lars i-Size User manual

Lionelo
Lionelo Luuk FIX User manual