manuals.online logo
Brands
  1. Home
  2. •
  3. Brands
  4. •
  5. MHZ
  6. •
  7. Window Blind
  8. •
  9. MHZ R 03 User manual

MHZ R 03 User manual

1
Technische Änderungen vorbehalten, Ausgabe 03.2021
Sous réserve de modifications techniques, édition 03.2021
Subject to technical changes, Edition 03.2021
Montage- und Bedienungsanleitung
INotice de montage et mode d'emploi I
Installation and operating instructions
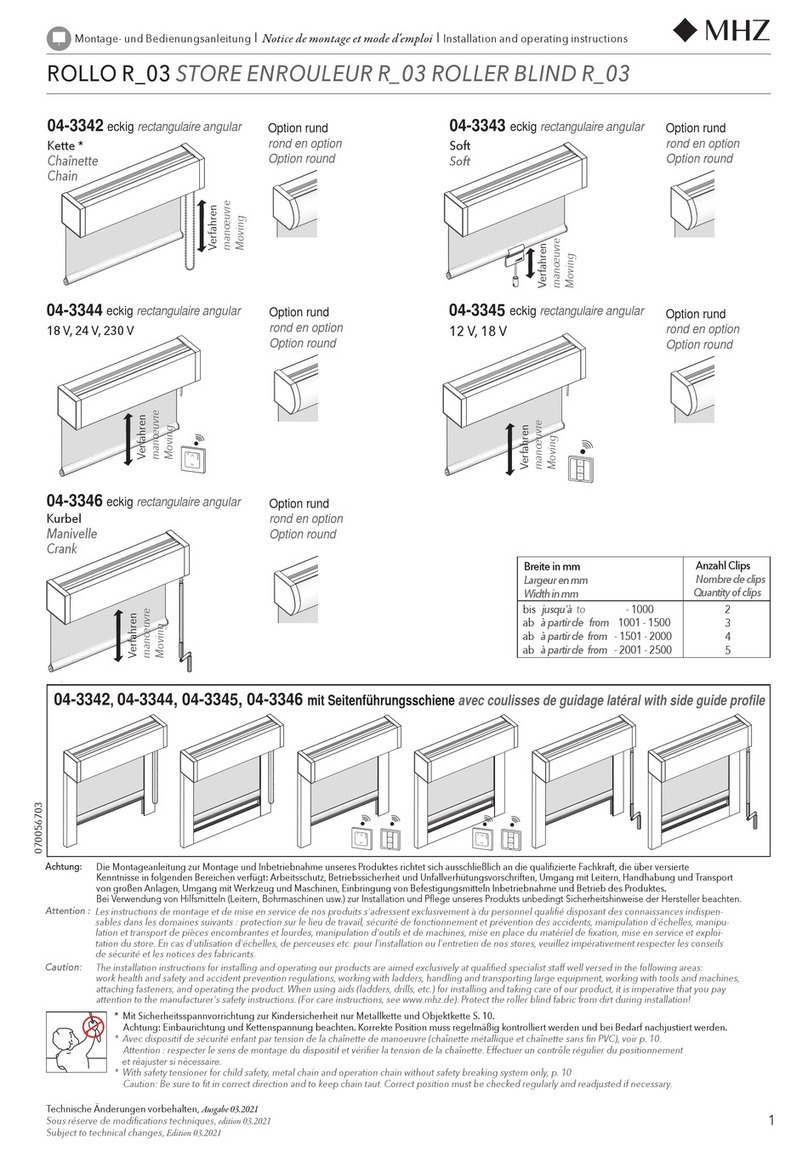
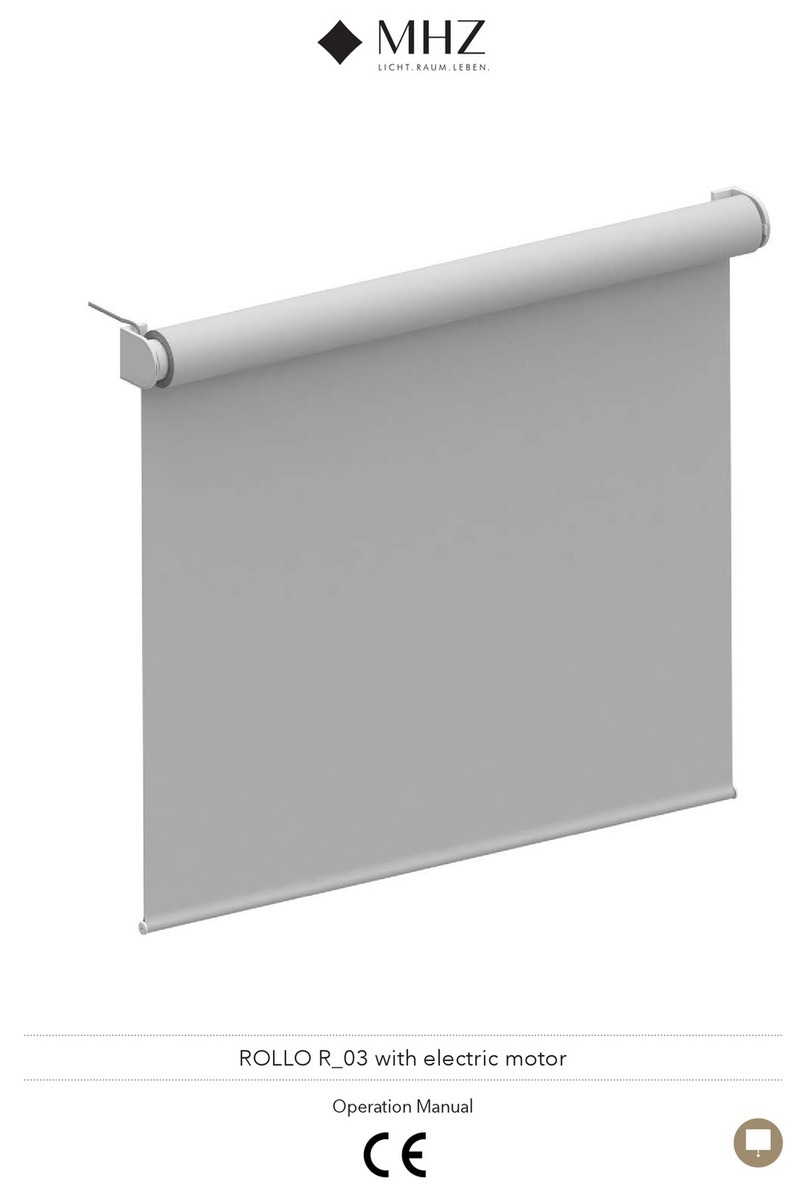
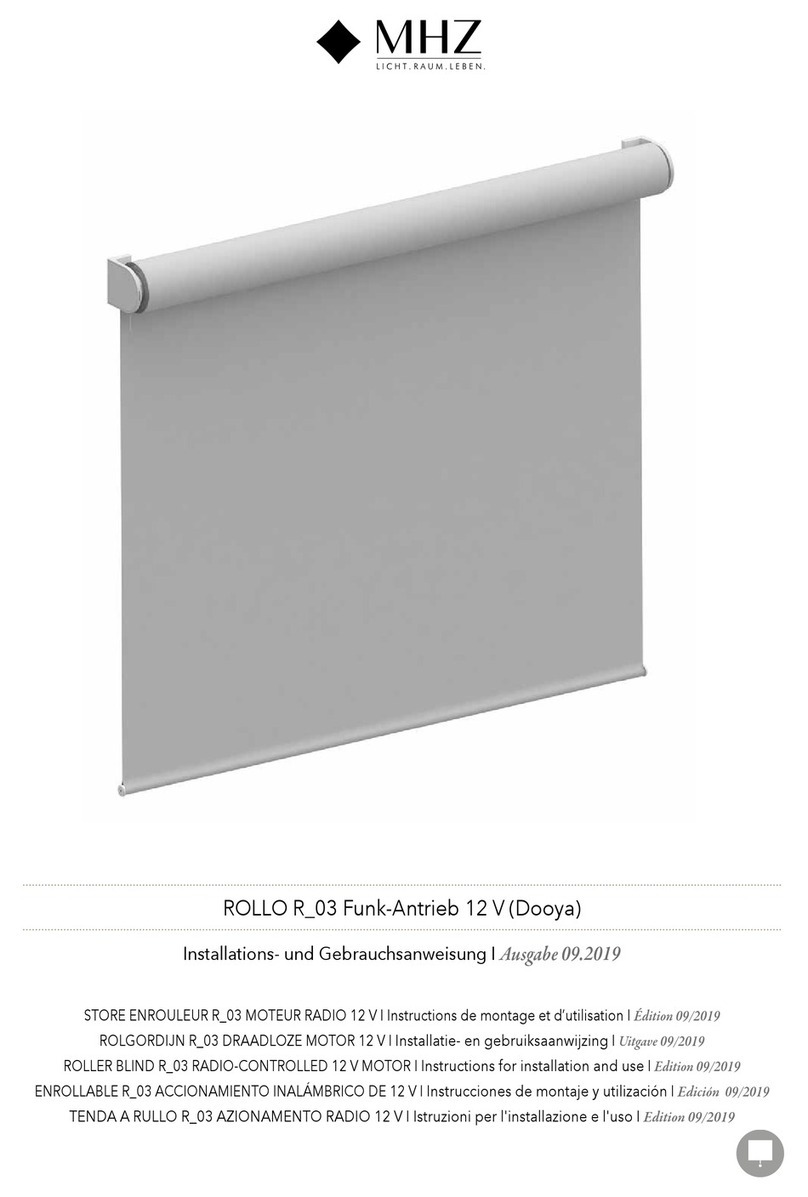
ROLLO R_03 STORE ENROULEUR R_03 ROLLER BLIND R_03
04-330304-3302
Verfahren
manœuvre
Moving
Verfahren
manœuvre
Moving
Kette
Chaînette
Chain operation
070056663
04-3304
Elektro-Antrieb 18 V, 24 V, 230 V
Moteur électrique 18 V, 24 V, 230 V
Electric drive 18 V, 24 V, 230 V
04-3305
Akku Funk-Antrieb 12 V, 18 V
Moteur radio avec accu 12 V, 18 V
Battery-operated Radio-Drive 12 V, 18 V
*
Achtung:
Die Montageanleitung zur Montage und Inbetriebnahme unseres Produktes richtet sich ausschließlich an die qualifizierte Fachkraft, die über versierte
Kenntnisse in folgenden Bereichen verfügt: Arbeitsschutz, Betriebssicherheit und Unfallverhütungsvorschriften, Umgang mit Leitern, Handhabung und Transport
von großen Anlagen, Umgang mit Werkzeug und Maschinen, Einbringung von Befestigungsmitteln Inbetriebnahme und Betrieb des Produktes.
Bei Verwendung von Hilfsmitteln (Leitern, Bohrmaschinen usw.) zur Installation und Pflege unseres Produkts unbedingt Sicherheitshinweise der Hersteller beachten.
Caution:
The installation instructions for installing and operating our products are aimed exclusively at qualified specialist staff well versed in the following areas:
work health and safety and accident prevention regulations, working with ladders, handling and transporting large equipment, working with tools and machines,
attaching fasteners, and operating the product. When using aids (ladders, drills, etc.) for installing and taking care of our product, it is imperative that you pay
attention to the manufacturer's safety instructions. (For care instructions, see www.mhz.de). Protect the roller blind fabric from dirt during installation!
Les instructions de montage et de mise en service de nos produits s'adressent exclusivement à du personnel qualifié disposant des connaissances indispen-
sables dans les domaines suivants : protection sur le lieu de travail, sécurité de fonctionnement et prévention des accidents, manipulation d'échelles, manipu-
lation et transport de pièces encombrantes et lourdes, manipulation d'outils et de machines, mise en place du matériel de fixation, mise en service et exploi-
tation du store. En cas d'utilisation d'échelles, de perceuses etc. pour l'installation ou l'entretien de nos stores, veuillez impérativement respecter les conseils
de sécurité et les notices des fabricants.
Attention :
Elektro-Anschluss muss durch eine Fachkraft erfolgen!
Die Vorschriften von VDE und örtlichen Energieunternehmen sind einzuhalten -
insbesondere VDE 0100 für Nass- und Feuchträume.
Tous les raccordements électriques doivent être effectués par des professionnels!
Il convient de se conformer aux directives générales et particulières en la matière et
de respecter scrupuleusement les normes en vigueur et notamment les prescriptions
relatives aux locaux humides.
Electric drive must be installed by qualified specialist staff! The VDE regulations and
the stipulations of the local energy companies must be complied with – in particular
VDE 0100 for wet and damp locations.
* Mit Sicherheitsspannvorrichtung zur Kindersicherheit nur Metallkette und Objektkette S. 16
Achtung: Einbaurichtung und Kettenspannung beachten. Korrekte Position muss regelmäßig kontrolliert werden und bei Bedarf nachjustiert werden
.
* Avec dispositif de sécurité enfant par tension de la chaînette de manoeuvre (chaînette métallique et chaînette sans fin PVC), voir p. 16.
Attention : respecter le sens de montage du dispositif et vérifier la tension de la chaînette. Effectuer un contrôle régulier du positionnement
et réajuster si nécessaire.
* With safety tensioner for child safety, metal chain and operation chain without safety breaking system only, p. 16
Caution: Be sure to fit in correct direction and to keep chain taut. Correct position must be checked regularly and readjusted if necessary.
Soft
Soft
2
Technische Änderungen vorbehalten, Ausgabe 03.2021
Sous réserve de modifications techniques, édition 03.2021
Subject to technical changes, Edition 03.2021
Montage Beton Pose sur béton Concrete installation
** Hinweis Montage Remarques concernant le montage Installation note
**
Montage Hochlochziegel Pose sur briques alvéolées Hollow brick installation
Montage Plattenbaustoff Pose sur plaque de fixation Panel building materials installation
Rollo R_03
|
Store enrouleur R_03
|
Roller Blind R_03
Anzeichnen Marquage Mark
Trägermontage
Supports de fixation
Bracket mounting
Fenstermitte Milieu fenêtre Centre of window
1/2 Bestellbreite (1/2 Gesamtbreite)
1/2 largeur de commande (1/2 largeur totale)
1/2 ordering width (1/2 total width)
1/2 Bestellbreite - 20 mm
1/2 largeur de commande - 20mm
1/2 ordering width - 20 mm
1/2 Bestellbreite (1/2 Gesamtbreite)
1/2 largeur de commande (1/2 largeur totale)
1/2 ordering width (1/2 total width)
1/2 Bestellbreite - 20 mm
1/2 largeur de commande - 20mm
1/2 ordering width - 20 mm
waagerecht ausrichten
alignement horizontal
align horizontally
3
Technische Änderungen vorbehalten, Ausgabe 03.2021
Sous réserve de modifications techniques, édition 03.2021
Subject to technical changes, Edition 03.2021
Wand Mur Wall
1.
Nische Niche Recess
2.
Decke Plafond Ceiling
3.
3.
2.
1. 1.
2.
3.
** **
**
Montage Wand
Montage au mur Wall installation
Click
2.
1.
Soft
Soft
30 mm
5.
Kette
Chaînette
Chain
1.
Click
2. 2.
1.
Click
Antrieb
Moteur
Electric drive
4.
3.
max.
15°
Click
Montage Akku 18 V
Montage de l'accu 18 V
Installation battery 18 V
1.
2.
1.
2.
Trägermontage
Supports de fixation
Bracket mounting
Rollo R_03
|
Store enrouleur R_03
|
Roller Blind R_03
4
Technische Änderungen vorbehalten, Ausgabe 03.2021
Sous réserve de modifications techniques, édition 03.2021
Subject to technical changes, Edition 03.2021
Rollo R_03
|
Store enrouleur R_03
|
Roller Blind R_03
Montage Decke
Montage au plafond Ceiling installation
2.
1.
2.
1.
Click
1. Schräge: 1 x 2,5° (3 mm), 2 x 5° (6 mm)
2. Distanz: 2 x 5° (3,5 mm)
optional Ausgleichscheibe:
*1.
2.
3.
Click
1. Inclinaison : 1 x 2,5° (3 mm), 2 x 5° (6 mm)
2. Distance : 2 x 5° (3,5 mm)
En option, rondelles de compensation:
*
1
2
Montage Nische
Montage en niche Recess installation
2.
1.
4.
3.
max.
15°
2.
1.
*
2. 2.
1.
*1.
*
**
max.
15°
*
3.
5.
4.
5.
Click
Click Click
Click
1/2 largeur de commande (1/2 largeur
totale)
1/2 largeur de commande - 13 mm
1/2 Bestellbreite (1/2
Gesamtbreite)
1/2 Bestellbreite minus 13 mm
15
waagerecht
ausrichten
Soft
Soft
Kette
Chaînette
Chain
Antrieb
Moteur
Electric drive
Soft
Soft
Kette
Chaînette
Chain
Antrieb
Moteur
Electric drive
1. Angled: 1 x 2,5° (3 mm), 2 x 5° (6 mm)
2. Distance 2 x 5° (3,5 mm)
optional compensating shim:
*
5
Technische Änderungen vorbehalten, Ausgabe 03.2021
Sous réserve de modifications techniques, édition 03.2021
Subject to technical changes, Edition 03.2021
Fenstermitte Milieu fenêtre Centre of window
25,1 mm 3
Trägermontage Alu-Wand-Träger
Supports de fixation murale en aluminium wall bracket mounting
8.
max.
15°
5.
6.
7.
1.
**
2.
3.
4.
Montage Wand
Montage au mur Wall installation
**
50 mm
Bohrung ø 6 mm
perçage ø 6 mm
Drill hole ø 6 mm
Rollo R_03
|
Store enrouleur R_03
|
Roller Blind R_03
Anzeichnen Marquage Mark
1/2 Bestellbreite (1/2 Gesamtbreite)
1/2 largeur de commande (1/2 largeur totale)
1/2 ordering width (1/2 total width)
1/2 Bestellbreite - 16 mm
1/2 largeur de commande - 16 mm
1/2 ordering width - 16 mm
1/2 Bestellbreite (1/2 Gesamtbreite)
1/2 largeur de commande (1/2 largeur totale)
1/2 ordering width (1/2 total width)
waagerecht ausrichten
alignement horizontal
align horizontally
1/2 Bestellbreite - 16 mm
1/2 largeur de commande - 16 mm
1/2 ordering width - 16 mm
6
Rollo R_03
|
Store enrouleur R_03
|
Roller Blind R_03
Technische Änderungen vorbehalten, Ausgabe 03.2021
Sous réserve de modifications techniques, édition 03.2021
Subject to technical changes, Edition 03.2021
Montage Schacht
Montage dans réservation Shaft installation
Demontage
Démontage
1. Schräge: 1 x 2,5° (3 mm), 2 x 5° (6 mm)
2. Distanz: 2 x 5° (3,5 mm)
optional Ausgleichscheibe:
*1.
2.
3.
1. Inclinaison : 1 x 2,5° (3 mm), 2 x 5° (6 mm)
2. Distance : 2 x 5° (3,5 mm)
En option, rondelles de compensation :
*
1
2
Click
1. Angled: 1 x 2,5° (3 mm),
2 x 5° (6 mm)
2. Distance: 2 x 5° (3,5 mm)
optional compensating shim:
*
Arretierung
Federmotor:
Behang geringfügig
ausziehen und
arretieren (Feder-
motor gesperrt)
Blocage de l'axe
automatique :
Tirer pour descendre
un peu le store puis
bloquer (l'axe automa-
tique est verrouillé)
1.
2.
Stopp Stop
Spring drive secured
in position:
Pull hanging out
slightly and secure
in position (spring
drive locked)
Soft
Soft
max.
15°
*
2.
1.
*
Click
2.
1.
*2.
1.
*
4.
**
Kette/Soft
Chaînette
/ Soft
Chain/Soft
1.
2.
3.
1.
*
5.
Click Click Click
Click
max.15°
Soft
Soft
Kette
Chaînette
Chain
Antrieb
Moteur
Electric drive
7
Technische Änderungen vorbehalten, Ausgabe 03.2021
Sous réserve de modifications techniques, édition 03.2021
Subject to technical changes, Edition 03.2021
Clip-Montage Wand
Fixation au mur par clips Wall clip mounting Clip-Montage
Decke
Fixation au plafond par clips Ceiling clip mounting
Clip-Montage Befestigungsschiene für 04-3302, 04-3303, 04-3304, 04-3305
Montage du rail de fixation par clips pour 04-3302, 04-3303, 04-3304, 04-3305
Clip installation for mounting bar for models 04-3302, 04-3303, 04-3304, 04-3305
1.
2.
3.
Click
2.
1. 3.
Click
min. 20 mm
**
1.
2.
1.
2.
3.
3.
Click
Click
ca.50mm
env.50mm
approx.50mm
50 mm
Click
1.
2.
3.
Click
1.
2.
ausrichten
aligner
align
**
**
**
**
2.
1. 3.
Click
min. 20 mm
3.
Rollo R_03
|
Store enrouleur R_03
|
Roller Blind R_03
Anzeichnen
Marquage
Mark
waagerecht ausrichten
Alignement horizontal Align horizontally
4,5 mm
53 mm
Fenstermitte Milieu fenêtre Centre of window
1/2 Bestellbreite (1/2 Gesamtbreite)
1/2 largeur de commande (1/2 largeur totale)
1/2 ordering width (1/2 total width)
1/2 Bestellbreite (1/2 Gesamtbreite)
1/2 largeur de commande (1/2 largeur totale)
1/2 ordering width (1/2 total width)
1/2 Bestellbreite - 50 mm
1/2 largeur de commande - 50 mm
1/2 ordering width - 50 mm
1/2 Bestellbreite - 50mm
1/2 largeur de commande - 50 mm
1/2 ordering width - 50 mm
Bohrung
ø 6 mm
perçage
ø 6 mm
Drill hole
ø 6 mm
ausrichten
aligner
align
8
Kette
Chaînette
Chain
04-3302
Soft
Soft
04-3303
Trägermontage (Direktmontage) geteilter Behang
Supports de fixation (montage direct) pour enrouleurs juxtaposés
Bracket mounting (direct mounting), non-coupled blind fabric
Demontage
Démontage Taking the blind down
04-3304
Elektro-Antrieb 24V 230V
Moteur électrique 24V, 230V
Electric drive 24 V 230 V
04-3305
Akku Funk-Antrieb 12V
Moteur radio avec batterie 12V
Battery-operated radio drive 12 V
Rollo R_03
|
Store enrouleur R_03
|
Roller Blind R_03
Technische Änderungen vorbehalten, Ausgabe 03.2021
Sous réserve de modifications techniques, édition 03.2021
Subject to technical changes, Edition 03.2021
Rollo R_03
|
Store enrouleur R_03
|
Roller Blind R_03
1.
2.
ausrichten
aligner
align
50 mm
**
Trägermontage
Supports de fixation Bracket mounting
Soft

Soft
Kette
Chaînette
Chain
Click
5.
6.
Lorem ipsum
6.
Click
5. 5.
6.
Click
Antrieb
Moteur
Electric drive
geteilt
juxtaposé
non-coupled
gekoppelt
accouplé
coupled
**
1.
2.
3.
**
3.
2.
1. **
5.
6.
7.
Click
8. 9.
Click
2
3
4
4. 4.
1
9
Technische Änderungen vorbehalten, Ausgabe 03.2021
Sous réserve de modifications techniques, édition 03.2021
Subject to technical changes, Edition 03.2021
Wand Mur Wall
Decke Plafond Ceiling
Bohrung ø 6 mm
perçage ø 6 mm
Drill hole ø 6 mm
Rollo R_03
|
Store enrouleur R_03
|
Roller Blind R_03
Bohrung ø 6 mm
perçage ø 6 mm
Drill hole ø 6 mm
15 mm
3.
34-49 mm
1.
2.
Decke Plafond Celling
**
10
Trägermontage, verstellbar
Supports de fixation, réglables Bracket mounting, adjustable
3.
Wand Mur Wall
1.
**
2.
50 mm
50 mm
Technische Änderungen vorbehalten, Ausgabe 03.2021
Sous réserve de modifications techniques, édition 03.2021
Subject to technical changes, Edition 03.2021
Anzeichnen
Marquage
Mark
waagerecht ausrichten
Alignement horizontal Align horizontally
Fenstermitte Milieu fenêtre Centre of window
1/2 Bestellbreite (1/2 Gesamtbreite)
1/2 largeur de commande (1/2 largeur totale)
1/2 ordering width (1/2 total width)
1/2 Bestellbreite - 13 mm
1/2 largeur de commande - 13 mm
1/2 ordering width - 13 mm
1/2 Bestellbreite - 26 mm
1/2 largeur de commande - 26 mm
1/2 ordering width - 26 mm
1/2 Bestellbreite (1/2 Gesamtbreite)
1/2 largeur de commande (1/2 largeur totale)
1/2 ordering width (1/2 total width)
1/2 Bestellbreite - 13 mm
1/2 largeur de commande - 13 mm
1/2 ordering width - 13 mm
1/2 Bestellbreite - 26 mm
1/2 largeur de commande - 26 mm
1/2 ordering width - 26 mm
variabler Wandabstand
Distance au mur réglable
variable wall clearance
**
**
**
**
ca.50mm
env.50mm
approx.50mm
Clip-Montage mit Befestigungsschiene Montage avec clips et rail de fixation Clip mounting with mounting rail
50 mm
11
3.
Click
34-49 mm
Clip-Montage Wand
Fixation au mur par clips
Wall clip mounting
Clip-Montage
Decke
Fixation au plafond par clips
Ceiling clip mounting
3.
Click
3.
3.
Click
Click
1.
2.
Click
3.
1. 2.
3.
Click
Wand mur Wall
1. 2.
1. 2.
2.
1.
2.
1.
min. 35 mm
Rollo R_03
|
Store enrouleur R_03
|
Roller Blind R_03
Technische Änderungen vorbehalten, Ausgabe 03.2021
Sous réserve de modifications techniques, édition 03.2021
Subject to technical changes, Edition 03.2021
Anzeichnen
Marquage
Mark
1/2 Bestellbreite (1/2 Gesamtbreite)
1/2 largeur de commande (1/2 largeur totale)
1/2 ordering width (1/2 total width)
1/2 Bestellbreite minus 25-50mm
1/2 largeur de commande minus 25-50mm
1/2 ordering width minus 25-50mm
variabler Wandabstand
Distance au mur réglable
variable wall clearance
waagerecht ausrichten
Alignement horizontal Align horizontally
Fenstermitte Milieu fenêtre Centre of window
1/2 Bestellbreite (1/2 Gesamtbreite)
1/2 largeur de commande (1/2 largeur totale)
1/2 ordering width (1/2 total width)
1/2 Bestellbreite minus 25-50mm
1/2 largeur de commande minus 25-50mm
1/2 ordering width minus 25-50mm
Bei Rollobreite ab 120 cm 3. Clip montieren
Pour largeurs de store à partir de 120 cm poser un 3e clip de fixation
For roller blind widths from 120 cm 3. install clip
Bohrung ø 6 mm
perçage ø 6 mm
Drill hole ø 6 mm
ausrichten
aligner
align
ausrichten
aligner
align
Decke plafond Ceiling
Clip-Montage mit Befestigungsschiene Montage avec clips et rail de fixation Clip mounting with mounting rail
12
1.
15
23
72 mm
min. 51
max. 71
Montage mit 2 x Rollo R_03 mit FV15 2-läufig
Montage avec 2 x store enrouleur R_03 avec FV15 2-rails
Installation with 2 x roller blind R_03 with FV15 2-channel
15
23
72 mm
min. 51
max. 71
Montage Sonnenschutzträgerwagen mit einstellbaren Trägern
Montage d'un chariot avec supports réglables pour protection solaire
Sun protection carrier installation with adjustable brackets
2.
2.
34-49 mm
Montage mit 2 x Rollo R_03 mit FV15 3-läufig
Montage avec 2 x store enrouleur R_03 avec FV15 3-rails
Installation with 2 x roller blind R_03 with FV15 3-channel
Rollo R_03
|
Store enrouleur R_03
|
Roller Blind R_03
Technische Änderungen vorbehalten, Ausgabe 03.2021
Sous réserve de modifications techniques, édition 03.2021
Subject to technical changes, Edition 03.2021
variabler Wandabstand
Distance au mur réglable
variable wall clearance
13
Obere Endlage einstellen Réglage du fin de course haut Adjust top end position
04-3302 04-3303
Obere Endlage nach unten verstellen
Réglage du fin de course haut vers le bas
Adjust top end position downwards
Behang leicht nach unten verfahren
Descendre légèrement le store
Move hanging down slightly
Kette
Chaînette Chain
Soft
Soft
Obere Endlage nach oben verstellen
Réglage du fin de course haut vers le haut
Adjust top end position upwards
nur geteilter Behang
uniquement pour stores juxtaposés
non-coupled blind fabric only
Endlage
Fin de course
End position
Federspannung
Tension du ressort
Spring tension
Rollo R_03
|
Store enrouleur R_03
|
Roller Blind R_03
Technische Änderungen vorbehalten, Ausgabe 03.2021
Sous réserve de modifications techniques, édition 03.2021
Subject to technical changes, Edition 03.2021
La tension de l'axe automatique est réglée en usine
1. Verrouiller l'axe automatique et retirer l'axe d'enroulement (voir démontage).
2. Insérer la clé Allen 4 mm sur le côté droit (tissu placé à l'arrière)
3.
Augmenter la tension du ressort (accélération de la vitesse de
déplacement) :
- déverrouillage de l'axe automatique (env. 1/4 de tour)
- réarmement du ressort (env. 1/2 tour)
- augmentation de la tension du ressort si nécessaire
- retour de l'axe automatique jusqu'en butée
(verrouillage).
4. Réduire la tension du ressort (réduction de la vitesse de
déplacement) :
- déverrouillage de l'axe automatique (env. 1/4 de tour)
- réduction de la tension du ressort si nécessaire
- réarmement du ressort (env. 1/2 tour)
- retour de l'axe automatique jusqu'en butée
(verrouillage).
Roller blind is set with the correct spring tension at the factory
1. Secure spring drive and remove roller blind tube (see taking the blind down).
2. Insert 4 mm Allen key on right-hand side (rear hanging).
3. Increase spring tension (higher movement speed)
- Release spring drive (approx. 1/4 turn)
- put back (approx. 1/2 turn)
- Increase spring tension if necessary
- Turn spring drive back to end stop (secured)
4. Reduce spring tension (lower movement speed):
- Release spring drive (approx. 1/4 turn)
- Reduce spring tension if necessary
- put back (approx. 1/2 turn)
- Turn spring drive back to end stop (secured).
4. Federspannung reduzieren (geringere Verfahrgeschwindigkeit):
- Federantrieb entsichern (ca. 1/4 Umdrehung)
- Federspannung reduzieren nach Bedarf
- zurückstellen (ca. 1/2 Umdrehung)
- Federantrieb bis zum Anschlag zurückdrehen
(gesichert).
Rollo ist werkseitig mit der korrekten Federspannung eingestellt
1. Federantrieb sichern und Rollowelle entnehmen (siehe Demontage).
2. Inbusschlüssel 4 mm auf rechter Seite (Behang hinten) ansetzen.
3. Federspannung erhöhen (höhere Verfahrgeschwindigkeit):
- Federantrieb entsichern (ca. 1/4 Umdrehung)
- zurückstellen (ca. 1/2 Umdrehung)
- Federspannung erhöhen nach Bedarf
- Federantrieb bis zum Anschlag zurückdrehen
(gesichert).
14
Technische Änderungen vorbehalten, Ausgabe 03.2021
Sous réserve de modifications techniques, édition 03.2021
Subject to technical changes, Edition 03.2021
Einstellen des Federantrieb 04-3303
Rollo R_03
|
Store enrouleur R_03
|
Roller Blind R_03
Réglage de l'axe automatique 04-3303
Adjust spring drive 04-3303
15
Technische Änderungen vorbehalten, Ausgabe 03.2021
Sous réserve de modifications techniques, édition 03.2021
Subject to technical changes, Edition 03.2021
Rollo R_03
|
Store enrouleur R_03
|
Roller Blind R_03
Wechsel der Bedienseite
1.) Demontage Rollowelle lt. MA
2.) Entnahme der Technik aus der Welle 3.) Wechsel Bedienseite und Montage der Technik
4.) Montage Rollowelle lt. MA
vorne
2. Demontage Bedienseite Links - Einbaulage Stoffablauf vorne
vorne
3. Montage Bedienseite Rechts - Einbaulage Stoffablauf vorne
hinten
3. Montage Bedienseite Rechts - Einbaulage Stoffablauf hinten
hinten
2. Demontage Bedienseite Links - Einbaulage Stoffablauf hinten
Changement du côté de manoeuvre
1.) Démontage de l'axe d'enroulement suivant notice de montage
2.) Retrait du mécanisme de l'axe d'enroulement 3.) Changement du côté de manoeuvre et pose du mécanisme
4.) Montage de l'axe d'enroulement suivant notice de montage
avant
2. Démontage côté manoeuvre à gauche - Déroulement de la toile par l'avant
avant
3. Montage côté manoeuvre à droite - Déroulement
de la toile par l'avant
arrière
3. Montage côté manoeuvre à droite - Déroulement de la toile par l'arrière
arrière
2. Démontage côté manoeuvre à gauche - Déroulement de la toile par l'arrière
Changing the operating side
1.) Removal of roller blind tube as per installation instructions
2.) Removal of hardware from the roller blind tube 3.) Changing operating side and installing hardware
4.) Installation of roller blind tube as per installation instructions
front
2. Uninstalling left-hand operating side – fabric passing in front when installed
front
3. Installing right-hand operating side – fabric passing in front when installed
at rear
3. Installing right-hand operating side – fabric passing on rear when installed
at rear
2. Uninstalling left-hand operating side – fabric passing on rear when installed
16
Technische Änderungen vorbehalten, Ausgabe 03.2021
Sous réserve de modifications techniques, édition 03.2021
Subject to technical changes, Edition 03.2021
In der Kette sind 2 Abreißkugeln mit einem Abstand
von 300 mm verbaut.
2 perles de la chaînette, espacées de 300 mm, se séparent en cas
de nécessité.
There are 2 safety breaking system beads built into the oper ating
chain 300 mm apart.
Auslösen des Abreißsystems
(gemäß Vorschrift Kindersicherheit).
Sous le poids de l'enfant, les 2 demi-
perles se séparent (dispositif de sécurité).
Triggering of the safety breaking system
(as per child safety regulations)
Zum Verschließen beide Kugeln
ineinanderschieben.
Pour refermer la chaînette, faire
glisser les 2 demi-perles pour
les emboîter l'une dans l'autre.
To lock together, push the two
beads into each other.
Montage Kindersicherheitsvorrichtungen
Montage des dispositifs de sécurité enfant
Child safety systems installation
transparente Bedienkette aus Kunststoff mit Abreißsystem
Chaînette de manœuvre transparente en PVC avec dispositif de sécurité Transparent plastic chain with safety breaking system
Bedienung Kette ohne Abreißsystem (Metallkette und Objektkette)
Manoeuvre chaînette sans dispositif de sécurité par ouverture automatique de la chaînette (chaînette métallique et chaînette sans fin PVC)
Operating chain without safety breaking system (metal chain and chain without safety breaking system)
Rollo R_03
|
Store enrouleur R_03
|
Roller Blind R_03
unten
en bas
below
Zahnscheibe verclipst
Zahnscheibe aufclipsen
Montageausrichtung
„UP“ = oben
max.
maxi.
Rondelle clipsée
Lock washer clipped on
Clipser la rondelle dentée
Snap on lock washer
Sens de montage
„UP“ = en haut
Mounting orientation
„UP“ = top
Achtung: Einbaurichtung der Sicherheits-
spannvorichtung und Kettenspannung
beachten. Korrekte Position muss regel-
mäßig kontrolliert werden und bei Bedarf
nachjustiert werden.
Attention : respecter le sens de montage
du dispositif et vérifier la tension de la
chaînette. Effectuer un contrôle régulier du
positionnement et réajuster si nécessaire.
Caution: Be sure to fit in correct direction
and to keep chain taut. Correct position
must be checked regularly and readjusted
if necessary.
Sicherheitsspannvorrichtung für Bedienkette
Dispositif de sécurité par tension de la chaînette de manoeuvre
Safety tensioner for operating chain
Kennzeichnung „UP“
(Rückseitig)
für Fensterrahmenbefestigung
für Wandbefestigung
Marquage „UP“ (au dos)
UP mark (back)
pour fixation sur châssis de fenêtre
For window frame mounting
pour fixation murale
For wall mounting
2.
3.
4.
1.
17
Technische Änderungen vorbehalten, Ausgabe 03.2021
Sous réserve de modifications techniques, édition 03.2021
Subject to technical changes, Edition 03.2021
ACHTUNG
Bitte lesen Sie diese Anleitung vor dem Anbringen und der Benutzung der Vorrichtung aufmerksam durch, und mon-
tieren Sie diese entsprechend. Kinder können sich strangulieren, wenn die Vorrichtung nicht ordnungsgemäß montiert
wird. Bitte diese Anleitung für spätere Bedarfsfälle aufbewahren. Die Verwendung zusätzlicher Sicherheitseinrich-
tungen hilft das Strangulationsrisiko zu vermindern, kann jedoch nicht als vollständig geschützt vor missbräuchlicher
Verwendung angesehen werden.
• Kleine Kinder können sich in den Schlingen von Schnüren, Ketten oder Gurten zum Ziehen sowie Schnüre zur Betäti-
gung von Fensterabdeckungen strangulieren. Schnüre sind aus der Reichweite von Kindern zu halten, um Strangu-
lierung und Verwicklung zu vermeiden. Sie können sich ebenfalls um den Hals wickeln.
• Betten, Kinderbetten und Möbel sind entfernt von Schnüren für Fensterabdeckungen aufzustellen.
• Binden Sie Schnüre nicht zusammen. Stellen Sie sicher, dass sich Schnüre nicht verdrehen und eine Schlinge bilden.
DE
FR
Prüfen Sie die Vorrichtung, wenn sie nicht regelmäßig verwendet wird und ersetzen Sie die Vorrichtung,
wenn sie schadhaft ist.
ATTENTION
Veuillez lire attentivement les instructions de pose et d’utilisation avant de procéder au montage des dispositifs
de sécurité. Un montage incorrect représente un risque de strangulation pour les enfants. Veuillez également
conserver la présente notice pour consultation ultérieure. L’utilisation de dispositifs de sécurité supplémentaires
permet certes de diminuer les risques sans toutefois exclure les conséquences dues à une mauvaise utilisation.
• Les cordons et chaînettes de manœuvre des stores intérieurs en formant une boucle au mur ou au sol présentent
des risques de strangulation ou d’enchevêtrement pour les jeunes enfants
• Afin d’éviter ce type de risque, il convient de garder les cordons et chaînettes hors de leur portée en éloignant
suffisamment les lits et autres meubles de ces éléments de manoeuvre.
• Veillez à ce que les cordons ne s’entrelacent pas et qu’ils ne s’enroulent pas en formant une boucle.
Contrôlez l’équipement en cas d’utilisation irrégulière et le remplacer en cas de détérioration.
Warnhinweis gemäß DIN EN 13120
Pictogramme de mise en garde conformément à la norme EN 13120
NL
OPGELET
Gelieve deze handleiding aandachtig door te lezen, vooraleer het mechanisme te installeren en te gebruiken en
monteer het juist. Wanneer het mechanisme niet volgens de voorschriften wordt gemonteerd, kunnen kinderen zich
ermee wurgen. Gelieve deze handleiding te bewaren voor toekomstig gebruik. Het gebruik van bijkomende veilig-
heidsvoorzieningen helpt om het risico op wurging te verminderen, maar kan niet als volledige bescherming tegen
verkeerd gebruik worden beschouwd.
• Kleine kinderen kunnen zich ophangen in de lussen van koorden, kettingen of riemen van trekmechanismen, evenals
in de koorden voor het bedienen van raambekledingen. Koorden moeten buiten het bereik van kinderen worden
gehouden om het risico op ophanging en verwikkeling te voorkomen. Kinderen kunnen de koorden tevens om hun
hals draaien.
• Bedden, kinderbedjes en meubels moeten uit de buurt van de koorden van raambekledingen worden opgesteld.
• Bind koorden niet samen. Zorg ervoor dat koorden niet in de war raken en een lus vormen.
Controleer het mechanisme, wanneer het niet regelmatig wordt gebruikt en vervang het, wanneer het
beschadigd is.
Waarschuwing conform DIN EN 13120
Rollo R_03
|
Store enrouleur R_03
|
Roller Blind R_03
18
Technische Änderungen vorbehalten, Ausgabe 03.2021
Sous réserve de modifications techniques, édition 03.2021
Subject to technical changes, Edition 03.2021
IT
UK
ATTENZIONE
Vi preghiamo di leggere attentamente queste istruzioni prima di applicare ed utilizzare il dispositivo e di montarlo
correttamente. I bambini possono strangolarsi se il dispositivo non è montato a regola d’arte. Conservare le presenti
istruzioni in caso di successiva necessità. L’utilizzo di apparecchiature di sicurezza aggiuntive contribuisce a ridurre
il rischio di strangolamento, ma non può essere considerato come una protezione completa da eventuali utilizzi
impropri.
• I bambini piccoli possono strangolarsi se si legano un cappio intorno al collo usando le corde, catene o cinghie da
tirare nonché le corde per l‘azionamento delle coperture per finestre. Le corde devono essere tenute lontane dalla
portata dei bambini per evitare strangolamenti ed avvolgimenti. Possono per l’appunto arrotolarsi intorno al collo.
• Letti, letti per bambini e mobili devono essere montati lontani dalle corde per le coperture per finestre.
• Non legare insieme le corde. Assicurarsi che le corde non si attorciglino né formino un cappio.
Verificare il dispositivo se non è utilizzato regolarmente e sostituirlo se difettoso.
ATTENTION
Please read the instructions carefully before mounting and using this device and fit accordingly. Children are at risk of
strangulation if the device is not mounted correctly. Please keep the instructions for future reference.
The implementation of additional safety systems can help to reduce the risk of strangulation, but cannot, however,
be seen as providing complete protection against misuse.
• Young children can be strangled by loops in pull cords, chains, tapes and inner cords that operate the product.
• To avoid strangulation and entanglement, keep cords out of the reach of young children. Cords may become
wrapped around a child’s neck.
• Move beds, cots and furniture away from window covering cords.
• Do not tie cords together. Make sure cords do not twist and create a loop.
Check the device if it is not in regular use and replace the device when it is damaged.
Avvertenza secondo DIN EN 13120
Warning notice in accordance with DIN EN 13120
Rollo R_03
|
Store enrouleur R_03
|
Roller Blind R_03
19
MHZ Hachtel GmbH & Co. KG
Sindelfinger Straße 21
D-70771 Leinfelden-Echterdingen
Telefon +49 800 123 654 779
E-Mail: auftrag@mhz.de
www.mhz.de
MHZ Hachtel & Co. Ges.m.b.H.
Laxenburger Straße 244
A-1230 Wien
Telefon +43 810 95 10 05
E-Mail: auftrag@mhz.at
www.mhz.at
MHZ Hachtel & Co. AG
Eichstrasse 10
CH-8107 Buchs/Zürich
Telefon +41 848 47 13 13
E-Mail: info@mhz.ch
www.mhz.ch
MHZ Hachtel S.à.r.l.
27, Rue de Steinfort
L-8366 Hagen
Téléphone +352 311 421-1
E-Mail: info@mhz.lu
www.mhz.lu
ATES-Groupe MHZ
1 B, rue Pégase
CS 20163
F 67960 Entzheim
Téléphone +33 388 10 16 20
E-Mail: info@ates-mhz.com
www.ates-mhz.com

Other manuals for R 03

2

This manual suits for next models

4

Other MHZ Window Blind manuals

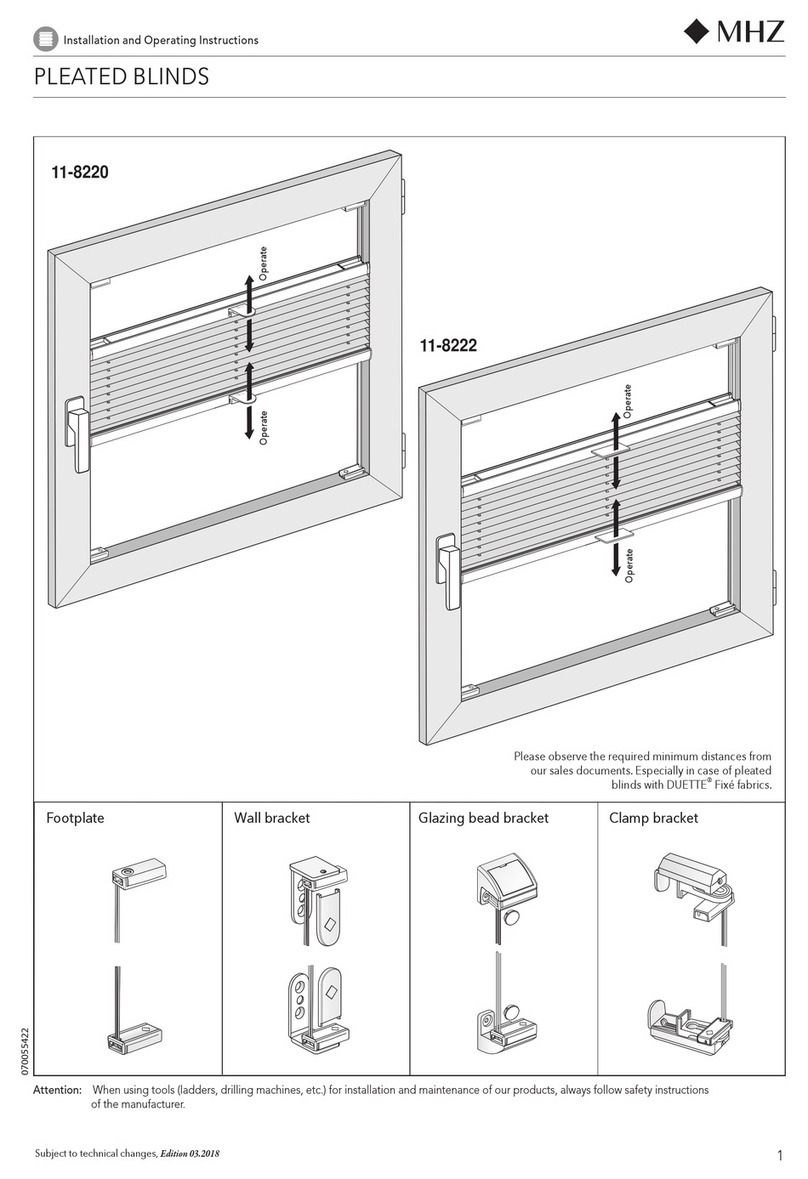
MHZ FENSTERCLIP 11-8220 User manual

MHZ

MHZ FENSTERCLIP 11-8220 User manual

MHZ 11-8110 User manual

MHZ

MHZ 11-8110 User manual

MHZ R 03 User manual

MHZ

MHZ R 03 User manual

MHZ s-enn SN 72 User manual

MHZ

MHZ s-enn SN 72 User manual

MHZ LOOK_2 04-1621 User manual

MHZ

MHZ LOOK_2 04-1621 User manual

MHZ MOTION 04-2445 User manual

MHZ

MHZ MOTION 04-2445 User manual

MHZ Solix Guide

MHZ

MHZ Solix Guide

MHZ Roll Up 24 RTS User manual

MHZ

MHZ Roll Up 24 RTS User manual

MHZ R 03 User manual

MHZ

MHZ R 03 User manual

MHZ MINI User manual

MHZ

MHZ MINI User manual

MHZ NOVELL User manual

MHZ

MHZ NOVELL User manual

MHZ Solix Guide

MHZ

MHZ Solix Guide

MHZ SOLIX EXTERNAL User manual

MHZ

MHZ SOLIX EXTERNAL User manual

MHZ 04-2501 User manual

MHZ

MHZ 04-2501 User manual

MHZ DM25LE/L-1.1/40 User manual

MHZ

MHZ DM25LE/L-1.1/40 User manual

MHZ s-enro SE 72/1 User manual

MHZ

MHZ s-enro SE 72/1 User manual

MHZ R 04 User manual

MHZ

MHZ R 04 User manual

MHZ 11-8220 User manual

MHZ

MHZ 11-8220 User manual

MHZ JALOUSIEN 09-1067 User manual

MHZ

MHZ JALOUSIEN 09-1067 User manual

MHZ 11-8110 Owner's manual

MHZ

MHZ 11-8110 Owner's manual

MHZ SKALAR MINI User manual

MHZ

MHZ SKALAR MINI User manual

MHZ SPIN Installation guide

MHZ

MHZ SPIN Installation guide

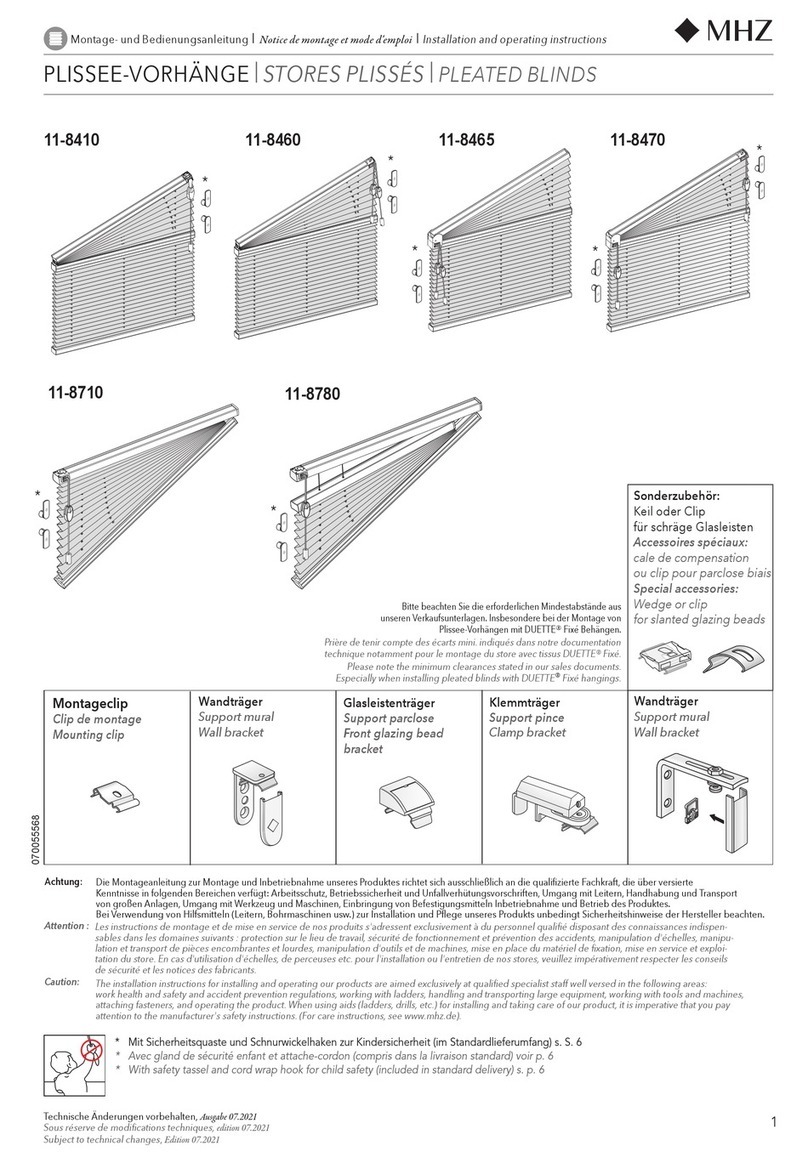
MHZ 11-8410 User manual

MHZ

MHZ 11-8410 User manual

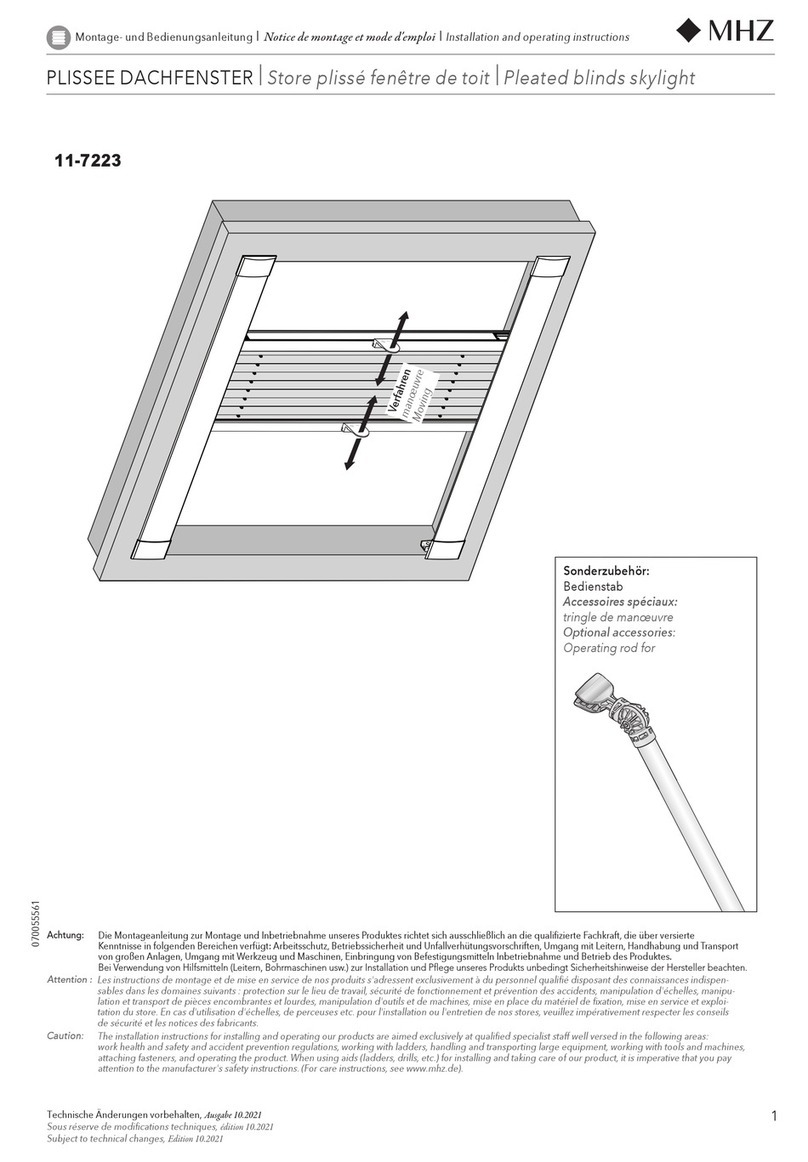
MHZ 11-7223 User manual

MHZ

MHZ 11-7223 User manual

Popular Window Blind manuals by other brands

weinor VertiTex ZipR Maintenance Instructions and Directions for use for the end user

weinor

weinor VertiTex ZipR Maintenance Instructions and Directions for use for the end user

MDT KNX Smart 55 BE-JTA5504.01 Technical manual

MDT

MDT KNX Smart 55 BE-JTA5504.01 Technical manual

Portos SHUTTERS SN5000 installation manual

Portos

Portos SHUTTERS SN5000 installation manual

Bali Horizontal Blinds How to install and operate

Bali

Bali Horizontal Blinds How to install and operate

Griesser Aluflex operating instructions

Griesser

Griesser Aluflex operating instructions

Allen + Roth C935480125 manual

Allen + Roth

Allen + Roth C935480125 manual

rollease acmeda Easy Spring Air Assembly and installation manual

rollease acmeda

rollease acmeda Easy Spring Air Assembly and installation manual

Hella TOP FOAM RvU Installation instructions and instructions for use

Hella

Hella TOP FOAM RvU Installation instructions and instructions for use

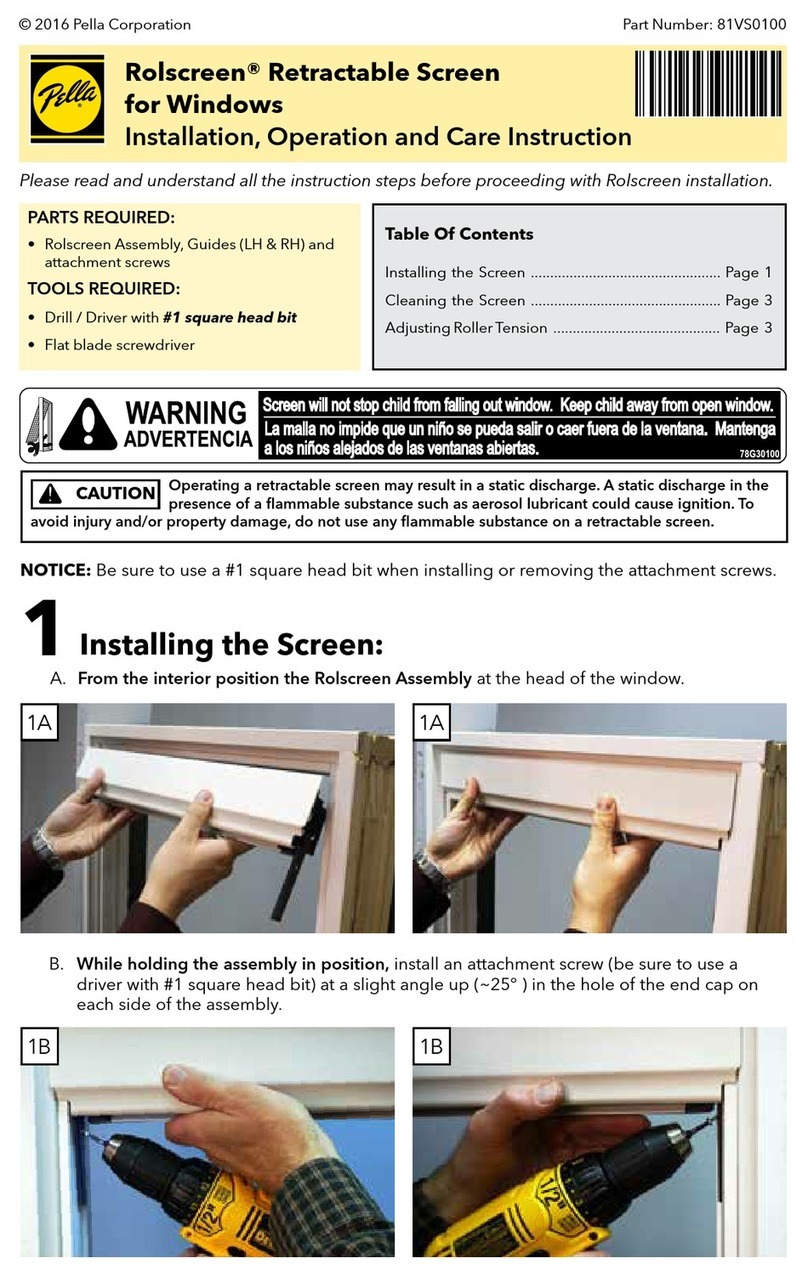
Pella Rolscreen Installation, Operation and Care Instruction

Pella

Pella Rolscreen Installation, Operation and Care Instruction

rollease acmeda SKYLINE BOTTOM UP installation manual

rollease acmeda

rollease acmeda SKYLINE BOTTOM UP installation manual

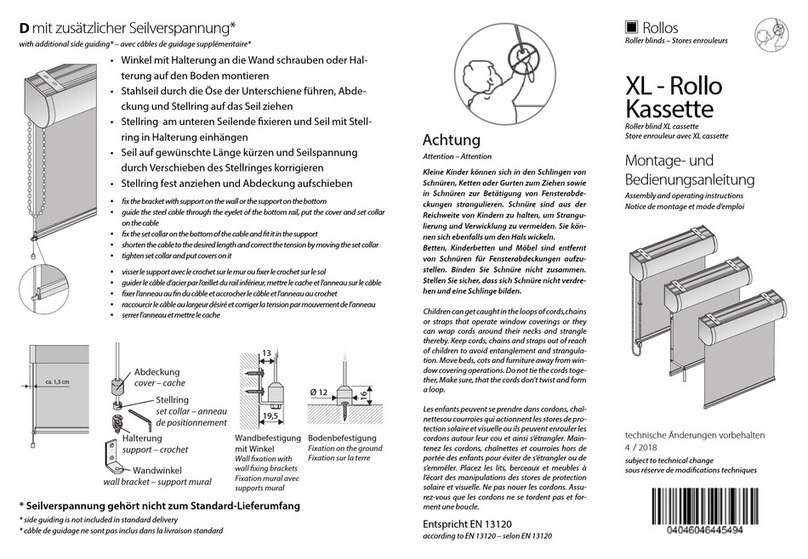
Rollos XL Cassette Assembly and operating instructions

Rollos

Rollos XL Cassette Assembly and operating instructions

Hella TOP FOAM Installation instructions and instructions for use

Hella

Hella TOP FOAM Installation instructions and instructions for use

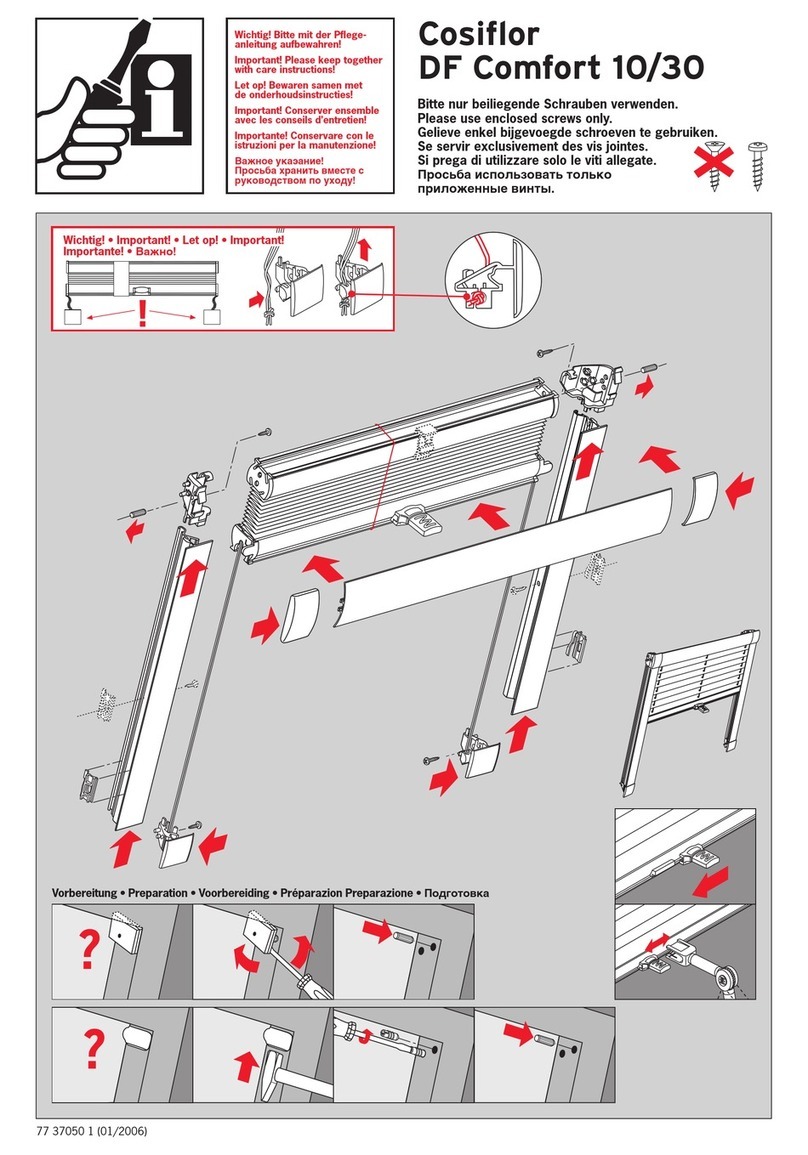
Cosiflor DF Comfort 10 installation instructions

Cosiflor

Cosiflor DF Comfort 10 installation instructions

rollease acmeda Easy Link Assembly manual

rollease acmeda

rollease acmeda Easy Link Assembly manual

LuxaFlex Lumishade product manual

LuxaFlex

LuxaFlex Lumishade product manual

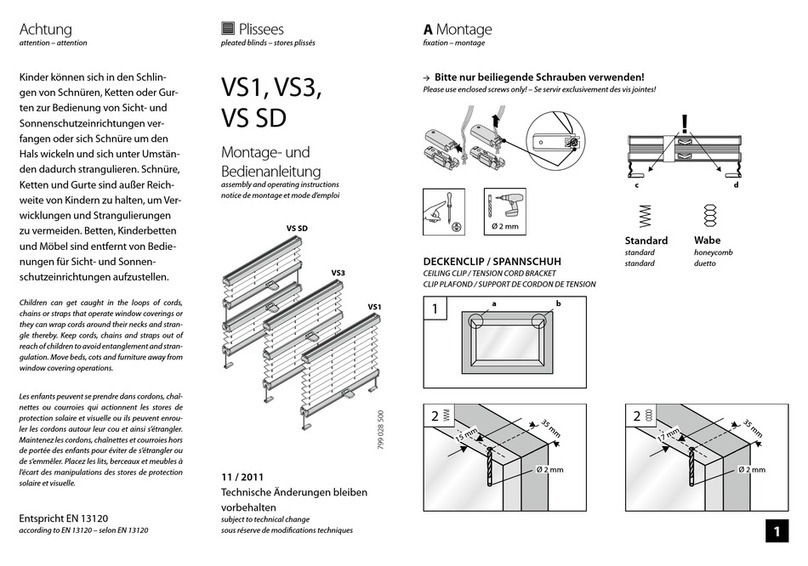
Plissees VS1 Assembly and operating instructions

Plissees

Plissees VS1 Assembly and operating instructions

John Lewis Roman blind user manual

John Lewis

John Lewis Roman blind user manual

Dometic Rollerblind PrecisionRise Installation and operating manual

Dometic

Dometic Rollerblind PrecisionRise Installation and operating manual

manuals.online logo
manuals.online logoBrands
  • About & Mission
  • Contact us
  • Privacy Policy
  • Terms and Conditions

Copyright 2025 Manuals.Online. All Rights Reserved.