MSI P230 User manual

P230 Instruction manual

1
Notice:
T★he battery should be taken out if the unit is left unused for a long period in order to
avoid being corroded by the seepage.
★Do not use the unit in places that are extremely hot, cold, dusty, or humid.
★Avoid dropping the unit.
★The battery service life may differ under different usage conditions, manufacturers and
models
★Please replace the battery when any of the following cases occur:
*The logo appears.
*The keys become inactive
*The unit stops running under normal condition.
Please replace the battery within 5 minutes of getting the battery low warning, or
the DRM10 function has to re-synch by connecting with the PC.
Important information:
Please read and retain all the operating instructions before operating the unit, we do not
assume any liability arising out of improper operation or incidental damages. Please
operate this unit with care and back up any files if necessary.

2
Features:
7-Color backlight
MP3/ WMA player
No driver necessary under Windows 2000/ XP/ ME
128MB-2048MB USB movable storage disk, have movable storage functions.
High quality digital voice recording
Adjust several sound effects
Supports DRM10 function
FM tuner and FM recording
Support Lyric Synchonization function
A-B repeat
USB 2.0

3
1. Music mode
2. Playback mode
3. Play sequence
4. EQ mode
5. AB repeat icon
6. Battery capacity
7. lyrics/menu display
8. Track display
9. Time display
10-Lock icon
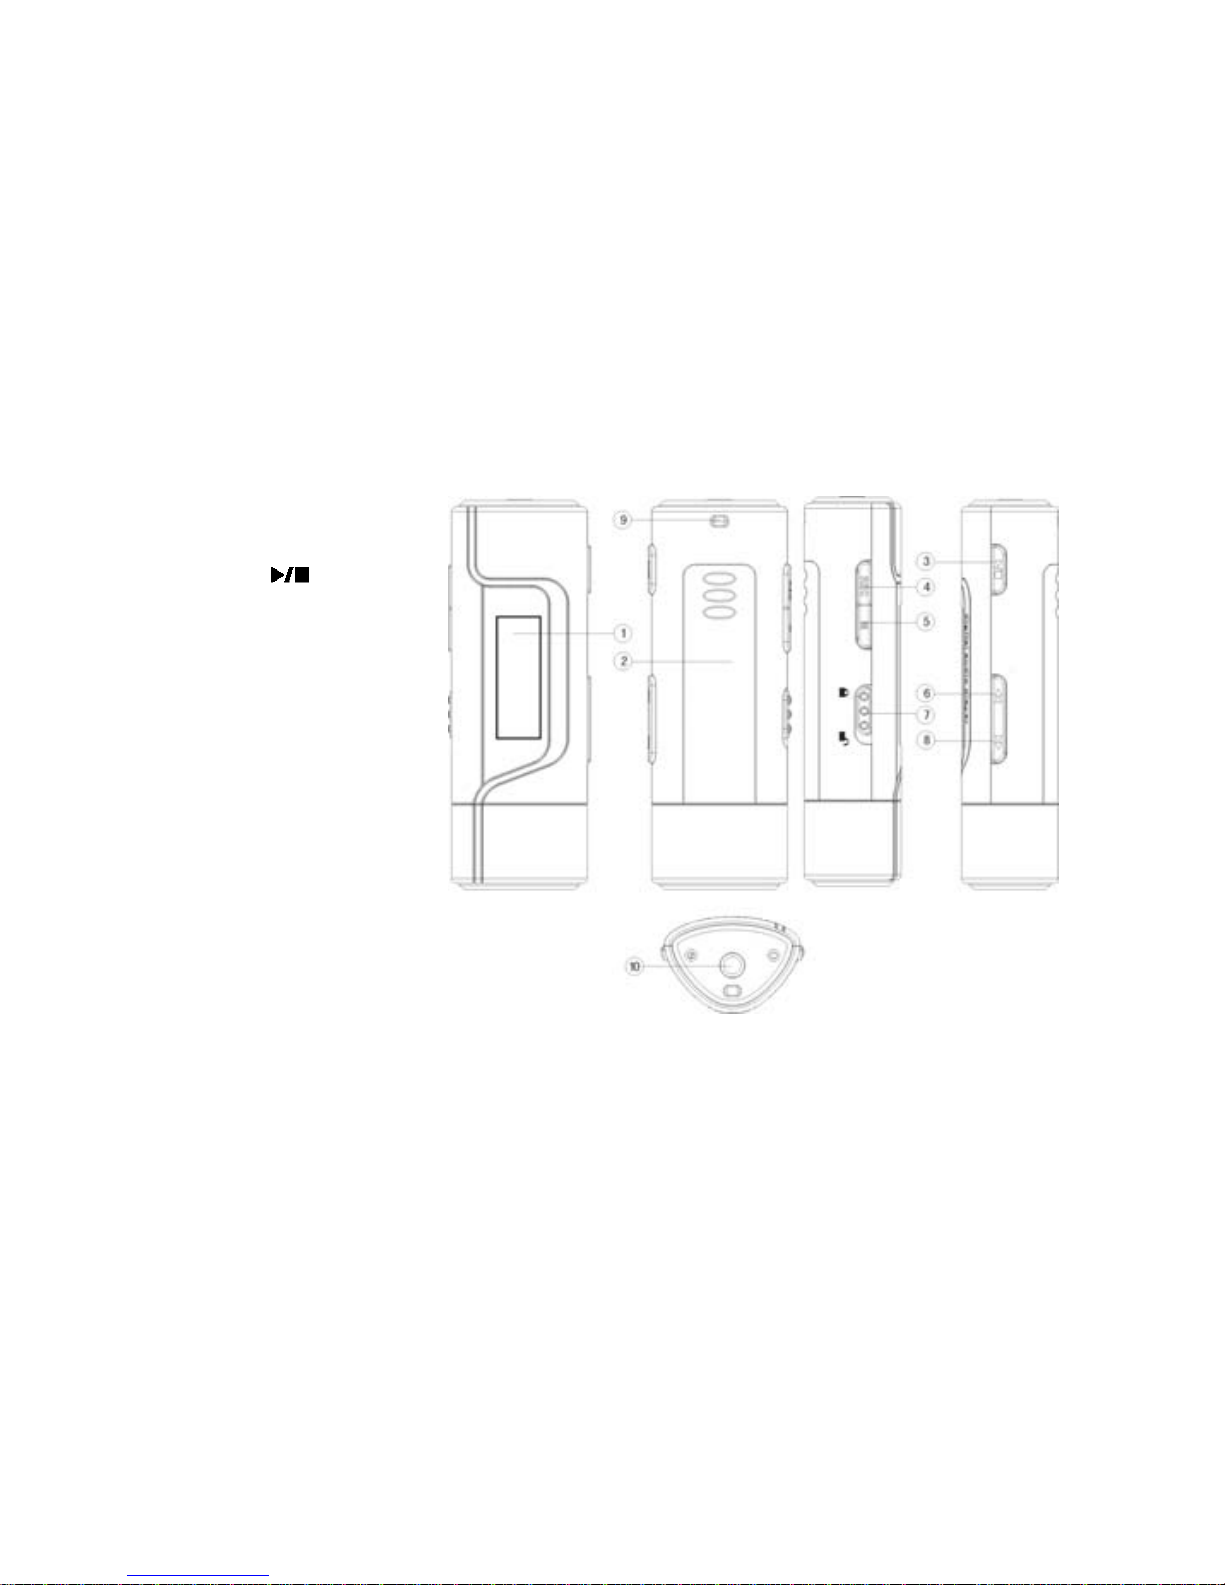
4
1-LCD display
2-Battery cover
3-Play button
4-Record button
5-M button
6-FF
7-Lock button
8-REW
9-String slot
10-Earphone Jack

5
1. Basic operation
1) Battery Installation
Note: this player is powered only by battery. When the battery icon displays,
please replace the battery with new one in time.
Please finish replacing the battery within 5 minutes, or the set time and date in the
player would lose and needs to be re-set. DRM10 function has to re-synch by
connecting with the PC.
2).Power on/off
On: Press the “ ” button to turn on the unit, the LCD displays the model of it. Then the
unit enters the stop state of MUSIC mode, displaying the current mode, the first song,
song time, and the icons of Repeat icon, Volume, Stop icon, and battery level.
Off: Press and hold the “ ” button (for about 5 seconds), the LCD shows the schedule
bar, and it turns off until the schedule bar is full.
2. MP3, WMA Playback:
Note: this unit can supports MP3 (layer3 of MPEG1, MPEG2 and MPEG2.5) and WMA
files. The default mode is MUSIC.

6
1). playback:
Under stop or pause status, press the “ ” button to start to playback. The LCD displays
the playback indicator, repeat indicator, song number, song time, the battery level ,
volume, and track icon.
2), Pause/Stop/Power off
Pause: under playback mode, press “ ” button, it paused, and the pause indicator
displayed on the LCD. Press the button again, the unit continues to play.
Stop: under playback or pause status, press and hold “ ” button until the stop sign ■
is displayed on the LCD. The unit stops playing.
Power off: under playback/pause/stop status, press and hold “ ” button (about 5
second) until the LCD displays the schedule bar. The unit powers off when the schedule
bar is full.
The time of pressing “ ” switch: power off >stop >pause.
3). Previous file/Next file, FF/REW
A. Press ◄◄ button to skip to the previous file; press ►► to skip to the next file.
B. Press M button to enter menu, press ◄◄ or ►► button to select “setting” and press
M button to confirm. Then select “FF/REW” and press M button to confirm and
returns to the previous menu. Press and hold ◄◄ or ►► button to realize the

7
FF/REW function. Press M button to cancel the FF/REW function.
4). Output EQ Mode Setting:
Press M button to enter the menu, press ◄◄ or ►► button to select “setting” and press
M button to confirm. Select “EQ” and press M button to confirm to enter. Press ◄◄ or
►► button to shift among NORMAL, JAZZ, DISC, POP and CLASSIC. Press M
button to confirm and return to the previous menu.
5). Volume Adjustment
Press and hold ◄◄ button to decrease the volume; press ►► button to increase the
volume.
6). Repeat Mode Select
Press M button to enter the menu, then press ◄◄ or ►► to select “setting” and then
select “Play sequence”. Press M button to confirm to enter. Press ◄◄ or ►► to select
NORMAL, REPEAT ONE, REPEAT ALL, RANDOM and RANDOM ALL. Press M
button to confirm and return to the previous menu.
7).Delete Track
Press M button to enter the menu, then press ◄◄ or ►► to select “delete” and then
press M button to confirm. Select “music” and press M button to enter the delete mode.
The LCD displays “delete files?”, the file name and confirm letter “yes” and “no”. Press

8
button to select “yes” or “no”. Select “yes” and press M to delete the current file and
skip to the next one. Select “no” to give up deleting the current file and skip to the next
one. Press ◄◄ or ►► to select the track you want to delete.
8). Backlight Setup
Press M button to enter the menu, then press ◄◄ or ►► to select “Setting” and press it
again to confirm. Then choose “Backlight”, press M button to enter the backlight setting
mode. Select the backlight color among: OFF, Red, Green, Blue, Yellow, Purple, Cyan,
White and Multi-Color by pressing ◄◄ or ►► button. Finally press M button to
confirm and return to the previous menu.
9). Auto power
Press M button to enter the menu, then press ◄◄ or ►► to select “Setting” and press it
again to confirm Then choose “power setting” by ◄◄ or ►► button, press M button to
enter the auto power off setting mode. Select the auto off time (disable, 1 min, 2 min, 5
min, 10 min) by ◄◄ or ►►button, and finally press M button to confirm your choice
and return to previous menu. Thus, the unit will power off automatically if there is no
operations under stop status as per the selected measure.
10). Check the capacity of memory
Press M button to enter the menu, then press ◄◄ or ►► to select "Query" option and

9
press M button again to confirm, the LCD will display "VER", "Total Capacity", "Rest
Capacity", press any button to exit.
11). Language selection:
Press M button to enter the menu, then press ◄◄ or ►► to select “Setting" and press
M button again to confirm. Then select “Language" option and press M button to enter.
Select the language you want by ◄◄ or ►►button. Finally press M button to confirm
and return to the previous menu.
12). Time setting
Press M button to enter the menu, then press ◄◄ or ►► to select “Setting” and press it
again to confirm. Then choose “Time Set”, press M button to enter the time setting mode.
Select the option you want to adjust by pressing ◄◄ or ►► button, and press M button
to confirm. Press ◄◄ or ►► button again to adjust the time or time format. Press
“cancel” to give up setting; press “OK” button or press and hold “M” button to confirm
and return to the previous menu.
13). Date setting
Press M button to enter the menu, then press ◄◄ or ►► to select “Setting” and press it
again to confirm. Then choose “Date Set”, press M button to enter the time setting mode.
Select the option you want to adjust by pressing ◄◄ or ►► button, and press M button
Table of contents
Other MSI MP3 Player manuals

MSI
MSI Mega Player 521 256MB User manual

MSI
MSI Mega Player 536 User manual

MSI
MSI Mega Player P200 User manual

MSI
MSI MEGA STICK 511 User manual

MSI
MSI Mega Player 515 Lite User manual

MSI
MSI P560 User manual

MSI
MSI P580 User manual

MSI
MSI Mega Player 515 Lite User manual

MSI
MSI Mega Player 515 Lite User manual

MSI
MSI Mega Player 540 User manual

MSI
MSI Mega Player 522 User manual

MSI
MSI Mega Player 533 User manual

MSI
MSI P500 User manual

MSI
MSI MEGA Stick 256 User manual

MSI
MSI Mega Player P310 512MB User manual

MSI
MSI MEGA STICK 527 User manual

MSI
MSI P650 User manual

MSI
MSI MEGA STICK 528 User manual

MSI
MSI P640 User manual

MSI
MSI Mega Player 516 User manual


