NSK Ti-Max Z Z-SG45L User manual


1
EN DE FR ES IT PT
1. User and Intended Use
User: Qualified Professionals
Intended Use: Dental Treatment and Oral Surgery
2. Precautions for handling and operation
Please read these precautions carefully and use only as intended or instructed.
Safety instructions are intended to avoid potential hazards that could result in personal injury or damage to the device. Safety instructions are
classified as follows in accordance with the seriousness of the risk.
Class Degree of Risk
CAUTION Hazard that could result in light or moderate injury or damage to the device if the safety instructions are not correctly
followed.
NOTICE General product specification information highlighted to avoid product malfunction and performance reduction.

2
CAUTION
•Read this Operation Manual before use to fully understand the product functions and file for future reference.
•When operating the product always consider the safety of the patient.
•Users are responsible for the operational control, maintenance and continual inspection of this product.
•Do not attempt to disassemble the product nor tamper with the mechanism except as recommended by NSK in this Operation Manual.
•Do not allow any impact on to the product. Do not drop the product.
•Operators and all others in the area must wear eye protection and a mask when operating this handpiece.
•Always operate with coolant water. Without coolant water, the handpiece may overheat causing a burn injury.
•If overheating and/or an unusual noise are observed even in use with coolant water, the bearings may be worn. Contact your Authorized NSK
Dealer to repair whenever any abnormalities are found.
•Entry of debris into the gear, or inside the handpiece, may result in overheating which could cause a burn injury.
•Should the product function abnormally, cease operation immediately and contact your Authorized NSK Dealer.
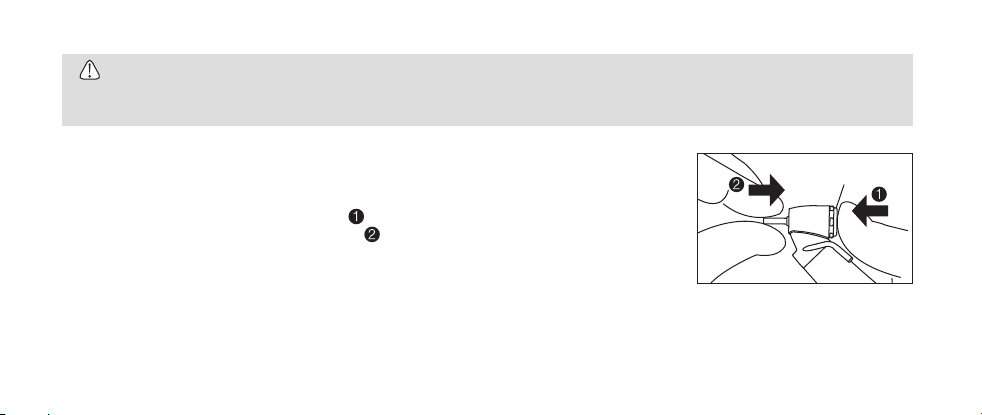
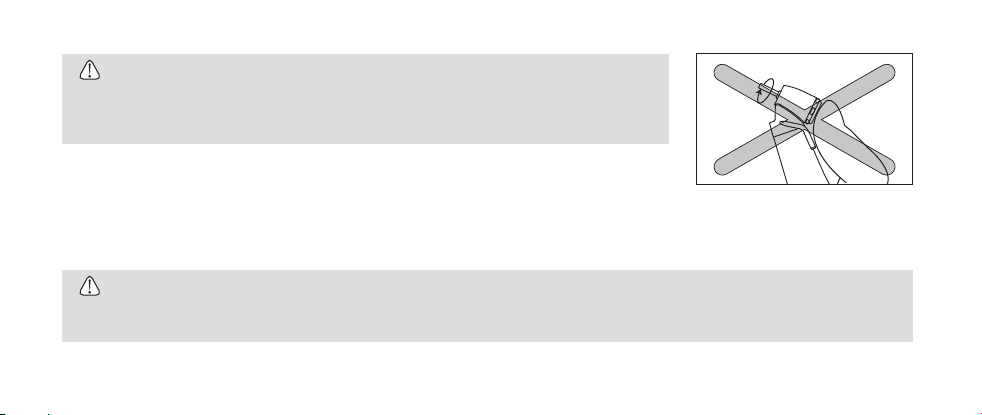
•Depressing the Push Button while the handpiece is in operation may cause overheating, serious technical damage and possible premature
handpiece failure. During operation avoid contact with any oral tissue that may cause the Push Button to be depressed while the handpiece is
in operation.
•Do not use high acid water or sterilizing solutions to wipe, immerse or clean the product.

3
EN DE FR ES IT PT
CAUTION
•The products are delivered in a non-sterile condition and must be autoclaved prior to use.
•Perform regular function and maintenance checks.
•If the product is not used for a long period check it is functioning correctly before using on a patient.
•To avoid clinical downtime it is recommended that a spare be kept on hand in case of a breakdown during surgery.
•U.S. Federal law restricts this device to sale by or on the order of a licensed physician.

4
3. Accessory List
No. Part Name Quantity
1 E Type Spray Nozzle 1
4. Connection & Disconnection of the Handpiece and Motor
4-1 Connection
1) Connect the handpiece direct to the motor (Fig. 1). When connecting an optic handpiece, twist the
handpiece until it locks into position with a clicking sound.
2) Make sure the handpiece is firmly connected to the motor.
4-2 Disconnection
Hold the motor and the handpiece separately and disconnect with care.
Fig. 1
MotorHandpiece

5
EN DE FR ES IT PT
5. Insertion & Removal of the Bur
5-1 To Insert the Bur (Fig. 2)
1) Insert the bur into the chuck.
2) Depress the Push Button to open the chuck ( ).
3) Fully insert the bur into the chuck until it stops ( ) then release the Push Button.
4) Ensure that the bur is secure by gently pulling and pushing the bur WITHOUT depressing the Push Button.
CAUTION
•Disconnect the handpiece only after the motor has completely stopped rotating.
•Connect ONLY to E type motors (ISO 3964).
Fig. 2
Push Button

6
5-2 To Remove the Bur (Fig. 3)
Depress the Push Button to open the chuck ( ) and remove the bur ( ).
NOTICE
•Grip the handpiece while placing your thumb tip on the Push button which makes it easier to depress the button.
CAUTION
•Always insert the bur all the way into the chuck.
•Remove the bur only after the handpiece has completely stopped rotating.
•Always keep the bur shank clean.
Fig. 3
Push Button

7
EN DE FR ES IT PT
CAUTION
•Entry of debris into the chuck, via the bur shank, could cause bur rotation slip and also prevent the bur from being securely located in the
chuck.
•When using burs follow the instructions of the bur manufacturer.
•Do not exceed maximum bur length recommended by the handpiece manufacturer.
•When using a bur with a 20 - 25mm length in combination with a Contra Angle handpiece, the working diameter must be within the value
specified in the table below. Using a bur with an excessive diameter could cause bur run-out and bend or break the bur.
•Do not apply excess pressure to the bur as it may break or bend or become difficult to remove.
•DO NOT use burs with problems listed below as the bur may break or disengage from the chuck.
- Bent, deformed, worn, rusted, broken, deficient bur.
- Bur which is cracked on the edge or axis.
- Non-ISO standard, or tampered bur.
Diamond Bur ø2mm or less
Carbide Bur ø1mm or less

8
6. Connection of the Irrigation Tube
Connect the Irrigation Tube to the External Spray Nozzle firmly (Fig. 4).
7. Check before treatment
Be sure to check the handpiece for abnormalities by following the procedure below.
1) Check the Head Cap is firmly tightened.
2) Check the coolant water is flowing properly.
3) Insert the bur into the handpiece. Then rotate the handpiece for about one minute with coolant water at
the Max. rotation speed of the attached motor. During rotation, check for abnormalities such as abnormal
vibration, noise or loose bur.
4) After the handpiece rotation has completely stopped, touch the handpiece head to confirm the head is
NOT heating abnormally (Fig. 5).
During the check, if the slightest abnormality is detected, stop using the handpiece immediately and contact
your Authorized NSK Dealer.
Fig. 4
Fig. 5
Irrigation Tube
External Spray Nozzle

9
EN DE FR ES IT PT
CAUTION
•To avoid injury, do not touch the handpiece head while the handpiece is in rotation. Depressing
the Push Button during rotation may cause burn injury, handpiece rotation failure or malfunction of
chucking system (Fig. 6).
8. Maintenance
After each patient maintain the product as follows.
CAUTION
•Immediately after use, the product should be cleaned, lubricated and sterilized. If blood remains on the external or internal surfaces it can
become clotted and cause rust.
Fig. 6

10
CAUTION
8-1 Cleaning (Handpiece)
1) Remove blood and other debris from the surface of the handpiece with clean water.
2) Wipe off any remaining moisture on the handpiece.
3) Wipe clean with alcohol-immersed cotton swab or cloth.
This icon denotes that the product can be washed via Thermo Disinfector.
Refer to the Thermo-Disinfector manual.
•After washing with Thermo-Disinfector and prior to lubrication, dry the product until all internal moisture is thoroughly removed. Thermo-
Disinfector moisture remaining inside the product could reduce the effect of lubrication and could cause corrosion inside of the product.
•To clean the product never use any solvent such as benzine or thinner.
•When cleaning debris off the handpiece surface, make sure no water enters from the rear side of the handpiece as entry of water may cause
handpiece malfunction.
•Do not rotate the handpiece in water as such operation may cause handpiece failure.

11
EN DE FR ES IT PT
8-2 Cleaning (Optic) (Z-SG45L)
Wipe clean the Glass Rod tip with an alcohol-immersed cotton swab. Remove all debris and oil (Fig. 7).
CAUTION
•Do not use a sharp tool to clean the Glass Rod. It could damage the glass and reduce the light transmission.
8-3 Cleaning (Spray Port)
Insert the Irrigation Tube into the nozzle and rinse the inside with clean water.
Fig. 7
Cotton Swab
Glass Rod

12
8-4 Lubrication
NSK PANA SPRAY Plus
Apply NSK PANA SPRAY Plus every time after each use and/or before autoclaving.
1) Remove the bur from the handpiece.
2) Insert the Spray Nozzle into the Spray Port nozzle on the can.
3) Insert the Spray Nozzle in rear of the handpiece. Hold the handpiece and spray for approximately 2 - 3
seconds. Apply lubricant until it expels from the handpiece head for at least 2 seconds (Fig. 8).
CAUTION
•Debris and blood could enter the product during surgical operations. To avoid accumulation of debris inside the product, NSK recommends to
lubricate the product with PANA SPRAY Plus immediately after use and before sterilization.
•When applying spray be sure to hold the handpiece firmly to prevent the handpiece from slipping out of the hand due to the spray pressure.
•Hold the spray can upright.
Fig. 8
Spray Nozzle
Handpiece

13
EN DE FR ES IT PT
Chuck cleaning
Clean the Push Button chuck once a week.
1) Mount the arrow-head spray nozzle tip into the spray can port.
2) Lubricate the chuck directly through the bur insertion hole (Fig. 9).
3) Lubricate handpiece by using NSK PANA SPRAY Plus (Fig. 8).
CAUTION
•If the chuck is not regularly cleaned the chuck grip may be weakened and the bur may be accidentally released while in operation.
Fig. 9
Arrow-head Spray Nozzle
Bur Insertion Hole

14
8-5 Sterilization
Sterilize the product by autoclave sterilization. Remove the bur after each patient and sterilize as noted below.
1) Insert into an autoclave pouch. Seal the pouch.
2) Autoclavable under the conditions below.
Autoclave for more than 20 min. at 121ºC, or 15 min. at 132ºC, or 3 min. at 134ºC.
3) The handpiece should remain in the autoclave pouch until required for use.
CAUTION
•Do not autoclave the product with other instruments even when it is in a pouch. This is to prevent possible discoloration and damage to the
product from chemical residue on other instruments.
•Keep the product in suitable atmospheric pressure, temperature, humidity, ventilation, and sunlight. The air should be free from dust, salt and
sulphur.
•Immediately after use, the product should be cleaned, lubricated and sterilized. If blood remains on the external or internal surfaces it can
become clotted and cause rust.
•Do not heat or cool the product too quickly. Rapid change in temperature could cause damage to the product.
•If the sterilizer chamber temperature may exceed 135ºC during the dry cycle then delete the dry cycle.

15
EN DE FR ES IT PT
CAUTION
•Autoclave sterilization is recommended for the product. The validity of other sterilization methods is not confirmed.
•Do not touch the product immediately after autoclaving as it will be very hot and must remain in a sterile condition.
NOTICE
•NSK recommends Class B sterilizers as stated in EN13060.
9. Periodical Maintenance Checks
Perform periodical maintenance checks every three months, referring to the check sheet below. If any abnormalities are found, contact your Authorized
NSK Dealer.
Points to check Details
Head cap is loose Check that the Head Cap is firmly tightened. If the Head Cap is loose, contact your Authorized NSK Dealer.
Rotation Rotate the handpiece and check for abnormalities such as abnormal rotation, vibration, noise, and overheating.

16
10. Specifications
Model Z-SG45L Z-SG45
Max. Rotation Speed (Motor) 40,000min-1
Max. Rotation Speed (Handpiece) 120,000min-1
Gear Ratio 1:3 Increasing
Bur Type ISO 1797-1 Type3 ø1.59 - 1.60mm FG Bur
Chucking Length 11.6mm
Bur Length 20 - 25mm
Max. Working Part Diameter Ø2mm
Optic Glass Rod -
Water Spray Type External Spray
Use Environment Temperature: 10 - 40°C, Humidity: 30 - 75%
Transportation and Store Environment Temperature: -10 - 50°C, Humidity: 10 - 85%, Atmospheric Pressure: 500 - 1,060hPa

17
EN DE FR ES IT PT
11. Symbol
This product is Autoclavable up to Max.135ºC.
This product can be washed via Thermo Disinfector.
Conforms to CE European Directive of "Medical device directive 93/42/EEC".
Manufacturer.
Authorized representative in the European community.
Caution: U.S. Federal law restricts this device to sale by or on the order of a licensed physician.
GS1 DataMatrix for Unique Device Identifier.
12. Warranty
NSK products are warranted against manufacturing errors and defects in materials. NSK reserves the right to analyze and determine the cause of any
problem. Warranty is voided should the product be not used correctly or for the intended purpose or has been tampered with by unqualified personnel
or has had non NSK parts installed. Replacement parts are available for seven years beyond discontinuation of the model.

18
13. Spare Parts List
Model Order Code
E Type Spray Nozzle Z0190090
14. Disposing product
In order to avoid the health risks of operators handling the disposal of medical equipment, as well as the risks of environmental contamination caused
thereof, a surgeon or a dentist is required to confirm the equipment is sterile. Ask specialist firms who are licensed to dispose of specially controlled
industrial wastes, to dispose the product for you.

19
EN DE FR ES IT PT
1. Benutzer und Verwendungszweck
Benutzer: Qualifiziertes Fachpersonal
Verwendungszweck: Zahnmedizinische Behandlung und Oralchirurgie
2. Sicherheitsanweisungen für die Handhabung und Bedienung
Lesen Sie bitte diese Sicherheitsanweisungen aufmerksam durch und benutzen Sie das Gerät ausschließlich gemäß seines bestimmungsgemäßen
Gebrauchs und entsprechend der Anweisungen.
Die Sicherheitsanweisungen sind dafür vorgesehen, mögliche Gefahren zu verhindern, die Körperverletzungen oder Beschädigungen am Gerät
verursachen können.
Die Sicherheitsanweisungen werden gemäß der Schwere des Risikos wie folgt klassifiziert.
KLASSE Ausmaß und Schwere der Gefährdung oder Schädigung
VORSICHT Ein mögliches Risiko, das zu leichten bis mittleren Personen- oder Sachschäden führen kann, wenn die Sicherheitshinweise
nicht beachtet werden.
HINWEIS Allgemeine Produktinformationen, die besonders hervorgehoben werden, um Störungen oder Leistungsminderungen zu
vermeiden.
This manual suits for next models
1
Table of contents
Languages:
Other NSK Medical Equipment manuals

NSK
NSK SGS Series User manual

NSK
NSK Varios Combi Pro User manual

NSK
NSK Osseo 100 User manual

NSK
NSK VarioSurg 3 User manual

NSK
NSK Surgic XT User manual

NSK
NSK Varios 560 LUX User manual

NSK
NSK PODIAVAC User manual

NSK
NSK Varios 750 User manual

NSK
NSK SGL70M User manual

NSK
NSK Surgic Pro+ Installation manual