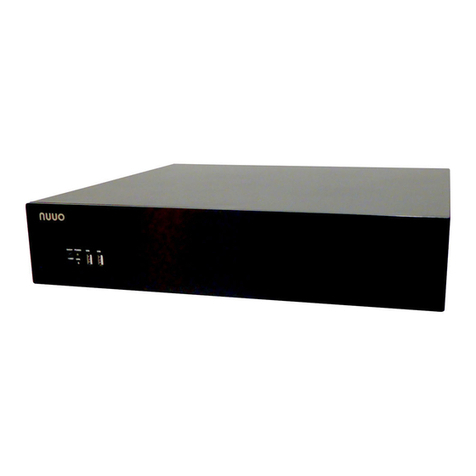
NUUO NVRsolo User manual

The Intelligent Surveillance Solution
NVRsolo
User Manual (Local)
Ver. 1.0.0.130221.00

1
Table of Contents
1 Introduction...................................................................................... 4
2 Tour the Unit..................................................................................... 5
2.1 Front View ................................................................................ 5
2.2 Rear View ................................................................................. 6
3 Set up the Unit.................................................................................. 8
3.1 Unpack the Unit ......................................................................... 8
3.2 Install Hard Drives ..................................................................... 8
3.3 Connect the Unit and Devices within the Network........................... 9
3.4 Connect the Monitor ................................................................... 9
3.5 Power on .................................................................................. 9
4 First Power-on..................................................................................11
4.1 Install Wizard ...........................................................................12
5 User Interface ..................................................................................19
5.1 Live View .................................................................................20
5.1.1 Video Area .....................................................................21
5.1.2 Status Bar......................................................................23
5.2 Playback ..................................................................................25
5.2.1 Video Area .....................................................................26
5.2.2 Status Bar......................................................................28
6 Settings ..........................................................................................30
6.1 Camera....................................................................................32
6.1.1 Camera Settings .............................................................33
6.1.2 Camera Search ...............................................................38
6.1.3 Camera Status................................................................42
6.2 Recording & Event.....................................................................44
6.2.1 Recording Settings ..........................................................45
6.2.2 Event & Action ................................................................52
6.2.3 Email.............................................................................58
6.3 Device .....................................................................................62
6.3.1 I/O Settings ...................................................................63
6.4 Storage ...................................................................................66
6.4.1 RAID Management ..........................................................67
6.4.2 Auto Backup ...................................................................75
6.5 Network...................................................................................79
6.5.1 Network Settings ............................................................80
6.5.2 Network Service..............................................................86
2
6.5.3 ezNUUO Registration .......................................................89
6.6 Management ............................................................................92
6.6.1 User Management ...........................................................93
6.6.2 License Management .......................................................99
6.6.3 Log System ..................................................................104
6.6.4 Save/Load Configuration ................................................109
6.7 System ..................................................................................115
6.7.1 Information ..................................................................116
6.7.2 System Settings............................................................118
6.7.3 System Upgrade ...........................................................126
6.7.4 Install Wizard ...............................................................131
6.8 Display ..................................................................................133
6.8.1 Display Settings ............................................................ 134
7 IR Remote Control ..........................................................................141
8 Appendix –RAID System.................................................................145
Introduction to RAID.......................................................................145
RAID 0 –Stripe .............................................................................. 145
RAID 1 –Mirror ..............................................................................146
RAID 5 –Block Striping with Distributed Parity...................................147
RAID 10 –Mirror / Stripe.................................................................147
Choosing a RAID Level ....................................................................148
9 Appendix –Camera Integration ........................................................149
Camera Support List .......................................................................149

3
GNU General Public License
This product includes copyrighted third-party software licensed under the terms of the GNU
General Public License. Please see the GNU General Public License (GPL) for the exact terms and
conditions of this license at www.gnu.org. The GPL source code incorporated into the product is
available for free download at our web site http://www.nuuo.com/.
Subject to GPL, you may re-use, re-distribute and modify the GPL source code.
Note that with respect solely to the GPL Software, no warranty is provided. We do not offer direct
support for the distribution.

4
1Introduction
NVRsolo is a Linux-embedded stand-alone system, providing a stable and good
quality local display through HDMI or VGA interface. As a network-based
surveillance system, NVRsolo processes remote access ability to strengthen its
usability.
NVRsolo is compatible with more than 70 brands of IP cameras, with monthly free
pack update. It features two useful functions, one-click setup and ezNUUO.
One-click setup saves the time in camera configuration by searching and
automatically adding cameras in the system. ezNUUO facilitates the process of
establishing Internet access to the NVRsolo system, meaning there is no more
router settings for remote (IE 8 and IE 9) and mobile viewing (iPhone, iPad,
Android).
Being consistent with all the systems in NUUO Mainconsole family, NVRsolo is
compatible with NUUO Central Management System, making it appropriate not
only for home or SMB recording, but also for chain stores or ATM/bank projects
by POS support.
This user’s manual encompasses the information users need to set up and
configure the system. It is recommended that you keep one copy of this manual
for any necessary reference in the future.

5
2Tour the Unit
Before the unit takes part in your work, get to know it first. This section will walk
you through the components and I/O ports on the unit and help you set the unit
to work at the earliest.
2.1Front View
Status LED:
No.
Description
Status Notice
Remark
1
Power Status LED
Power-on: blue
Power-off: dark
--
2
System Status LED
Healthy: blue
Unhealthy: orange
Abnormal temperature
status: orange with blinking
Off: dark
1) Orange: System is
abnormal
(including RAID)
2) Orange with
blinking: CPU
temperature/fan
rpm is beyond the
normal range
3) Blinking (200 ms
On/ 200 ms Off)
3
HDD Status LED
Healthy: blue
Failed: orange
No disk: dark
Rebuilding: orange with
blinking
1) LED for all disks
2) Blinking (200 ms
On/ 200 ms Off)
4
Ethernet Status LED
Linking: blue
Accessing: blue with blinking
No linking: dark
1) LED for Ethernet
port (1*output for
detecting
connection status
of switch)
2) Blinking (200 ms
On/ 200 ms Off)
5
Alarm LED
No event happened: dark
Event detected: orange with
blinking
Blinking (200 ms On/
200 ms Off)

6
External Control and I/O Ports:
No.
Description
1
Power button
6
Remote control IR receiver
7
USB 2.0 connector
2.2Rear View
Status LED:
No.
Description
Status Notice
Remark
5
Ethernet Activity LED
Linking: green
Accessing: green with
blinking
No linking: dark
1) LED for Ethernet
port
2) Blinking (200 ms
On/ 200 ms Off)
External Control and I/O Ports:
No.
Description
1
DC-in power connector
2
3.5 mm mic-in (reserved)
3
3.5 mm audio out (headphone jack) (reserved)
4
VGA connector
5
RJ-45 LAN ports 1 / 2
6
eSATA connector
7
COM port (RS-232 reserved)
8
USB 2.0 connectors
9
HDMI connector
10
Connection of IR extender
11
3.5 mm line-in (reserved)

7
12
Reset toggle
Horizontal
Vertical
Foot pad*4
(horizontal used)
Accessory box
Vertical stand
Screw*4
Foot pad*4
(vertical used)

8
3Set up the Unit
Set up the unit by installing the hard drive(s), connecting to network and power
supply.
3.1Unpack the Unit
This package contains the following items:
The unit
IR remote control, 1.5M IR extender cable
Two type of screws for 2.5”/3.5”disk drives, SATA cable
[Horizontal] foot pads; [Vertical] Stand, foot pads and screws
12V 4A 48W power adapter, power cord
Warranty card, Quick Start Guide, CD with Install Wizard,Remote
Live Viewer, Playback System, Backup System, Verification Tool
and Offline License Tool application, user manual, and quick start
guide
Battery spec is 1.5V, AAA, R03. Two batteries are required for a remote control.
3.2Install Hard Drives
Refer to compatibility list and install HDDs. For optimal performance
consideration, install disks with the same model and storage capacity. The
available RAID level depends on the amount of disks installed.
1 bay unit: install 3.5” HDD
Screw*4
(3.5”HDD used)
HDD bracket
3.5”HDD

9
1 bay unit: install 2.5” HDD
When installing HDDs on HDD bracket, please mind your hands from scratching.
3.3Connect the Unit and Devices within the Network
Connect the unit, cameras, and router/switch. If you need to make the video
visible over the Internet, please connect to a “router”with Internet connection,
and the unit will retrieve an IP address through DHCP by default.
The unit processes built-in DHCP service, which takes the job of router to assign IP
addresses, which is suitable for the pure LAN environment.
3.4Connect the Monitor
The unit processes two display interfaces, VGA and HDMI. Connect the monitor to
the unit.
The supporting display resolutions are 1920x1080, 1280x1024, 1280x720, and
1024x768. Please confirm that one of the resolutions is supported by your monitor.
3.5Power on
Attach the power cord from the power source to the power adapter.
Connect the power adapter to the back of the unit enclosure. See the rear view
HDD bracket
2.5”HDD*2
Screw*8
(2.5”HDD used)

10
figure.
Press the power button once connecting the power. See the front view figure.
It takes about a minute for the unit to fully power up. Once it is powered up:
The System Status LED turns blue
The buzzer beeps one time
To power off the unit, press and hold the power button for 2 seconds until two
beeps are heard. The system will proceed to shut down once the button is
released.
If the system crashes or stops responding, press and hold the power button for 10
seconds to enforce hardware power-off, which turns off the computer by cutting off
the power directly. Hence, such power-off isn’t recommended for a system that is
working properly.

11
4First Power-on
To power on the unit, press the power button on the front panel. The unit will
sound a beep and powers on.
When the system starts up for the first time, it asks users to select the language
to use in the system. Then the system will restart again to apply the selected
language.
Language can also be changed later in Main Menu > System menu > System Settings
submenu > General tabbed page
Right after the restart, the system will trigger the Install Wizard, which will lead
through some basic settings of the operating system.

12
4.1Install Wizard
The Install Wizard opens featuring two modes:
Mode
Description
Express Mode
Features the quick setup of the unit including administrator password
setup, online license activation, camera setup, system date/time setting
and upgrade notification activation.
Select this mode if you are not familiar with the network settings or not
sure if your network includes a router.
Before proceeding with this mode, connect all the cables and cameras.
Advanced Mode
Features more settings than the Express Mode does by the additional
DHCP server settings, network settings and RAID level setting.
All the settings featured by Install Wizard are accessible from the operating system’s
Main Menu, and thus can be skipped for makeshift.
1. Setup the password of administrator. If you want to keep the default as
admin, click the Next button directly.

13
2. The unit possesses built-in DHCP service, which enables the system to
dynamically assign IP addresses to the connected camera clients within the
same subnet. When you have router in your network, we strongly recommend
choosing Always disable to avoid any IP conflicts. If you are not sure if there
is any router in your network, please choose Smart enable, which detects the
network environment then decide to enable or disable the service. Click the
Next button.
3. If you select Smart enable from the previous setup, there is at least one LAN
has to be set as a static IP. Click the Next button.

14
4. Define the IP range for built-in DHCP server. The system will assign IP
addresses based on the range you defined to devices. Click the Next button.
5. There are several base licenses differed by models. Activate camera license to
have more channel capacity, and click the Next button.

15
6. Click the Setup button to search and automatically add the cameras within
the same subnet. Click the Next button.

16
7. Set up the time zone, date, and time, and adjust daylight saving changes if
needed. Once daylight saving function is enabled, the time change will
activate automatically every year based on the recurrence you set. Click the
Next button.
8. Check “Enable Upgrade Notification”box if you want to receive notification
when there is a newer FW version. Click the Next button. If you are using
remote control to set up, you can press +button to quickly flip through the
agreement.

17
9. Follow the following instruction and select the RAID type you want to create.
If you have created a volume, you will see the information of this volume on
the table as the picture below. Click the Next button.
The available RAID level depends on the amount of disks installed.
10. Review your settings. If the settings are correct, click the Finish button to
exit the settings procedure and activate the system.

18
Once the preliminary setup is through, the system auto-restarts. Before the
operating system opens onscreen, users are prompted to enter a username and
password to log in the operating system. The username and password are both
“admin” by default if you haven’t provided an alternate password in the Install
Wizard. (Username isn’t changeable with Install Wizard.)
Click the keyboard
icon to open
the virtual
keyboard for text
input.
Click to submit.

19
5User Interface
The operating system presents its user interface in two major screens to deliver
the service, one is the Live View screen; the other is Playback screen. The Live
View screen shows the instant video(s) while the Playback screens plays the
recorded videos. Both screens come with a horizontal bar baring a handful of
clickable buttons to launch actions from the system and allow users to exert the
system’s functions. The following of this chapter will guide you through these two
screens.
Toolbar
Video Area
Mode Icon
Status Bar
Status Area
Live View
Toolbar
Video Area
Mode Icon
Status Bar
Time Bar
Playback
Other manuals for NVRsolo
3
This manual suits for next models
1
Table of contents
Other NUUO Security System manuals

NUUO
NUUO NVRmini 2 User manual

NUUO
NUUO NVRsolo NS-8060 User manual

NUUO
NUUO NVRmini 2 User manual

NUUO
NUUO DigiPlayer LDP1601 User manual

NUUO
NUUO NAS NVRmini User manual

NUUO
NUUO NAS NVRmini User manual

NUUO
NUUO Titan NVR User manual

NUUO
NUUO NAS NVRmini User manual

NUUO
NUUO Crystal User manual

NUUO
NUUO NVRsolo User manual