manuals.online logo
Brands
  1. Home
  2. •
  3. Brands
  4. •
  5. Polycom
  6. •
  7. IP Phone
  8. •
  9. Polycom Integra VVX 500 User manual

Polycom Integra VVX 500 User manual

1) Corporate Directory
2) Call Log
3) Mute
4) Transferring
5) Voicemail
6) Forward
7) Conferencing
8) Headset Settings
9) Volume
10) Setting Up
11) Hold
12) Park/ Retrieve
13)Menu
610-964-8000 www.evolveip.netsupport.evolveip.net
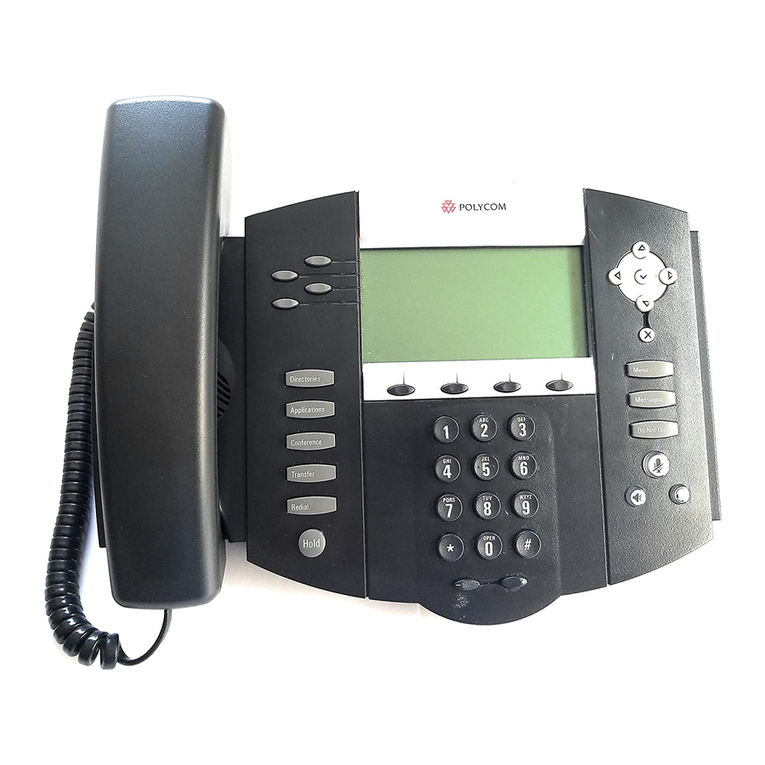
Polycom VVX500
1) Corporate Directory
a. Press the “Corp Directory” button.
b. Select whether you wish to search by first or
last name.
c. Use the dial key pad or the computer keyboard
icon in the middle of your screen to enter the first
few letters of the name you wish to search.
d .When finished, select “Search Directory.”
e. If a match is found, it will return a list of names
with the letters that you entered.
f. Once a person is selected, press the “Dial” but-
ton on your screen to make the call.
g. If you want to see all of the caller’s phone
numbers select the “Details” button.
2)Call Log
a. Press the “Call Log” button to view all your
Missed, Placed, and Received calls.
b. When you press call log it will automatically
populate all your Placed Calls. To view your
Missed or Received calls press the middle funnel
button at the top left corner of your screen and
then select the type of call you wish to view.
c. From this screen, select:
i. The name/number of the person and it will
begin to dial out
ii. Select the (i) icon to save the number to
your personal directory or dial the number
iii. If you save a number you will find it under
the Directory Icon. When in the directory if you
select the contact you have the ability to add
them to your favorites (speed dial)
Note: Favorites will show up on your main screen
underneath your extension. To delete them you
must go back into the call log, select favorites,
select the (i) icon next to their name, and then
select the trashcan at the bottom left hand
corner.
3) Mute
a. Press the “Mute” to mute your phone (the but-
ton will remain red while on mute).
b. Press the button again to take your phone o
mute.
4) Transferring
a. Consulted Transfer: Allows users to consult with
the third party before completing the transfer. To
perform a consulted transfer:
i. Press the “Transfer” key on your screen.
ii. Dial the extension or 10 digit number of the
party to whom you want to transfer the call.
When the last digit of the phone number is
dialed the phone will automatically dial the
second caller (or you can push the green call
button next the number to push it through
faster)
iii. Once the caller is announced hit the
“Transfer” key again and the transfer is
completed.
iv. Or to pull the call back, hit the “Cancel”
button and you will immediately be connected
to the original caller.
b. Blind Transfer: Transfers a call without
consultation:
i. Press the “Transfer” key on the screen.
ii. The screen will pop up with a Blind button on
the top right hand corner. Press “Blind” and the
dial box will change to say “Blind Transfer to”
iii. Dial the extension or 10 digit number to whom
you want to transfer the call to. When the last
digit of the phone number is dialed the phone
will automatically dial the second caller and the
call has been transferred.
c. Voicemail Transfer: Transfers a call straight into
voicemail.
i. When on a call press the “Transfer” button.
ii. Dial *55 and the extension of the party’s
voicemail the caller would like to go to followed
by “#”
iii. This will automatically send the caller into
voicemail.
610-964-8000 www.evolveip.net
support.evolveip.net
5) Voicemail
a. Press the Envelope in the upper left hand
corner of screen to setup and retrieve voicemail.
b. First enter the 6 digit default passcode
provided by your group/IT administrator.
c. Once the default passcode is entered, enter
a new 6 digit pass code (it cannot be six of the
same digit or ascending/descending order). This
will be the permanent pass code when checking
voicemail.
d. Follow the prompt to set up greetings.
7)Conferencing (3 Way Call)
Users have the ability to conference up to 2 other
callers. To create up to a 3-way conference call:
a. Connect to the first party.
b. Press the “Conference” button (putting the
first caller on hold) to create a new call.
c. Place a call to the second party
d. When the second party answers, press the
“More” soft key and then “Conference” key again
to join all parties in the conference.
e. Your caller ID will now say “From: Conf:Conf” to
indicate you are on a conference call.
6) Forward: To enable call forwarding
a. Press the “Forward” key on your screen.
b. Select a Forwarding Type: Forward, No Answer,
or Busy.
c. For all types, enter a number to forward all
future calls to. For No Answer, enter the number
of rings before forwarding.
d. Press the Enable key to confirm Call Forward-
ing. A 90 degree arrow will appear on the top of
your phone next to your extension.
e. To disable call forwarding: Perform steps A and
B, but select Disable.
8) Headset Setting
For Frequent or full-time headset users, there
is an option to default all calls to headset. To
enable Headset Memory Mode:
a. Press the “Menu” button and then select Set-
tings, followed by Basic, Preferences, Headset,
and Headset Memory.
b. Select “Enable” and then back out and press
the Menu button to get out of the screen.
9) Volume
a. Press the left volume button on the phone
to decrease the volume; press the right volume
button to increase the volume.
b. This will adjust your ringer, handset, or speaker
volume depending on which state you are in.
10) Setting up Speed Dials using Star
Codes for single digit speed dialing (8 or
less speed dials)
a. Press *74
b. Select a number between 2 and 9 to configure
as a speed dial key.
c. Enter the extension or 10-digits you want as the
speed dial and then press the pound key “#”
d. To dial, press the configured speed dial digit
and then press the green phone button to dial
out.
e. Press *75
f. Select a number between 00 and 99 to config-
ure as a speed dial key.
g. Enter the extension or 10-digits you want as the
speed dial and then press the pound key “#”
h. To dial, press # and then the configured two
digit speed dial digits and then the green phone
button to dial out.
11) Hold
a. When on a call, your screen will change and
the first option to the left on the screen will be
the “Hold” option.
b. By selecting the “Hold” option, you will be
putting the caller on hold and by default music
will be played for the caller on hold.
c. To take the caller o of hold, press the “Re-
sume” button.
12) Park/Retrieve
Parking a call:
a. When on a call, press the “Park” button.
b. You will see a display that will ask you what
extension you would like to park the call on.
c. Enter either your extension or the co-workers
extension the call is for and press the “Enter”
button.
d. You will hear a recording that says your call
has been parked.
*After 60 seconds if the call is not retrieved, the
call will ring the original phone and open up a
line to answer.
Retrieving a Call
e. To retrieve a call, press the “Park/Retrieve”
button.
f. You will see a display that will ask you what
extension the call was parked on.
g. Enter the extension the call was parked on and
press the “Enter” button.
h. You will immediately be connected with the
call that was parked.
13) Menu
The Menu button allows you to select several
options. Some of the options include but are not
limited to:
a. New Call: shows you your recent calls and
allows you to place calls
b. Messages: will bring you to the Message Cen-
ter, which brings you to your Voicemail
c. Directories: Shows you all your saved numbers
d. Settings: dierent options like:
i. Basic: Ring Type, Preferences, Login Creden-
tials, etc
ii. Advanced: Password needed to set up
(Change User Password and Reboot Phone)
iii. Features: Do Not Disturb, Last Call Return,
Forwarding Options, etc
e. Applications: Brings you to your Corporate
Directory Search Page

Other manuals for Integra VVX 500

31

Other Polycom IP Phone manuals

Polycom SpectraLink 6000 System User manual

Polycom

Polycom SpectraLink 6000 System User manual

Polycom VVX 600 series User manual

Polycom

Polycom VVX 600 series User manual

Polycom SoundPoint IP 600 SIP User manual

Polycom

Polycom SoundPoint IP 600 SIP User manual

Polycom SoundPoint IP 300 User manual

Polycom

Polycom SoundPoint IP 300 User manual

Polycom Polycom SoundPoint IP 430 User manual

Polycom

Polycom Polycom SoundPoint IP 430 User manual

Polycom SoundPoint 320 User manual

Polycom

Polycom SoundPoint 320 User manual

Polycom SoundPoint IP 331 Installation and operation manual

Polycom

Polycom SoundPoint IP 331 Installation and operation manual

Polycom PENNNET 650 Instruction manual

Polycom

Polycom PENNNET 650 Instruction manual

Polycom SoundPoint IP 450 User manual

Polycom

Polycom SoundPoint IP 450 User manual

Polycom VVX 400 Series User manual

Polycom

Polycom VVX 400 Series User manual

Polycom Poly VVX150 User manual

Polycom

Polycom Poly VVX150 User manual

Polycom VVX 201 User manual

Polycom

Polycom VVX 201 User manual

Polycom VVX 250 User manual

Polycom

Polycom VVX 250 User manual

Polycom VVX 350 Instruction manual

Polycom

Polycom VVX 350 Instruction manual

Polycom SoundPoint IP 450 User manual

Polycom

Polycom SoundPoint IP 450 User manual

Polycom SoundPoint IP 450 User manual

Polycom

Polycom SoundPoint IP 450 User manual

Polycom VVX 400 User manual

Polycom

Polycom VVX 400 User manual

Polycom SoundPoint IP 430 SIP User manual

Polycom

Polycom SoundPoint IP 430 SIP User manual

Polycom 1725-11530-310 Service manual

Polycom

Polycom 1725-11530-310 Service manual

Polycom VVX 500 User manual

Polycom

Polycom VVX 500 User manual

Polycom CX300 User manual

Polycom

Polycom CX300 User manual

Polycom VVX 250 User manual

Polycom

Polycom VVX 250 User manual

Polycom SoundStation IP 6000 User manual

Polycom

Polycom SoundStation IP 6000 User manual

Polycom SoundPoint IP 3 Series User manual

Polycom

Polycom SoundPoint IP 3 Series User manual

Popular IP Phone manuals by other brands

Allworx Verge Series quick start guide

Allworx

Allworx Verge Series quick start guide

Motorola 200IP-2P user manual

Motorola

Motorola 200IP-2P user manual

Siemens OpenStage 80 SIP operating manual

Siemens

Siemens OpenStage 80 SIP operating manual

Grandstream Networks BudgeTone-100 Series user manual

Grandstream Networks

Grandstream Networks BudgeTone-100 Series user manual

Nexus CISCO Single Line user guide

Nexus

Nexus CISCO Single Line user guide

Mitel Office Suite 6920 Series manual

Mitel

Mitel Office Suite 6920 Series manual

elmeg IP120 user guide

elmeg

elmeg IP120 user guide

Panasonic KX-UTG200 operating instructions

Panasonic

Panasonic KX-UTG200 operating instructions

Cisco DATAVOX 7941 Brief

Cisco

Cisco DATAVOX 7941 Brief

Ericsson Dialog 4422 Brochure & specs

Ericsson

Ericsson Dialog 4422 Brochure & specs

Alcatel-Lucent IP Touch 4008 Basic User Training Guide

Alcatel-Lucent

Alcatel-Lucent IP Touch 4008 Basic User Training Guide

Samsung OfficeServ ITP-5121D user guide

Samsung

Samsung OfficeServ ITP-5121D user guide

iPECS LIP-9000 Series user guide

iPECS

iPECS LIP-9000 Series user guide

LG-Ericsson IPECS 1000i Series Settings guide

LG-Ericsson

LG-Ericsson IPECS 1000i Series Settings guide

Cisco 79 SERIES Training

Cisco

Cisco 79 SERIES Training

Cisco IP Phone Quick user guide

Cisco

Cisco IP Phone Quick user guide

Cisco 7931G - Unified IP Phone VoIP Administration guide

Cisco

Cisco 7931G - Unified IP Phone VoIP Administration guide

iPECS 1040i Features guide

iPECS

iPECS 1040i Features guide

manuals.online logo
manuals.online logoBrands
  • About & Mission
  • Contact us
  • Privacy Policy
  • Terms and Conditions

Copyright 2025 Manuals.Online. All Rights Reserved.