manuals.online logo
Brands
  1. Home
  2. •
  3. Brands
  4. •
  5. quadient
  6. •
  7. Postal Equipment
  8. •
  9. quadient IN-360 Series User manual

quadient IN-360 Series User manual

Connect the weighing platform connector (e) into the COM PORT
on the rear of the machine. Then connect the LAN cable (f) and
power cable (g) to either side of the machine.
7
Open the cover. Place the meter (i) into the meter compartment and
push backwards until it slots into position. Close the cover.
3
Machine components:
Machine Base
Feed Table with
Sealing Unit Catch Tray
LAN Cable Power Cable MeterInk
Cartridge
Unpack all components from the box, remove packaging
and any transit tape.
1
Lift the machine slightly on the left hand side and align the hooks to attach the feed
table (b) – align the catch tray (c) to the right hand side of the machine (a).
5
Lower weighing platform release panel at rear
of the machine. Place weighing platform (d) on
top of the machine and slide forward to lock. Lift
panel to secure and clip cable into place.
Insert the ink Cartridge (h) into the machine with the ‘TOP’ and ‘LOCK’
stickers facing upwards. Push the ink Cartridge (h) towards the back of
the machine until you hear a ‘click’ - close the cover of the machine.
Turn on the machine using the switch behind the
power cable (g) and follow the steps on screen.
8
Select LAN and press ‘OK’ to test connection type.
OK
Installation Process
1 LAN
9
Obtain registration PIN from MyQuadient.
Registration PIN
www.myquadient.co.uk
10
IN-360 Series Base - Guernsey
Quick Installation Guide For more help with your installation, please visit: kb.quadient.co.uk/in360_Video_QSG
Lift the cover of the machine to reveal the
ink Cartridge (h) and meter (i) locations.
2
6
4
Press the button and credit the meter.
Credit
Credit available
£100.00
Amount of credit to add
£10
13
Press OK to start the alignment test and pass a blank envelope
through the machine, then choose the straightest line. Continue
to follow the steps on screen to complete the installation.
11
A C E G I K
B D F H J OKBack
Headset alignment
Perform an imprint test
Adjust alignment
Select the letter corresponding to the best
verticle line
B D F H J
A C E G I K
14
Your machine is now ready to use. Please turn over
for your Quick User Guide.
Weighing Platform
connector Remove tabs from
print heads before
inserting into unit!
Weighing Platform
Rear of mailing system base
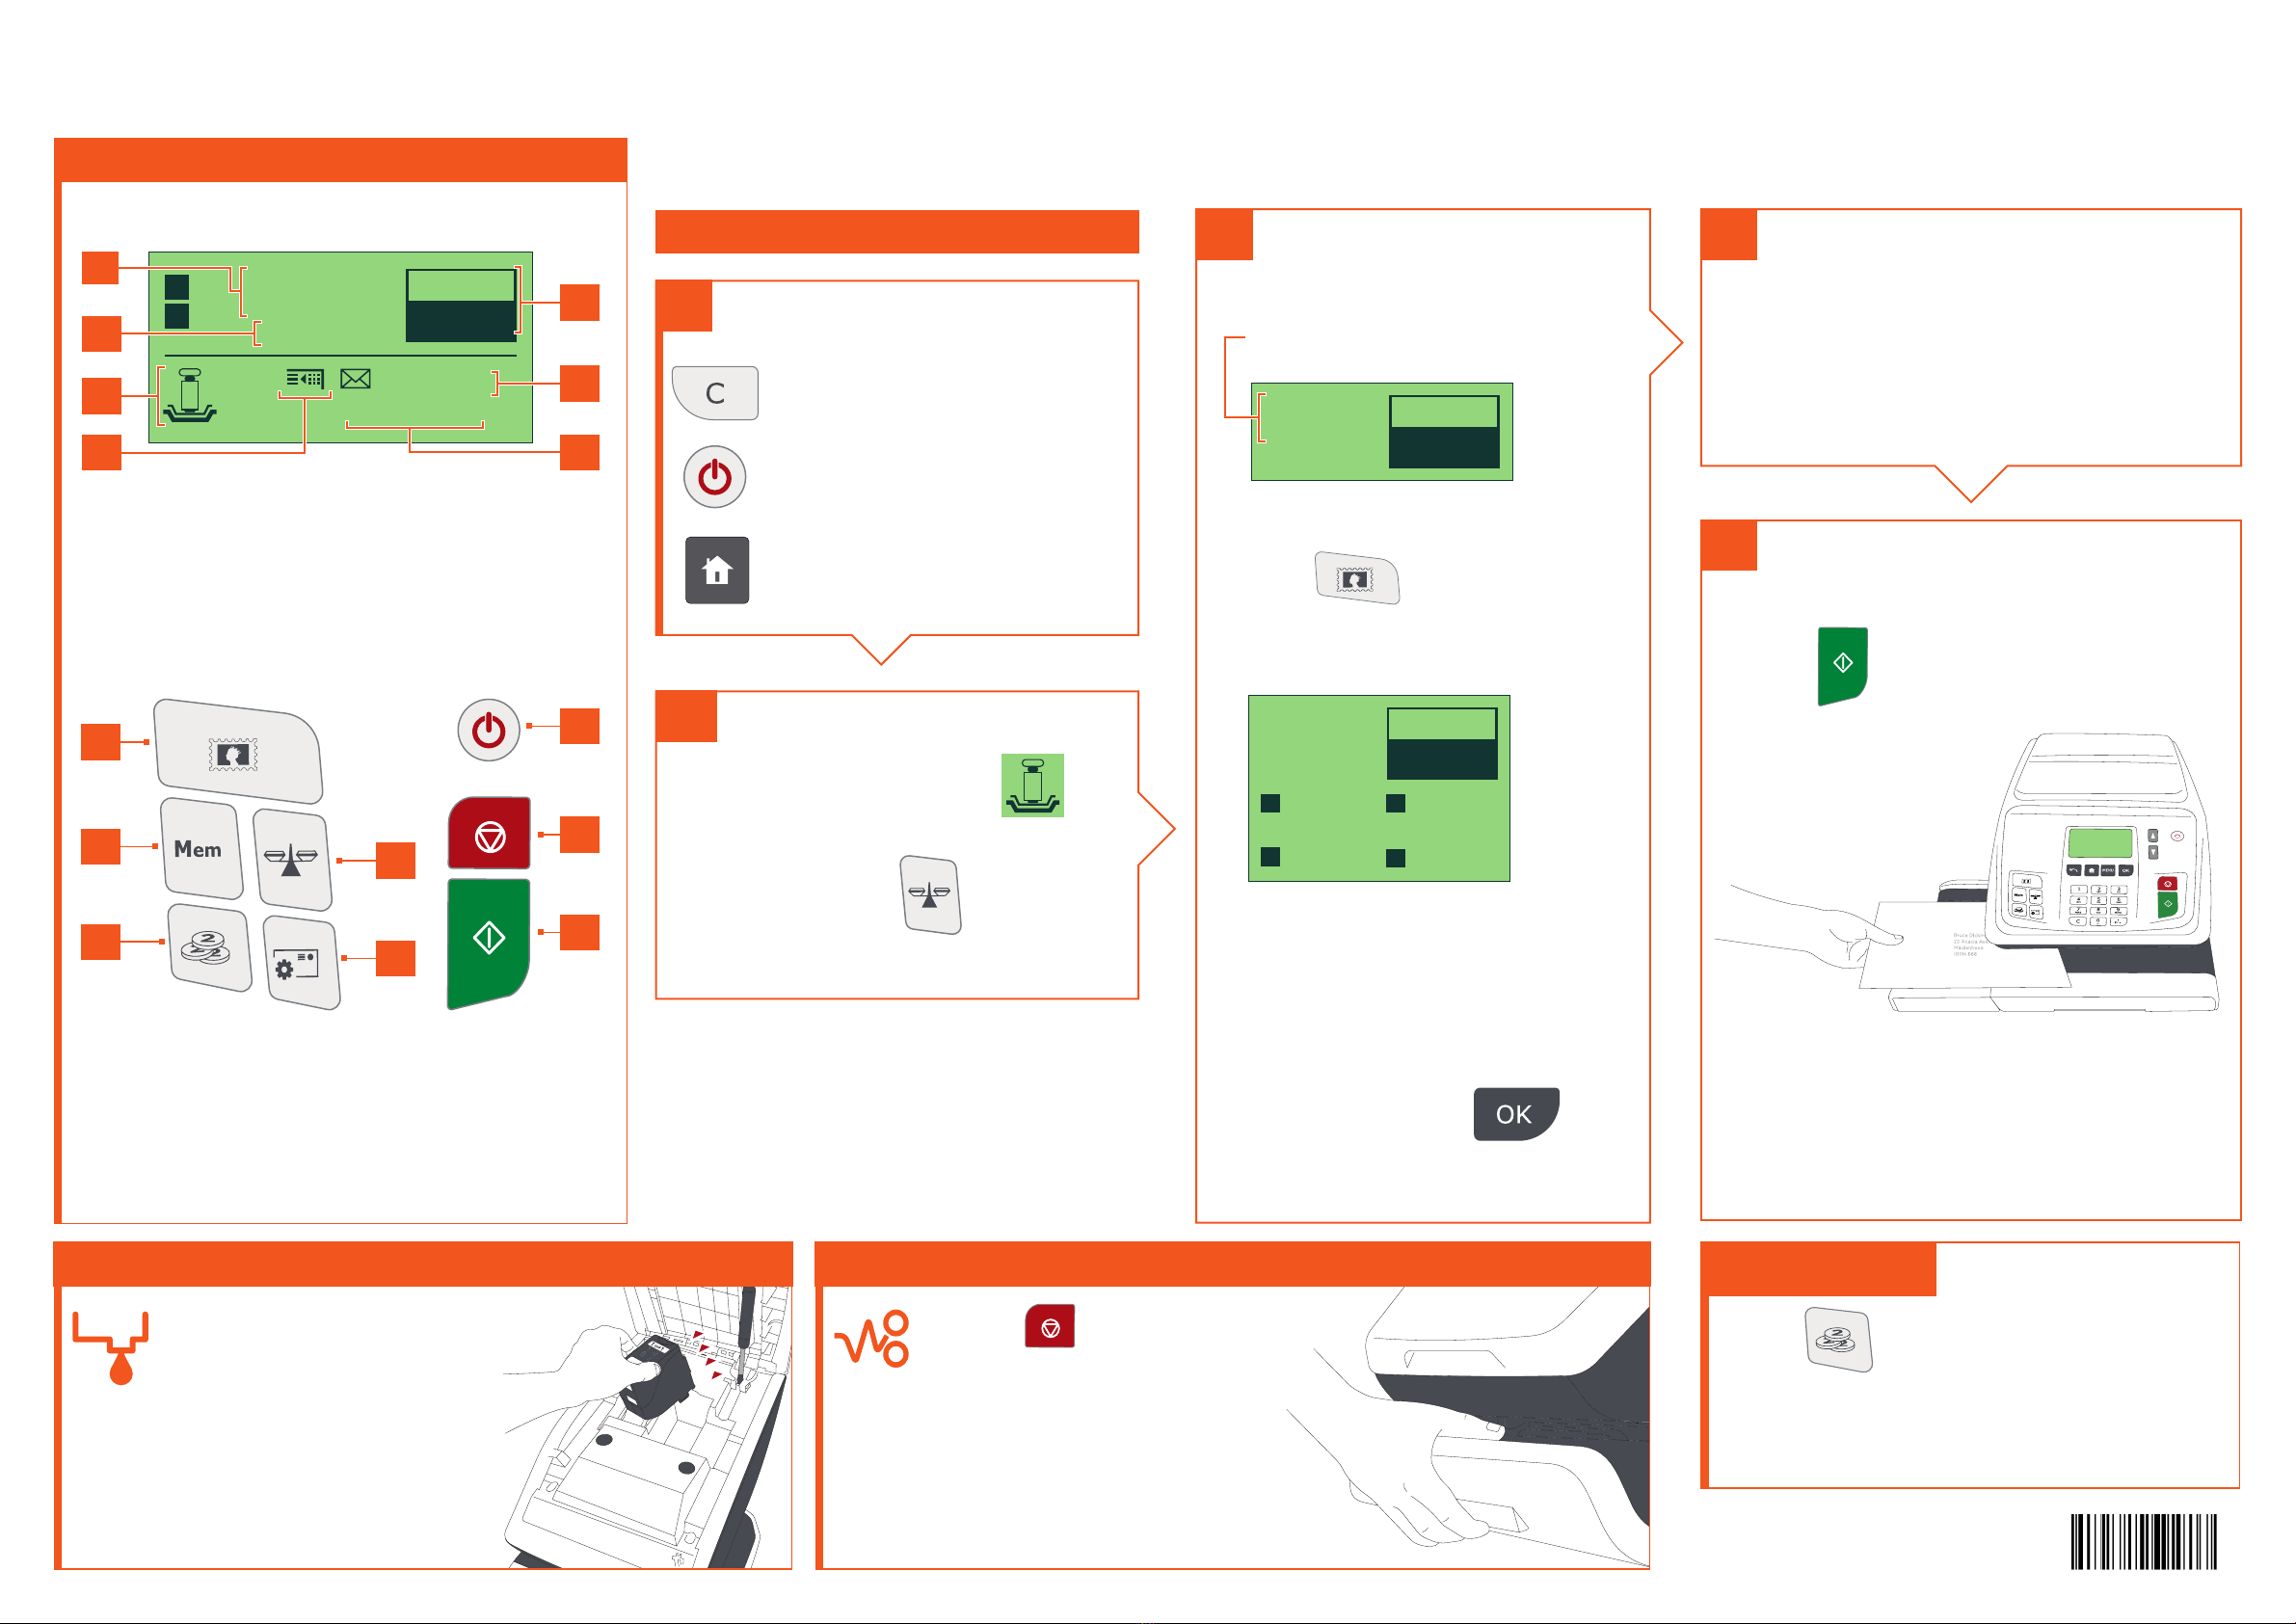
Getting to know your Franking Machine
£000.0
E
S
Mem: None
Acct:00000
Let Loc Std
No services
20.01.20 0g
Screen Information
A1 Rate and services
A2 Date printed
A3 Weighing type
A4 Imprint position oset
A5 Postage and weight
A6 Job memory (can contain rate, stamp settings and account)
A7 Current account
A6
A7
A1
A2
A3
A4
Shortcut keys
B1 Rate and services selection
B2 Job memories (rate, stamp settings and account)
B3 Credit management
B4 Weighing modes
B5 Type of imprint and imprint settings
B6 Sleep/wake (amber/green)
B7 Stops printing
B8 Starts printing
B6
B1
B2 B7
B4
B8
B5
B3
A5
For more specific information on your
franking machine, please visit:
www.myquadient.co.uk
and log in to your account or visit:
kb.quadient.co.uk/in360_ug_gy
for access to your user guide.
IN-360 Quick User Guide - Guernsey
Quick steps to franking your mail 4
1. Press on the key pad to
stop the motor.
2. Under the base, lift up the
release handle and, using
your other hand, remove
stuck envelope.
If Jamming occurs
1. On the new ink
cartridge, remove the
protective strips from
the printing heads.
2. Lift machine cover
and follow instructions
printed on sticker inside.
Changing the ink cartridge
2To weigh an item:
1. Check that the A3 icon is
2. Otherwise press
and select
the option: Standard weighing
1To reset the machine press:
to clear the information
on screen.
to wake the machine
up with default settings.
to return to the home screen.
3Select a rate (and services): Using the envelope sealer
2. Use the keypad to choose a rate
or service option, or use the
wizard for access to more rates.
3. Place your mail on the platform.
Currently selected rate and
services are indicated at the
top of the screen.
£000.0
Let Loc Std
No services
20.01.20 0g
Change/add services:
1. Press
The Rate selection screen
is displayed.
£000.0
Let Loc Std
No services
20.01.20 0g
1Inland 2Intl
7Services 8Wizard
4. When done, press
to confirm your selection and
return to the home screen.
Adding credit
Press
choose ‘Credit’ and follow
the instructions on screen.
Note: in order to add credit to the
machine there must be funds available
in your postage account.
To order consumables for your machine visit www.quadient.co.uk
5When all steps are completed
print the stamp:
2. When the rollers start, insert the mail
into the machine from the left hand
side. If using the sealer, make sure that
the lip of the envelope is inserted into
the sealer as mail passes through.
1. Press to start the motors of
your franking machine.
To prepare the envelope sealer, lift the
reservoir out of machine and open the
lid. Fill with sealing fluid to indicator mark
and leave for 5 minutes. Top up, then
replace reservoir.
A0130868/A - 21/02/2020

Other manuals for IN-360 Series

6

Other quadient Postal Equipment manuals

quadient IS-330 User manual

quadient

quadient IS-330 User manual

quadient IM-22 User manual

quadient

quadient IM-22 User manual

quadient IS-280 User manual

quadient

quadient IS-280 User manual

quadient iX-5 Series User manual

quadient

quadient iX-5 Series User manual

quadient IS-440 User manual

quadient

quadient IS-440 User manual

quadient iX-9 Series User manual

quadient

quadient iX-9 Series User manual

quadient IS-350 User manual

quadient

quadient IS-350 User manual

quadient IS-350 User manual

quadient

quadient IS-350 User manual

quadient iX-5 Series User manual

quadient

quadient iX-5 Series User manual

quadient IS-6000 User manual

quadient

quadient IS-6000 User manual

quadient IS-6000 Assembly instructions

quadient

quadient IS-6000 Assembly instructions

quadient IS-350 User manual

quadient

quadient IS-350 User manual

quadient IS-280 User manual

quadient

quadient IS-280 User manual

quadient IN-360 Series Parts list manual

quadient

quadient IN-360 Series Parts list manual

quadient iX-5 Series User manual

quadient

quadient iX-5 Series User manual

quadient IS-480 User manual

quadient

quadient IS-480 User manual

quadient IS-5000 User manual

quadient

quadient IS-5000 User manual

quadient IS-480 User manual

quadient

quadient IS-480 User manual

quadient IS-480 User manual

quadient

quadient IS-480 User manual

quadient IS-280 User manual

quadient

quadient IS-280 User manual

quadient CS-200 User manual

quadient

quadient CS-200 User manual

quadient iX-3 Series User manual

quadient

quadient iX-3 Series User manual

quadient iX-3 Series User manual

quadient

quadient iX-3 Series User manual

quadient HD-MB50D User manual

quadient

quadient HD-MB50D User manual

Popular Postal Equipment manuals by other brands

Pitney Bowes DM300 manual

Pitney Bowes

Pitney Bowes DM300 manual

Opex Eagle Remittance Processor Operator's manual

Opex

Opex Eagle Remittance Processor Operator's manual

SSS Siedle BGA 611 Series Product information

SSS Siedle

SSS Siedle BGA 611 Series Product information

Opex Omation Envelopener 210 Series Operator's manual

Opex

Opex Omation Envelopener 210 Series Operator's manual

Neopost IS-440 user guide

Neopost

Neopost IS-440 user guide

Elane PS 3000 user manual

Elane

Elane PS 3000 user manual

Pitney Bowes SendPro C Return Instructions

Pitney Bowes

Pitney Bowes SendPro C Return Instructions

Pitney Bowes DM300c series Update instructions

Pitney Bowes

Pitney Bowes DM300c series Update instructions

Pitney Bowes DM Series Setup guide

Pitney Bowes

Pitney Bowes DM Series Setup guide

MSL JET+ 250 Getting started

MSL

MSL JET+ 250 Getting started

MSL JET PLUS 400 Getting started

MSL

MSL JET PLUS 400 Getting started

Creative Solutions PP330 installation instructions

Creative Solutions

Creative Solutions PP330 installation instructions

Neopost IJ 70 Fitting instructions

Neopost

Neopost IJ 70 Fitting instructions

Welltec System postmate 3 user manual

Welltec System

Welltec System postmate 3 user manual

Frama Matrix F Series Quick installation guide

Frama

Frama Matrix F Series Quick installation guide

Pitney Bowes SendPro C Auto quick start guide

Pitney Bowes

Pitney Bowes SendPro C Auto quick start guide

manuals.online logo
manuals.online logoBrands
  • About & Mission
  • Contact us
  • Privacy Policy
  • Terms and Conditions

Copyright 2025 Manuals.Online. All Rights Reserved.