RainPoint TTV103WRF User manual

Instruction
1 Zone WiFi Water Timer with WiFi Hub
Model: TTV103WRF + TWG004FRF
US Free Hotline: +1-833-3815659
E-mail: seice@rainpointus.com
Facebook: @Rainpointglobal
Customer Suppo
www.rainpointus.com
RAINPOINT®
*SAVE THIS MANUAL FOR FUTURE REFERENCE.

Thank you for chosing RAINPOINT 1 Zone WiFi Water Timer with WiFi Hub!
After using the RainPoint WiFi water timer, you'll nd it easier, faster and more convenient than ever before! You are
able to schedule, manually operate, auto watering and monitor ow just with your sma phone. When the timer is
connected to the hub and your WiFi, it can synchronize the weather forecast from internet to automatic update and
adjustment your watering plan. The timer works much like other WiFi devices: as long as your phone can access the
internet , you can connect the device and control your timer no matter where you are.
Whatever your outdoor watering needs, RainPoint provides best-in-class irrigation products to help you more
eectively manage and control your watering.
Let's sta to enjoy the wondeul sma irrigation life!
WELCOME TO RAINPOINT
More product information and user guide will happen on
Have Questions?
: RainPoint
: @Rainpointglobal
: 1-833-3815659
: seice@rainpointus.com
TABLE OF CONTENTS
CONTENTS IN THE BOX 01
TTV103WRF 1 Zone WiFi Water Timer
TWG004FRF WiFi Hub
PRODUCTS OVERVIEW 02
FEATURES OVERVIEW 04
INTRODUCTION 1-4
Manual Power ON/OFF
Power ON/OFF By Schedule
WIFI SOCKET 17
RESET THE DEVICE 22
STEP 1. INSTALL APP ON YOUR PHONE 05
STEP 2. CONNECT THE WIFI HUB 06
STEP 3. CONNECT THE WIFI TIMER 07
INSTALLATION 5-10
Automation & Tap-to-Run
How to set the automatic rain delay?
SMART AUTOMATION 18
HOME MANAGEMENT 21
APP HOME SCREEN 11
Device Parameter
Manual Watering
WIFI WATER TIMER 12
Watering Plan & Manual Rain Delay
WiFi Soil Sensor & Water Flow Meter*
APP PROGRAMMING 11-22
TROUBLESHOOTING 23
WARRANTY 26
CUSTOMER SUPPORT 26
STEP 4. INSTALL THE WIFI TIMER 09
STEP 5. TEST BEFORE USE 10
*WiFi soil sensor is sold separately, this kit does not
contain WiFi soil sensor
INTRODUCTION
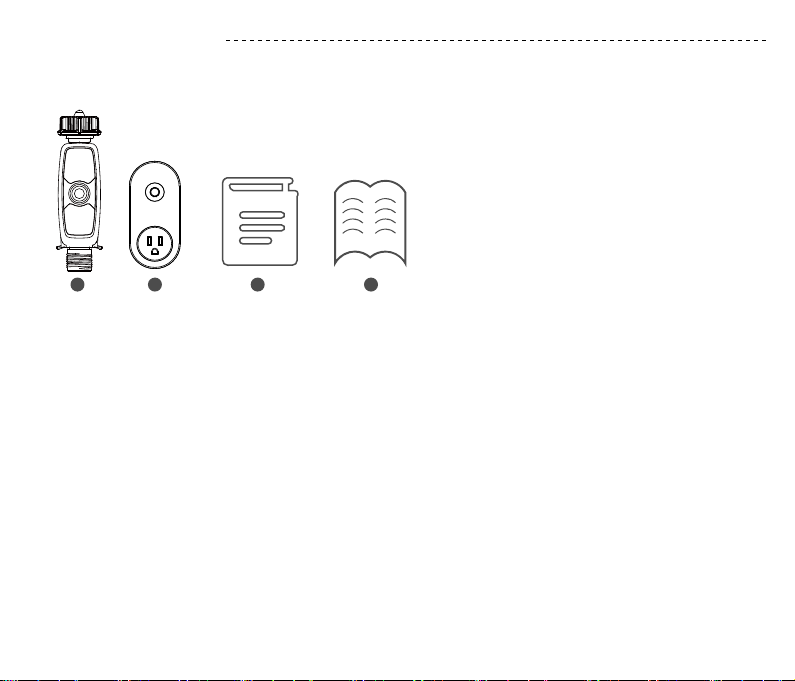
A.1 x TTV103WRF 1 Zone WiFi Water Timer
B.1 x TWG004FRF WiFi Hub
C.1 x Instruction Manual
D.1 x Quick Setup Guide
FCC Notice:
This device generates radio frequency energy and may cause inteerence to radio and television reception. It has
been type tested and found to comply with the limits for a Class B computing device in accordance with the
specications in Pa 15 of FCC Rules, which are designed to provide reasonable protection against such inteerence
in a residential installation. However, there is no guarantee that inteerence will not occur in a paicular installation.
If this equipment does cause inteerence to radio or television reception, which can be determined by turning the
equipment o and on, the user is encouraged to t to correct the inteerence by one or more of the following
measures:
• Reorient the receiving antenna
• Move the device away from the receiver
• Plug the device into a dierent outlet so that device and receiver are on dierent branch circuits.
If necessa, the user should consult the dealer or an experienced radio/television technician for additional
suggestions.
- 01 -
CONTENTS IN THE BOX
A B C D

Specication
Range Between WiFi Hub and Timer: 160 ft in the open area without inteerence
Working Water Pressure: 0.5 bar to 8 bar(7.25-116.03PSI)
Temperature Operating Range: 3°C - 50°C (37°F-122°F )
Power By: 4 AA alkaline batteries (not included)
WaterProof: IP54
- 02 -
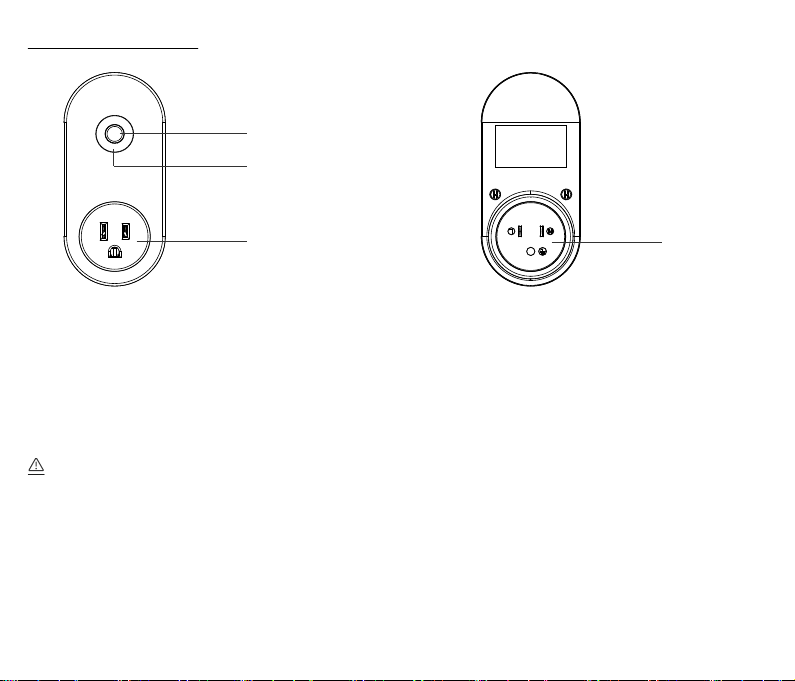
PRODUCTS OVERVIEW
For outdoor use with cold water only.
Keep away from freezing. In freezing weather, the timer should be placed indoors.
Used up or dead batteries must be removed from the timer and disposed of properly.
Inlet Filter
Water Inlet
Timer Button
LED Indicator
Water Outlet
Batte Compament
TTV103WRF 1 Zone WiFi Water Timer
Specication
Range Between WiFi Hub and Router: 160 ft in the open area without inteerence
Temperature Operating Range: 3°C - 40°C (37°F-104°F )
WiFi Frequency Band: 2.4Ghz Only
Input: 100-240V ~ 50/60Hz 0.2A
Output: 5V-1.0A
- 03 -
For indoor use only.
Only applicable to 2.4Ghz WiFi. If your router is a dual-band router, please independently enable the 2.4GHz
WiFi band and name it dierently from the 5GHz WiFi band.
TWG004FRF WiFi Hub
Power Plug
Hub Button
Power Indicator
WiFi Socket with Power Supply

1) WiFi Remote Control: Connect with 2.4GHz WiFi, set and check irrigation schedule by APP.
2) WiFi Socket: The WiFi Hub can be use as WiFi socket.
3) Manual Watering: Manually turn on/o watering and set watering time.
4) Watering on Schedule: The timer can set up to 3 separate watering programs eve day. Each watering programs
has dierent sta time and watering duration.
5) Automatic Watering: ① When the WiFi timer is connected to the WiFi soil sensor (not included), it can
automatically irrigate or stop according to the soil temperature and humidity data; ② When you locate the home
address for the timer, the APP will automatically synchronize the local weather information, and the timer can be
automatically executed according to the weather trigger conditions you set.
6) Rain Delay: Manual Rain Delay and Automatic Rain Delay
7) Water Flow Meter: Built-in water ow meter to track water usage in the last 10 days.
8) Two Watering Modes: Irrigation mode and Mist mode.
9) Co-management with family: Home Management allows you to Add family members and give them permissions,
manage the irrigation of your home garden together.
10) Low Batte and Water Leak Alarm: APP will send you ale messages when low batte or product failure.
11) One WiFi hub can pair with maximum 4 WiFi water timers.
12) One WiFi water timer can pair with 1 WiFi soil sensor*.
- 04 -
FEATURES OVERVIEW
WiFi wi RF
RF
ROUTER
CLOUD
2.4Ghz WiFi
* Only compatible with Rainpoint TCS005FRF Wi-Fi soil sensor (not included).
* Only applicable to 2.4Ghz WiFi

INSTALLATION
Please scan the QR code or search the link to access the setup video
or FAQ to install the device quickly and easily.
Setup Video: www.rainpointus.com/pages/playlist
FAQ: www.rainpointus.com/downloads/faq
Tips:
- 05 -
STEP 1. INSTALL APP ON YOUR PHONE
FAQ
Setup Video
Rainpoint 1 Download the RainPoint App
Search for RainPoint on Google Play or App Store or scan the QR
code to download the RainPoint APP.
2 Register your RainPoint account
Open your RainPoint APP, select Set Up
Follow the prompts to register a RainPoint account with your email
or mobile number.
Note:
Ensure your count/region details are correct at this stage.
You may be prompted to allow access your location. This allows the
app to show weather information, and can still function if you choose
to opt out.

- 06 -
STEP 2. CONNECT THE WIFI HUB
Tips:
If your router is a dual-band router, and you cannot identify
the 2.4Ghz or 5Ghz WiFi, please tap the blue words Common
router setting method to name the 2.4Ghz WiFi dierently,
then you can select it individually.
1. Plug your WiFi Hub to an indoor power source near your
WiFi router and the outdoor location of your timer.
2. Open RainPoint App and tap Add deviceor to add a
new device.
3. Tap Sma Irrigation and Add Manually, then select
Irrigation Hub.
4. select 2.4Ghz WiFi, and enter the password.
- 07 -
STEP 3. CONNECT THE WIFI TIMER
Tips:
If the indicator doesn’t blink rapidly (2 times per second),
please tap Resetting Devices and follow the prompts (Or
refer to the RESET THE DEVICE section of this manual) to
reset the WiFi hub and make the hub indicator blink rapidly.
5. Conrm the power indicator on your WiFi hub blink rapidly
(2 times per second). Then the APP will search and pair
your WiFi Hub automatically.
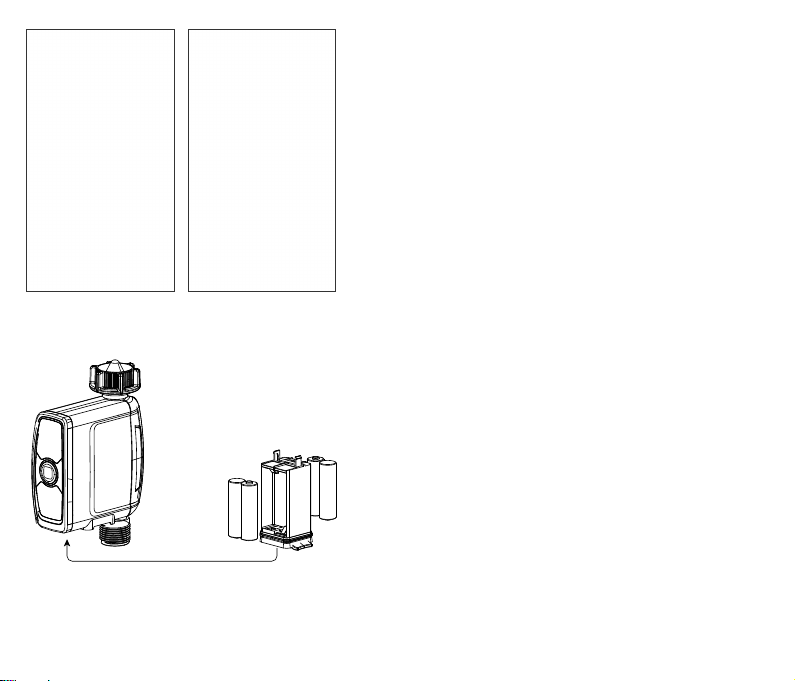
1. Inse 4 new AA alkaline batteries into the batte tray of
the timer. Restore the batte tray and make ceain it is
secured.
Warnning:
*Please use only alkaline batteries.
*Do not mix old and new batteries.
*Batteries are to be inseed with the correct polarity.
*Exhausted batteries are to be removed from the product.
*Please remove the batte from long-term no use.
6. After the connection is successful, the color icon of
irrigation hub will be displayed on the APP home screen.
+
+
-
+
-
+
-
+
-
This manual suits for next models
1
Table of contents
Other RainPoint Timer manuals

RainPoint
RainPoint ITV201P User manual

RainPoint
RainPoint ITV205 User manual

RainPoint
RainPoint HTV113FRF User manual

RainPoint
RainPoint ITV101P User manual

RainPoint
RainPoint HTV213FRF User manual

RainPoint
RainPoint ITV205 Installation guide

RainPoint
RainPoint TTV102B User manual

RainPoint
RainPoint TTV203WRF User manual

RainPoint
RainPoint ITV201P User manual

RainPoint
RainPoint ITV105 User manual


