manuals.online logo
Brands
  1. Home
  2. •
  3. Brands
  4. •
  5. Rapid
  6. •
  7. Glue Gun
  8. •
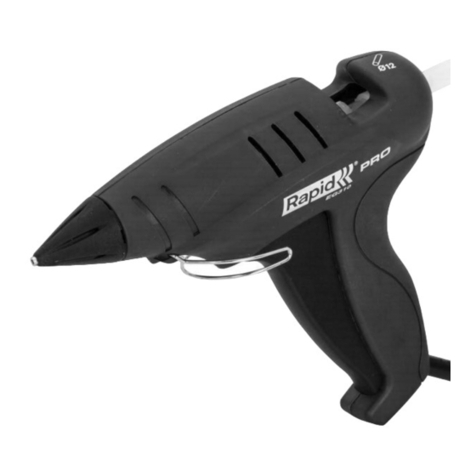
  9. Rapid EG380 User manual

Rapid EG380 User manual

EG380
Electric hot melt applicator
Pistolet à colle électrique
Elektrische klebepistole
Aplicador hot melt eléctrico con cable
Incollatrice elettrica
Elektrisch lijmpistool
Aplicador de cola eléctrico
Elektrisk smältlimpistol
Tavná lepící pistole
Elektrisk limpistol
Ηλεκτρικό πιστόλι θερμόκολλας
Sähkötoiminen kuumaliimapistooli
Клеевой пистолет со шнуром
Električna naprava za lepljenje s
talečim lepilom
Elektrická tavná pištoľ
Par Angélique CONSTANT , 09:16, 20/12/2011
4
ELECTRIC HOT MELT APPLICATOR: EG380
Operating instructions
Technical Characteristics
Dimensions (WxHxD) 36 x 24 x 8 cm
Weight : 1.7 kg
Working voltage : 220V-240V~, 50Hz
Power rating : 400W
Temperature : 140° - 220°C
Regulation : Thermostat
Glue sticks: Rapid Ø 12mm
Special features
• Nonbreakablehandleandlightweight
• Uniqueeffort-savingtrigger,withcircularTPRhandle
for comfortable hour long operation
• Temperatureadjustorbetween140-220°C
Safety Instructions
Read safety rules and instructions
carefully before using this machine.
• Thisapplianceisnotintendedforuseby
persons (including children) with reduced
physical, sensory or mental capabilities, or lack of
experience and knowledge, unless they have been
given supervision or instruction concerning use of the
appliance by a person responsible for their safety.
Children should be supervised to ensure that they do
not play with the appliance.
• Donotuseorstorethismachineinahumid
environment. Do not place it where it may be splashed
by water. Do not expose it to extreme changes in
temperature during or directly after use.
• Onlyuseitindoorsonaclean,dryworksurface.
Excessive dust and dirt may reduce lifetime of this
tool.
• Neverunplugthemachinebypullingthecable.
• Ifthepowercableisdamagedorcut,removetheplug
from the electric socket immediately and do not use
the machine. It must be replaced by the manufacturer
or its service agent or a similar qualified person in
order to avoid a hazard.
• Unplugthemachinewhennotinuse,beforeany
servicing operations (maintenance, cleaning etc.)
• Alwaysverifythattheapplianceisattachedtoa
ground socket.
• Whenusinganelectricextensioncable,checkthat
it is in good working order and that it has a ground
socket.
• Neverusethetoolifitisdamagedinanyway.
• NeverinsertobjectsotherthanØ12mmRapidglue
sticks into the machine.
• Neverremoveagluestickthathasalreadybeen
inserted.
• TheEVAadhesivecanbestoredindefinitelyinthe
unheated gun and re-melted by heating up the tool.
Useonlyrecommendedadhesivesinthisgluegun.
• Itisnormalforthistooltobecomequitewarmduring
use. This is normal and does not indicate a problem.
• HotSurfaces:thenozzleoftheapplianceandtheglue
can reach a temperature of approx. 220°C. Do not
touch the heated nozzle or the hot adhesive. Avoid any
contact with the skin. If you burn yourself, put the burn
in cold water immediately. Never try to remove a large
quantity of glue without medical help.
• Keepchildrenaway.Childrenshouldnotusethisglue
gun.
• Whenapplyingataheight,takeallthenecessary
precautions to ensure that the glue does not run onto
the operator or onto any object. Make sure that you
have enough protection wear (skin, eyes)
• Somematerialsareheat-sensitiveandcanbe
damaged by the hot nozzle or even the hot glue.
Whenever possible, test a piece of scrap material or a
hidden portion of the object being repaired.
• Stayalert.Payattentiontoyourwork.Bewareofany
drippinghotgluefromyourproject.Usecommon
sense. Do not operate this gun when you are tired.
Do not operate under the influence of alcohol or other
drugs that may impair your physical abilities.
• Whenyouhavefinishedusingthemachine,unplugit
and wait until it has cooled. Never immerse glue gun
in water or other liquids to speed cooling process.
Allow it to air cool only. The glue gun should be stored
in a closed dry and secure place (tool box, drawer,
cupboard, etc.).
Instructions for Use
• Plugthegluegunintoasuitablesocket,redlighton
means the power is on.
• Allowthetooltoheatforapproximately3-5minutes.
Insert a glue stick in the back of the tool.
• Whenthegunisfullyheated,squeezethetrigger
slowly, until the melted material begins to flow from
the nozzle. Release the trigger to stop the glue flow.
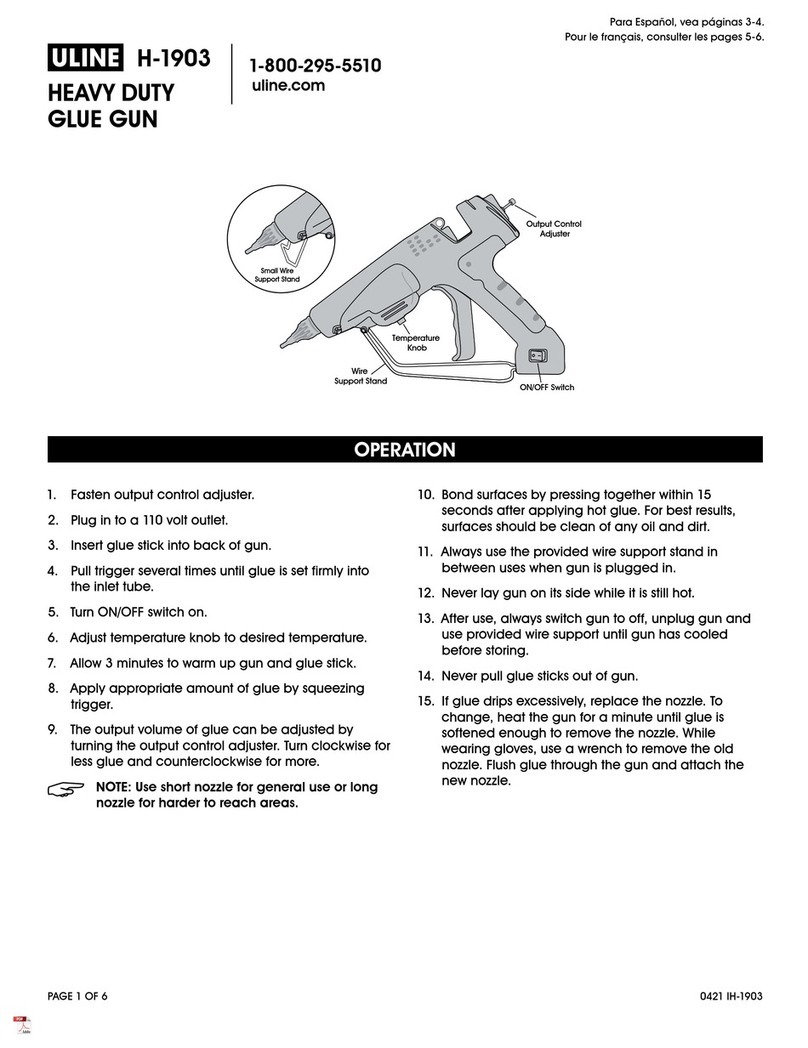
Temperature
adjustor
Glue feeding
direction
Power input
Trigger
ON/OFF switch
5
• Setthetemperaturebuttontoadjusttheoperating
temperature between 140-220° C.
• Workwithglueguntriggertoadjusttheoutputand
speed of the glue stick.
• Tochangethenozzle,thegluegunshouldbeslightly
warm but unplugged.
• Unscrewthenozzleusinggloves.
Breakdowns and remedies
• Topreventthecloggingofthisgluegun,
keep feeding mechanism and melt chamber
free from dirt and other foreign debris.
• Storeunusedgluesticksinaclean
environment.
• Donotpullgluestickfromthebackofthegluegun.
The feed mechanism may be damaged or impaired. If
you need to change glue type, cut off the protruding
end and feed the remainder through with the new glue
stick.
• Donotlaytheheatedgunonitsside.Keeptheheated
gun in an upright position, on the metal stand or
workbench, with nozzle pointed down.
• Ifmeltedgluehasescapedfromthemeltchamber
entrance and is interfering with the feed mechanism;
allow gun to cool, and gently remove the obstructing
glue.
• Replacethenozzleifgluedripsexcessively.Donot
attempt to change the nozzle when glue is cold. To
change the nozzle, the gun must be heated until the
glue is softened enough to remove the nozzle (about
1minute).Useglovesandremovetheoldnozzle.
Flush glue through the gun, to clean out the melting
chamber. Replace with a new nozzle. Tighten only until
snug. Do not over tighten.
• Keepoutsideofgluegunclean.
• Donotusegluesotherthanthoserecommendedby
Rapid
• Leavingthetoolswitchedonfortoolongwithoutuse
canleadtorisks.Unnecessaryoverheatingovera
long period of inactivity, without use, depending on
the length of time and type of glue used, can have
adverse effects:
* Melting and softening of the glue stick at the back
of the tool, or even adhesion of the stick in the back
entrance sleeve at the entrance of the heater. In this
case, restarting your tool for subsequent operation
may take longer and be more difficult.
In the event of such a problem, Rapid recommends
that you follow these steps:
- Plug in the tool and leave it heating for around
fifteen minutes.
- Start to push the glue by pressing lightly on the
trigger from time to time. Continue to let the tool
warm up and repeat this action until it unblocks.
The unblocking time may be longer or shorter
depending on: The type and composition of the
glue that would have been used and the duration
for which the tool has been left heating up
unnecessarily, without being used for gluing.
If start-up is still difficult after this action:
- Remove the nozzle, beware with the device being
hot.
-Placethetoolonitsstand.Leaveitpluggedin
and heated.
- Purge the tool by letting the hot glue flow out
under gravity, onto a disposable support
(container, paper, cardboard,..).
- Start to push the glue by pressing lightly on the
trigger from time to time. Continue to let the tool
warm up and repeat this action until it unblocks.
Pull the trigger a few times, to make sure that the
old glue has been completely cleared and the
tool has been completely purged.
* Charring of the glue, depending on the nature and
composition of the glue used, occurs when the
glue remains molten, trapped inside the tool, for too
long. Once charred, the glue will begin to obstruct
the nozzle and thus lead to a glue leakage of glue
towards the back of the tool which in the long-term
can be serious consequences such as a system
blockage at the front or a break in the heating
system.
In this event:
- Remove the nozzle, beware with the device
being hot.
- Placethetoolonitsstand.Leaveitpluggedin
and heated. Purge the tool by letting the hot glue
flow out under gravity, onto a disposable support
(container, paper, cardboard,..).
- Insert a new glue stick, pushing lightly on the
trigger.
- Pull the trigger a few times, to make sure that the
old glue has been completely cleared and the
tool has been completely purged.
- Replace the nozzle with a new one.
• Inanycase,youshouldnever:
- Force the trigger before the tool has heated up to its
working temperature
- Push hard on the glue stick, never attempt to remove
it from the back.
• Repairworkonthegluegunshouldbecarriedoutby
qualified staff only.
• Ifthepowersupplycableisdamageditmustbe
replaced by the manufacturer, the manufacturer’s after
sales service or a similarly qualified person in order to
avoid any danger.
Temperature control Changing Nozzle
6
Electric wiring diagram
Warranty and repairs under warranty
Warranty period: This product is guaranteed for 1 year
from the date of purchase (original sales receipt acting
as proof).
Warranty conditions: All points mentioned in this
document must have been fully adhered to.
Warranty repairs: The Esselte-Rapid After-Sales
Service is the only approved service to carry out warranty
repairs on this tool.
In the event of a claim under the warranty:
1 Return the product in its original packaging to the
shop or outlet that supplied you with this product,
2 Accompany the returned product with the original
dated receipt.
Any breach of one of these points would prevent
consideration by RAPID under the manufacturer’s
warranty.
picture needed
TS
Heating
Heating
Fuse
Thermostat
ON/OFF Switch AC 220~240V
220-240V 200W
220-240V 200W
PISTOLET À COLLE ÉLECTRIQUE: EG380
Notice technique
Caractéristiques techniques
Dimensions(LxHxP) 36x24x8cm
Poids : 1.7 kg
Tension de service : 220 V-240V~, 50 Hz
Consommation électrique : 400 W
Température : 140° - 220 °C
Régulation : Thermostat
Bâtons de colle : Rapid Ø 12 mm
Caractéristiques particulières
• Poignéeincassableetpoidsléger
• Gâchetteuniquesanseffort,avecpoignéeTPR
circulaire pour une utilisation longue durée confortable

• Réglagedelatempératurede140à220°C
Consignes de sécurité
Lisez attentivement les règles et
consignes de sécurité avant d’utiliser
cet appareil.
• Cetappareiln’estpasdestinéàl’usage
des personnes (enfants y compris) aux capacités
physiques, sensorielles ou mentales réduites, ou
qui manquent d’expérience et de connaissances, à
moins qu’ils soient sous la surveillance ou instruits sur
l’utilisation de l’appareil par une personne responsable
deleursécurité.Lesenfantsdoiventêtresurveillés
afin de s’assurer qu’ils ne jouent pas avec l’appareil.
• N’utilisezpasetnestockezpascetappareildansun
environnement humide. Ne le placez pas où il peut
êtreéclaboussépardel’eau.Nel’exposezpasà
desvariationsdetempératureextrêmespendantou
immédiatement après son utilisation.
• Utilisez-leseulementàl’intérieursurunesurface
detravailpropreetsèche.Lapoussièreetlasaleté
excessives peuvent réduire la durée de vie de cet
outil.
• Nedébranchezjamaisl’appareilentirantsurlecâble.
• Silecâbleélectriqueestendommagéoucoupé,
retirez immédiatement la fiche de la prise électrique
etn’utilisezpasl’appareil.Ildoitêtreremplacépar
le fabricant ou son agent de service, ou par une
personne qualifiée similaire, afin d’éviter un risque.
• Débranchezl’appareils’iln’estpasutilisé,avanttoute
opération d’entretien (réparation, nettoyage, etc.)
• Vérieztoujoursquel’appareilestbranchéàuneprise
mise à la terre.
• Sivousutilisezunerallongeélectrique,vériezson
bon état de marche et que sa prise est reliée à la
terre.
• N’utilisezjamaisl’outils’ilestendommagédequelque
façon que ce soit.
• N’insérezjamaisd’objetsautresquelesbâtonsde
colle Rapid Ø12 mm dans l’appareil.
• Neretirezjamaisunbâtondecolledéjàinséré.
• L’adhésifEVApeutêtrestockéindénimentdansle
pistoletnonchaufféetêtrerefonduenchauffantl’outil.
Utilisezuniquementlesadhésifsrecommandésdans
ce pistolet à colle.
• Ilestnormalquecetoutildeviennerelativementchaud
pendant l’utilisation. Cette situation est tout à fait
normale et n’est pas le signe d’une anomalie.

Other Rapid Glue Gun manuals

Rapid LITHION BGX300 User manual

Rapid

Rapid LITHION BGX300 User manual

Rapid LITHION BGX300 User manual

Rapid

Rapid LITHION BGX300 User manual

Rapid BGX7 User manual

Rapid

Rapid BGX7 User manual

Rapid HOBBY User manual

Rapid

Rapid HOBBY User manual

Rapid EG130 User manual

Rapid

Rapid EG130 User manual

Rapid BGX7 User manual

Rapid

Rapid BGX7 User manual

Rapid G1000 User manual

Rapid

Rapid G1000 User manual

Rapid EG313 User manual

Rapid

Rapid EG313 User manual

Rapid EG320 User manual

Rapid

Rapid EG320 User manual

Rapid BGC500 User manual

Rapid

Rapid BGC500 User manual

Rapid LCD 19 User manual

Rapid

Rapid LCD 19 User manual

Rapid EG Point User manual

Rapid

Rapid EG Point User manual

Rapid BGX500 User manual

Rapid

Rapid BGX500 User manual

Rapid BGX7 User manual

Rapid

Rapid BGX7 User manual

Rapid EG310 Operating instructions

Rapid

Rapid EG310 Operating instructions

Rapid EG130 User manual

Rapid

Rapid EG130 User manual

Rapid EG Point User manual

Rapid

Rapid EG Point User manual

Rapid LITHION BGX300 User manual

Rapid

Rapid LITHION BGX300 User manual

Rapid EG330 User manual

Rapid

Rapid EG330 User manual

Rapid EG360 User manual

Rapid

Rapid EG360 User manual

Rapid EG111 Operating instructions

Rapid

Rapid EG111 Operating instructions

Popular Glue Gun manuals by other brands

GÜDE HP-39004 Translation of the original instructions

GÜDE

GÜDE HP-39004 Translation of the original instructions

STEINEL MobileGlue 3011 manual

STEINEL

STEINEL MobileGlue 3011 manual

Cleopatre POPCPP Care and use instructions

Cleopatre

Cleopatre POPCPP Care and use instructions

TREND T60 manual

TREND

TREND T60 manual

VONROC GG501AC Original instructions

VONROC

VONROC GG501AC Original instructions

Parkside PNKP 105 B1 Translation of the original instructions

Parkside

Parkside PNKP 105 B1 Translation of the original instructions

Parkside PNKP 105 A1 Operation and safety notes

Parkside

Parkside PNKP 105 A1 Operation and safety notes

Westfalia KL 1011B instruction manual

Westfalia

Westfalia KL 1011B instruction manual

DeWalt dC540 instructions

DeWalt

DeWalt dC540 instructions

TEC 305-12 operating instructions

TEC

TEC 305-12 operating instructions

Arrow GT30LI manual

Arrow

Arrow GT30LI manual

Topex 42E522 manual

Topex

Topex 42E522 manual

Graco GC-1402 user manual

Graco

Graco GC-1402 user manual

Draper CGG1 instructions

Draper

Draper CGG1 instructions

Parkside PHP 500 B2 Operation and safety notes

Parkside

Parkside PHP 500 B2 Operation and safety notes

Harbor Freight Tools Bauer 21505C-B Owner's manual & safety instructions

Harbor Freight Tools

Harbor Freight Tools Bauer 21505C-B Owner's manual & safety instructions

xtegra Stickfast GX80 operating instructions

xtegra

xtegra Stickfast GX80 operating instructions

Bosch gluepen Original instructions

Bosch

Bosch gluepen Original instructions

manuals.online logo
manuals.online logoBrands
  • About & Mission
  • Contact us
  • Privacy Policy
  • Terms and Conditions

Copyright 2025 Manuals.Online. All Rights Reserved.