Roto ZRV M User manual

Montageanleitung
Mounting instructions
ZRV M
616558-00
ZVR-M.book Seite 0 Montag, 10. Dezember 2012 4:31 16

ZVR-M.book Seite 1 Montag, 10. Dezember 2012 4:31 16

1
!
1
2
Deutsch..................................................................................... 2
English ...................................................................................... 3
Français..................................................................................... 4
. ................................................................................................ 6
ZVR-M.book Seite 1 Montag, 10. Dezember 2012 4:31 16

2
Allgemeine Sicherheitshinweise
• Diese Anleitung vor Montage und Gebrauch sorgfältig
durchlesen und alle Hinweise beachten!
• Dafür sorgen, dass diese Anleitung allen Benutzern zu-
gänglich ist.
• Diese Anleitung bis zur Entsorgung des Produkts sorgfältig
aufbewahren.
• Diese Anleitung bei einem Besitzerwechsel an den neuen
Besitzer weitergeben.
Bestimmungsgemäße Verwendung
Das Verdunkelungsrollo ist bestimmt zum Einsatz im Innen-
bereich und zur Verdunkelung von Innenräumen.
Es darf ausschließlich an den dafür vorgesehenen Roto-
Wohndachfenster-Typen montiert und eingesetzt werden.
Das Verdunkelungsrollo schützt vor seitlichem Lichteinfall.
Die Dessins sind lichtundurchlässig, bieten aber keine
100%ige Dunkelheit (im physikalischen Sinne).
Bei einem textilen Behang, wie er beim Verdunklungsrollo
eingesetzt wird, kann es zu leichter Wellenbildung im Rand-
bereich und einem geringen indirekten Lichteinfall kommen.
Dies deutet nicht auf ein fehlerhaftes Produkt hin.
Auspacken / Lieferumfang prüfen
(Bild A1)
⚠Erstickungsgefahr!
Kunststoffteile, Styroporteile, Schrauben, Klein-
teile usw. können für Kinder zu einem gefähr-
lichen Spielzeug werden.
> Verpackungsmaterial und Montageinhalt nicht achtlos
liegen lassen und von Kindern und Kleinkindern fern-
halten.
• Verpackungsmaterial (Karton, Styropor, Kunststoffbeutel)
bitte entsprechend den örtlichen
Bestimmungen entsorgen.
• Beim Auspacken und Montieren mit sauberen Händen
oder mit Handschuhen arbeiten, um den Behang nicht zu
verschmutzen.
• Bitte den Lieferumfang prüfen. Falls Teile fehlen, beim
Fachhändler nachfragen.
• Bei der Schraubhilfe (Bild A1, Teil K) handelt es sich um
ein Hilfsmittel, nicht um ein zu montierendes Teil.
Werkzeuge / Hilfsmittel bereitlegen
(Bild A2)
• Kreuzschlitz-Schraubendreher, PZ1
• Bei Bedarf: stabile Aufstiegshilfe (Stehleiter)
• Schraubhilfe (Bild A1, Teil K)
Montage
(Bild 1-6)
⚠Sturzgefahr!
> Nur Aufstiegshilfen mit festem Stand, genügend Halt
und ausreichend hoher Tragkraft benutzen!
> Nicht aus dem Wohndachfenster lehnen.
⚠Verletzungsgefahr durch herunterfallende Bau-
teile!
> Zur Montage ausschließlich mitgeliefertes und dem
Fensterrahmenmaterial entsprechendes Befestigungs-
material verwenden.
> Werkzeug, Bauteile und Befestigungsmaterial niemals
auf Aufstiegshilfen ablegen.
> Kinder vom Montageort fernhalten.
Einstellung
(Bild 7)
Nach der Montage ist keine Einstellung erforderlich. Die
Spannung der Schnur ist bereits werksseitig voreingestellt.
Falls die Griffleiste des Verdunkelungsrollos nicht parallel zur
Kassette steht, muss die Griffleiste einmalig ausgerichtet
werden:
• Griffleiste ganz öffnen (zur Kassette hin schieben) und erst
dann komplett schließen.
Bedienung
(ohne Bild)
• Verdunkelungsrollo in der Mitte des Griffs anfassen und
auf die gewünschte Position schieben.
Es bleibt in jeder Position stehen.
Pflege und Wartung
Für eine lange Lebensdauer empfehlen wir, die Aluminium-
Oberfläche des Produkts mindestens einmal pro Jahr zu rei-
nigen.
• Aluminium-Oberfläche nur mit einem feuchten Tuch abwi-
schen.
• Den Rollo-Behang vorsichtig abbürsten.
Nachspannen der Schnur
(Bild B1-B4, hinterer Anleitungsteil)
Die Schnüre in der Führungsschiene können sich nach län-
gerem Gebrauch etwas ausdehnen und damit die Funktion
des Rollos beinträchtigen. Wenn das Rollo sich selbstständig
öffnet, sollten die Schnüre nachgespannt werden.
Ersatzteile, Verschleißteile,
Reparatur
(Bild A1)
> Ausschließlich Original- Ersatz- und Verschleißteile des
Herstellers verwenden.
> Reparatur ausschließlich von einem Fachbetrieb
durchführen lassen.
Demontage und Entsorgung
(ohne Bild)
Ausgediente Verdunkelungsrollos oder Bauteile gehören
nicht in den Hausmüll.
• Bitte entsprechend den örtlichen Bestimmungen entsor-
gen.
Deutsch
ZVR-M.book Seite 2 Montag, 10. Dezember 2012 4:31 16

!
3
General safety instructions
• Read this manual carefully before installing and operating
the device and follow all instructions.
• Ensure that this manual is accessible to all users.
• Keep this manual in a safe place until you dispose of the
product.
• If the product changes hands, pass this manual on to the
new owner.
Intended use
The blackout blind is intended for indoor use and for blacking
out rooms.
It may only be installed and used on the Roto skylight types
designed for their use.
The blackout blind protects against laterally incident light.
The patterns are opaque but do not to black out the room
completely (in a physical sense).
Fabric blinds, such as those used for black-out roller blinds,
may become slightly wavy at the edges, allowing light to
pass through laterally. This is not a product fault.
Unpacking/checking the scope of delivery
(Fig. A1)
⚠Risk of suffocation!
Plastic parts, polystyrene, screws, small parts,
etc., can be very dangerous for children to play
with.
> Do not leave the packaging material and installation
parts lying around, and keep away from children and
toddlers.
• Please dispose of the packaging material (cardboard, polysty-
rene, plastic bag) according to local regulations.
• When unpacking and installing the device, work with clean
hands or with gloves to avoid soiling the product.
• Please check the scope of delivery. If parts are missing,
consult a dealer.
• The screwing aid (Fig. A1, part K) is a tool and not an in-
stallable part.
Preparing tools/aids
(Fig. A2)
• Cross-head screwdriver, PZ1
• If needed: stable climbing equipment (step ladder)
• Screwing aid (Fig. A1, part K)
Installation
(Fig. 1-6)
⚠Risk of falling!
> Only use climbing equipment that is resting on a solid
foundation and that offers good support and high car-
rying capacity.
> Do not lean out of the skylight.
⚠Risk of injury from falling components!
> To mount the product, only use fixing materials that
were included in the delivery and that are suitable for
the window frame material.
> Never place tools, components and fixing materials on
the climbing equipment.
> Keep children away from the installation site.
Settings
(Fig. 7)
Settings are not required after installation. The cord tension
is preadjusted at the factory.
If the handle rail of the blackout blind is not parallel to the
cassette, the handle rail must be aligned once.
• Open the handle rail fully (slide it toward the cassette) and
then close it completely.
Operation
(no figure)
• Hold the blackout blind at the centre of the handle and slide it
to the desired position. It stops in any position.
Care and maintenance
To ensure a long life, we recommend you clean the alumi-
nium surface of the product at least once a year.
• Wipe the aluminium surface with a moist cloth only.
• Carefully brush off the blind.
Tensioning the cord
(Fig. B1-B4, back of the manual)
The cords in the guide rail may stretch after long-term use
and cause the blind to function improperly. If the blind opens
on its own accord, the cords should be retensioned.
Spare parts, wear parts, repair
(Fig. A1)
> Only use original spare and wear parts from the manuf-
acturer.
> If you the blind should only be repaired by a blinds spe-
cialist.
Dismantling and disposal
(no figure)
Used blackout blinds or components should not be discar-
ded with the household waste.
• Please dispose of the parts as required by local regulations.
English
ZVR-M.book Seite 3 Montag, 10. Dezember 2012 4:31 16

4
Consignes générales de sécurité
• Lire entièrement et attentivement ces instructions avant la
pose et l'utilisation et respecter toutes les consignes.
• Veiller à ce que ces instructions restent accessibles à tous
les utilisateurs.
• Conserver soigneusement ce manuel jusqu'à élimination
du produit.
• Confier ces instructions au nouveau propriétaire en cas de
transmission du produit.
Utilisation conforme
Le store occultant est destiné à une utilisation à l'intérieur et
pour occulter des pièces fermées.
Il est prévu exclusivement pour une pose et une utilisation
sur des fenêtres de toit ROTO.
Le store occultant protège contre une incidence latérale de la
lumière. Les motifs sont opaques, mais ne garantissent pas
une obscurité à 100% (au sens physique).
Lorsqu'il s'agit d'une toile textile comme celles qui sont mon-
tées sur un store d'occultation, de légères ondulations peu-
vent se former sur les bords du store et la lumière peut être
légèrement indirecte. Ceci n'indique pas que le produit est
défectueux.
Déballage / contrôle du contenu de la
livraison
(Figure A1)
⚠Risque d'étouffement !
Les pièces en plastique, en polystyrène, les vis,
les petites pièces, etc. peuvent être dangereuses
pour les enfants s'ils jouent avec.
> Ne pas laisser traîner les emballages et le matériel de
pose et les tenir hors de la portée des enfants.
• Eliminer le matériel d'emballage (carton, polystyrène, sacs
de plastique) conformément aux dispositions locales.
• Travailler avec les mains propres ou des gants lors du dé-
ballage et la pose afin de ne pas salir le store.
• Contrôler le contenu de la livraison. Si des pièces man-
quent, contacter le service agréé.
• L'auxiliaire de vissage (Fig. A1, pièce K) est un accessoire
et non une pièce à monter.
Préparation des outils et accessoires
(Figure A2)
• Tournevis cruciforme, PZ1
• Si nécessaire : aide à la montée (échelle d'appui)
• Auxiliaire de vissage (Fig. A1, pièce K)
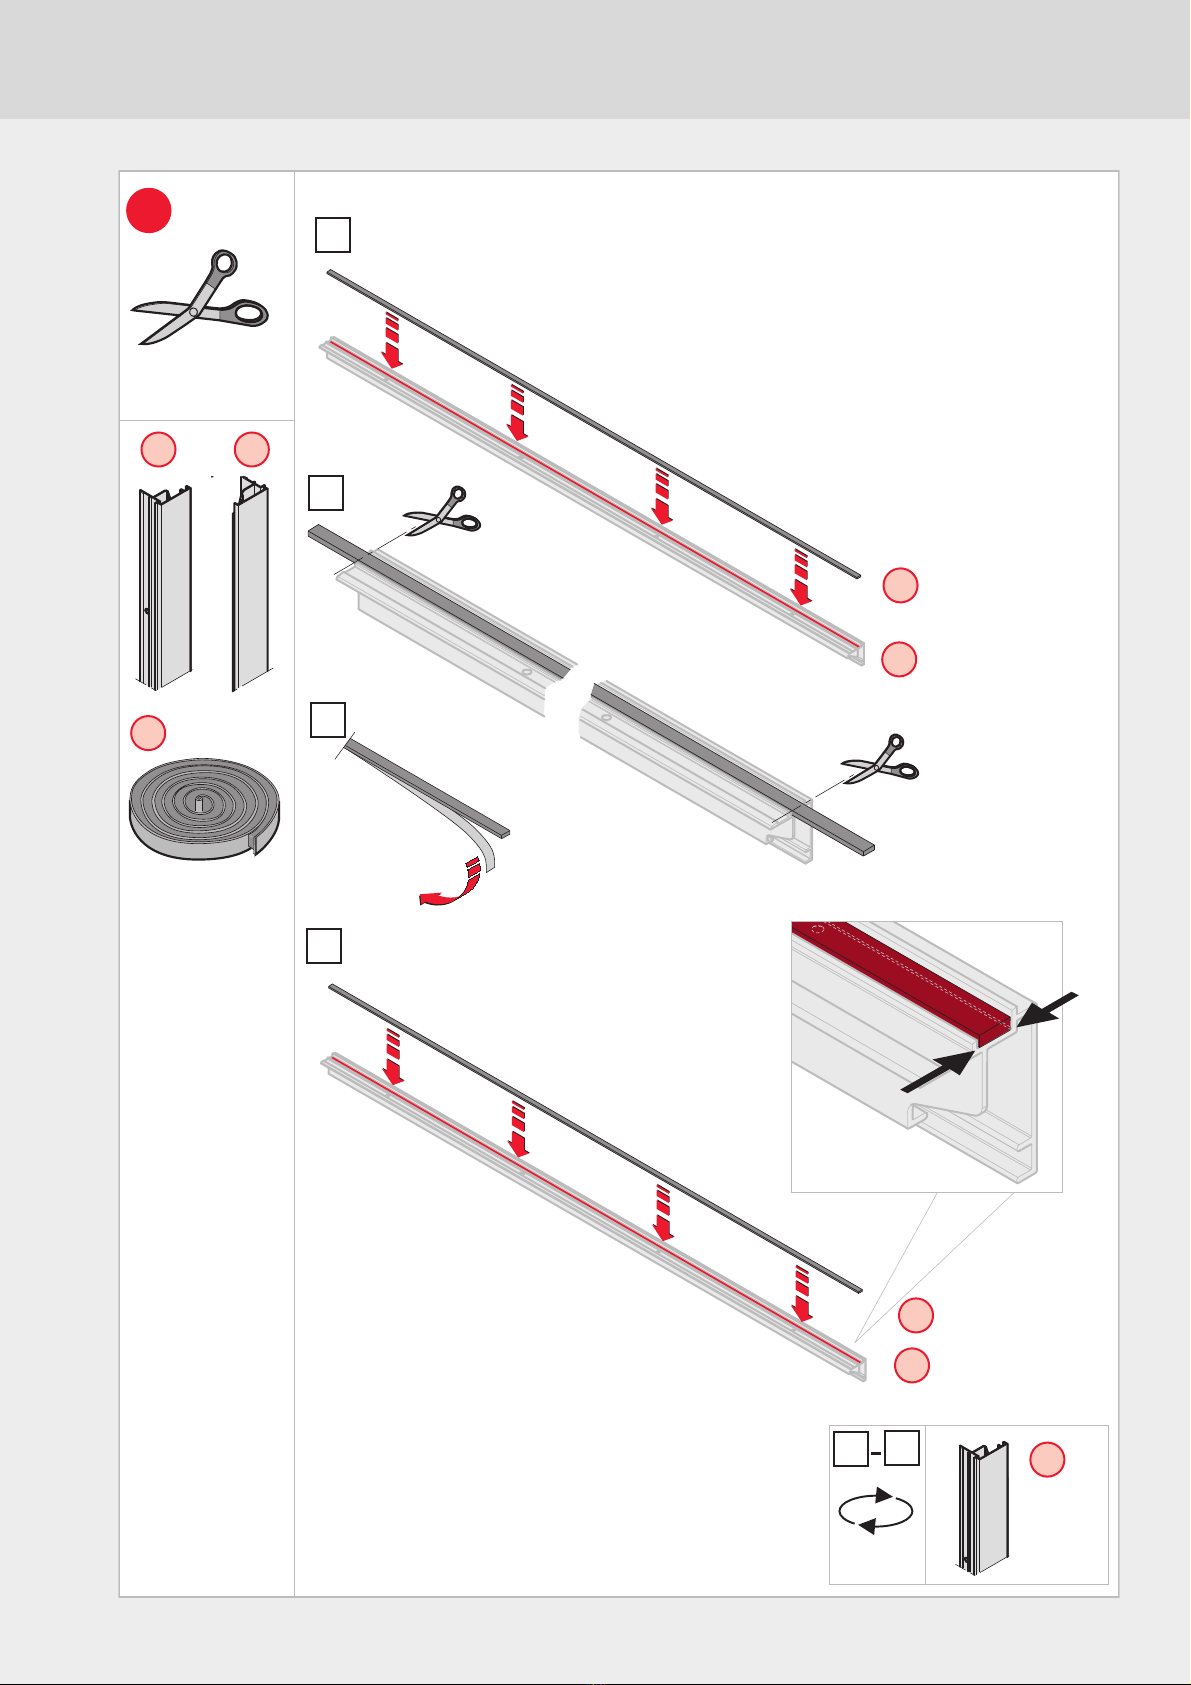
Pose
(Fig. 1-6)
⚠Risque de chute !
> N'utiliser que des aides à la montée stables, et offrant
un appui et une force de portée suffisants.
> Ne pas s'appuyer à la fenêtre de toit.
⚠La chute de pièces représente un risque de
blessure !
> Utiliser exclusivement le matériel livré et un matériel de
fixation adapté au matériel du cadre de la fenêtre.
> Ne jamais déposer d'outils et de matériel de fixation sur
les aides à la montée.
> Tenir les enfants à l'écart de l'emplacement de pose.
Réglage
(Fig. 7)
Aucun réglage n'est nécessaire une fois la pose terminée. La
tension du cordon a déjà été réglée en usine.
Si la baguette de tirage du store occultant ne s'aligne pas par-
allèlement par rapport au caisson, il faudra l'aligner. Cette
opération est unique :
• Il faut ouvrir le store complètement (tirer la baguette de ti-
rage vers le caisson) avant de le fermer complètement.
Manœuvre
(sans illustration)
• Prendre le store occultant par le milieu de la poignée et le
tirer dans la position souhaitée.
Il reste alors dans cette position.
Entretien et maintenance
Afin de garantir la longévité du store à enroulement, nous
vous recommandons de nettoyer régulièrement la surface en
aluminium du produit, et ceci au moins une fois par an.
• Essuyer la surface en aluminium avec un chiffon humide.
• Brosser la toile du store avec précaution.
Correction de la tension du cordon
(Fig. B1 à B4, à la fin des instructions)
Les cordons dans les coulisses peuvent se distendre quelque
peu au bout d'une utilisation prolongée et compromettre
ainsi le fonctionnement du store. Si le store s'ouvre de lui-
même, il faut retendre les cordons.
Pièces de rechange, pièces d'usure,
réparation
(Fig. A1)
> Utiliser exclusivement les pièces de remplacement et
d'usure d'origine du fabricant.
> Faire réaliser les réparations exclusivement par un ser-
vice agréé.
Dépose et élimination
(sans illustration)
Ne pas jeter les stores occultants usagés ou ses composants
dans les ordures ménagères.
• L'éliminer conformément aux prescriptions locales.
Français
ZVR-M.book Seite 4 Montag, 10. Dezember 2012 4:31 16

!
5
ZVR-M.book Seite 5 Montag, 10. Dezember 2012 4:31 16

6
A
B
C
D
E
K
F
G
I
J
H
4x
Ø3x16
Ø3x12
Ø3x10
Ø3x10
1x
A1
L8x
J
1x
A2
.
ZVR-M.book Seite 6 Montag, 10. Dezember 2012 4:31 16

7
H
A
H
A
1
1.
2.
4.
3.
+1cm+1cm
ZVR-M.book Seite 7 Montag, 10. Dezember 2012 4:31 16

8
H
2
1.
1.
2.
3.
4.
4.
G
H
G
H
F
FG
ZVR-M.book Seite 8 Montag, 10. Dezember 2012 4:31 16

9
BC
C
I4x
Ø3x16
3
B
1.
1.
2.
2.
C
I
41.
2.3.
4.
A
A
J2x
JJ
Ø3x10
ZVR-M.book Seite 9 Montag, 10. Dezember 2012 4:31 16

10
5
1.
1.
6
FG
G
1.2.
3.
G
5.
4.
G
ZVR-M.book Seite 10 Montag, 10. Dezember 2012 4:31 16

11
7
K
K
L
L
4x
Ø3x12
1.
2.
0
G
54
F
8
1.
D E
D
1.
E
click
ZVR-M.book Seite 11 Montag, 10. Dezember 2012 4:31 16

12
==
1.
2.
9
ZVR-M.book Seite 12 Montag, 10. Dezember 2012 4:31 16

13
ZVR-M.book Seite 13 Montag, 10. Dezember 2012 4:31 16

14
B1
D
E
?
!
B2
1.
F
1.
G
ZVR-M.book Seite 14 Montag, 10. Dezember 2012 4:31 16

15
B3
1.3.
F
3.
G
1.
2.
G
B4
1.
1.
86
≤ 5 cm
Bi l dbl ock.fm Seite15 Donnerstag, 11. Apri l 2013 2: 28 14

16
ZJE.book Seite 38 Montag, 10. Dezember 2012 3:27 15

17
ZJE.book Seite 39 Montag, 10. Dezember 2012 3:27 15

* 0,14 EUR / Min. aus dem dt. Festnetz. Mobilfunkpreise können abweichen.
2013.06. VR
+39 0421 618 211
+39 0421 618 455
www.roto-frank.it
+33 (0)387 29 24 30
+33 (0)387 91 49 01
www.roto-frank.fr
+ 32 (0)67 89 41 30
+ 32 (0)67 89 41 72
www.roto-frank.be
+44 (0) 1788 558 600
+44 (0) 1788 558 606
www.roto-frank.co.uk
+ 31 (0)800 0232 114
+ 31 (0)800 0232 116
www.roto-frank.nl
+48 81 855 05 22-25
+48 81 855 05 28
www.roto.pl
+420 272 651 428
+420 271 750 187
www.roto-frank.cz | .sk
+36 99 511 686/687
+36 99 511 688
www. roto.hu
(+351) 236 218 072
(+351) 236 215 289
www.imporjan.com
+30 231 0796 950
+30 231 0796 783
www.eurotechnica.gr
+43 (0)2 75 42 11 99
+43 (0)2 75 42 11 99 50
www.roto-frank.at | .si
+ 90 216 57 39 692
+ 90 216 57 23 148
+353 (0)6 75 07 00
+353 (0)6 73 46 31
www.careyglass.com
+41 (0)44 267 47 47
+41 (0)44 267 47 46
www.roto-dachfenster.ch
+49 (0)1805 90 50 51
*
+49 (0)1805 90 40 51
www.roto-frank.com
+38 513 490 360
www.supera.hr
rotoinfo.ee@roto-frank.com
www.roto.ee
rotoinfo.[email protected]
www.roto.lv
info.lt@roto-frank.com
www.roto.lt
+7 495 287 35 20
Kaliningrad
+7 906 234 88 88
+7 495 287 35 24
www.roto.ru
+38 044 566 73 37
+38 044 566 78 78
www.roto.ua
+40 31 2281 5 86
+40 31 2281 5 89
www.roto-romania.ro
+34 98 152 69 39
www.rototejado.com
+375 17 258 54 05
+375 17 258 57 65
+375 17 258 81 71
www.roto.by
+359 889 93 96 96
+359 32 55 01 99
www.buldach.com
ROTHISPANIA S. L. U. MIZOL LTD
VTI-Invest
Rueckseite.fm Seite 16 Mittwoch, 12. Juni 2013 5:12 17
Table of contents
Other Roto Window Blind manuals

Roto
Roto ZFA M 6 H/K Series User manual

Roto
Roto ZJA M User manual

Roto
Roto ZRV M 43 H/K Series User manual

Roto
Roto ZAR M 73 User manual

Roto
Roto ZRO E WDF 73 6 Series User manual

Roto
Roto ZAR M 73 Series User manual

Roto
Roto ZAR User manual

Roto
Roto ZAR M R4/R7 User manual

Roto
Roto ZRO E User manual

Roto
Roto ZJA M User manual
Popular Window Blind manuals by other brands

Lippert
Lippert Solera 5000 Series installation manual

SELT
SELT Venetian Blind C50 Slim Technical and Operational Documentation

MHZ
MHZ DUETTE Care Instructions

Bettio
Bettio MOOVICA Instructions for use and maintenance

POWERSHADES
POWERSHADES FLAT FABRIC CASSETTE installation guide

LuxaFlex
LuxaFlex Vertical Blinds Mounting instructions