manuals.online logo
Brands
  1. Home
  2. •
  3. Brands
  4. •
  5. Saxby Lighting
  6. •
  7. Lighting Equipment
  8. •
  9. Saxby Lighting RULAR CCT User manual

Saxby Lighting RULAR CCT User manual

www.saxbylighting.com
Instruction manual
91945
RULAR CCT
Saxby Lighting. BH17 7BY
V1 10/12/2019
We recommend cleaning with a soft dry cloth. Do not use solvents or abrasive cleaners as these could damage the finish.
Live Voltages may be present in this unit even when turned off or when completely disconnected. For your safety,
always switch off the power supply before cleaning.
Care and Safety
Technical data
240 V~, 50 Hz
Supply
Voltage:
Bulb
Type: 41W LED module (SMD) CCT, 3000/4000/6000K
Conformity with all relevant EC Directive requirements.
Waste electrical products should not be disposed of with household waste. Please recycle where facilities
exist. Check with your Local Authority or local store for recycling advice.
This product is rated at IP20
IP
20
The LEDs in this fitting are non-replaceable. If any damage occurs this fitting should be discarded.
This is a Class 1 product and must be earthed.
Warning
Please read these instructions carefully before commencing any work.
This unit must be fitted by a competent and qualified electrician.
Check the pack and make sure you have all the parts listed.
Install in accordance with the IEE Wiring regulations and current Building Regulations.
To prevent electrocution switch off at mains supply before installing or maintaining this fitting. Ensure other persons cannot
restore the electrical supply without your knowledge. If you are in any doubt, please consult a qualified electrician..
If replacing an existing fitting, make a careful note of the connections.
This product is not dimmable.
This product is rated at IP20.
This light fitting contains non-replaceable parts and cannot be serviced. If damage occurs the part should be discarded.
Waste electrical products should not be disposed of with household waste. Please recycle where facilities exist. Check with
your local authority or retailer for recycling advice.
Thank you for purchasing this light fitting. Please read the instructions carefully before use to ensure safe and satisfactory
operation of this product. Please retain these instructions for future reference.
Layout
This product can be installed on the ceilling or wall.
Ensure the ceiling or wall is capable of holding the weight of the product.
Installation
Having correctly identified the wiring from your existing light fitting, connect to the connection block inside the
product in the following way:
Wiring
You have to correctly identified the wires.
The connections are tight.
No loose strands have been left out of the connection block.
Check that...
This is a class 1 product and must be earthed.
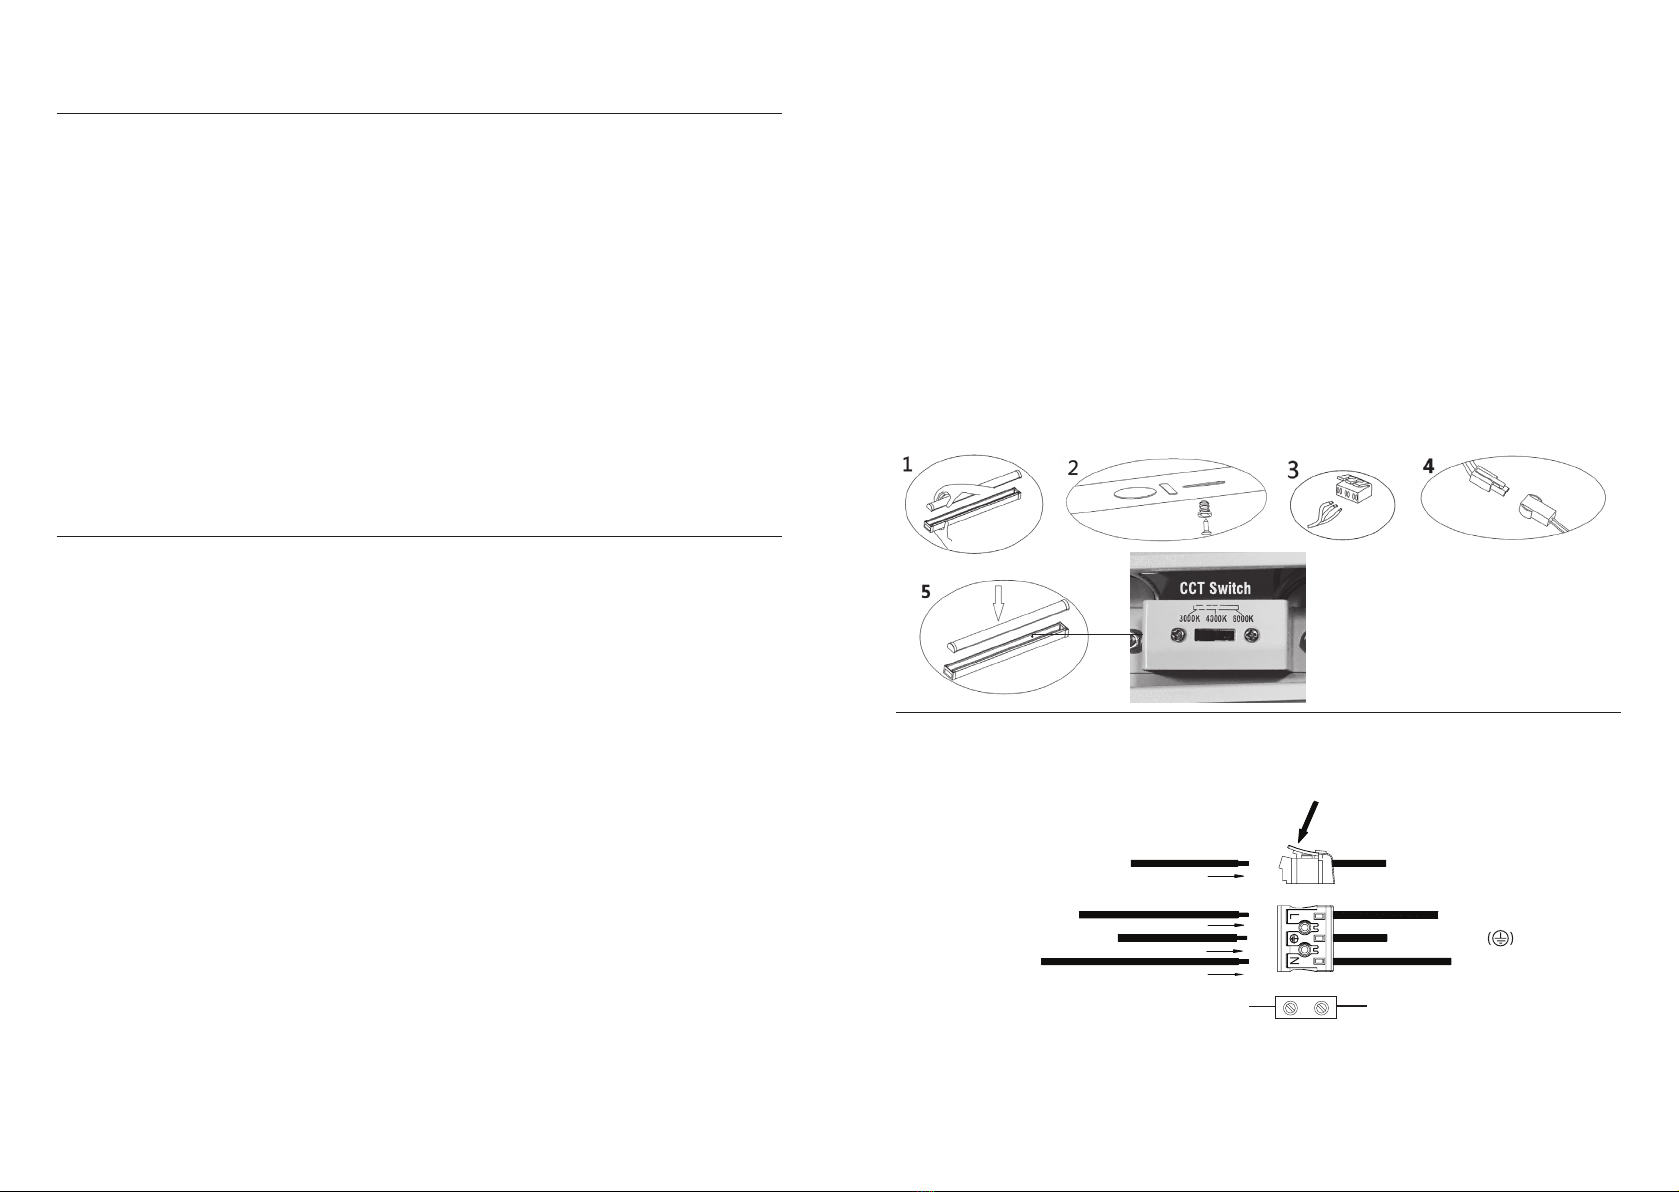
This product is colour changing and can be either warm white (3000K) or cool white(4000K) or daylight white (6000K).
Choose your preferred colour before installing by using the switch in the product.
SUPPLY
Loop Loop
Spare block supplied in fixing pack
Brown(L)
Blue(N)
Green / Yellow
Neutral
Switched Live
Earth (Green/Yellow)
LIGHT FITTING
Existing fittings must be completely removed before installation of a new product. Before removing the existing fitting,
carefully note the position of each set of wires.
• Starting from one end and working along, remove the LED diffuser unit by gently squeezing the sides of the metal body and
lifting off the diffuser unit to one side.
• Hold the product in place and mark the position of the fixing holes, This may require the help of an assistant. If wall mounting,
ensure that the product is level.
• Ensure the ceiling or wall is capable of holding the weight of the product, Take care to avoid damaging any concealed wiring
and pipes. The correct fixings should be used for brick, cavity walls or plasterboard.
• Connect the supply cable to the quick fit terminal block as wiring diagram.
• Connect the LED driver output cable to the LED diffuser unit, Ensuring it is securely clipped together.
• Refit the LED diffuser unit by clipping it into place ensuring the sides are aligned with the body.
Take care not to trap any cables.
• Replace fuse or circuit breaker and switch on. Your light is now ready for use.

This manual suits for next models

1

Other Saxby Lighting Lighting Equipment manuals

Saxby Lighting Lucca Wall 67176 Manual

Saxby Lighting

Saxby Lighting Lucca Wall 67176 Manual

Saxby Lighting Odyssey Spike User manual

Saxby Lighting

Saxby Lighting Odyssey Spike User manual

Saxby Lighting 10430 Manual

Saxby Lighting

Saxby Lighting 10430 Manual

Saxby Lighting 13801 User manual

Saxby Lighting

Saxby Lighting 13801 User manual

Saxby Lighting Reeve Connect Batten Series Manual

Saxby Lighting

Saxby Lighting Reeve Connect Batten Series Manual

Saxby Lighting Flexline 73670 Manual

Saxby Lighting

Saxby Lighting Flexline 73670 Manual

Saxby Lighting 73721 Manual

Saxby Lighting

Saxby Lighting 73721 Manual

Saxby Lighting Sight Twin Spot Manual

Saxby Lighting

Saxby Lighting Sight Twin Spot Manual

Saxby Lighting HeroPro CCT Emergency User manual

Saxby Lighting

Saxby Lighting HeroPro CCT Emergency User manual

Saxby Lighting Aqualine Kit Manual

Saxby Lighting

Saxby Lighting Aqualine Kit Manual

Saxby Lighting 108750 User manual

Saxby Lighting

Saxby Lighting 108750 User manual

Saxby Lighting shieldLED 400 Manual

Saxby Lighting

Saxby Lighting shieldLED 400 Manual

Saxby Lighting EL-20079 Manual

Saxby Lighting

Saxby Lighting EL-20079 Manual

Saxby Lighting 101626 User manual

Saxby Lighting

Saxby Lighting 101626 User manual

Saxby Lighting Orion20 User manual

Saxby Lighting

Saxby Lighting Orion20 User manual

Saxby Lighting Sight ECO User manual

Saxby Lighting

Saxby Lighting Sight ECO User manual

Saxby Lighting Tribeca Wall Manual

Saxby Lighting

Saxby Lighting Tribeca Wall Manual

Saxby Lighting Flexline Kit Manual

Saxby Lighting

Saxby Lighting Flexline Kit Manual

Saxby Lighting 43787 Manual

Saxby Lighting

Saxby Lighting 43787 Manual

Saxby Lighting Sight Plus User manual

Saxby Lighting

Saxby Lighting Sight Plus User manual

Saxby Lighting 43810 Manual

Saxby Lighting

Saxby Lighting 43810 Manual

Saxby Lighting Sight 3 in 1 Manual

Saxby Lighting

Saxby Lighting Sight 3 in 1 Manual

Saxby Lighting 1818PIR Manual

Saxby Lighting

Saxby Lighting 1818PIR Manual

Saxby Lighting Icarus Twin Wall EL-40054 Manual

Saxby Lighting

Saxby Lighting Icarus Twin Wall EL-40054 Manual

Popular Lighting Equipment manuals by other brands

Kogan SMARTERHOME KA52CWCLSWA user guide

Kogan

Kogan SMARTERHOME KA52CWCLSWA user guide

Bowens ESPRIT 2 125 operating instructions

Bowens

Bowens ESPRIT 2 125 operating instructions

Patlite SUPERSLIM ME-A Series installation manual

Patlite

Patlite SUPERSLIM ME-A Series installation manual

Wetelux 92 36 60 Original instruction manual

Wetelux

Wetelux 92 36 60 Original instruction manual

Aseko ASIN Aqua SALT user manual

Aseko

Aseko ASIN Aqua SALT user manual

ML Accessories AX CCT Installation & maintenance manual

ML Accessories

ML Accessories AX CCT Installation & maintenance manual

Federal Signal Corporation Vision SLR installation instructions

Federal Signal Corporation

Federal Signal Corporation Vision SLR installation instructions

ADJ Vizi Spot 5R User instructions

ADJ

ADJ Vizi Spot 5R User instructions

Lightolier Lighting Systems Baselyte-BSL23 Specification sheet

Lightolier

Lightolier Lighting Systems Baselyte-BSL23 Specification sheet

Conrad 77 72 24 operating instructions

Conrad

Conrad 77 72 24 operating instructions

Chroma Cascade user manual

Chroma

Chroma Cascade user manual

NEO TOOLS 30SMD Original user manual

NEO TOOLS

NEO TOOLS 30SMD Original user manual

Commercial Electric CFL65-PC-GR Use and care guide

Commercial Electric

Commercial Electric CFL65-PC-GR Use and care guide

olympia electronics GR-423/12L/MAR quick start guide

olympia electronics

olympia electronics GR-423/12L/MAR quick start guide

Bresser BR-D1200BL instruction manual

Bresser

Bresser BR-D1200BL instruction manual

Quantum ELM Replacement instructions

Quantum

Quantum ELM Replacement instructions

Chauvet DJ Festoon String instructions

Chauvet DJ

Chauvet DJ Festoon String instructions

LIGMAN VANCOUVER 33 installation manual

LIGMAN

LIGMAN VANCOUVER 33 installation manual

manuals.online logo
manuals.online logoBrands
  • About & Mission
  • Contact us
  • Privacy Policy
  • Terms and Conditions

Copyright 2025 Manuals.Online. All Rights Reserved.