manuals.online logo
Brands
  1. Home
  2. •
  3. Brands
  4. •
  5. Saxby Lighting
  6. •
  7. Lighting Equipment
  8. •
  9. Saxby Lighting Regen Manual

Saxby Lighting Regen Manual

This manual suits for next models

1

Other Saxby Lighting Lighting Equipment manuals

Saxby Lighting 75145 Manual

Saxby Lighting

Saxby Lighting 75145 Manual

Saxby Lighting Eris Manual

Saxby Lighting

Saxby Lighting Eris Manual

Saxby Lighting 10430 Manual

Saxby Lighting

Saxby Lighting 10430 Manual

Saxby Lighting SMART IKON User manual

Saxby Lighting

Saxby Lighting SMART IKON User manual

Saxby Lighting Aqualine 24V Manual

Saxby Lighting

Saxby Lighting Aqualine 24V Manual

Saxby Lighting 13801 User manual

Saxby Lighting

Saxby Lighting 13801 User manual

Saxby Lighting HeroPro CCT Microwave Emergency User manual

Saxby Lighting

Saxby Lighting HeroPro CCT Microwave Emergency User manual

Saxby Lighting 81572 User manual

Saxby Lighting

Saxby Lighting 81572 User manual

Saxby Lighting HeroPro CCT Emergency User manual

Saxby Lighting

Saxby Lighting HeroPro CCT Emergency User manual

Saxby Lighting IkonPRO CCT User manual

Saxby Lighting

Saxby Lighting IkonPRO CCT User manual

Saxby Lighting Odyssey Bollards ST501228 User manual

Saxby Lighting

Saxby Lighting Odyssey Bollards ST501228 User manual

Saxby Lighting 76768 Manual

Saxby Lighting

Saxby Lighting 76768 Manual

Saxby Lighting 43787 Manual

Saxby Lighting

Saxby Lighting 43787 Manual

Saxby Lighting Kios 2 User manual

Saxby Lighting

Saxby Lighting Kios 2 User manual

Saxby Lighting ICARUS PIR 2LT WALL User manual

Saxby Lighting

Saxby Lighting ICARUS PIR 2LT WALL User manual

Saxby Lighting 99562 User manual

Saxby Lighting

Saxby Lighting 99562 User manual

Saxby Lighting 73721 Manual

Saxby Lighting

Saxby Lighting 73721 Manual

Saxby Lighting Pillo Plus CCT User manual

Saxby Lighting

Saxby Lighting Pillo Plus CCT User manual

Saxby Lighting SIGHTPRO 108087 User manual

Saxby Lighting

Saxby Lighting SIGHTPRO 108087 User manual

Saxby Lighting 1818PIR Manual

Saxby Lighting

Saxby Lighting 1818PIR Manual

Saxby Lighting Sight Plus User manual

Saxby Lighting

Saxby Lighting Sight Plus User manual

Saxby Lighting 67360 User manual

Saxby Lighting

Saxby Lighting 67360 User manual

Saxby Lighting Odyssey 78667 User manual

Saxby Lighting

Saxby Lighting Odyssey 78667 User manual

Saxby Lighting 79192 User manual

Saxby Lighting

Saxby Lighting 79192 User manual

Popular Lighting Equipment manuals by other brands

Life 39.9F70020C quick start guide

Life

Life 39.9F70020C quick start guide

EuroLite LED ML-20 user manual

EuroLite

EuroLite LED ML-20 user manual

LIGMAN OD-50141 installation manual

LIGMAN

LIGMAN OD-50141 installation manual

Home Accents Holiday 1002461144 instructions

Home Accents Holiday

Home Accents Holiday 1002461144 instructions

Experia IRiS Ripple Light instruction manual

Experia

Experia IRiS Ripple Light instruction manual

Erco Gecko Mounting instructions

Erco

Erco Gecko Mounting instructions

Inter-lux ZTA.100.Surface Installation and maintenance instructions

Inter-lux

Inter-lux ZTA.100.Surface Installation and maintenance instructions

Whelen Engineering Company TN Series installation guide

Whelen Engineering Company

Whelen Engineering Company TN Series installation guide

IKEA BJÖRKSPIREA manual

IKEA

IKEA BJÖRKSPIREA manual

Toolland PM 6640 instruction manual

Toolland

Toolland PM 6640 instruction manual

GTD GTD-LP200 user manual

GTD

GTD GTD-LP200 user manual

LIVARNO home 1105-W-UK manual

LIVARNO home

LIVARNO home 1105-W-UK manual

ProLights EclPar IPMFC user manual

ProLights

ProLights EclPar IPMFC user manual

Velvet EVO Series user manual

Velvet

Velvet EVO Series user manual

IDTOLIGHT GENT installation instructions

IDTOLIGHT

IDTOLIGHT GENT installation instructions

MAYTONI S35 installation manual

MAYTONI

MAYTONI S35 installation manual

MaxLite MLFP14DP4535 user manual

MaxLite

MaxLite MLFP14DP4535 user manual

SLV Elektronik 550621 instruction manual

SLV Elektronik

SLV Elektronik 550621 instruction manual

manuals.online logo
manuals.online logoBrands
  • About & Mission
  • Contact us
  • Privacy Policy
  • Terms and Conditions

Copyright 2025 Manuals.Online. All Rights Reserved.

Regen Tape 5m IP65
79317, 79318
Instruction leaflet
Care and Safety
Accessories
•We recommend cleaning with a soft dry cloth. Do not use solvents or abrasive cleaners as these could
79324 (IP44)
79327 (IP44)
79326
damage the LED’s.
•For your safety, always switch off the power supply before cleaning.
•For LED strips and connectors: just push together to connect - use supplied brackets to secure
to mounting surface.
•Use the supplied silicone sealant and plastic sleeves to seal the connecting joints and ends of the
LED strips to maintain IP44 protection. But LED strip are still IP65 protection.
WWW.saxbylighting.com Saxby lighting. BH17 7BY
79325 (IP44)
V3 08/01/2020
Thank you for purchasing this light fitting. Please read the instructions carefully before use to ensure safe and satisfactory
operation of this product. Please retain these instructions for future reference.
Warning
Technical data
Layout
This product can be dimmable when using
dimmable driver.
Please read these instructions carefully before
commencing any work.
This product contains non-replacable parts and
cannot be serviced. If damage occurs the part
should be scrapped.
This unit must be fitted by a competent and
qualified electrician.
Check the pack and make sure you have all of the
parts listed.
This system operates at Safety Extra Low Voltage
(24V d.c.), via a LED driver. Never connect the
LED strips directly to the mains without using
the correct LED driver.
Install in accordance with IEE Wiring regulations
and current Building Regulations.
Supply
Bulb Type:
Voltage: 24V
79317: 55W LED SMD, 3300K
79318: 55W LED SMD, 4000K
Conformity with all relevant EC Directive requirements.
Waste electrical products should not be disposed of with household waste.
This is a Class 3 product and requires the use of a LED Driver (not supplied).
Jet - proof
Please recycle where facilities exist.Check with your Local Authority or
local store for recycling advice.
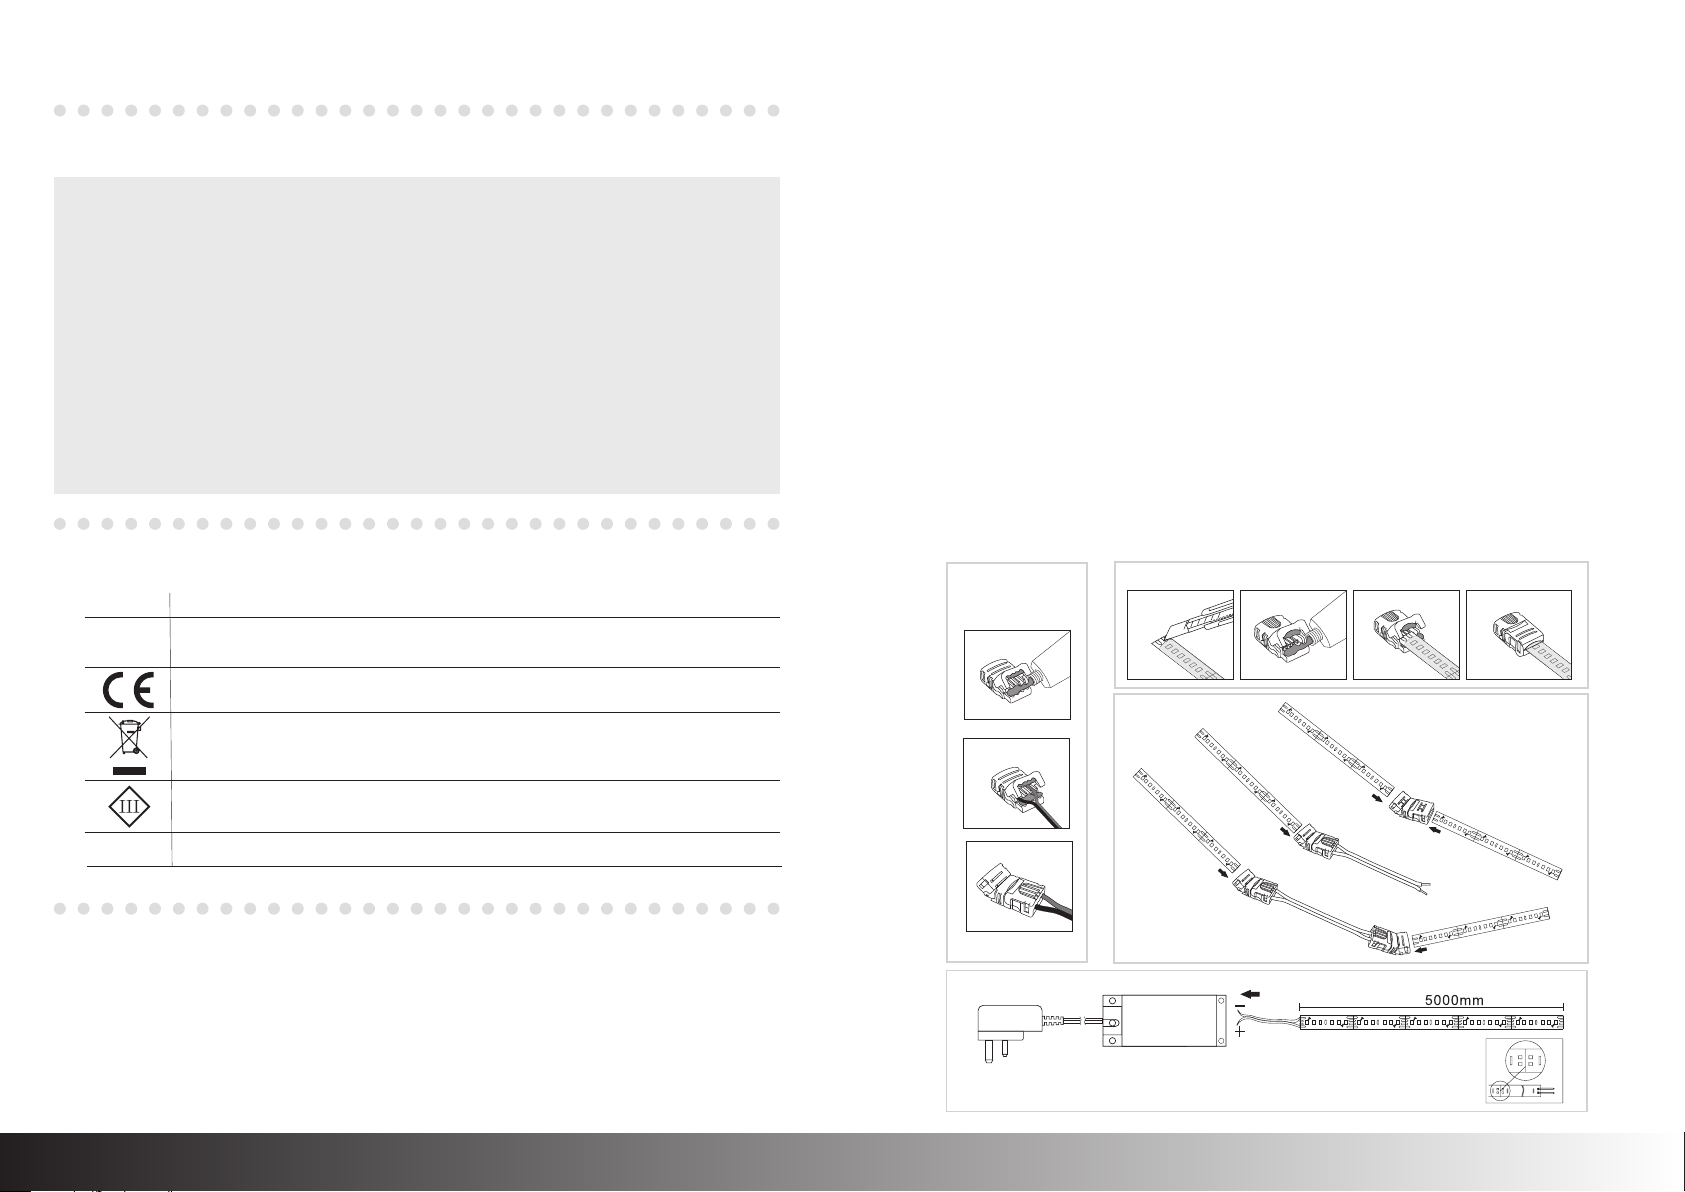
Installation
•Position the LED driver next to the mains outlet socket that the system will connect to.
Do not plug-in at this stage. Make sure that the LED driver used can load the total power of the LED strip.
•After deciding the layout of the LED strips, ensure the cables are long enough to connect
to the desired positions.
•Cut to the desired length. The maximum permissible length of 24V SMD LED's for each driver is listed
Ensure that the cut is made at the copper connection points.
•Before connect the Regen strip or the cable, must use the glue to connect, details refer to below Figs.
•Peel the backing tape off the Regen strip. Apply moderate pressure to stick the LED's to the surface.
An assistant may be required to help stick longer lengths accurately.
•The unit can be easily shortened to whole metre lengths. To shorten the tape to a specific length,
then it can be done in multiples of 100mm.
•Connect the power connector to the LED driver.
•Ensure that all the connections are tight
•Connect the power supply to the mains and turn on.
•In order to ensure thelife of the lamp belt. It is recommended to be used
with our profile range. (80497 to 80501)
•The Regen LEDs are mounted on a sticky tape which can be stuck to most surfaces.
•The Regen LEDs can be shortened to a minimum of 100mm or multiples of 100mm.
•Cables in walls must be protected using suitable conduit or plastic trunking.
•Avoid locating any cables in positions that would cause a hazard. Position cables and Regen LEDs
(not supplied) away from areas where they may be at risk from being cut, trapped or damaged.
•Plan the desired layout of this fitting carefully, ensuring the cables will reach the distance between the power
supply and the Regen LEDs.
IP65
Always unplug the LED driver from the mains
when installing or maintaining this system.
Do not exceed the LED driver load. LED drivers
may require a minimum load to operate.
The mains plug must be situated indoors (e.g.
house, garage, shed) in order to protect it from
the elements.
If replacing an existing fitting, make a careful
note of the connections.
•• Connect the LED tape to the LED drive - ensuring You have correctly identified the wires.
Rated constant input voltage when a luminaire is operated from a constant volotage controlgear not
provided with the luminaire.
Rated constant input current when the luminaire is operated frome a constant current controlgear not
provided with the luminaire. Luminaires supplied with constant current shall also be marked with the
highest allowed U out value of the controlgear.
Fig 4.
Fig 3.
Fig 1. Fig 2.
79324
79325
79327