manuals.online logo
Brands
  1. Home
  2. •
  3. Brands
  4. •
  5. Saxby Lighting
  6. •
  7. Lighting Equipment
  8. •
  9. Saxby Lighting SHIELDPRO CCT 90376 User manual

Saxby Lighting SHIELDPRO CCT 90376 User manual

www.saxbylighting.com
Instruction manual
90376
SHIELDPRO CCT
We recommend cleaning with a soft dry cloth. Do not use solvents or abrasive cleaners as these could damage the finish.
For your safety, always switch off the power supply before cleaning.
Care and Safety
Technical data
220-240 V~, 50 Hz
Supply
Voltage:
Bulb
Type: 7W LED SMD CCT, 3000K / 4000K / 6000K
The light source of this luminaire is not replaceable; when the light source reaches its end of life the whole
luminaire shall be replaced.
Having correctly identified the wiring from your existing light fitting, pull the mains wire through the hole and connect to the
quick fit connection block in the following way.
Wiring
You have correctly identified the wires.
The connections are tight.
No loose strands have been left out of the connection block.
Check that...
V2 21/08/2021
EU Manufacturer: 1 Gnarrenburg, 27442
UK Manufacturer: BH17 7BY
Terminations:
Live supply to L = ( Brown or Red )
Earth to = ( Green / Yellow )
Neutral to N = ( Blue or Black )
L LN N
The terminal block allows for Loop-in / Loop-out
connection.
INSERT CABLE
L LN N
PUSH DOWN LIGHT FITTING
SUPPLY
Brown or Red (L)Live
Neutral Blue or Black (N)
Brown or Red (L)
Blue or Black (N)
Conformity with all relevant EC Directive requirements.
The power supply is Double Insulated and does not require connection to an Earth circuit.
Waste electrical products should not be disposed of with household waste. Please recycle where facilities
exist. Check with your Local Authority or local store for recycling advice.
This product is rated at IP65 (Below the ceiling), IP20 (Recessed parts).
IP
65
This product is suitable for dimming.
Conformity with all relevant UKCA Directive requirements.
This product is fire rated to 30, 60, 90 minutes.
90min
60
30
There are three optional colour bezels –90377 (Satin Nickel), 90378 (Chrome) and 92513 (Matt black). Rotate the fixed bezel
one quarter turn anticlockwise and pull it away from the luminaire. Select a new bezel and rotate it one quarter turn clockwise
back onto the front of the luminaire.
Do not remove the rubber seal from the rear of the luminaire outer rim. Ensure that it is secure and correctly positioned to
maintain the IP65 rating.
Warning
Please read these instructions carefully before commencing any work.
This unit must be fitted by a competent and qualified electrician.
Install in accordance with the IEE Wiring regulations and current Building Regulations.
Check the pack and make sure you have all the parts listed.
To prevent electrocution switch off at the mains supply before installing or maintaining this fitting.
Ensure other persons cannot restore the electrical supply without your knowledge.
If replacing an existing fitting, make a careful note of the connections
The mains supply cable must have a minimum cross section area of 1.0mm2
Cables must be protected using suitable conduit or plastic trunking.
This product complies with IEE Building Regulations part B and is suitable for use in 30, 60 or 90 minute fire rated ceilings.
This luminaire is suitable for use in ambient temperatures of -10°C to +40°C.
This system contains non-replaceable parts and cannot be serviced. If damage occurs the part should be scrapped.
This product is suitable for dimming.
This luminaire can be loosely covered with mineral wool insulation material. However, minimum clearance distances
around the luminaire must be observed: 25mm above the top of the luminaire.
Waste electrical products should not be disposed of with household waste. Please recycle where facilities exist. Check with
your local authority or retailer for recycling advice.
Thank you for purchasing this light fitting. Please read the instructions carefully before use to ensure safe and satisfactory
operation of this product. Please retain these instructions for future reference.
This light fitting is double insulated and does
not require connection to an Earth circuit.
Installation
Existing fittings must be completely removed before installation of a new product. Before removing the existing fitting, carefully
note the position of each set of wires.
The ceiling surface must be flat and smooth to ensure a good fit.
Note that the switch is turned off before installation.
Ensure that the screws and cable entry points are sealed to maintain the IP rating of the product.
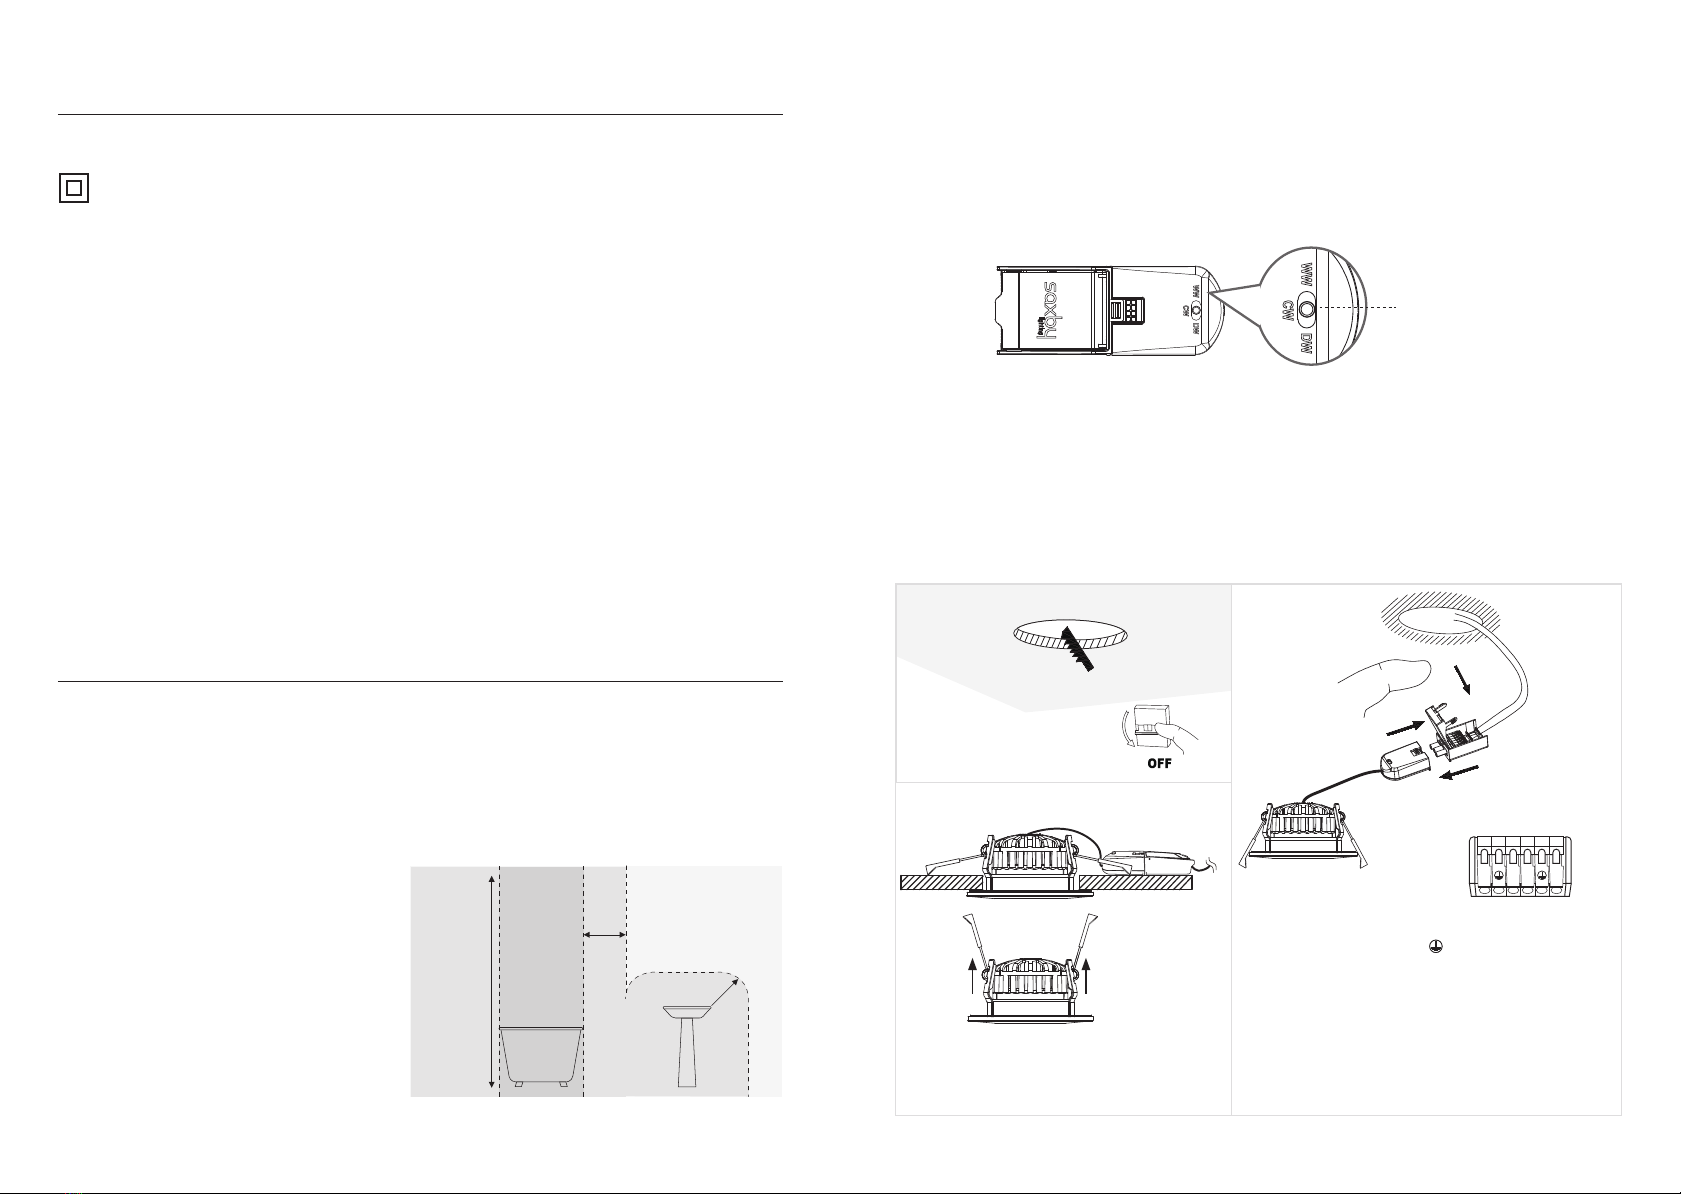
This product is colour changing and can be either warm white (3000K) or cool white(4000K) or daylight white (6000K)
Choose your preferred colour before installing by using the switch on back of the driver.
WW (3000K)
CW (4000K)
DW (6000K)
• Cut a mounting hole 70mm diameter in the ceiling taking care not to foul any pipes, mains cables or joists beneath the
surface (Ref. Fig.1). It is always recommended to cut the hole slightly smaller than the size specified, and then file the hole
until the recessed unit fits snugly. Ensure a minimum ceiling void depth of 57mm is available.
• Ensure that the product is sitting properly in the hole.
• Open the terminal block cover, Connect the mains supply cable into the terminals (Ref. Fig. 2).
• Push the spring clips upwards and fit into the ceiling hole, then push the unit up until firmly in position, ensuring that no
cables are trapped. (Ref. Fig. 3).
• Switch on. Your light is now ready for use.
Fig. 1
Fig. 3
Cut hole Dia: 70mm
Minimum cavity depth: 57mm
The terminal block allows for
Loop-in / Loop-out connection.
Terminations:
Live supply to L = ( Brown or Red )
Earth to = ( Green / Yellow )
Neutral to N = ( Blue or Black )
L LN N
Fig. 2
Layout
Plan the desired layout of these fittings carefully, ensuring the cables will reach the distances between each light fitting.
Avoid locating any cables in positions that would cause a hazard. Position cables and junction boxes (not supplied) away from
areas where they may be at risk from being cut, trapped or damaged.
The mains supply cable must have a minimum cross section area of 1.0mm2.
When more than one downlight is installed, the minimum distance between units is 500mm. the unit must be located a
minimum distance of 50mm from a joist.
This product must be mounted out of arms reach.
This product is suitable for use in outside zones of a
bathroom only. Please see diagram.
If this unit is being fitted in a room containing a bath or
shower, a 30mA RCD must be used - in accordance with
IEE regulations.
Zone 1 Outside zones0.6m
0.6m
2.25m
Zone 2Zone 2

This manual suits for next models

3

Other Saxby Lighting Lighting Equipment manuals

Saxby Lighting OrionSMART User manual

Saxby Lighting

Saxby Lighting OrionSMART User manual

Saxby Lighting Surge PIR Manual

Saxby Lighting

Saxby Lighting Surge PIR Manual

Saxby Lighting 43810 Manual

Saxby Lighting

Saxby Lighting 43810 Manual

Saxby Lighting Odyssey Bollards ST501228 User manual

Saxby Lighting

Saxby Lighting Odyssey Bollards ST501228 User manual

Saxby Lighting Varone 55702 Manual

Saxby Lighting

Saxby Lighting Varone 55702 Manual

Saxby Lighting Surge PIR User manual

Saxby Lighting

Saxby Lighting Surge PIR User manual

Saxby Lighting ICARUS PIR 2LT WALL User manual

Saxby Lighting

Saxby Lighting ICARUS PIR 2LT WALL User manual

Saxby Lighting Flexline 73670 Manual

Saxby Lighting

Saxby Lighting Flexline 73670 Manual

Saxby Lighting IkonPRO RGB LED Kit User manual

Saxby Lighting

Saxby Lighting IkonPRO RGB LED Kit User manual

Saxby Lighting Orion20 User manual

Saxby Lighting

Saxby Lighting Orion20 User manual

Saxby Lighting Picco User manual

Saxby Lighting

Saxby Lighting Picco User manual

Saxby Lighting Reeve Connect Batten Series Manual

Saxby Lighting

Saxby Lighting Reeve Connect Batten Series Manual

Saxby Lighting EL-20079 Manual

Saxby Lighting

Saxby Lighting EL-20079 Manual

Saxby Lighting 73721 Manual

Saxby Lighting

Saxby Lighting 73721 Manual

Saxby Lighting Axial Rectangular User manual

Saxby Lighting

Saxby Lighting Axial Rectangular User manual

Saxby Lighting shieldLED 400 Manual

Saxby Lighting

Saxby Lighting shieldLED 400 Manual

Saxby Lighting 13801 User manual

Saxby Lighting

Saxby Lighting 13801 User manual

Saxby Lighting Severus CCT User manual

Saxby Lighting

Saxby Lighting Severus CCT User manual

Saxby Lighting Tango User manual

Saxby Lighting

Saxby Lighting Tango User manual

Saxby Lighting Aqualine 24V Manual

Saxby Lighting

Saxby Lighting Aqualine 24V Manual

Saxby Lighting 101626 User manual

Saxby Lighting

Saxby Lighting 101626 User manual

Saxby Lighting 75922 Manual

Saxby Lighting

Saxby Lighting 75922 Manual

Saxby Lighting 73796 User manual

Saxby Lighting

Saxby Lighting 73796 User manual

Saxby Lighting 75430 User manual

Saxby Lighting

Saxby Lighting 75430 User manual

Popular Lighting Equipment manuals by other brands

Bruck 220 490 user manual

Bruck

Bruck 220 490 user manual

GE 73007 Installation and operation manual

GE

GE 73007 Installation and operation manual

Martin Exterior Wash Pro QUAD XL Safety and installation manual

Martin

Martin Exterior Wash Pro QUAD XL Safety and installation manual

NBG Home SMRTLite DS18876 Use and care guide

NBG Home

NBG Home SMRTLite DS18876 Use and care guide

LEGRAND DLI90BTWE instruction sheet

LEGRAND

LEGRAND DLI90BTWE instruction sheet

Panlux LV15HP/CH instructions

Panlux

Panlux LV15HP/CH instructions

Saber Compact ATD-80355 user manual

Saber Compact

Saber Compact ATD-80355 user manual

Jula 423-193 operating instructions

Jula

Jula 423-193 operating instructions

Monzana MZAR400 instructions

Monzana

Monzana MZAR400 instructions

PSL CONOPLUS RED user manual

PSL

PSL CONOPLUS RED user manual

ArtFox SHINE BAR 12Q user manual

ArtFox

ArtFox SHINE BAR 12Q user manual

XAL SONIC Mounting instructions

XAL

XAL SONIC Mounting instructions

Startax AUTOLINE 1606-40108 manual

Startax

Startax AUTOLINE 1606-40108 manual

TECHTOP URANUS 18 WW 25 user manual

TECHTOP

TECHTOP URANUS 18 WW 25 user manual

Ecco Reflex 5500 Series Installation and operation instructions

Ecco

Ecco Reflex 5500 Series Installation and operation instructions

Emergi-Lite Lux-Ray LED manual

Emergi-Lite

Emergi-Lite Lux-Ray LED manual

Tridonic Excite Series manual

Tridonic

Tridonic Excite Series manual

AUTLED LC-007-034 user manual

AUTLED

AUTLED LC-007-034 user manual

manuals.online logo
manuals.online logoBrands
  • About & Mission
  • Contact us
  • Privacy Policy
  • Terms and Conditions

Copyright 2025 Manuals.Online. All Rights Reserved.