Seca 220 User manual

seca 220
Measuring rod
for
seca column scales

2 •
TABLE OF CONTENTS
English
1. Device description. . . . . . . . . . . . . 3
1.1 Intended use. . . . . . . . . . . . . . . 3
1.2 Functional description . . . . . . . . 3
1.3 User qualification. . . . . . . . . . . . 3
Assembly . . . . . . . . . . . . . . . . . 3
Operation . . . . . . . . . . . . . . . . . 4
2. Safety information . . . . . . . . . . . . . 4
2.1 Safety information in these
instructions for use . . . . . . . . . . 4
2.2 Basic safety precautions . . . . . . 4
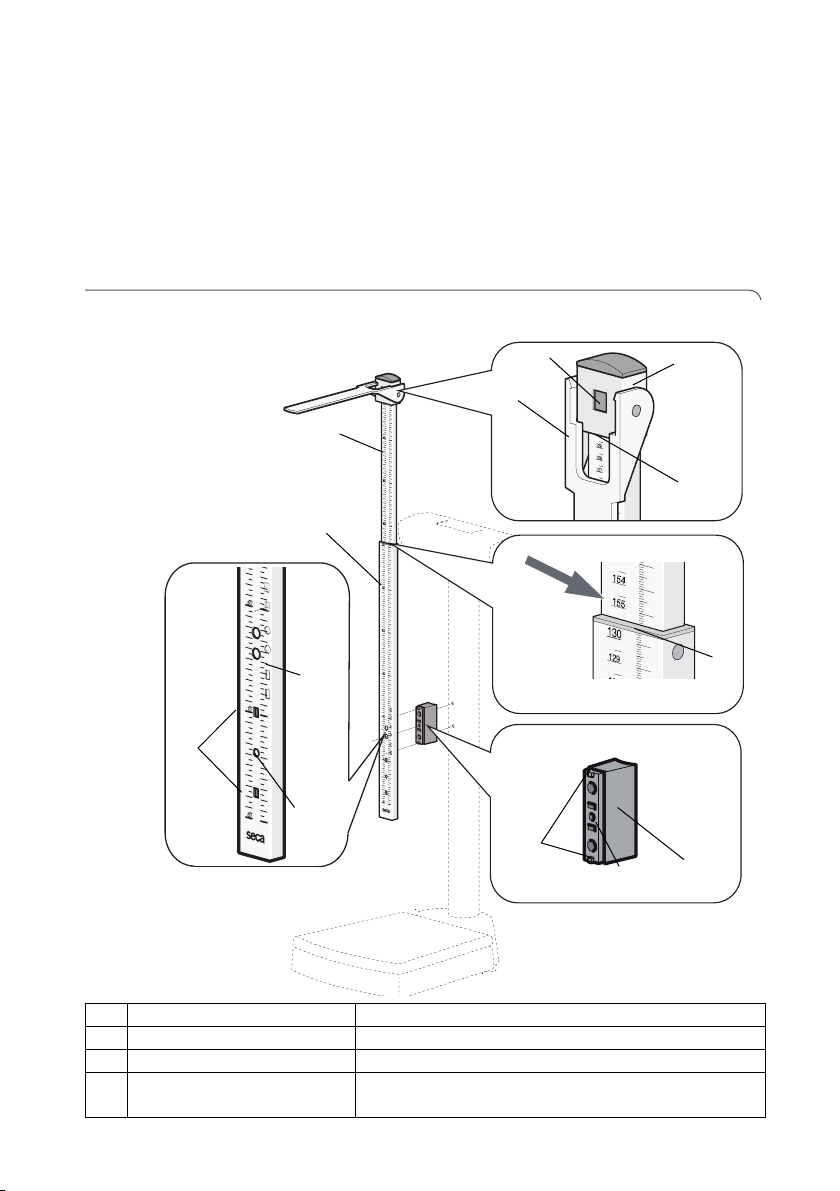
3. Overview. . . . . . . . . . . . . . . . . . . . . 5
3.1 Controls and
mounting elements . . . . . . . . . . 5
3.2 Marking on the device and
on the rating plate . . . . . . . . . . . 6
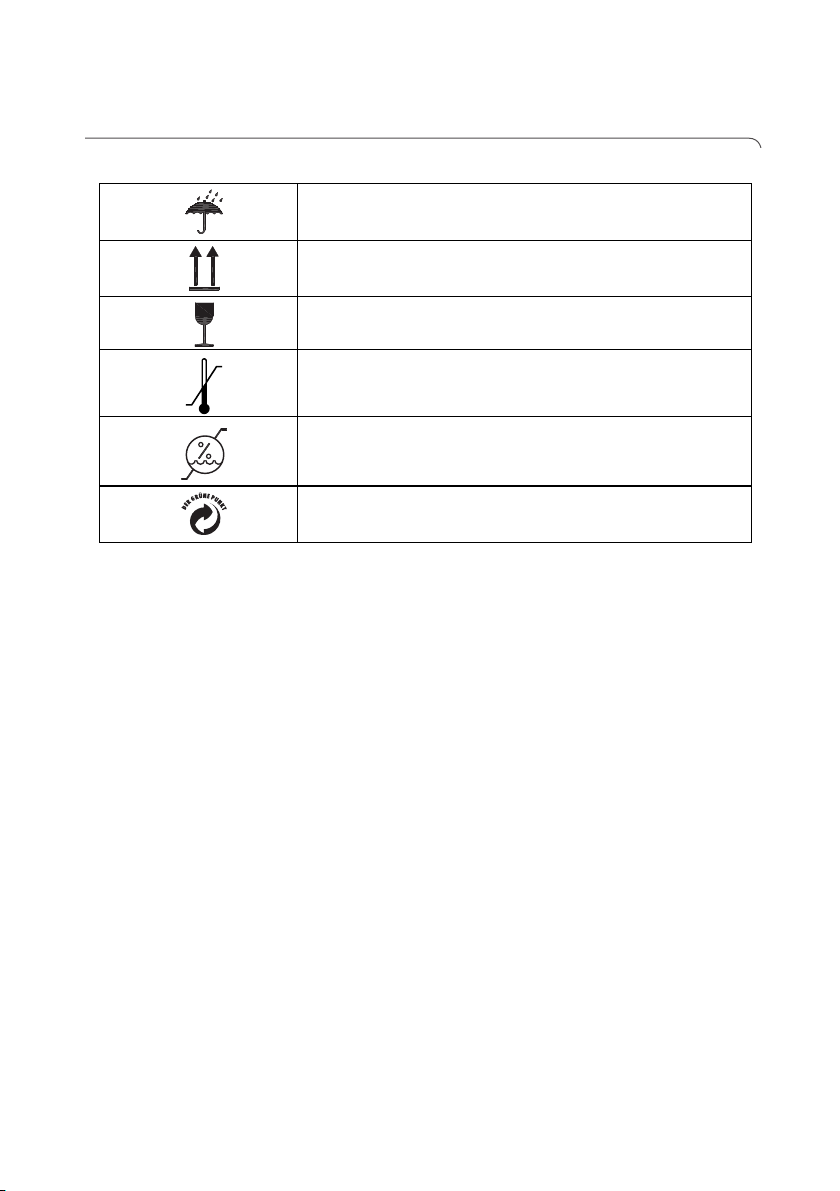
3.3 Marking on the packaging. . . . . 7
4. Before you really get started…. . . 8
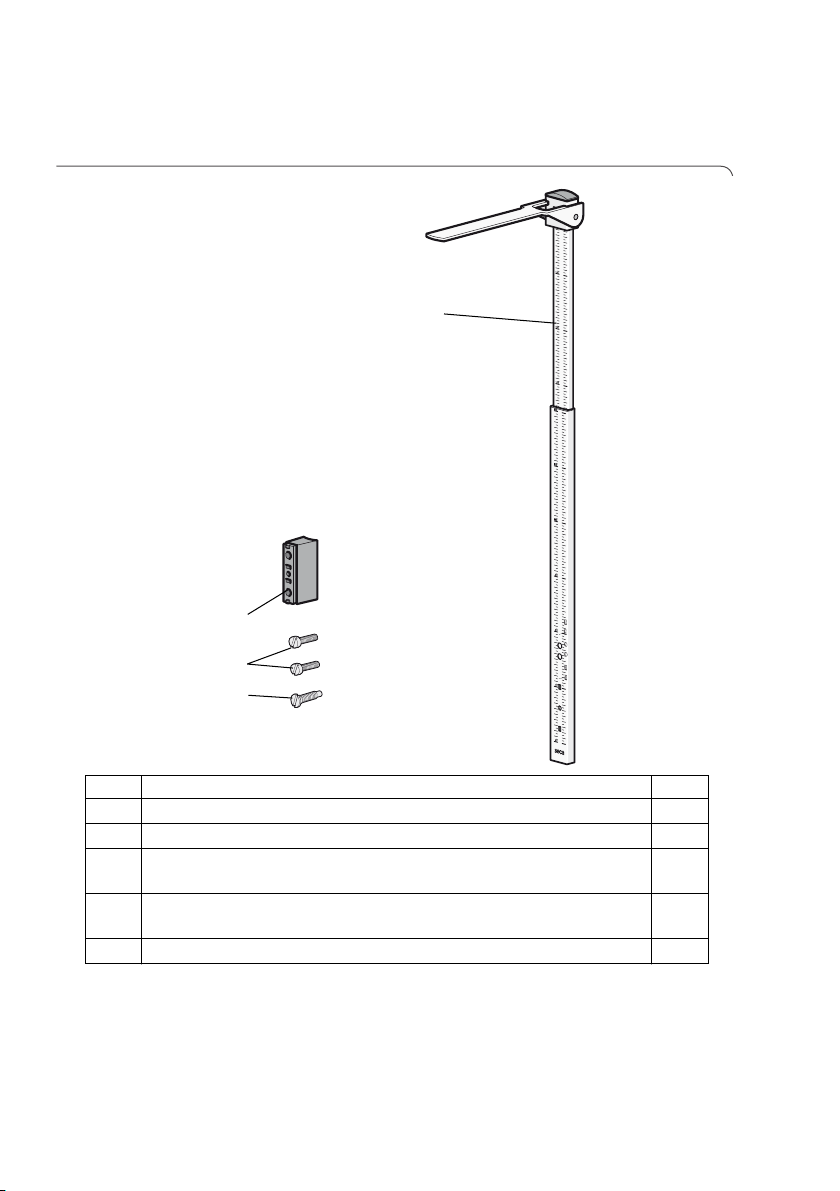
4.1 Scope of delivery. . . . . . . . . . . . 8
4.2 Mounting the measuring rod . . . 9
Selecting the mounting
position . . . . . . . . . . . . . . . . . . 9
Attaching spacer to column . . 10
Attaching measuring rod
to spacer . . . . . . . . . . . . . . . . 11
4.3 Verifying position of
measuring rod . . . . . . . . . . . . . 12
Checking position. . . . . . . . . . 12
Adjusting position. . . . . . . . . . 13
5. Performing length
measurement . . . . . . . . . . . . . . . 14
5.1 Measuring patients
smaller than 130.5 cm. . . . . . . 14
5.2 Measuring patients
taller than 130.5 cm. . . . . . . . . 15
6. Hygiene Treatment . . . . . . . . . . . 16
6.1 Cleaning . . . . . . . . . . . . . . . . . 16
6.2 Disinfecting . . . . . . . . . . . . . . . 16
6.3 Sterilizing. . . . . . . . . . . . . . . . . 16
7. Function Check . . . . . . . . . . . . . . 17
8. Troubleshooting . . . . . . . . . . . . . 17
9. Servicing. . . . . . . . . . . . . . . . . . . . 17
10. Technical Data . . . . . . . . . . . . . . 18
10.1 General technical data . . . . . 18
10.2 Technical data,
length measuring . . . . . . . . . 18
11. Warranty . . . . . . . . . . . . . . . . . . . 19

• 3
English
1. DEVICE DESCRIPTION
1.1 Intended use
The medical measuring rod seca 220 is used with seca
column scales primarily in hospitals, medical practices
and in-patient care facilities in accordance with national
regulations.
In combination with a scale the measuring rod serves
as a complete measuring station and is therefore used
for conventional determination of weight and height as
well as establishment of general state of nutrition; It
assists the physician supervising treatment in making a
diagnosis or deciding on a course of treatment.
To make an accurate diagnosis, however, other speci-
fic examinations have to be ordered by the physician
and their results taken into account, in addition to
determining weight and height values.
1.2 Functional description
The measuring rod is compatible to a range of seca
column scales. The measuring rod consists of two tele-
scopic elements:
• Lower telescopic element:
Measuring range 1: 60 cm -130.5 cm
• Upper telescopic element:
Measuring range 2: 130.5 cm - 200 cm
The head slide of the measuring rod is locked at the
top of the upper telescopic element to measure per-
sons taller than 130.5 cm. The head slide needs to be
released to measure persons smaller than 130.5 cm.
The measuring flap on the head slide can be folded
down.
1.3 User qualification
Assembly Devices that are shipped partially assembled may only
be mounted by sufficiently qualified persons such as
specialist dealers, hospital technicians or seca service
technicians.

4 •
Operation The device may only be operated by healthcare
professionals.
2. SAFETY INFORMATION
2.1 Safety information in these instructions for use
CAUTION!
Used to identify a hazardous situation. If you fail
to take note of this information, minor to mode-
rate injuries may result.
ATTENTION!
Used to identify possible incorrect usage of the
device. If you fail to take note of this information,
you may damage the device, or the measured
results may be incorrect.
NOTE:
Includes additional information about use of the
device.
2.2 Basic safety precautions
• Please observe the information in this user manual.
• Keep this user manual in a safe place. This user
manual is part of the product and must be readily
available.
CAUTION!
Patient hazard, damage to device
• Use the supplied assembly material only.
• Fold down the measuring slide after each
measurement.
• Have the device serviced regularly as descri-
bed in the respective section of this docu-
ment.
• Technical changes to the device are not per-
mitted. The unit contains no user-serviceable
parts. Make sure that maintenance and repair
are only carried out by an authorised seca
service partner. You can find your local ser-
vice partner at www.seca.com or send an

Overview • 5
English
• Make sure you only use genuine seca acces-
sories and spare parts. Otherwise the war-
ranty provided by seca will become null and
void.
3. OVERVIEW
3.1 Controls and mounting elements
4
3
6
5
2
7
1
8
11
9
10
13
12
155.5 cm
No. Element Function
1Lower telescopic element Measuring range 1: 60 cm - 130.5 cm
2Upper telescopic element Measuring range 2: 130.5 cm - 200 cm
3Measuring flap • To be positionned on top of the patient‘s head
• Can be folded down

6 •
3.2 Marking on the device and on the rating plate
4Lock
• Locks head slide at top of upper telescopic ele-
ment for measurement in measuring range 2
• Releases head slide for measurement on lower
telescopic element (measuring range 1)
5Head slide
• Locked at top of upper telescopic element
• To be released for measurement on lower teles-
copic elment (measuring range 1)
6Read-off line 1 (red) For measurements in measuring range 1
7Read-off line 2 (red) For measurement in measuring range 2
8Spacer Connects the measuring rod to the scale
9Carriage
Slides vertically
• For mounting the spacer on the scale
• For adjusting the measuring rod
10 Guide pins
• Engage in the guide holes of the measuring rod
• Ensure that the measuring rod is mounted in a
vertical position
11 Mounting range
• 2 mounting positions at the rear for mechanical
seca scales
• 1 mounting postion on the front for electronic
seca scales
For details see “Selecting the mounting position”
on page 9
12 Fixing hole The fixing screw of the measuring rod is inserted in
this hole
13 Guide holes The guide pins of the spacer are inserted here
No. Element Function
Text/Symbol Meaning
Model Model number
xx/xx Batch number, engraved on back of device
Follow instructions for use
Device conforms to EC directives
•0123: Notified body for medical products:
TÜV SÜD Product Service
0123

Overview • 7
English
3.3 Marking on the packaging
Protect from moisture
Arrows indicate top of product.
Transport and store in an upright position.
Fragile
Do not throw or drop.
Permitted min. and max. temperature for transport and
storage
Permitted min. and max. moisture for transport and
storage
Packaging material can be disposed of through recycling
programs

8 •
4. BEFORE YOU REALLY GET STARTED…
4.1 Scope of delivery
a
b
c
d
No. Component Pcs.
aMeasuring rod seca 220 1
bSpacer connecting measuring rod to column of scale 1
cScrew M5 x 30 mm
Connects spacer to scale 2
dScrew M6 x 13 mm (total length: 22 mm)
Connects measuring rod to spacer 1
Instructions for use, not shown 1

Before you really get started… • 9
English
4.2 Mounting the measuring rod
Selecting the mounting
position
To ensure the measured results are correct, the posi-
tion of the measuring rod varies depending on the
model of the scale. The following table gives the moun-
ting position for your seca column scale:
• First row: Mounting positions of the spacer and the
measuring rod on the scale
• Left-hand column: Mounting positions of the mea-
suring rod on the spacer
Position at spacer Position at scale
seca 711
seca 712
seca 700
seca 711-220 kg -
-seca 709
seca 710 -
--
Electronic column
scales, e.g.
seca 704
A
B
C
A
B
C

10 •
Attaching spacer to
column
To mount the spacer on the column of the scale, pro-
ceed as follows.
1. Slide the carriage so you can insert a screw in the
bottom hole.
2. Line up the spacer with the holes in the column.
3. Insert a screw in the bottom hole of the spacer and
tighten securely.
4. Slide the carriage so you can insert a screw in the
top hole.
5. Insert a screw in the top hole of the spacer and
tighten securely.
6. Slide the carriage into the centre.
2.
3.
1.
5.
4.
6.

Before you really get started… • 11
English
Attaching measuring
rod to spacer
CAUTION!
False measurement results
No proper measurement results will be possible
if the mounting position selected is not suitable
for your column scale.
Make sure to select the correct mounting po-
sition for your column scale (see “Selecting
the mounting position” on page 9.)
1. Pull the upper telescopic element out to the 155 cm
mark.
The holes in the lower telescopic element are expo-
sed.
2. Adjust the measuring rod as provided for your mo-
del of scale (here: position for models seca 709 und
seca 710).
3. Position the measuring rod on the spacer at the
height provided for your model of scale (here: posi-
tion for models seca 709 und seca 710).
4. Check that the guide pins of the spacer are inserted
in the guide holes of the measuring rod.
5. Screw the measuring rod to the spacer.
6. Check the position of the measuring rod (see “Ve-
rifying position of measuring rod” on page 12).
155 cm

12 •
4.3 Verifying position of measuring rod
Checking position After mounting the measuring rod, you must check its
position and correct if necessary. To do so, proceed as
follows:
1. Unfold the measuring flap.
2. Pull the upper telescopic element out to the
155 cm-mark.
The fixing screw in the lower telescopic element is
exposed so that you can correct the position of the
measuring rod if necessary.
3. Measure the distance between the underside of the
measuring flap and the patient standing area, e.g.
using a tape measure.
NOTE:
The area on which the patient stands for height
measurement is the weighing platform or the
floor, depending on the model of the scale.
Requirement: The measured distance (reference
dimension) between the underside of the measuring
flap and the patient standing area is 155 cm.
4. Should the value measured deviate from the refe-
rence dimension, note down the deviation and cor-
rect the vertical position of the measuring rod as
described in the following section.
155 cm
155 cm
155 cm
155 cm

Before you really get started… • 13
English
Adjusting position To correct the position of the measuring rod proceed
as follows:
1. Slightly loosen the screw on the measuring rod.
2. Adjust the measuring rod together with the carriage
of the spacer according to the measured deviation
from the reference dimension.
3. Tighten the screw on the measuring rod.
4. Check the distance between the measuring flap
and patient standing area once again.
5. If necessary, re-adjust the position of the measuring
rod.
NOTE:
• If you are unable to set the specified reference
dimension, check that you have selected the
correct mounting position for your seca
column scale (see “Selecting the mounting
position” on page 9.).
• Your seca service partner will also be happy
to help. You can find your local seca service
partner at www.seca.com or just send an e-

14 •
5. PERFORMING LENGTH MEASUREMENT
CAUTION!
Patient hazard
Allways perform a function check as described
in section “Function Check” on page 17 before
using the device.
5.1 Measuring patients smaller than 130.5 cm
1. Unlock the head slide by pressing on the lock.
2. Unfold the measuring flap so it engages in a hori-
zontal position.
3. Ask the patient to step under the measuring flap:
– Back to the measuring rod
– Body kept straight
– Head straight: So-called "Frankfurt plane"
parallel to the measuring flap
4. Move the head slide on the lower telescopic ele-
ment until the measuring flap rests on the patient's
head.
5. Read off the measured result at the read-off line
(read-off line 1) of the headslide (here: 113.5 cm).
6. Ask the patient to step away from the measuring
rod.
7. Fold the measuring flap down.
8. Move up the head slide until it engages in the lock.
113.5 cm

Performing length measurement • 15
English
5.2 Measuring patients taller than 130.5 cm
1. Unfold the measuring flap so it engages in a hori-
zontal position.
2. Pull the upper telescopic element out until the pati-
ent can comfortably stand under the measuring
flap.
3. Ask the patient to step under the measuring flap:
– Back to the measuring rod
– Body kept straight
– Head straight: So-called "Frankfurt plane"
parallel to the measuring flap
4. Slide down the upper telescopic element until the
measuring flap rests on the patient's head.
5. Read off the measured result at the read-off line
(read-off line 2) of the lower telescopic element
(here: 141.5 cm).
6. Ask the patient to step away from the measuring
rod.
7. Slide the upper telescopic element to the lowest
position.
8. Fold the measuring flap down.
141.5 cm

16 •
6. HYGIENE TREATMENT
ATTENTION!
Damage to device
Inappropriate detergents may damage the sen-
sitive surfaces of the devices.
Do not use caustic or abrasive detergents.
Do not use spirits or benzine.
6.1 Cleaning
Use a soft cloth dampened with mild soapsuds to
clean the surfaces of the device.
6.2 Disinfecting
1. Follow the instructions on the disinfectant.
2. Disinfect the device at regular intervals with a com-
mercially available disinfectant, e.g. with 70% isop-
ropyl alcohol.
Please take note of the following terms:
• Prior to every measurement with direct skin contact:
– Weighing platform
– Head slide and measuring flap
– Measuring flap extension (if applicable)
• After every measurement with direct skin contact:
– Weighing platform
– Head slide and measuring flap
– Measuring flap extension (if applicable)
• If required:
– Column and display of the scales
– Telescopic elements of the length measuring
rod
– Heel stop (if applicable)
6.3 Sterilizing
This device may not be sterilised.

Function Check • 17
English
7. FUNCTION CHECK
Perform functional check prior to each operation.
A complete functional check includes:
• Visual inspection for mechanical damage
• Visual and functional inspection of all movable pa-
parts
• Functional check of the control elements
CAUTION!
Risk of injury
If you notice any faults or deviations during the
functional check, do not use the unit.
Have repairs of the unit carried out by seca
service or an authorized service partner.
8. TROUBLESHOOTING
9. SERVICING
The seca measuring rod does not require maintenance.
Should any part of it fail to function, please contact an
authorised service partner.
You can find your local service partner at
www.seca.com or just send an e-mail to
Problem Cause/Solution
Measurement does not
return plausible results.
Measurement result read off incorrectly
- Use the correct edge for the measuring range
currently in use (“Performing length measure-
ment” from page 14)
- Read off the decimal places for the current
measuring range in the correct direction (“Per-
forming length measurement” from page 14)
Incorrect position/posture of patient
- Correct the position/posture of the patient
(“Performing length measurement” from
page 14)
Measuring rod mounted incorrectly on column
scale
- Mount the measuring rod correctly (“Before
you really get started…” from page 8)

18 •
10.TECHNICAL DATA
10.1 General technical data
10.2 Technical data, length measuring
General technical data
Dimensions
• Depth
• Width
• Height (rectracted)
• Height (extended)
17 mm
40 mm
980 mm
1480 mm
Weight approx. 0.7 kg
Temperatur range
• Operation
• Storage
• Transport
+10 °C to +40 °C (50 °F to 104 °F)
-10 °C to +65 °C (14 °F to 149 °F)
Air pressure
• Operation
• Storage
• Transport
700 - 1060 hPa
700 - 1060 hPa
700 - 1060 hPa
Humidity
• Operation
• Storage
• Transport
30% - 80% no condensation
0% - 95% no condensation
Medical device in accordance with
Directive 93/42/EEC Class I with measuring function
Technical data, length measuring
Measuring range 1 60 cm - 130.5 cm
Measuring range 2 130.5 cm - 200 cm
Graduation 1 mm
Accuracy better than ± 5 mm

Warranty • 19
English
11.WARRANTY
We offer a two-year warranty from the date of delivery
for defects attributable to faulty material or poor work-
manship. This excludes all moveable parts such as
(rechargeable) batteries, cables, power supply units,
etc. Defects which are covered by the warranty shall be
rectified free of charge for customers on production of
the sales receipt. No further claims can be accepted.
The costs of shipment in both directions shall be borne
by the customer where the device is not located at the
customer's premises. In the event of any damage
during shipment warranty claims can only be asserted
where the complete original packaging was used for
shipment and the scales were secured inside in the
same manner as in the original packaging. You should
therefore keep all packaging.
The warranty shall become null and void where the
device is opened by persons not expressly authorised
to do so by seca.
We ask customers based abroad to contact their local
sales agent directly in the case of warranty claims.

Konformitätserklärung
Declaration of conformity
Certificat de conformité
Dichiarazione di conformità
Declaratión de conformidad
Overensstemmelsesattest
Försäkran om överensstämmelse
Konformitetserklæring
Vaatimuksenmukaisuusvakuutus
Verklaring van overeenkomst
Declaração de conformidade
Δήλωση Συμβατότητας
Prohlášení o shodĕ
Vastavusdeklaratsioon
Megfelelőségi nyilatkozat
Atitikties patvirtinimas
Atbilstības apliecinājums
Oświadczenie o zgodności
Izjava o skladnosti
Vyhlásenie o zhode
Onay belgesi
Other manuals for 220
2
Table of contents
Other Seca Medical Equipment manuals