Sony DSBK-1501 User manual

2000 by Sony Corporation
3-205-071-06(1)
設置説明書
Installation Instructions
Manuel d’installation
Installationsanleitung
Istruzioni per l’installazione
Instrucciones de Instalación
お買い上げいただきありがとうございます。
電気製品は、安全のための注意事項を守らないと、
火災や人身事故になることがあります。
•この設置説明書には、事故を防ぐための重要な注意事項と製品の取り
扱いかたを示してあります。この設置説明書をよくお読みのうえ、製
品を安全にお使いください。お読みになったあとは、いつでも見られ
るところに必ず保管してください。
•ご使用にあたっては、デジタルビデオカセットレコーダー本体に付属
の取扱説明書の「安全のために」と「 警告」、「 注意」をよくお読
みください。お読みになったあとは、いつでも見られるところに必ず
保管してください。
•本基板の取り付けは、必ずお買い上げ店またはソニーのサービス窓口
にご依頼ください。
Digital Input/Output
Board
DSBK-1501

Before operating the unit, please read this manual thoroughly and
retain it for future reference.
Avant d’utiliser l’appareil, veuillez lire attentivement ce manuel et le
conserver pour future référence.
Bitte lesen Sie dieses Handbuch vor der Benutzung des Geräts
sorgfältig durch und bewahren Sie es zum späteren Nachschlagen
auf.
Leggere attentamente questo manuale prima di utilizzare l’unità, e
conservarlo per riferimenti futuri.
Antes de poner en funcionamiento la unidad, lea detenidamente
este manual y consérvelo para referencias futuras.
For the customers in the USA
This equipment has been tested and found to comply with the limits
for a Class A digital device, pursuant to Part 15 of the FCC Rules.
These limits are designed to provide reasonable protection against
harmful interference when the equipment is operated in a
commercial environment. This equipment generates, uses, and can
radiate radio frequency energy and, if not installed and used in
accordance with the instruction manual, may cause harmful
interference to radio communications. Operation of this equipment
in a residential area is likely to cause harmful interference in which
case the user will be required to correct the interference at his own
expense.
You are cautioned that any changes or modifications not expressly
approved in this manual could void your authority to operate this
equipment.
All interface cables used to connect peripherals must be shielded
in order to comply with the limits for a digital device pursuant to
Subpart B of Part 15 of FCC Rules.
This device complies with Part 15 of the FCC Rules. Operation is
subject to the following two conditions: (1) This device may not
cause harmful interference, and (2) this device must accept any
interference received, including interference that may cause
undesired operation.
For the customers in Canada
This Class A digital apparatus complies with Canadian ICES-003.
Pour les utilisateurs au Canada
Cet appareil numérique de la classe A est conforme à la norme
NMB-003 du Canada.
Інформація для споживачів в Україні.
Обладнання відповідає вимогам:
–Технічного регламенту обмеження використання деяких
небезпечних речовин в електричному та електронному
обладнанні (постанова КМУ від 03/12/2008 № 1057).

3
警告
お客様へ
以下の「取り付け 」の項は、特約店およびソニーのサービス窓口用の説明です。
お客様がこの説明書に記載され た取り付け作 業を行うと、火災や、感電やけがな
どの人身事故につながることがあります。
お客様ご自身では絶対に取り付け作業を行わないでください。
本基板の取り付けは、必ずお買い上げ店またはソニーのサービス窓口にご依頼く
ださい。

4
概要/Overview/Aperçu/Kurzbeschreibung/
Descrizione/Descripción general
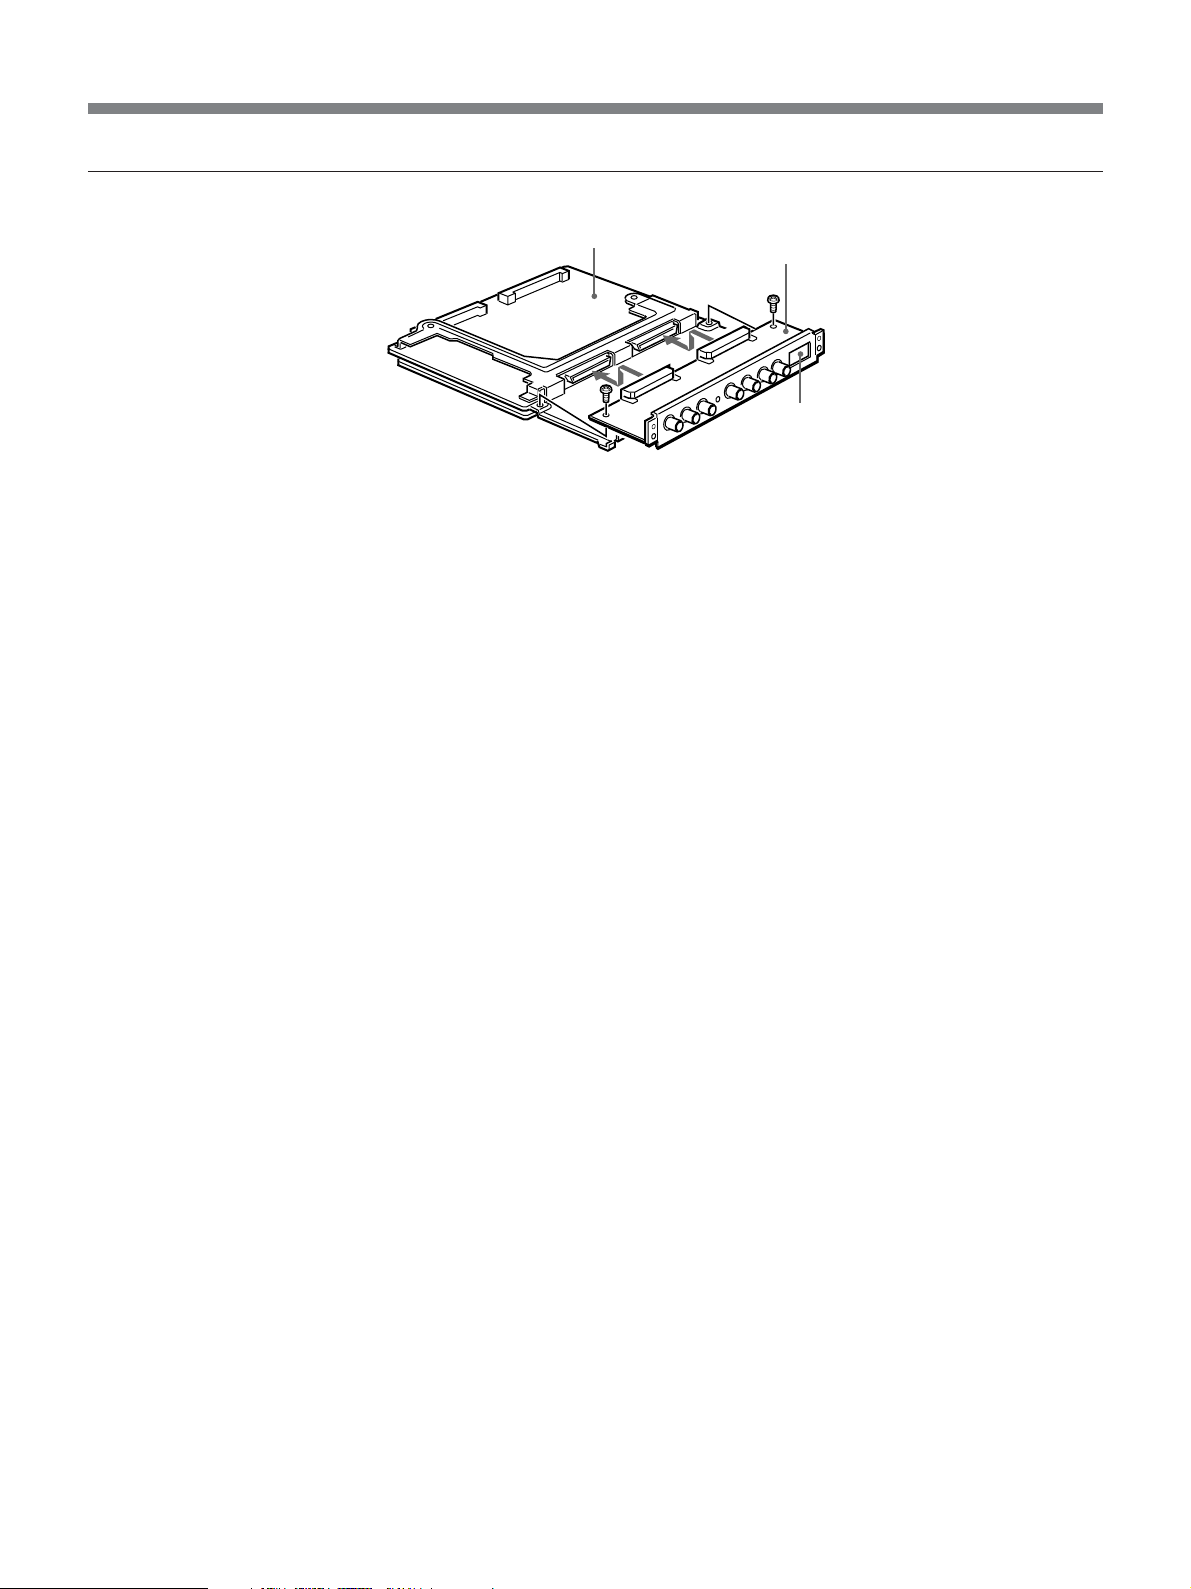
デジタルインプット/ アウトプットボ ードDSBK-1501はデジタルビデオカセット
レコーダー DSR-1500 用のオプション基板です。
オプション基板 DSBK-1501には、取り付け用ネジ3本(M3×6)が付属し
ています。
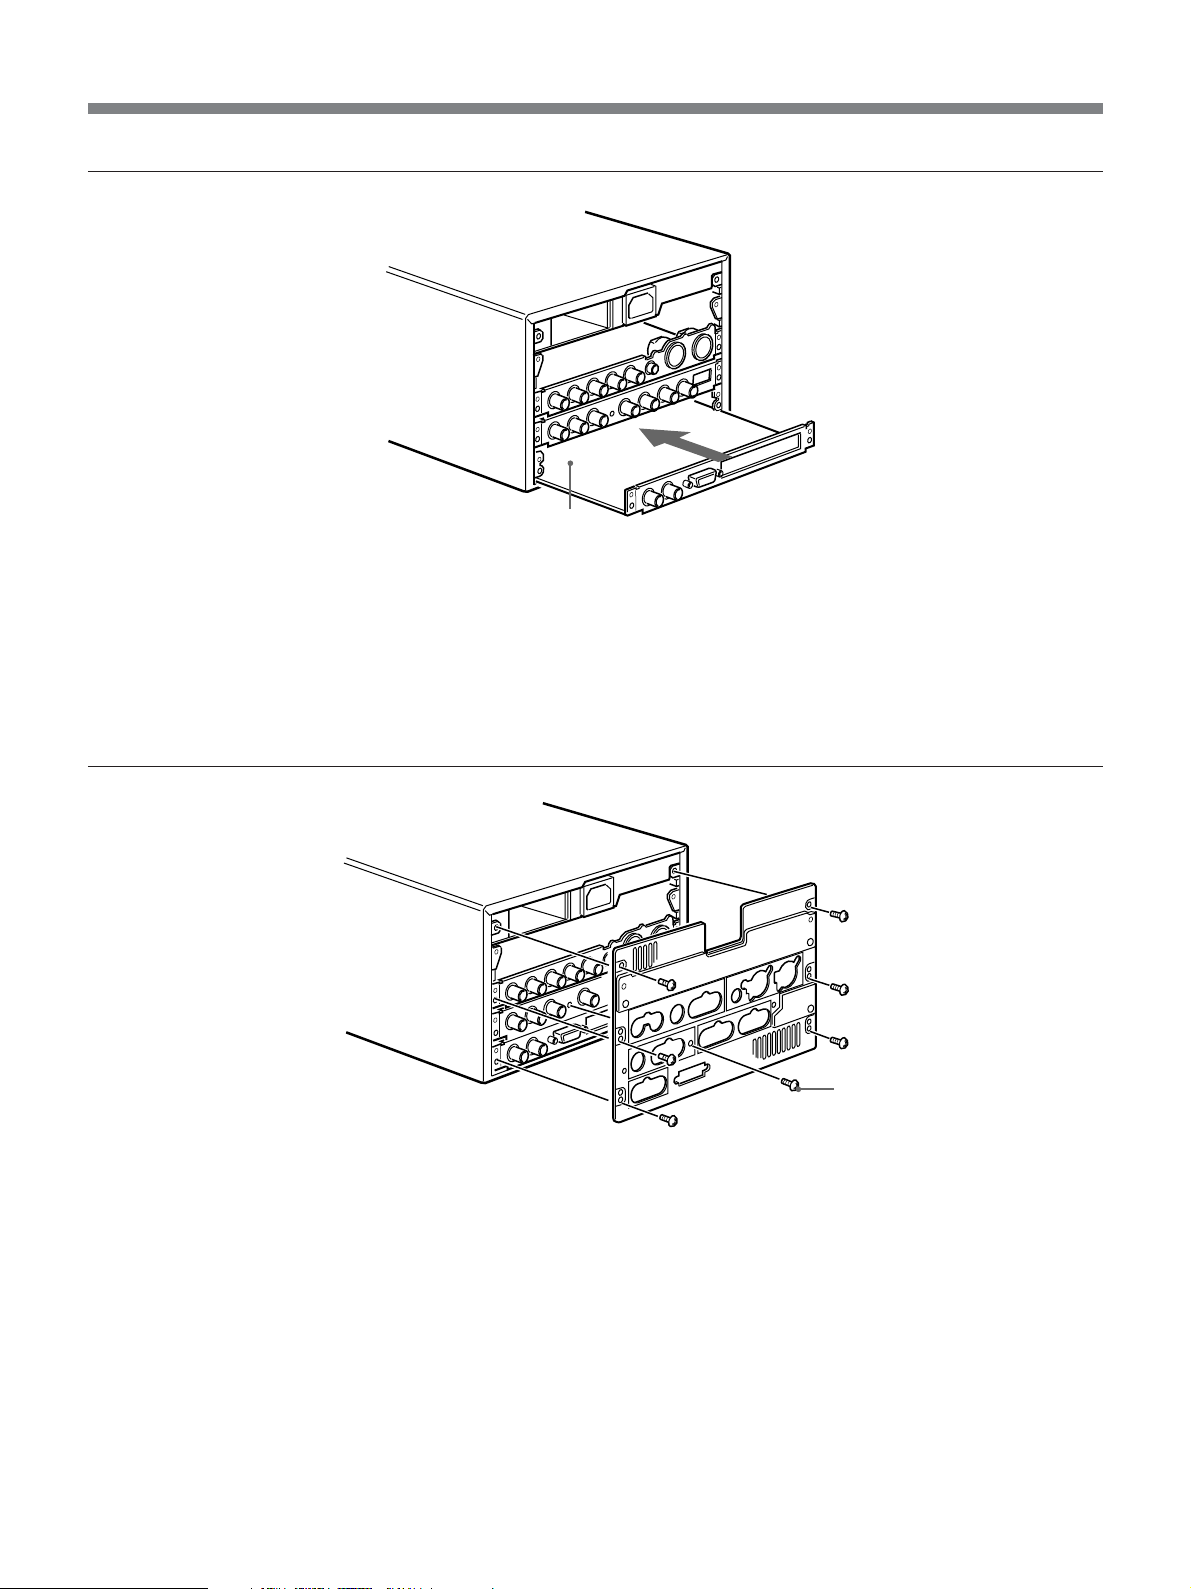
DSR-1500に本基板を取り付けた後の接続や操作については、DSR-1500
の取扱説明書をご覧ください。
The DSBK-1501 Digital Input/Output Board is an optional board
for the DSR-1500/1500P Digital Videocassette Recorder.
The DSBK-1501 optional board is provided with three fastening
screws (M3 ×6).
Refer to the DSR-1500/1500P Operating Instructions for
information on connecting and operating the DSR-1500/1500P
fitted with the DSBK-1501.
La carte d’entrée/sortie numérique DSBK-1501 est une carte
optionnelle prévue pour le magnétoscope enregistreur numérique
DSR-1500/1500P.
La carte optionnelle DSBK-1501 est dotée de trois vis de fixation
(M3 ×6). Voir le mode d’emploi du DSR-1500/1500P pour les
informations sur le raccordement et le fonctionnement du
DSR-1500/1500P équipé de la carte DSBK-1501.
Die Digital-E/A-Karte DSBK-1501 ist eine Option für den
Digitalvideorecorder DSR-1500/1500P.
Die optionale Karte verfügt über drei Befestigungsschrauben
(M3 ×6). Näheres über Anschluß und Betrieb des DSR-1500/
1500P mit installierter DSBK-1501 finden Sie in der
Bedienungsanleitung des Videorecorders.
La scheda di ingresso/uscita digitale DSBK-1501 è una scheda
opzionale per il videoregistratore digitale DSR-1500/1500P.
La scheda opzionale DSBK-1501 viene fornita con tre viti di
fissaggio (M3 ×6).
Per ulteriori informazioni sul collegamento e sull’azionamento del
DSR-1500/1500P con montata la scheda DSBK-1501, consultare il
Manuale di istruzioni per l’uso del DSR-1500/1550P.
La tarjeta de entrada/salida digital DSBK-1501 es una tarjeta
opcional para la videograbadora digital DSR-1500/1500P.
La tarjeta opcional DSBK-1501 se suministra con tres tornillos de
fijación (M3 ×6).
Consulte el manual de instrucciones del modelo DSR-1500/1500P
para obtener información acerca de la conexión y funcionamiento
del modelo DSR-1500/1500P instalado en la unidad DSBK-1501.
お使いになる前に、必ず動作確認を行ってください 。故障その他に伴う
営業上の機会損失等は保証期間中および保証期間経過後にかかわら
ず、補償はいたしかねますのでご了承ください。
Note
Always verify that the unit is operating properly before use.
SONY WILL NOT BE LIABLE FOR DAMAGES OF ANY
KIND INCLUDING, BUT NOT LIMITED TO,
COMPENSATION OR REIMBURSEMENT ON ACCOUNT
OF THE LOSS OF PRESENT OR PROSPECTIVE PROFITS
DUE TO FAILURE OF THIS UNIT, EITHER DURING THE
WARRANTY PERIOD OR AFTER EXPIRATION OF THE
WARRANTY, OR FOR ANY OTHER REASON
WHATSOEVER.
Remarque
Vérifiez toujours que l’appareil fonctionne correctement avant
l’utilisation. Sony n’assumera pas de responsabilité pour les
dommages de quelque sorte qu’ils soient, incluant mais ne se
limitant pas à la compensation ou au remboursement, à
cause de la perte de profits actuels ou futurs suite à la
défaillance de cet appareil, que ce soit pendant la période de
garantie ou après son expiration, ou pour toute autre raison
quelle qu’elle soit.
Hinweis
Bestätigen Sie vor dem Gebrauch immer, dass das Gerät richtig
arbeitet. SONY KANN KEINE HAFTUNG FÜR SCHÄDEN
JEDER ART, EINSCHLIESSLICH ABER NICHT BEGRENZT
AUF KOMPENSATION ODER ERSTATTUNG, AUFGRUND
VON VERLUST VON AKTUELLEN ODER ERWARTETEN
PROFITEN DURCH FEHLFUNKTION DIESES GERÄTS
ODER AUS JEGLICHEM ANDEREN GRUND, ENTWEDER
WÄHREND DER GARANTIEFRIST ODER NACH ABLAUF
DER GARANTIEFRIST, ÜBERNEHMEN.
Nota
Verificare sempre che l’apparecchio stia funzionando
correttamente prima di usarlo. LA SONY NON SARÀ
RESPONSABILE DI DANNI DI QUALSIASI TIPO,
COMPRESI, MA SENZA LIMITAZIONE A, RISARCIMENTI
O RIMBORSI A CAUSA DELLA PERDITA DI PROFITTI
ATTUALI O PREVISTI DOVUTA A GUASTI DI QUESTO
APPARECCHIO, SIA DURANTE IL PERIODO DI
VALIDITÀ DELLA GARANZIA SIA DOPO LA SCADENZA
DELLA GARANZIA, O PER QUALUNQUE ALTRA
RAGIONE.
Nota
Verifique siempre que esta unidad funciona correctamente antes
de utilizarlo. SONY NO SE HACE RESPONSIBLE POR
DAÑOS DE NINGÚN TIPO, INCLUYENDO PERO NO
LIMITADO A LA COMPENSACIÓN O PAGO POR LA
PÉRDIDA DE GANANCIAS PRESENTES O FUTURAS
DEBIDO AL FALLO DE ESTA UNIDAD, YA SEA
DURANTE LA VIGENCIA DE LA GARANTÍA O DESPUÉS
DEL VENCIMIENTO DE LA GARANTÍA NI POR
CUALQUIER OTRA RAZÓN.

5
Caution
If this option is installed incorrectly, personal injury or
damage to peripheral items may occur due to fire,
shock, or other accidental circumstances. To avoid
such risks, installation should be performed by
qualified service personnel.
Attention
L’installation incorrecte de cette option pourra donner
lieu à des blessures personnelles ou bien des
dommages à des éléments périphériques suite à un feu,
une décharge électrique ou d’autres circonstances
accidentelles. Pour éviter de tels risques, faites faire
l’installation par un personnel de service qualifié.
Vorsicht
Bei falscher Installation dieser Option besteht die
Gefahr von Verletzungen bzw. Beschädigung von
Peripheriekomponenten durch Brand, Stromschlag
oder sonstige Probleme. Überlassen Sie daher
Installationsarbeiten ausschließlich qualifiziertem
Fachpersonal.
取り付け/Installation/Installation/Installation/
Installazione/Instalación
Cautela
Se questa opzione non viene installata correttamente,
si possono verificare lesioni alle persone o danni a
unità periferiche dovuti a incendi, scosse elettriche e
altri incidenti. Per evitare tali rischi, l’installazione
dovrebbe essere eseguita da personale tecnico
qualificato.
Precaución
Si no instala esta opción correctamente, podrían
producirse daños personales o dañarse los periféricos
debido a un incendio, descarga eléctrica u otros
accidentes. Para evitar estos riesgos, la instalación
deberá efectuarla personal técnico cualificado.
1
ブランクパネル (b)とリア パネル(a)を外す。
Remove the blanking panel (b) and the rear panel (a).
Retirez la plaque de suppression (b) et le panneau
arrière (a).
a
b
Nehmen Sie das Abdeckblech (b) und die Rückseite
(a) ab.
Rimuovere il pannello di chiusura (b) e il pannello
posteriore (a).
Retire el panel de supresión (b) y el panel posterior (a).

6
2
最下段の基板(SSS-10)を引き出す。
Pull out the lower board (SSS-10).
Retirez la carte inférieure (SSS-10).
SSS-10
Ziehen Sie die unterste Karte (SSS-10) heraus.
Estrarre la scheda inferiore (SSS-10).
Extraiga la tarjeta inferior (SSS-10).
3
下から2番目の基板(DVP-19)を引き出す。
Pull out the second board (DVP-19) from the bottom.
Retirez la seconde carte (DVP-19) à partir du bas.
DVP-19
Ziehen Sie die zweite Karte (DVP-19) von unten
heraus.
Estrarre la seconda scheda (DVP-19) dal basso.
Extraiga la segunda tarjeta (DVP-19) de la parte
inferior.
取り付け/Installation/Installation/Installation/Installazione/Instalación

7
4
引き出した基板(DVP-19)端部のコネクターに DSBK-1501 基板の
コネクターをはめ 込 ん で から、DSBK-1501基板をネジ止めする。
既にDSBK-1503基板とi.DVIN/OUTコネクターが装着済みの場
合は、i.DVIN/OUTコネクターをコネクターアダプターから外し
DSBK-1501基板の i.DVIN/OUTコネクター取り付け部(c)に取り
付け直してください。
Plug the connectors on the DSBK-1501 board into the
connectors on the edge of the board (DVP-19) you
have just pulled out, then fasten the DSBK-1501 board
with the screws.
If the DSBK-1503 board and i.DV IN/OUT connector
are already installed, remove the i.DV IN/OUT
connector from the connector adapter, and refit to the
i.DV IN/OUT connector section (c) of the DSBK-1501
board.
Branchez les connecteurs de la carte DSKB-1501 dans
le connecteurs à l’extrémité de la carte (DVP-19) que
vous venez de retirer, puis fixez la carte DSBK-1501
avec les vis.
Si la carte DSBK-1501 et le connecteur i.DV IN/OUT
sont déjà installés, retirez le connecteur i.DV IN/OUT
de l’adaptateur de connecteur, et réajustez-le à la
section connecteur i.DV IN/OUT (c) de la carte
DSBK-1501.
DVP-19
DSBK-1501
c
Verbinden Sie die Steckverbinder an Karte DSBK-
1501 mit den Steckverbindern an der herausgezogenen
Karte (DVP-19). Befestigen Sie dann Karte DSBK-
1501 mit den Schrauben.
Sind die Karte DSBK-1503 und der Steckverbinder
i.DV IN/OUT bereits installiert, so trennen Sie
Steckverbinder i.DV IN/OUT vom
Steckverbinderadapter und bringen ihn am Bereich (c)
an Karte DSBK-1501 an.
Inserire i connettori che si trovano sulla scheda DSBK-
1501 nei connettori situati sul bordo della scheda
(DVP-19) appena estratta, quindi fissare la scheda
DSBK-1501 con le viti.
Se la scheda DSBK-1503 e il connettore i.DV /IN/
OUT sono già stati installati, rimuovere il connettore
i.DV /IN/OUT dall’adattore relativo e rimontare la
sezione del connettore i.DV /IN/OUT (c) della scheda
DSBK-1501.
Enchufe los conectores de la tarjeta DSBK-1501 en los
conectores del borde de la tarjeta (DVP-19) que acaba
de extraer y, a continuación, fije la tarjeta DSBK-1501
con los tornillos.
Si la tarjeta DSBK-1503 y el conector i.DV IN/OUT
ya se encuentran instalados, extraiga el conector i.DV
IN/OUT del adaptador del conector y vuelva a
colocarlo en la sección del conector i.DV IN/OUT (c)
de la tarjeta DSBK-1501.

8
5
ガイド(d)に合わせてDVP-19 基板とDSBK-1501 基板を挿入し、
DVP-19基板のコネクター(e)を本体のコネクター(f)にはめ込む。
このとき、位置決め穴(g)を本体端部のだぼに合わせるように す る。
Insert the DVP-19 board and DSBK-1501 board,
aligning them with the guides (d), and plug the
connectors (e) of the DVP-19 board into the
connectors (f) on the DSR-1500/1500P unit.
At this point, align the positioning holes (g) with the
studs at the edge of the unit.
Insérez la carte DVP-19 et la carte DSBK-1501, en les
alignant sur les guides (d) et branchez les connecteurs
(e) de la carte DVP-19 dans ceux (f) du DSR-1500/
1500P.
Alignez alors les trous de positionnement (g) sur les
goujons à l’extrémité de l’appareil.
f
e
e
d
g
g
DVP-19
DSBK-1501
f
Schieben Sie die Karte DVP-19 und DSBK-1501 in
die Führungen (d) und führen Sie sie in den
Videorecorder ein. Verbinden Sie die Steckverbinder
(e) der Karte DVP-19 mit den Steckverbindern (f) am
DSR-1500/1500P.
Fluchten Sie nun die Positionieröffnungen (g) mit den
Gewindestutzen am Rand des Geräts.
Inserire le schede DVP-19 e DSBK-1501, allineandole
con le guide (d) e inserire i connettori (e) che si
trovano sulla scheda DVP-19 nei connettori (f) che si
trovano sull’unità DSR-1500/1500P.
A questo punto, allineare i fori di posizionamento (g)
con i perni che si trovano al bordo dell’unità.
Introduzca las tarjetas DVP-19 y DSBK-1501,
alineándolas con las guías (d), y enchufe los
conectores (e) de la tarjeta DVP-19 en los conectores
(f) de la unidad DSR-1500/1500P.
A continuación, alinee los orificios de posicionamiento
(g) con las tachuelas situadas en el borde de la unidad.
取り付け/Installation/Installation/Installation/Installazione/Instalación

9
6
最下段の基板(SSS-10)を元に戻す。
Replace the lower board (SSS-10).
Remettez la carte inférieure (SSS-10) en place.
SSS-10
Setzen Sie die unterste Karte (SSS-10) wieder ein.
Rimettere a posto la scheda inferiore (SSS-10).
Vuelva a colocar la tarjeta inferior (SSS-10).
7
リア パ ネ ル を元に戻す。このとき、ネジ(h)も締める。
Replace the rear panel. Fasten the screw (h).
Remettez le panneau arrière en place. Serrez la vis (h).
h
Bringen Sie die Rückseite an, und ziehen Sie die
Schraube (h) an.
Rimettere a posto il pannello posteriore. Serrare le viti
(h).
Vuelva a colocar el panel posterior. Apriete el tornillo
(h).


Sony Corporation
Printed in Japan
Other Sony Control Unit manuals
Popular Control Unit manuals by other brands

SMC Corporation
SMC Corporation ASP-X369 Series instruction manual

Riello UPS
Riello UPS Multi I/O Series user manual

CEBEK
CEBEK FM-2 quick guide

ICP DAS USA
ICP DAS USA I-87004W user manual

National Instruments
National Instruments cFP-RLY-421 operating instructions

Heros
Heros tiny SCR Preselector user manual