1-4 DPP-SV55 V1 (UC, CE)
Installing the printer driver
Install the Sony DPP-SV55 Printer Driver Software for Mac OS 8.5.1/8.6/9.0 Ver. 1.0 (“printer
driver” in this manual) into your Macintosh.
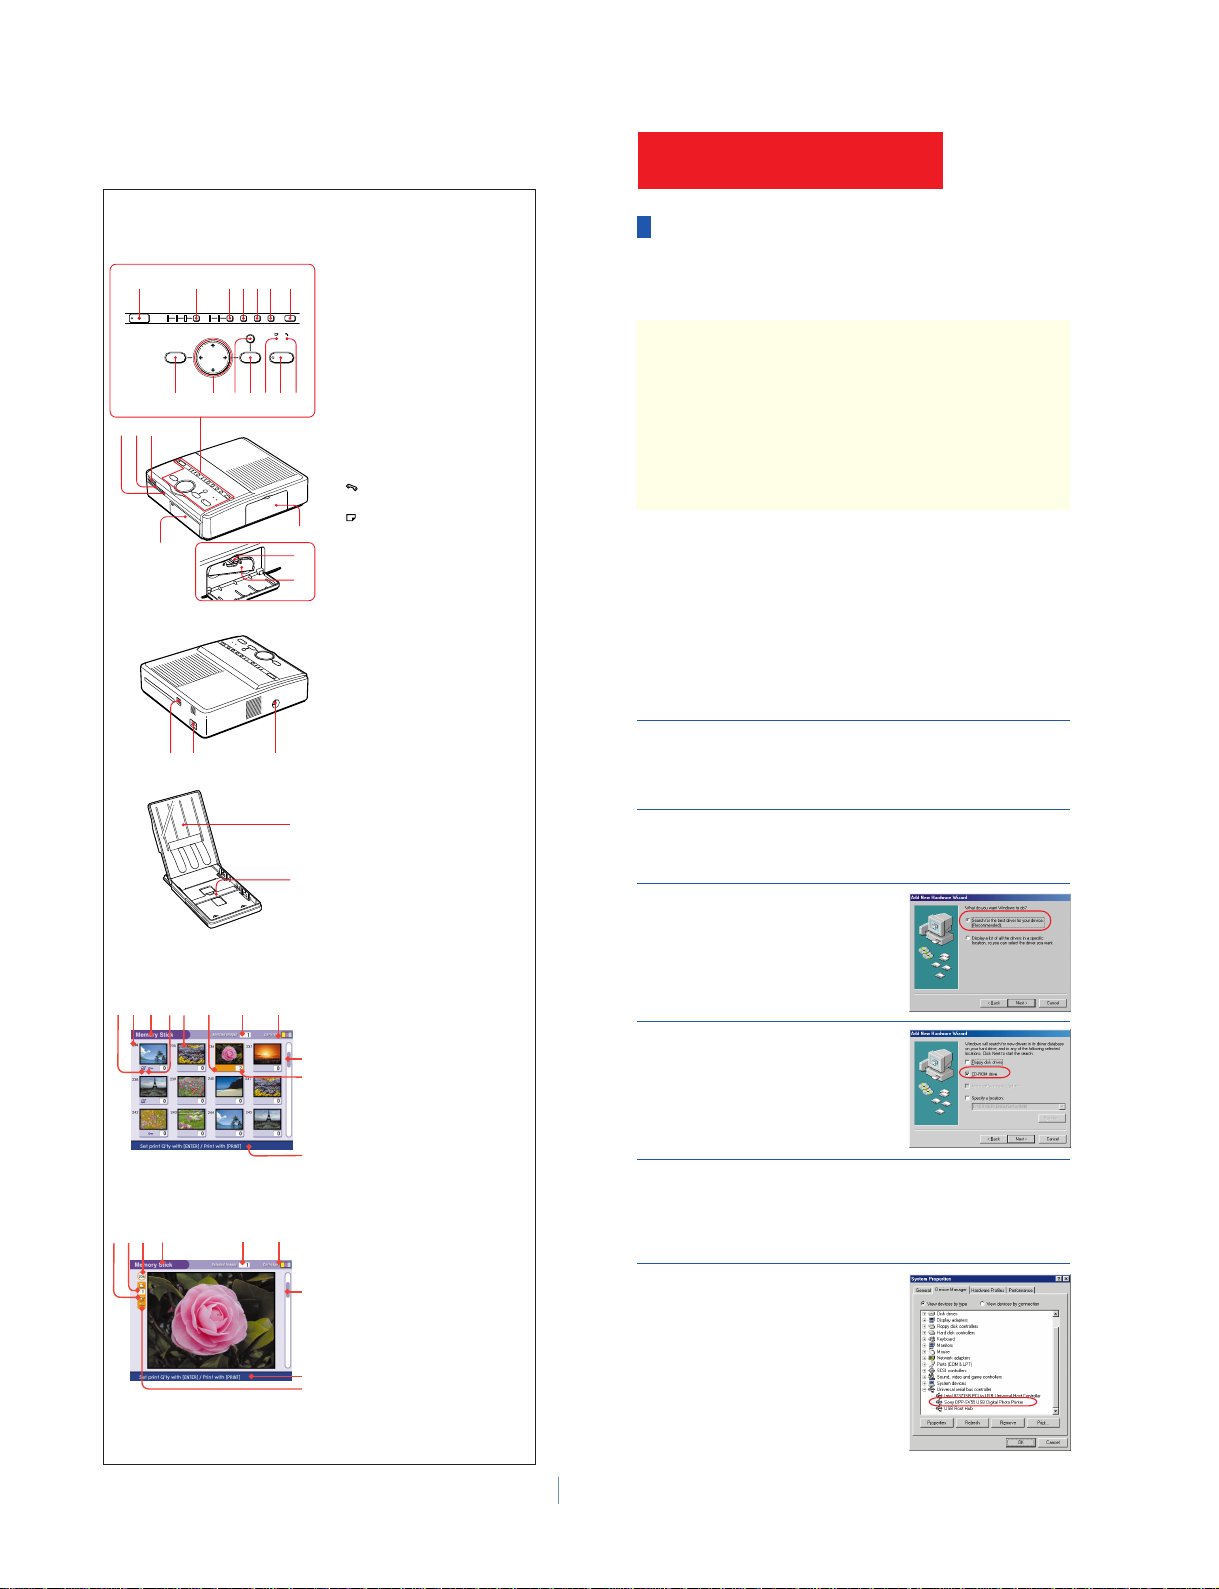
1
Connect your Macintosh and the printer.
For the connections, refer to “Connecting the printer” of “Operating Instructions – Basic
Operations.”
Note
Close all programs before running the installer.
2
Turn on the printer and start your Macintosh.
3
Insert the supplied CD-ROM into
your CD-ROM drive and select the
software language by double-
clicking the corresponding folder
in the CD-ROM.
The selected language folder opens.
4
Double-click“Setup Program.”
5
Click“Install.”
Installation starts. Follow the instructions on the screen to complete installation.
Uninstalling the printer driver
When the software becomes unnecessary, remove the software as follows: In step 5, click
“Uninstall.”
Printing from an application software
You can use an application software to print your computer’s hard disk images with the DPP-
SV55 Digital Photo Printer.
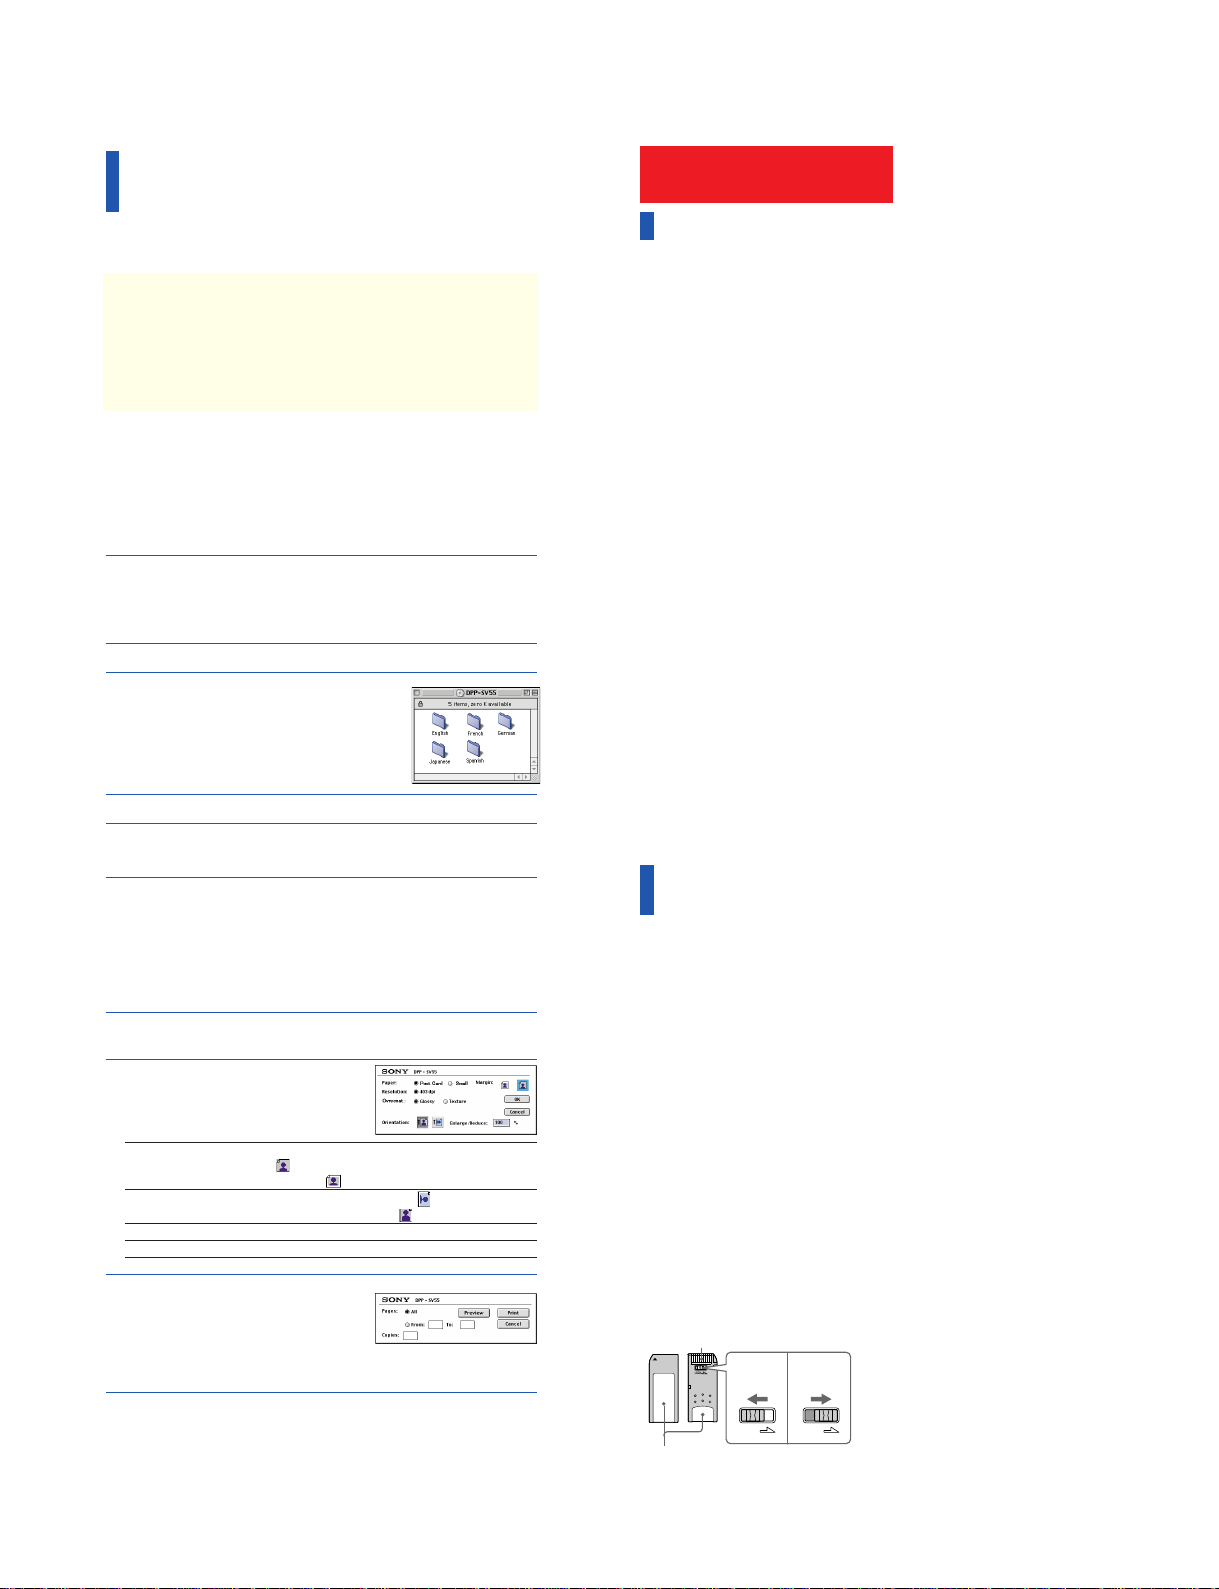
1
Select“Chooser”from the Apple menu and click“Sony DPP-
SV55”in the“Chooser.”
2
Closethe“Chooser”andselect
“Print Setup”from the “File”
menu and set printing in
detail.
Paper/Margin To make Post Card Size borderless print, click “Post Card” and no
margin icon . To make border Post Card Size print, click “Post
Card” and margin icon . To make Small Size print, click “Small.”
Orientation To print a wide image, click landscape icon .
To print a tall image, click portrait icon .
Overcoat Select the overcoat type (“Glossy”/“Texture”).
Enlarge/Reduce Select the enlarged or reduced size to be printed.
3
Click “OK” to close the dialog box
and select“Print” from the“File”
menu to start printing.
Specify the printing range and copies. Then click
“Preview” to display the print preview or “Print”
to start printing.
Notes
•We cannot guarantee the printer operations when a
hub is used or when two or more USB devices are
connected to your computer.
•When two or more DPP-SV55 printers are
connected to your computer, you cannot operate
the printer.
• You cannot operate the printer from another USB
device being used simultaneously.
Using the printer with Macintosh
The supplied software enables you to print an image from your Macintosh with the Digital
Photo Printer DPP-SV55. To print an image from the computer, you need a commercially
available printing application software.
System requirements
To use the supplied software, you need a Macintosh computer that must meet the
following system requirements.
OS: Mac OS 8.5.1/8.6/9.0 should be pre-installed.
Port: USB port should be installed as standard.
RAM: 32 MB or more (64 MB or more is recommended.)
Harddiskspace: 50 MB or more (It depends on the number of copies you print.)
Drive: CD-ROM drive (for software installation)
Note
To make a print as expected, we suggest you use the
application software that allows you to check the print
preview. Otherwise, make the image size to 1664
(dots) x 2466 (dots) and the resolution to 403 dpi.
LOCK LOCK
Place the label here
Connector
Write enable
position Write
protect
position
Additional Information
Precautions
On safety
•Operate the printer on 120 V AC, 60 Hz (for
the US model) or 220 to 240 V AC, 50/60 Hz
(for the models for other areas) only.
•Be careful not to set or drop any heavy
objects on the power cord, or to damage the
power cord in any way. Never operate this
printer with a damaged power cord.
•Should any solid object or liquid fall into
the cabinet, unplug the printer and have it
checked by qualified personnel before
operating it any further.
•Never disassemble the printer.
• To disconnect the power cord, pull it out by
the plug. Never pull the power cord itself.
•When the printer is not going to be used for
an extended period of time, disconnect the
power cord from the wall outlet.
•Do not handle the printer roughly.
• To reduce the risk of electrical shock,
always unplug the printer from the
electrical outlet before cleaning and
servicing the printer.
On installation
• Avoid placing the printer in a location
subject to:
–vibration
–high humidity
–excessive dust
–direct sunlight
–extremely high or low temperatures
•Do not use electrical equipment near the
printer. The printer will not work properly
in electromagnetic fields.
•The printer is designed to operate
horizontally. Never attempt to operate the
printer in a tilted position.
•Do not place heavy objects on the printer.
•Leave enough room around the printer so
that the ventilation holes are not blocked.
Blocking these holes may cause internal
heat build-up.
On moisture condensation
If the printer is brought directly from a cold
location to warm location or placed in an
extremely warm or humid room, moisture
may condense inside the unit. In such cases
the printer will probably not work properly
and may even develop a fault if you persist in
using it. If moisture condensation occurs, turn
off the power and do not use the printer for at
least one hour.
On transport
When you transport the printer, remove the
print cartridge, paper tray, the “Memory
Stick” or PC card from the printer and put the
printer and its peripherals in the original box
with the protective packaging.
If you no longer have the original box and
packing parts, use similar packing material so
that the printer will not be damaged while
transporting.
On cleaning
Clean the cabinet, panel and controls with a
soft dry cloth, or a soft cloth lightly moistened
with a mild detergent solution. Do not use any
type of solvent, such as alcohol or benzine,
which may damage the finish.
On restrictions on duplication
If duplicating documents with the printer, pay
special attention to the following:
•Duplication of banknotes, coins, or
securities is against the law.
•Duplication of blank certificates, licenses,
passports, private securities, or unused
postal stamps is also against the law.
•TV program, films, video tapes, others’
portraits or other materials may be
copyrighted. Unauthorized video printing
of such materials may infringe the
provisions of the copyright law.
About“Memory Stick” and PC
card
The printer can read and write “Memory
Stick” and PC card (PCMCIAATA compatible
type II flash memory cards with a power
specification of 5V or 3.3/5V). By using a
commercially available PC card adaptor, you
can also use Smart Media and other types of
compact flash cards.
On “Memory Stick”
There are two types of “Memory Stick”:
general “Memory Stick” and “MagicGate
Memory Stick.” The “MagicGate Memory
Stick” is equipped with the MagicGate
copyright protection technology that uses
encryption technology. You can use both types
of “Memory Stick” with your printer.
However, because the printer does not support
the MagicGate standards, data recorded with
the printer is not subject to MagicGate
copyright protection.
To protect“Memory Stick”images
To prevent accidental erasure of important
image data, slide the write protect switch on
the “Memory Stick” to the write protect
position when you just view the images.
Only when you write, delete data, or format a
“Memory Stick,” slide it to the write enable
position.
Notes
•You cannot use the PC cards with the power
specification of 3V only.
•Do not insert other types of PC card into the
printer’s insertion slot. The printer may be
damaged.
•Do not drop, bent, or submit the “Memory Stick”
or PC card to external shock.
•Do not disassemble or modify the “Memory Stick”
or PC card.
•Avoid getting liquids on the “Memory Stick” or
PC card.
• Avoid using or storing the “Memory Stick” or PC
card in a location subject to:
–extremely high temperature such as the hot
inside of a car or the outdoors exposed to a
burning sun, or a place near a heater.
–direct sunlight
–high humidity
–corrosive substances
–excessive dust
–electrostatic or electronic noises
–magnetic fields
•Avoid touching the connector of the “Memory
Stick” or contacting it with a metal object.
•When attaching a label to the “Memory Stick” as
specified in the illustration, use the label supplied
for the “Memory Stick” only. Do not use any other
labels.
•When storing and carrying the “Memory Stick” or
PC card, keep it in its original case to ensure
protection of important data.
•Avoid removing the “Memory Stick” or PC card
from the insertion slot or turning off the power of
the printer while the printer is accessing the
“Memory Stick” or PC card. Otherwise, data may
be rendered unreadable.
• When using a compact flash card or Smart Media,
use a commercially available PC card adaptor that
is compatible with the card. Attach the card into
the adaptor and then insert it into the printer. For
how to install the card and adaptor, refer to the
operating instructions of the PC card adaptor.
•Avoid inserting or removing the compact flash
card or Smart Media into or out of the PC card
adaptor while the PC card adaptor is inserted in
the printer. The data may be rendered unreadable
or erased.