TFK Joggster Sport User manual

1
Gebrauchsanleitung
Operating manual
Istruzioni d’uso
Instrucciones de uso
Notice d’utilisation
Gebruiksaanwijzing
Bruksanvisning
Használati utasítás
Instrukcja obsługi
Návod k obsluze
Návod na použitie
Instrucţiuni de Utilizare
Инструкции за употреба
Product video on
www.buggy.de
QR Code
2
V
II
I
1
3
III
a
b
IV
VI
12
10
9
10
11
VII
VIII
IX
X
XI
XII
XIII
XIV
XV
2
a
a
a
III
d
c
c
x
x
y
y
z
4
5
6
7
8
13
14
15
16
17
18
19
20
22
21
23
23
24
25
26

3
DE Gebrauchsanleitung und Garantiebestimmungen 4
GB operating manual and warranty conditions 8
IT Istruzioni d’uso e condizioni di garanzia 12
ES Instrucciones de uso y condiciones de garantía 16
FR Notice d’utilisation et dispositions de garantie 20
NL Gebruiksaanwijzing en garantiebepalingen 24
NO Bruksanvisning og garantibestemmelser 28
SE Bruksanvisning och Garantipolicy 32
HU Használatiútmutatóésgaranciávalkapcsolatosrendelkezések 36
PL Instrukcja obsługi oraz warunki gwarancji 40
CZ Návod k obsluze a zàruční podmínky 44
SK Návod na použitie a podmienky záruky 48
RO Instrucţiuni de Utilizare şi Condiţii de acordare a Garanţiei 52
BG Инструкции за употреба игаранция 56

4
Gebrauchsanleitung und Garantiebestimmungen
Herzlich willkommen in der Welt von TFK.
Bitte nehmen Sie sich ein Paar Minuten Zeit und lesen Sie die folgenden
Hinweise vor der Benutzung sorgfältig durch. WICHTIG: Bewahren Sie die
Anleitung für spätere Rückfragen auf. Wenn Sie diese Hinweise nicht
beachten, kann die Sicherheit Ihres Kindes beeinträchtigt werden! Beachten
Sie bitte auch die Sicherheitshinweise bei der Benutzung des Joggster Sport
zum Joggen und Skaten!
SICHERHEITSHINWEISE + WARNUNGEN
- WARNUNG: Lassen Sie Ihr Kind nicht unbeaufsichtigt!
- WARNUNG: Diese Sitzeinheit ist für Kinder unter 6 Monaten nicht
geeignet. Gewicht bis maximal 15 kg!
- WARNUNG: Dieser Wagen ist mit Quickfix oder MultiX Wanne für Kinder
ab 0 Monaten bestimmt!
-WARNUNG: Vergewissern Sie sich, dass Ihr Kind beim Aufklappen und
Zusammenklappen des Wagens außer Reichweite ist, um Verletzungen
zu vermeiden.
-WARNUNG: Vergewissern Sie sich vor Gebrauch, dass alle
Verriegelungen geschlossen sind!
-WARNUNG: Am Schieber befestigte Lasten beeinträchtigen die
Standfestigkeit des Wagens!
-WARNUNG: Verwenden Sie einen Sicherheitsgurt, sobald Ihr Kind
selbständig sitzen kann.
-WARNUNG: Verwenden Sie den Schrittgurt immer in Verbindung mit dem
Beckengurt!
-WARNUNG: Es ist zu überprüfen, dass der Kinderwagenaufsatz oder die
Sitzeinheit oder der Autokindersitz vor Gebrauch korrekt eingerastet ist.
-WARNUNG: Lassen Sie Ihr Kind nicht mit dem Wagen spielen.
-Autokindersitze, die in Verbindung mit einem Fahrgestell verwendet werden,
ersetzten weder eine Wiege noch ein Kinderbett. Sollte Ihr Kind Schlaf
benötigen, sollte es dafür in einen geeigneten Kinderwagenaufsatz, eine
geeignete Wiege oder ein geeignetes Bett gelegt werden!
-Den Wagen nie ohne gesicherte Parkbremse abstellen!
-Heben Sie den Wagen niemals mit einem Kind darin hoch!
-Benutzen Sie keine (Roll-) Treppen, wenn sich ein Kind im Wagen befindet!
-Die maximale Beladung im Korb ist 5 kg! Jede andere Tasche und der
Karabiner Haken am Verdeck darf mit max 0,5kg beladen werden.
- Reifenluftdruck: 1,2 bar
- Bitte überprüfen Sie in regelmäßigen Abständen die Bremsen und
Verbindungen auf ihre Funktion! Verwenden Sie im Reparaturfall nur
originale Ersatzteile!

5
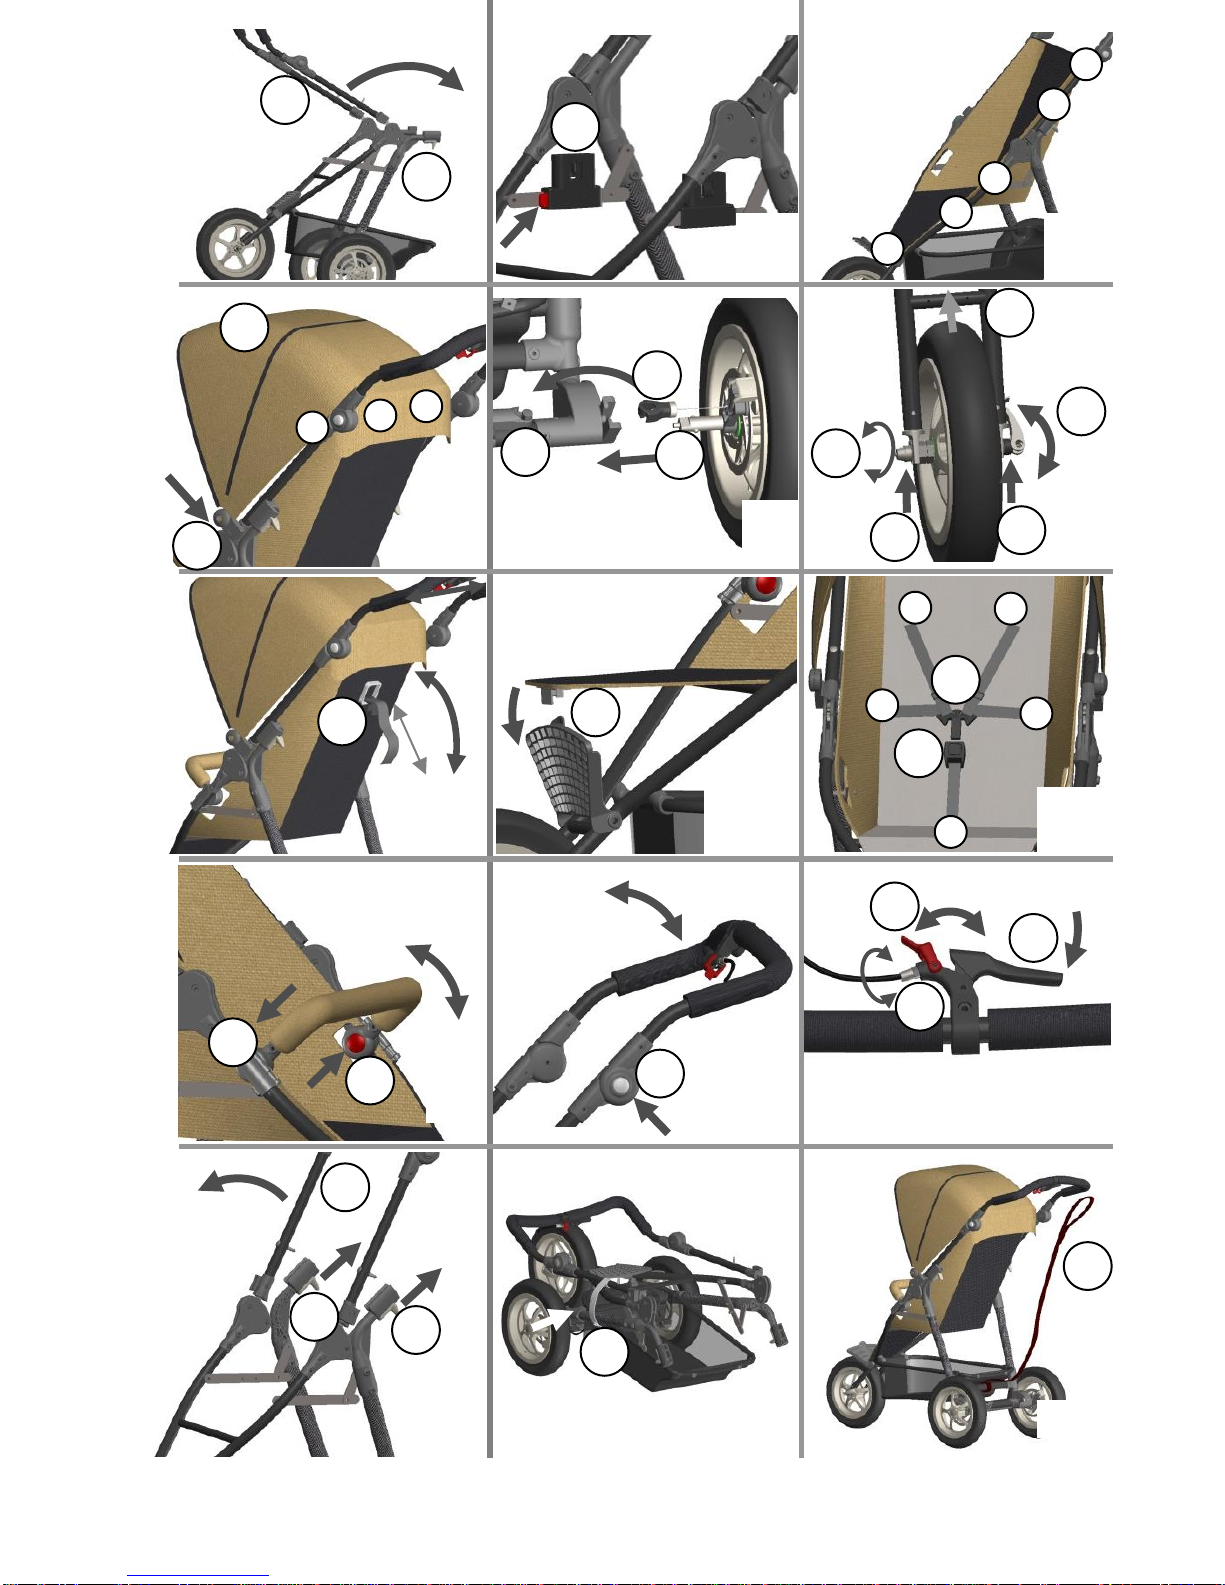
GEBRAUCHS- UND MONTAGEANLEITUNG
- (Abb.I) Um den Joggster light benutzen zu können, klappen Sie die
Schiebestange (1) nach oben. Der komplette Wagen wird dadurch
aufgeklappt. Achten Sie darauf, dass die Pins in der Verriegelung (2)
hörbar einrasten.
- (Abb.II) Die Basisadapter (3) werden auf die Stahlstreben von oben
aufgesteckt, bis sie verriegeln. Zum Abnehmen einfach den roten Knopf
drücken. Darauf werden entsprechend die Adapter für die TFK Wannen
Quickfix oder MultiX gesteckt. Adapter sind auch für die Autositze
MaxiCosi, Recaro Previa, Cybex ATON und Cloud, BeSafe IziGo, Kiddy
Evoluna und Römer baby Safe verfügbar.
- (Abb.III) Bevor Sie den Sitz montieren können, entnehmen Sie die Basisadapter.
Der Sitz wird mit je 4 Druckknöpfen (a) an beiden Seiten am Rahmen befestigt.
Zusätzlich wird er am Fußbrett mit 2 Druckknöpfen (b) befestigt.
- (AbbIV) Stecken Sie das Verdeck links und rechts in die Halterungen (4)an
der Schiebestange. Anschießend wird es mit zwei Druckknöpfen (c) am Sitz
und zwei Schlaufen (d) an beiden Rahmenstreben befestigt. Wenn Sie den
Reißverschluss (5) öffnen, können Sie das Verdeck weiter nach vorne öffnen.
- (Abb.V) Zur Montage der Hinterräder stecken Sie die Achse (6) in den
Rahmen, so dass auch die Bremse in der Halterung sitzt. Befestigen Sie
den Bremshaken (7) in der M-Brake (8). Wenn Sie die Räder abnehmen
möchten, lösen Sie das Bremskabel (7)und drücken Sie den Känguru-
Knopf in der Mitte des Rades ein. Jetzt können Sie die Räder abziehen.
- (Abb.VI) Stecken Sie das Vorderradad in die Vordergabel (12) und
ziehen Sie die Rändelmutter (11)bei geöffnetem Schnellverschluss (9)
leicht an. Achten Sie darauf, dass die „Nasen“ der Ausfallsicherungen in
den dafür vorgesehenen Öffnungen sind. Jetzt können Sie den
Spannhebel (9) umlegen, sodass das Rad fest in der Vordergabel (12)
sitzt. Ziehen Sie danach den Spannhebel (9) wieder fest. In der
Radaufnahme befinden sich 2 Madenschrauben (10), mit denen Sie den
Geradeauslauf des Joggster light bei Bedarf einstellen können.
- (Abb.VII) Die Sitzlehne ist stufenlos mit dem Band verstellbar. Drücken
Sie dazu die beiden Plastikteile (13) zusammen und Verstellen den
Sitzwinkel mit dem Band.
- (Abb.VIII) Die Fußraste kann nach oben geklappt werden. Arretieren
Sie dieses dazu mit dem Fußbrett (14).
- (Abb.IX) Das Gurtschloss schließen Sie, indem Sie die beiden Stecker
(15) in das Gurtschloss (16) hörbar einrasten. Zum Öffnen drücken Sie
einfach den Knopf in der Mitte der Halterung (16). Die Gurte können an
die Größe ihres Kindes mit dem Spannsystem x, y und z angepasst
werden. Der Gurt ist an den 5 Punkten x, y, z befestigt.
- (Abb.X) Stecken Sie den Bauchbügel von oben auf die Rahmenrohre.
Sichern sie ihn durch Umlegen der Klemmhebel (17). Durch drücken der
roten Knöpfe (18) links und rechts können Sie ihn in verschiedene
Positionen schwenken.

6
- (Abb.XI) Die Schiebestangenhöhe kann durch drücken der zwei
Verstellgelenke (19) eingestellt werden.
- (Abb.XII) Die Handbremse ist zugleich Lauf- und Parkbremse. Um die
Parkbremse zu aktivieren, müssen Sie den Bremshebel (20) ganz anziehen
und den roten Parkhebel (21) komplett umlegen, damit der Bremshebel (20)
maximal angezogen bleibt und die Bremse dauerhaft blockiert. Falls die
Bremswirkung nachlässt, können Sie eine Feineinstellung vornehmen.
Drehen Sie dazu die Stellschraube (22) am Bremsgriff entgegen dem
Uhrzeigersinn und prüfen Sie die Bremswirkung erneut.
- (Abb.XIII) Um den Joggster Sport zusammenzulegen, müssen Sie die
beiden Verriegelungen (23) nach oben ziehen. Diese bleiben
automatisch geöffnet. Dann können Sie den Schiebergriff (24) nach
vorne hin umlegen. Die Rahmenkonstruktion klappt automatisch ein.
- (Abb.XIV) Schließen Sie die Transportsicherung (25) am Rahmen, damit
sich der Joggster light nicht versehentlich aufklappt.
Sicherheitshinweise bei der Benutzung zum Joggen oder Skaten
- (Abb.XV) Befestigen Sie die mitgelieferte Fangschlaufe (26) an der
Hinterachse und streifen Sie sich die Seite mit dem Gummizug über das
Handgelenk! Verhindert wegrollen!
- Joggen oder Skaten Sie nicht mit Kindern, wenn diese noch nicht
selbstständig aufrecht sitzen können. Eine Gefahr für die Gesundheit und der
körperlichen Entwicklung des Kindes kann besteht
- Stellen Sie den Sitz in die aufrechte Position und klappen Sie das Verdeck aus.
Sichern Sie den Sitz zusätzlich mit den 4 Schlaufen der Rückenlehne am
Rahmen (27 & 28)
- Schnallen Sie Ihr Kind fest mit dem 5-Punkt-Gurt an! Ziehen Sie Ihrem Kind einen
Helm auf und feste Schuhe an!
- Joggen oder skaten Sie nicht mit der Tragewanne oder einem Gruppe-0-Sitz!
- Stellen Sie sicher, das Ihr Kind keine losen Gegenstände im Wagen hat, die
herausfallen können!
- Stellen Sie sicher, dass keine losen Gegenstände im Korb liegen!
- Tragen Sie selbst angemessene Schutzkleidung.
- Fahren Sie immer vorausschauend, mit angemessener Geschwindigkeit und
gefährden Sie keine anderen Verkehrsteilnehmer!
- Bleiben Sie bremsbereit!
- Skaten und laufen Sie nur auf ebenen Fahrbahnbelägen und meiden Sie Steigungen
und Gefälle über 5%! Fahren Sie nicht über Hindernisse undLöcher!
- Alle Räder müssen immer Bodenkontakt haben! Keine schnellen Richtungs-
änderungen und Kurven!
- Überprüfen Sie alle Bauteile auf Ihre Festigkeit und Funktion vor dem
Sporteinsatz und Erhöhen Sie den Reifendruck auf 1,5 bar!
- Joggen oder Skaten Sie nicht bei Umwelteinflüssen wie Sturm, Regen,
Schnee, Eisglätte und Dunkelheit!
- Benutzen Sie den Joggster Sport nur dann zum Skaten, wenn Sie bereits
ein/e geübte/r Fahrer/in sind. Sie müssen sicher ohne Hilfe bremsen können!
Der Joggster Sport ist keine „Lauflernhilfe“! Bitte stützen Sie sich nicht auf ihn
auf und benutzen Sie ihn auch nicht als „Bremse“!

7
PFLEGEHINWEISE
-Reinigen Sie alle Teile mit einem feuchten Tuch.
-Benutzen Sie keine aggressiven Reinigungs- oder Schmiermittel!
-Ölspray an den Faltgelenken und Radlagern stellt die Leichtgängigkeit sicher.
-Sie können den Sitzbezug mit der Hand bei 30° waschen. Nicht in die
Waschmaschine oder Trockner geben
-Die Bereifung kann unter Umständen zur Verfärbung des Bodenbelags führen.
Fremdkorper (z.B. Steinchen) in den Reifen müssen entfernt werden um eine
eventuelle Beschädigung von Bodenbelägen zu vermeiden.
GARANTIEBEDINGUNGEN
Bei berechtigten Beanstandungen gelten die gesetzlichen Bestimmungen. Zum
Nachweis des Erwerbes, bewahren Sie bitte den Kaufbeleg für die Dauer der
gesetzlichen Verjährungsfrist auf. Diese beträgt 2 Jahre *) und beginnt mit der
Übergabe des Produkts an Sie. Falls bei diesem Produkt Mängel bestehen, beziehen
sich diese auf sämtliche Material- und Herstellungsfehler, die zum Zeitpunkt der
Übergabe vorliegen. Keine Ansprüche bestehen für:
• Natürlicher Verschleiß und Schäden durch übermäßige Beanspruchung.
• Schäden durch ungeeignete oder unsachgemäße Verwendung.
• Schäden durch fehlerhafte Montage und Inbetriebnahme.
• Schäden durch nachlässige Behandlung oder Wartung.
• Schäden durch unsachgemäße Änderungen am Wagen.
Fehler müssen unverzüglich gemeldet werden, damit keine Folgeschäden entstehen!
Reklamationsfall oder nicht?
TFK Produkte sind meist zu einem hohen Teil aus Aluminium gefertigt und somit rostfrei.
Manche Teile sind jedoch auch lackiert, verzinkt oder haben eine sonstigen
Oberflächenschutz. Je nach Wartung oder Beanspruchung können diese Teile auch
rosten. Hierbei handelt es sich dann um keinen Mangel.
Kratzer sind normale Verschleißerscheinungen und kein Mangel.
Feuchte Textilien, die nicht getrocknet und ausreichend gelüftet werden, können
schimmeln und stellen keinen produktionsbedingten Mangel dar.
Durch Sonneneinstrahlung, Schweiß, Reinigungsmittel, Abrieb oder zu häufiges
Waschen ist ein Ausbleichen nicht auszuschließen und somit kein Mangel.
Bitte prüfen Sie beim Kauf genau, ob alle Stoffteile, Nähte, Druckknöpfe und
Reisverschlüsse ordnungsgemäß vernäht sind und funktionell in Ordnung sind.
Abgefahrene Räder sind natürliche Verschleißerscheinungen. Schäden durch
äußere Einwirkungen sind kein Mangel. Leichte Unwucht ist nicht vermeidbar und
stellt keinen Mangel dar.
Der Übergabe-Check soll immer durchgeführt werden, um Reklamationen schon im
Vorfeld zu vermeiden. Wenn Sie später einen Fehler feststellen, melden Sie diesen
unverzüglich bei Ihrem Händler. Dieser wird sich bei uns melden, um die weitere
Vorgehensweise zu besprechen. Unangemeldete oder unfreie Sendungen bei TFK
werden nicht akzeptiert.
*) gültig nur in der EU. In anderen Ländern sind die jeweils gesetzlichen Fristen gültig.

8
Operating Manual and Warranty Conditions
Welcome to the world of TFK.
Please take a few moments of your valuable time to read the
following instructions carefully before use and keep them in a safe
place. If you do not comply with the instructions, the safety of your
child could be compromised! Please also note the safety instructions
for using the Joggster Sport when jogging or inline skating!
SAFETY INSTRUCTIONS + WARNINGS
•WARNING: Do not leave your child unsupervised.
•WARNING: This pushchair is signed for children aged over six months
and with maximum weight of 15 kg! Always carry one child only!
•WARNING: Before use, make sure that all the locks are properly engaged!
•WARNING: Loads attached to the push bar may impair the balance
of the pushchair!
•WARNING: Always secure your child with the 5-point harness, even
when using the foot muff!
•WARNING: Always use the crotch strap in connection with the lap belt!
•Never park the pushchair without engaging the parking brake!
•Never lift the pushchair when the child is sitting in it!
•Do not use stairs or escalators while the child is sitting in the pushchair!
•When carrying the pushchair on stairs or over other obstacles,
always check that the locks are secure!
•Lift the pushchair only at the fixed frame parts!
•Do not attach any non-TFK accessories!
•The maximum load in the basket is 5 kg! Any other bag or hook on
the hood may be loaded with max. 0,5 kg.
Please check the function of the brakes and the joints at regular
intervals! In case of repairs, please always use original spare parts
only!
OPERATING AND ASSEMBLY MANUAL
• (Fig. I) In order to be able to use Joggster Sport, fold the push bar
(1) upwards. The complete pushcar is folded open. Make sure that
the pins are audibly engaged in the lock (2).
• (Fig. II) Basic adapters (3) are pulled on the bars, so that they lock
hearable into the pins.
• (Fig. III) Before assembling the seat, you have to remove the basic
adapters. The seat is mounted to the frame with 3 push buttons (a)

9
on each side of the frame. Additionally, it’s fixed to the foot rest with
2 pushbuttons (b). On each side of the seat, there’re 2 push buttons
(c) where the wind protection of the hood are fixed.
• (Fig. IV) Insert the hood into the holders (4) on the outer push bar
and into the holder on the centre push bar. Then it is secured to the
seat and the frame (d) with two push buttons (c). It can be
additionally secured to the centre bar with a belt. If you open the
zipper (5), you can extend the hood further forwards.
• (Fig. V) For the assembly of the rear wheels, insert the axle (6) in the
frame so that the brake is also located in the holder. Mount the
brake calliper (7) in the M-brake (8). If you want to remove the
wheels, release the brake cable (7) and press the kangaroo button in
the centre of the wheel. Now you can remove the wheels.
• (Fig. VI) For the initial assembly of the front wheel, first push the
quick-release hub axle (12) through the fall-out protection piece
(“nose” facing the wheel) and then through the wheel hub. After
that, push on another fall-out protection piece (“nose” facing the
wheel) and secure the axle with the knurled nut (14). Then insert the
wheel into the front fork (15) and tighten the knurled nut (14) slightly
with the quick-release lock (12) still open. Make sure that the “noses”
of the fall-out protection pieces are positioned in the provided
openings. You can now close the quick-release lock (12) so that the
wheel is positioned firmly in the front fork (15). Inside of the wheel
attachment you find two set screws (13) to adjust the straight running
when necessary.
• (Fig. VII) Backrests can be continuously adjusted with the belt. To
this end, you must press both plastic parts (13) together and adjust
the seat angle with the belt.
• (Fig. VIII) The foot rest can be folded upwards. To this end, it must
be locked in place with the foot board (14).
• (Fig. IX)Close the belt buckle by audibly engaging both plugs (15)
in the belt buckle (16). If you want to open the harness, simply press
the button in the centre of the buckle (16). The harnesses can be
adjusted to the size of your child using the tensioning system x, y and
z. The harness is located at the 5 points x, y, z.
• (Fig. X) Insert the belly bar from above into the frame tubes. Secure
it by moving the clamping lever (17). By pressing the red buttons (18)
at the left and right side you can swivel it to different positions.
• (Fig. XI) You can set the height of the push bar by pressing the two
adjustment joints (23).
• (Fig. XII) The handbrake is a walking and parking brake at the
same time. To activate the parking brake, you must pull the brake
lever (20) fully tight and completely close the red parking lever (21),

10
so that the brake lever (20) remains tightened to the maximum and
the brake is permanently blocked. If the braking effect starts to
weaken, you can carry out a fine adjustment. To do so, turn the
adjusting screw (22) on the brake grip anti-clockwise and check the
braking effect again.
• (Fig. XIII) To close Joggster Sport, you must push both locks (23)
upwards. They remain automatically open. Then you can move the
push bar (24) in forward direction. The frame construction
automatically closes.
• (Fig. XIV)Close the transport lock (25) on the frame to ensure that
the Joggster Trail does not accidentally open up again.
Safety instructions for use while jogging or inline skating
• Attach the enclosed retention strap (29) on the rear axle and pull
the side with the elastic band over your wrist (Fig. XV)!
• Place the seat in its upright position and secure your child tightly with the
5-point harness! Give your child a helmet! Do not jog or skate with the
seat lowered!
Fix the seat with 4 belts of the backrest to the frame (30 & 31)
• Make sure that your child does not have any loose objects in the
pushchair that could fall out!
• Always proceed carefully and never put any other road or path
users at risk! Always be ready to brake!
• Skate and run on level surfaces only and avoid gradients and
slopes of over 5% ! Do not roll over obstacles or potholes!
• Do not jog or skate with the carry-cot or a Group 0 child’s seat!
• Increase the tyre pressure to 1.5 bar!
• Do not jog or skate in weather conditions such as storms, rain, snow, frost or
darkness!
• Additional stable loads in the basket increase the anti-tilt stability!
Please use the Joggster Sport for skating only if you are already an
experienced skater. The Joggster Sport is not a “learning aid for
skaters”! Please do not lean on the pushchair or use it as a “brake”!
The Joggster Sport is equipped with the following components that
are indispensable for sports use: Adjustable brake discs on the rear
axle, fixed front wheel, fine adjustment for straight running, retention
strap for the wrist, freely attached seat cover for better shock
absorption, mosquito net, height-adjustable push bar, bumper bar
and 5- point safety harness.

11
CARE INSTRUCTIONS
- Clean all parts with a damp cloth.
- Do not use any caustic cleaning or lubricating agents!
- Anoil sprayon thefoldingjoints andthe wheelbearingswillguarantee smoothrunning.
- You can wash the seat cover by hand at 30°. Not suitable for a washing
machine or tumble dryer!
- The tires can cause eventually a discoloration of the floor surfacing.
Foreign bodies in the tires (such as small stones) have to be removed in order
to prevent a possible damage of the floor surfacing.
WARRANTY CONDITIONS
The statutory provisions shall apply for justified complaints. As proof of
purchase, please keep the till receipt for the duration of the statutory period
of limitation. This term is 2 years *) and starts with the handover of the
product to you. Should any faults arise in relation to this product, they shall
involve any faults of material and manufacture that exist at the date of
transfer. Any claims shall be excluded for:
• Natural wear and damage due to excessive stress
• Damage due to unsuitable or improper use
• Damage due to faulty assembly and commissioning
• Damage due to negligent handling or maintenance
• Damage due to improper modifications to the pushchair
Faults must be notified immediately, so that no subsequent damage can be
caused!
A case for complaint or not?
• Most TFK products are produced to a large extent from aluminium and so
are rust-proof. However, some parts are also painted, galvanized or have
other surface protection. These parts may rust, depending on the level of
maintenance and stress. This can therefore not be regarded as a fault.
• Scratches are normal signs of wear and are not a fault.
• Moist textiles that are not dried can moulder and so can not be considered
as a production-related fault.
• The fading of colours due to sunshine, perspiration, cleaning agents,
abrasion or excessively frequent washing cannot be ruled out and so does not
represent a fault.
• Please check carefully at the time of purchase whether all the fabric parts,
seams, press studs and zips are sewn and function properly.
• Worn-down wheels are of course a sign of wear. Damage due to external
influences is not a fault. Slight imbalances are inevitable and do not
represent a fault. The handover check must always be carried out to prevent
inconvenient problems right at the outset. If you find a fault at a later date,
please notify your authorised dealer immediately. He will then contact us to
discuss the subsequent procedure. Any deliveries to TFK that are unnotified or
not prepaid will not be accepted.
*) valid only in the EU. In other countries according to the respective
warranty terms.

12
Istruzioni d’uso e condizioni di garanzia
Benvenuti nel mondo di TFK.
Prendetevi qualche minuto e leggete attentamente le seguenti
istruzioni. Conservatele poi per riferimenti futuri. La mancata lettura
delle presenti istruzioni può essere pericolosa per la sicurezza del
vostro bambino! Leggete anche le avvertenze di sicurezza riguardo
all’utilizzo del Joggster Sport quando si corre o si pattina che
troverete nella parte interna di questo pieghevole.
Avvertenze di sicurezza
-Non lasciare mai il bambino incustodito all’interno o in prossimità del passeggino!
-Il passeggino è idoneo per bambini di età a partire da 6 mesi e fino ad un
peso massimo di 15 kg! Utilizzare il passeggino per un bambino alla volta.
-Prima di utilizzare il passeggino, assicurarsi sempre che tutti i
dispositivi di bloccaggio siano inseriti!
-Borseocontenitoriappesialmaniglionepregiudicanolastabilitàdelpasseggino!
- Fissare sempre il bambino con la cintura di sicurezza a 5 punti,
anche se si utilizza il sacco coprigambe!
-Utilizzare sempre la cintura inguinale in combinazione con la cintura in vita!
-Quando si sosta, assicurasi sempre che il freno sia inserito!
-Non sollevare mai il passeggino quando il bambino è al suo interno!
-Non utilizzare le scale mobili quando il bambino è all’interno del passeggino!
-Verificaresempreidispositividiarrestoquandosiscendonoscaleosimiliostacoli!
-Sollevare il passeggino solo afferrandolo dalle parti rigide del telaio!
-Non installare accessori non originali TFK!
-Non caricare nel cestello pesi superiori a 5 kg!
Siete pregati di verificare regolarmente le condizioni dei freni e dei
giunti! In caso di riparazioni utilizzare esclusivamente ricambi originali!
Istruzioni d’uso e di montaggio
- (Fig. I) Per potere utilizzare il Joggster Sport, aprite per prima cosa la parte
inferiore del telaio. Spingete verso il basso il telaio del cestello (1) aiutandovi
con la mano o con il piede, fino a sentire che scatta in posizione. Questa
operazione è molto importante per la stabilità del passeggino.
- (Fig. II) Dopodiché ruotate verso l’alto il maniglione (2), fino a fare scattare
in posizione il doppio dispositivo di sicurezza (3) (anellino rosso). Chiudete ora
i fermi di blocco(4) posizionati a sinistra e a destra sopra lo snodo.

13
• (Fig. III) Prima di assemblare la seduta passeggino è necessario rimuovere
gli adattatori di base. La seduta si fissa al telaio grazie a 3 bottoni automatici
(a) presenti su ogni lato del telaio. Altri due bottoni fissano il tessuto al
poggiapiedi (b). Su ogni lato della seduta, ci sono due bottoni (c) dove si
fissa la capottina.
• (Fig. IV) Inserire la capottina (5) alla sinistra e alla destra nelle apposite sedi
(6) che si trovano sul maniglione (2). Fissarla poi allo schienale con i quattro
bottoni (d).
-(Fig. V) Quando si inseriscono le ruote posteriori per la prima volta, posizionate
la pinza dei freni (7) sul disco dei freni (8). Dopodiché inserite l’asse della ruota
(9) nel mozzo e fatelo passare nell’apposito foro dell’asse posteriore fino a
farlo scattare in posizione. Agganciate infine il cavo dei freni (10) all’apertura
sul cilindro centrale del freno (11). Verificate il corretto funzionamento dei freni
azionando la leva del freno a mano (24) posizionata sul maniglione (2). Per
togliere le ruote, allentate il cavo dei freni (18) e premete il bottone TFK (9) al
centro della ruota. Ora è possibile sfilare la ruota.
- (Fig. VI) Quando si inserisce la ruota anteriore per la prima volta, fate
passare innanzitutto l’asse della leva di blocco (12) attraverso un dispositivo
di sicurezza (13) (“dente” verso la ruota) e poi nel mozzo. Dopodiché infilate
un altro dispositivo di sicurezza (13) (“dente” verso la ruota) e bloccate l’asse
con il dado zigrinato (14). Inserite ora la ruota nella forcella anteriore (15) e
con la leva di blocco aperta, serrate leggermente il dado zigrinato (14).
Fate attenzione affinché i “denti” dei dispositivi di sicurezza (13) si trovino
nelle apposite sedi. Ora potete chiudere la leva di blocco (12), in modo che
la ruota sia ben salda nella forcella anteriore (15). Qualora non riusciate a
spingere bene il vostro Joggster Sport, aprite la leva di blocco (12) e
correggete la posizione dell’asse. Ricordatevi di richiudere sempre la leva di
blocco (12).
-(Fig. VII) Lo schienale è regolabile in molteplici posizioni tramite le cerniere
lampo laterali (16). Prestate attenzione affinché le cerniere lampo siano
sempre completamente chiuse o completamente aperte.
-(Fig. VIII) Il poggiapiedi (17) può essere richiuso verso l’alto. Ruotatelo verso
l’alto e bloccatelo con la staffa in metallo (18) posizionata sotto il medesimo.
Quando si apre il poggiapiedi (19), lo si potrà spostare in tre differenti
posizioni.
- (Fig. IX) Sotto l’arco della capottina è arrotolata una zanzariera (20). Aprite
la cerniera lampo e tiratela verso il basso passando sopra al poggiapiedi.
Aprendo un’ulteriore cerniera lampo potrete togliere completamente la
zanzariera.
- (Fig. X) Per fissare la barra ventrale (21) sollevate le coperture laterali del
rivestimento ed inserite gli innesti sul tubo del telaio. Fissarla chiudendo la
levetta di sgancio (22). Premendo i bottoni rossi a destra e a sinistra potrete
ruotare la barra in diverse posizioni.
- (Fig. XI) L’altezza del maniglione è modificabile premendo i due bottoni di
regolazione (23).

14
- (Fig. XII) Il freno a mano è sia freno di sosta sia freno di arresto. Per inserire il
freno di sosta tirate completamente la levetta del freno (24) e chiudete la
levetta rossa di sosta (25). Così facendo il freno è bloccato. Per sbloccarlo,
tirate verso il basso la leva del freno (24) e disinserite la levetta di sosta (25).
Se la capacità frenante diminuisce, potete rimediare nel modo seguente:
ruotate in senso antiorario la vite di regolazione (26) sull’impugnatura del
freno e verificate nuovamente la capacità frenante.
- (Fig. XIII) Per chiudere il Joggster Sport, piegate il poggiapiedi (19),
disinserite i due fermi di sicurezza (4) sopra lo snodo e la doppia sicurezza (3)
e ruotate in avanti il maniglione (2). Con un colpo deciso tirate la maniglia
del cestello (27) verso l’alto. Così facendo il passeggino si piega.
- (Fig. XIV) Durante il trasporto bloccate il passeggino con l’apposito fermo
(28), per evitare che si apra inaspettatamente.
Avvertenze di sicurezza quando si utilizza il passeggino
correndo o pattinando
- Fissate sull’asse posteriore il laccio di sicurezza (29) appositamente fornito
ed infilate al polso l’estremità con l’elastico! (fig. XV)
- Riponete lo schienale in posizione eretta, fissate il bambino con la cintura a 5
punti e dotatelo di elmetto! Non correte o pattinate con lo schienale abbassato!
- Assicuratevi che il vostro bambino non abbia oggetti nel passeggino, che
potrebbero cadere fuori!
- Spingete sempre il passeggino con molta attenzione onde evitare di mettere in
pericolo gli altri utenti dei mezzi di trasporto. Siate sempre pronti a frenare!
- Correte o pattinate solo su piste ciclabili piane ed evitate pendenze
(saSport o discese) superiori ai 5% ! Non passate sopra ostacoli o buche!
-Nonsipuòcorrereopattinareconlacarrozzinaoconunseggiolinoperautodelgruppo0!
- Aumentate la pressione delle ruote a 1,5 bar!
- Evitate di correre o pattinare in caso di eventi atmosferici avversi, quali
temporali, pioggia, neve, ghiaccio o oscurità.
- Pesi eccessivi nel cestello aumentano il rischio di rovesciamento!
Utilizzate il Joggster Sport per pattinare solo se siete già dei pattinatori
esperti. Il Joggster Sport non è un “aiuto alla pattinata”! Non appoggiatevi al
passeggino e non utilizzatelo come freno!
Il Joggster Sport è munito dei seguenti accessori, indispensabili per un utilizzo
sportivo: freni a disco installabili sull’asse posteriore, ruota anteriore fissa,
dispositivo di regolazione dell’assetto del passeggino, laccio da polso,
seduta agganciata tramite cinghie per smorzare le vibrazioni, zanzariera,
maniglione regolabile, barra ventrale e cintura di sicurezza a 5 punti.

15
INDICAZIONI DI MANUTENZIONE
-Pulire tutti gli elementi con un panno umido.
-Non utilizzare detergenti o lubrificanti aggressivi!
-Oliolubrificantesui giunti pieghevoliesuicuscinetti delleruoteassicurailfacileazionamento.
-La fodera può essere lavata a mano ad una temperatura di 30°. Non lavare a
macchina o mettere nell’asciugabiancheria!
-In alcuni casi, le gomme delle ruote potrebbero lasciare macchie nere sul
pavimento. Devono essere rimossi i corpi estranei (p.e. sassolini) dalle gomme delle
ruote per evitare di rovinare i pavimenti.
CONDIZIONI DI GARANZIA
In caso di reclami giustificati, vengono applicate le disposizioni di legge. Conservare lo
scontrino come prova d’acquisto per l’intera durata della garanzia. “Ha una durata di
due anni *) ed inizia con la consegna del passeggino all’acquirente.
Se il prodotto presenta difetti, si tratta di vizi del materiale o errori di produzione già
presenti al momento della consegna. La garanzia non è valida per
• normale usura e danni causati da eccessiva sollecitazione;
• danni causati da uso improprio o incuria;
• danni causati da montaggio e messa in funzione errati;
• danni causati da uso o manutenzione negligenti;
• danni causati da modifiche improprie al prodotto.
I difetti devono essere comunicati immediatamente al fine di evitare ulteriori danni!
È un caso di reclamo?
I prodotti TFK sono fabbricati in gran parte con alluminio e quindi inossidabili. Alcuni
componenti sono però smaltati, zincati o hanno una protezione superficiale. A
seconda della manutenzione o della sollecitazioni a cui sono sottoposti, questi
componenti possono anche arrugginirsi. In questo caso non si tratta di difetti del
prodotto.
I graffi sono normali segni d’usura e non rappresentano un vizio del prodotto.
Sui tessuti umidi che non vengono asciugati e ben arieggiati si può formare della
muffa, che non rappresenta un difetto di produzione.
Non è possibile escludere uno scolorimento del materiale dovuto all’esposizione ai
raggi solari, al sudore, ai detergenti di pulizia, all'usura o a lavaggi troppo frequenti;
non si tratta dunque di vizi del prodotto.
Si prega di controllare al momento dell’acquisto che tutte le parti in stoffa, le
cuciture, i bottoni e le chiusure lampo siano cucite e funzionino correttamente.
Ruote consumate sono normali conseguenze dell’usura. Danni dovuti a cause
esterne non rappresentano difetti del prodotto. Un leggero sbilanciamento non può
essere evitato e pertanto non rappresenta un difetto del prodotto.
Controllare il prodotto al momento dell’acquisto per evitare possibili reclami
successivi. Se successivamente si dovessero presentare dei difetti, comunicarli
immediatamente al proprio rivenditore di fiducia. Questi si metterà in contatto con TFK
per discutere le misure da adottare. TFK non accetta spedizioni senza preavviso o non
affrancate.
*) valida solo nell’UE. Negli altri Paesi valgono le rispettivi norme vigenti in
materia.”

16
Instrucciones de uso y condiciones de garantía
Bienvenido al mundo de TFK.
Tómese un par de minutos para leer detenidamente las siguientes
instrucciones antes de utilizar el producto, y téngalas siempre a mano.
Tenga en cuenta que si no las sigue, puede poner en peligro la seguridad
del niño. Observe también las indicaciones de seguridad relativas a la
utilización del Joggster Sport para correr y patinar.
INDICACIONES DE SEGURIDAD Y ADVERTENCIAS
-ADVERTENCIA: tenga siempre al niño bajo supervisión.
-ADVERTENCIA: este cochecito con asiento es apto para niños a
partir de los 6 meses y admite un peso máximo de 15 kg.
-ADVERTENCIA: este cochecito con capazo Quickfix o MultiX es apto
para niños a partir de 0 meses.
-ADVERTENCIA: para evitar accidentes, cuando vaya a plegar o desplegar
el cochecito, asegúrese de que el niño no está en la proximidad y puede
hacerle daño.
-ADVERTENCIA: antes de utilizarlo, asegúrese de que todos los
mecanismos de bloqueo están cerrados.
-ADVERTENCIA: si se coloca alguna carga en el manillar, el
cochecito perderá estabilidad.
-ADVERTENCIA: utilice el cinturón de seguridad para sujetar al niño
en cuanto éste pueda sentarse solo.
-ADVERTENCIA: utilice siempre el cinturón de entrepierna en combinación
con el de pelvis.
-ADVERTENCIA: antes de colocar al niño, compruebe que el capazo,
el asiento o la silla de auto están bien encajados.
-ADVERTENCIA: no permita que el niño juegue con el coche.
-Las sillas de auto que se utilizan en combinación con un chasis no
sustituyen ni a la cuna ni a una cama de bebé. Si el niño necesita
dormir, debería colocarlo en un capazo, una cuna o una camita
adecuada para ello.
-No deje nunca el cochecito parado sin el freno de estacionamiento
puesto.
-Nunca levante el cochecito con el niño dentro.
-No utilice escaleras (mecánicas) para subir el cochecito con el niño dentro.
-La carga máxima que admite el capazo es de 5 kg. Las bolsas
admiten 1 kg como máximo.
- Presión de las ruedas: 1,2 bar.

17
Compruebe con regularidad que los frenos y las uniones funcionan
correctamente. Si tiene que reparar el cochecito, utilice sólo piezas
de repuesto originales.
INSTRUCCIONES DE USO Y MONTAJE
- (Fig.I) Para poder utilizar el Joggster Sport, eleve el manillar (1). De este
modo se desplegará todo el cochecito. Para ello empuje hasta que las
clavijas hagan clic al encajar en el enclavamiento (2).
- (Fig.II) Los adaptadores básicos (3) se deslizan desde arriba por los
travesaños de acero hasta que encajan. Para desmontarlo, presione el
botón rojo.
- (Fig.III) Antes de montar el asiento, retire los adaptadores básicos. El
asiento se fija con 4 botones a presión (a) a cada lado del chasis.
Además, se fija al reposapiés con 2 botones a presión (b).
- (Fig.IV) Coloque la capota a la izquierda y la derecha de las
sujeciones (4) del manillar. A continuación se fija en el asiento con dos
botones (c) y a los travesaños con dos lazos (d). Abriendo la cremallera
(5), puede desplegar la capota más hacia delante.
- (Fig.V) Para montar las ruedas traseras, coloque el eje en (6) en el
chasis de modo que el freno también descanse en la sujeción. Fije el
mosquetón (7) en el freno (8). Para retirar las ruedas, afloje el cable del
freno (7), presione el pulsador TFK ubicado en el centro de la rueda y
extráigalas.
- (Fig.VI) Introduzca la rueda delantera en la horquilla delantera (12) y
apriete ligeramente la tuerca moleteada (11) con el cierre rápido (9)
abierto. Compruebe que las "narices" de los seguros están colocadas en
las aberturas previstas para ello. Ahora puede apretar la palanca
tensora (9), para que la rueda se asiente en la horquilla delantera (12).
A continuación, vuelva a apretar la palanca tensora (9). En el
alojamiento de la rueda hay 2 tornillos prisioneros (10), que permiten
ajustar la estabilidad direccional del
Joggster Sport.
- (Fig.VII) El respaldo se puede regular con precisión con la cinta.
Presione ambas piezas de plástico (13) y regule el ángulo del asiento
con la cinta.
- (Fig.VIII) El reposapiés se puede plegar hacia arriba. Para ello
levántelo y fíjelo con el estribo de metal (14).
- (Fig.IX) El cierre del cinturón se enclava encajando las dos pestañas
(15) en él (16). Para abrirlo, pulse el botón ubicado en el centro de la
fijación (16). Los cinturones se pueden ajustar mediante el sistema de
sujeción x, y, z para adaptarlos al niño. El cinturón se fija por los 5 puntos
con x, y, z.
- (Fig.X) Coloque la barra de protección desde arriba en los tubos del
chasis. Fíjela con la palanca de sujeción (17). Puede cambiar la posición
pulsando el botón rojo (18) de la izquierda y la derecha.

18
- (Fig.XI) La altura del manillar se puede ajustar pulsando las dos
articulaciones (23).
- (Fig.XII) El freno de mano funciona a la vez de freno de marcha y de
estacionamiento. Para accionar el freno de estacionamiento, apriete a
fondo la palanca de freno (20) y desplace por completo la palanca de
estacionamiento roja (21) para que la palanca de freno esté
accionada al máximo (20) y el freno actúe de manera permanente. Si
los frenos pierden eficacia, reajústelos. Gire el tornillo de apriete (22) de
la empuñadura del freno hacia la izquierda y compruebe si los frenos
funcionan mejor así.
- (Fig.XIII) Para plegar el Joggster Sport, levante los dos mecanismos de
bloqueo (23). Estos se abrirán automáticamente. Y podrá plegar el
manillar (24) hacia delante. El chasis se pliega automáticamente.
- (Fig.XIV) Cierre el seguro de transporte (25) del chasis para que el
Joggster Sport no se despliegue accidentalmente.
Indicaciones de seguridad para cuando se utiliza para correr o
patinar
- Asegure la correa suministrada (29) en el eje trasero y pásese por la
muñeca el extremo con el tensor de goma.
(Fig.XV) ¡Evita que el cochecito se escape!
- Coloque el asiento en posición vertical y despliegue la capota.
- Abroche al niño con el cinturón de 5 puntos. Colóquele un casco y calzado
bien cerrado.
- No corra ni patine con el respaldo del asiento abatido.
- No corra ni patine con el capazo o una silla para niños del Grupo 0.
- Compruebe que el niño no lleva objetos sueltos en el carro que puedan
caerse.
- Compruebe que no lleva objetos sueltos en el capazo.
- Lleve ropa de protección adecuada.
- Mire siempre al frente cuando conduzca el carro, no vaya a velocidad
excesiva y tome precauciones para no poner en peligro la seguridad de
terceros.
- Mantenga siempre la mano sobre el freno.
- Patine y corra siempre por terreno llano transitable y no tome nunca pendientes ni
cuestas que superen el 5%. Evite circular por obstáculos y socavones.
- Las ruedas deben permanecer siempre en contacto con el suelo. No haga
cambios de sentido ni tome las curvas con brusquedad.
- Suba la presión de los neumáticos a 1,5 bar.
- No corra ni patine cuando hace mal tiempo, por ejemplo, con tormenta,
lluvia, nieve, escarcha, ni por la noche.
- Utilice el Joggster Sport para patinar solo si es un patinador con
experiencia. Debe ser capaz de frenar sin ayuda. El Joggster Sport no es una
ayuda para aprender a patinar. No se apoye en él ni lo utilice como "freno".

19
INSTRUCCIONES DE MANTENIMIENTO
-Para limpiar todas las piezas, utilice un paño húmedo.
-No utilice detergentes ni lubricantes agresivos.
-Aplique aceite en spray en las articulaciones y los cojinetes de las ruedas para que
funcionen con suavidad.
-Las fundas del asiento se pueden lavar a mano a 30°. No las lave a máquina ni las
introduzca en la secadora.
-En ocasiones, las ruedas pueden dejar marcas negras en el suelo. Retire las cosas
que se enganchen en las ruedas (p. ej. piedras) para evitar daños en el suelo.
CONDICIONES DE GARANTÍA
En caso de reclamación justificada, se aplicará la normativa legal. Conserve el recibo
de la compra como comprobante durante el período de garantía legal. Ésta es de 2
años y empieza cuando se le entrega el cochecito. Las deficiencias del producto
quedan limitadas a defectos de material y fabricación que ya existían en el momento
de la entrega. La garantía no cubre:
• Síntomas naturales de desgaste y daños ocasionados por el uso excesivo.
• Daños derivados de una utilización inadecuada o incorrecta.
• Daños derivados de un montaje y la puesta en funcionamiento inadecuados.
• Daños derivados de un manejo o mantenimiento negligentes.
• Daños derivados de alteraciones improcedentes del cochecito.
Notifique los defectos inmediatamente para evitar daños mayores.
Motivos de reclamación
Los productos de TFK se fabrican principalmente a base de aluminio y, por tanto, son
inoxidables. Sin embargo algunas piezas están lacadas, galvanizadas o disponen de
otro tipo de protección en la superficie. En función del mantenimiento y el uso, estas
piezas se pueden oxidar. De ser así, esto no se considera un defecto.
Los rasguños son síntomas normales de desgaste y no se consideran un defecto.
Los tejidos húmedos que no se sequen ni ventilen lo suficiente pueden
enmohecerse. Esto no se considera un defecto de fabricación.
La luz del sol, el sudor, los detergentes, el roce o un lavado muy frecuente pueden
decolorar el tejido, lo cual no se considera un defecto.
Al comprar el producto, le recomendamos que compruebe si el tejido, las costuras
y las cremalleras están bien cosidos y funcionan correctamente.
Después de un uso continuado, las ruedas presentarán signos naturales de
desgaste. Los daños derivados de acciones externas no se consideran un defecto.
Es inevitable que pueda haber algún desequilibrio en el cochecito, lo cual no se
considera un defecto.
Compruebe por norma el producto al recibirlo para evitar posteriores reclamaciones.
Si detecta una tara posteriormente, diríjase a su distribuidor lo antes posible. Éste se
pondrá en contacto con nosotros para saber cómo proceder. TFK no acepta envíos
sin previo aviso y sin autorización.
*) válido sólo en la UE. En los demás países se aplicarán los plazos establecidos por la
ley.

20
Notice d’utilisation et dispositions de garantie
Bienvenue dans le monde de TFK.
Nous vous prions de bien vouloir consacrer quelques minutes à la lecture des
consignes suivantes avant la première utilisation. Conservez-les ensuite pour
vous y reporter ultérieurement en cas de besoins. Si vous ne respectez pas
ces consignes, la sécurité de votre enfant peut être mise en danger ! Veuillez
respecter également les consignes de sécurité pour l'utilisation du Joggster
Sport lors du Jogging et du roller skating.
CONSIGNES DE SECURITE + AVERTISSEMENTS
- AVERTISSEMENT : ne laissez pas votre enfant sans surveillance !
- AVERTISSEMENT : cette voiture est destinée aux enfants de 6 mois au moins,
et dont le poids maximal n’est pas supérieur à 15 kg ! Ne transportez toujours
qu’un seul enfant !
- AVERTISSEMENT :assurez-vous avant l’utilisation quetouslesblocagessontbienfermés!
- AVERTISSEMENT: les charges fixées à la poignée nuisent à la stabilité de la voiture !
- AVERTISSEMENT : attachez toujours votre enfant avec le harnais d’attache à cinq
points, même lorsque la voiture est équipée de la housse pour les jambes.
- AVERTISSEMENT : utilisez la sangle d’entrejambe toujours en combinaison
avec la sangle de bassin !
- Ne garez jamais la voiture sans avoir serré le frein de stationnement !
- Ne soulevez jamais la voiture lorsque votre enfant y est assis !
- N’utilisez pas d’escaliers (mécaniques) si votre enfant est assis dans la
voiture !
- Vérifiez impérativement les blocages lorsque vous portez la voiture dans les
escaliers ou par-dessus d’autres obstacles !
- Ne soulevez la voiture que par les parties fixes du châssis !
- N’utilisez pas d’accessoires de fabricants autres que TFK !
- La charge maximale du panier est de 5 kg !
- N’utilisez pas la capote pour y transporter des charges !
Veuillez vérifier à des intervalles réguliers le bon fonctionnement des freins et
des assemblages ! En cas de réparation, n’utilisez que des pièces de
rechange d’origine !
INSTRUCTIONS D'UTILISATION ET DE MONTAGE
- (Fig.I) Pour pouvoir utiliser le Joggster Sport, dépliez toujours d’abord la
partie inférieure du châssis. Repoussez le châssis du panier (1) avec la main
ou le pied vers le bas jusqu’à ce qu’il s’enclenche de manière audible. Ceci
est très important pour la stabilité.
- (Fig.II) Pivotez ensuite la poignée (2) vers le haut jusqu’à ce que la double
sécurité (3) s’enclenche. Fermez alors les verrouillages (4) à gauche et à
droite de l’articulation de pliage.
Table of contents
Languages:
Other TFK Stroller manuals


