TIPTEL 28XS User manual

11/2010
Versie 1

About This Guide
Thank you for choosing the tiptel IP 28xs which is especially designed for power users in the office
environment. It features fashionable and sleek design, abundant telephony applications, broad
interoperability with the popular 3rd party VoIP products, fulfilling the VoIP deployment needs.
In this User Guide, you will find everything you need to quickly use your new phone. Be sure to
verify with your system administrator that your network is prepared for configuring your IP phone.
As well, be sure to read the Packing List section in this guide before setting up and using the
phone.

Tables of Contents
Getting Started ..................................................................... - 1 -
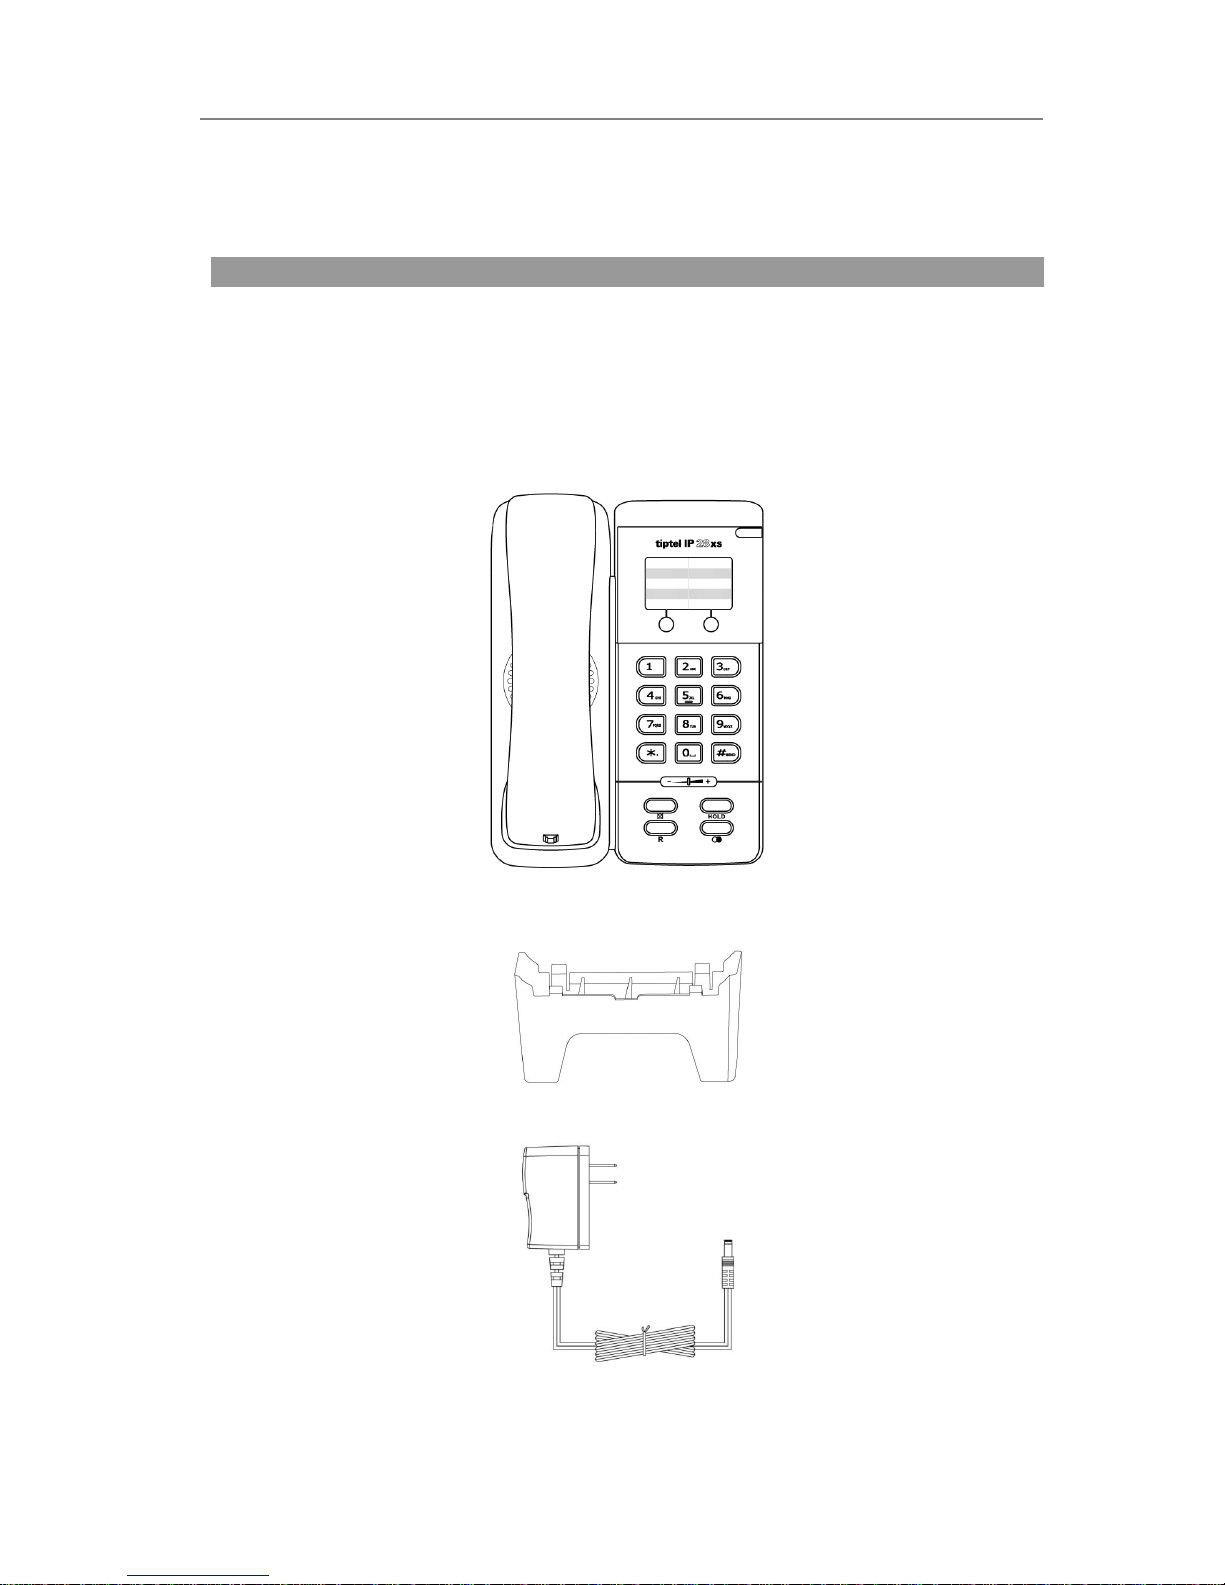
Packing List ...................................................................................................................- 1 -
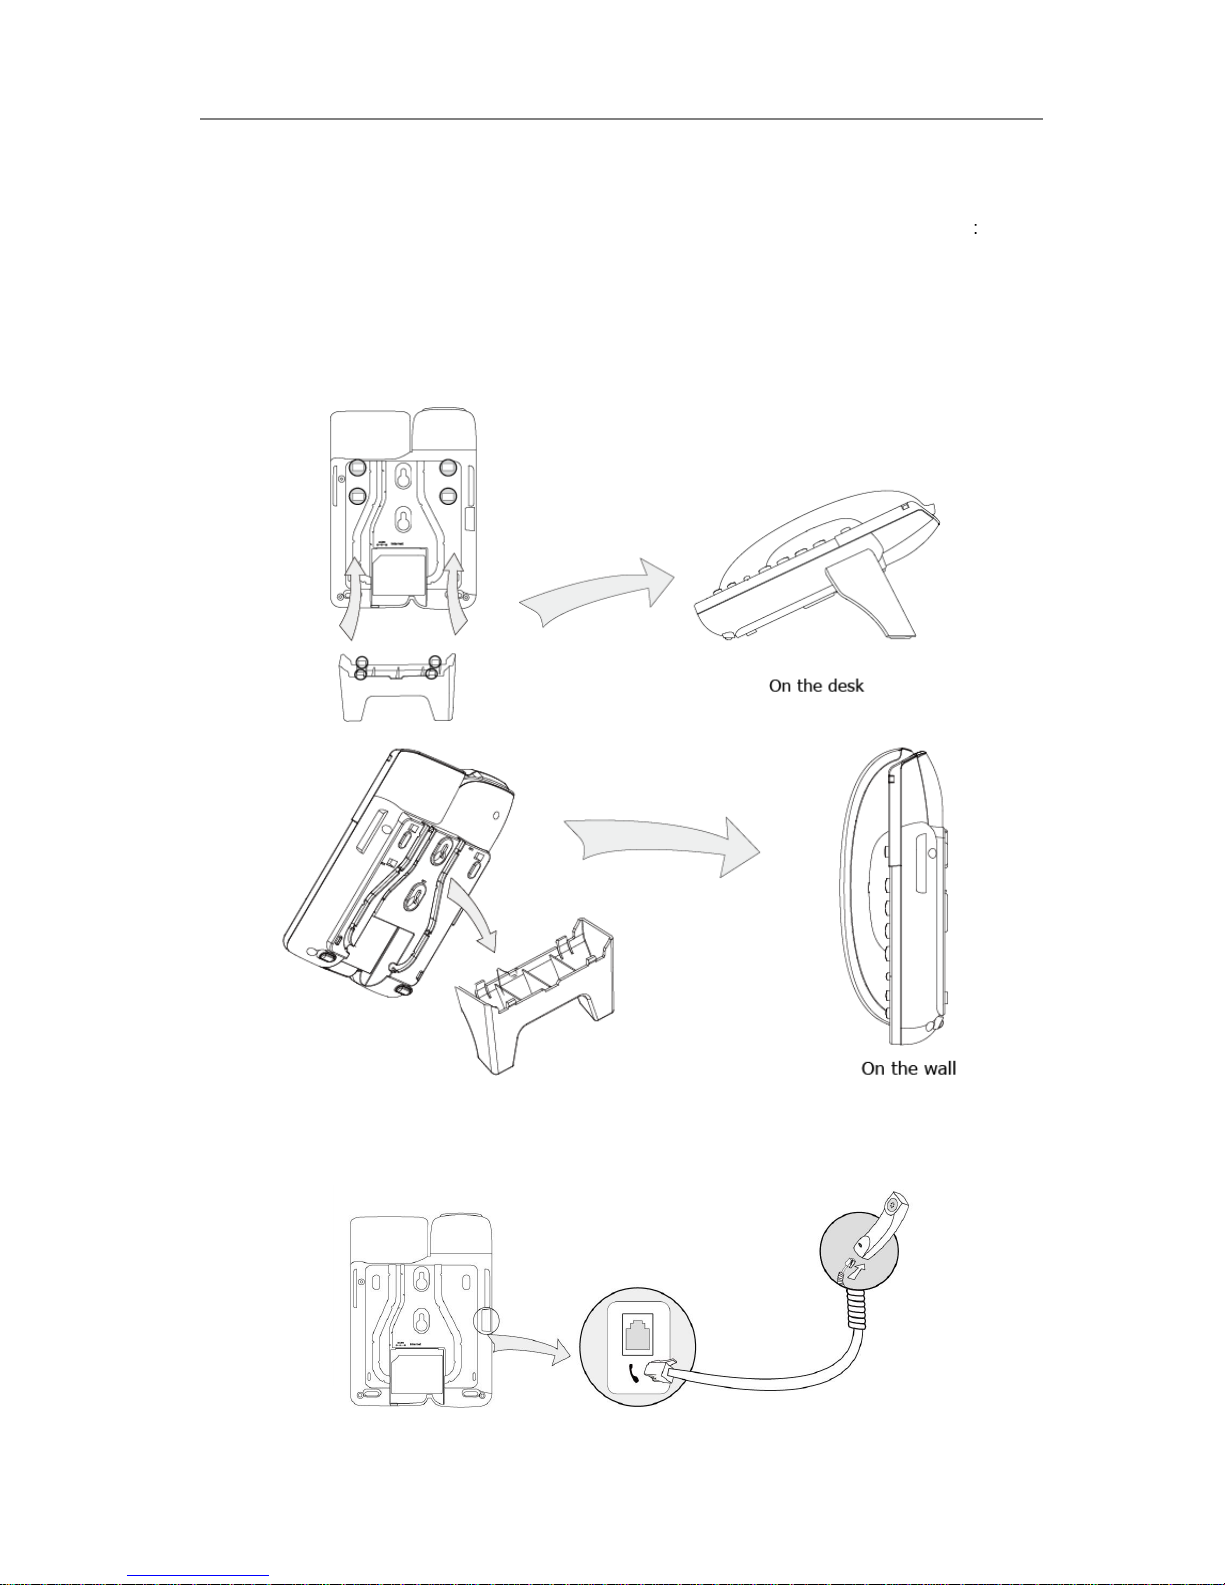
Assembling the Phone ..................................................................................................- 3 -
Configuration and Registration......................................................................................- 4 -
Network Configuration............................................................................................- 4 -
Configuring via Web Page .....................................................................................- 6 -
Overview ............................................................................... - 8 -
Keypad Instruction.........................................................................................................- 8 -
Power Indication LED....................................................................................................- 9 -
User Interface................................................................................................................- 9 -
Customizing Your Phone....................................................- 11 -
General Settings.......................................................................................................... - 11 -
Phone Status........................................................................................................ - 11 -
Audio Setting............................................................................................................... - 11 -
Volume.................................................................................................................. - 11 -
Ring Tone ............................................................................................................. - 11 -
Codec Selection...................................................................................................- 12 -
Other Settings..............................................................................................................- 12 -
Key as Send.........................................................................................................- 12 -
Hot Line................................................................................................................- 13 -
Dial Plan...............................................................................................................- 13 -
Dial Now...............................................................................................................- 13 -
Block Out..............................................................................................................- 14 -
Using the Basic Call Functions......................................... - 15 -
Making a call................................................................................................................- 15 -
Call Devices .........................................................................................................- 15 -
Answering a call ..........................................................................................................- 15 -
Answering an incoming call..................................................................................- 15 -
Denying an incoming call.....................................................................................- 15 -
DND......................................................................................................................- 15 -
Call Forward.........................................................................................................- 15 -
During anActive Call...................................................................................................- 16 -
Mute......................................................................................................................- 16 -
Call Hold...............................................................................................................- 16 -
Call Waiting ..........................................................................................................- 16 -
Call Transfer.........................................................................................................- 17 -

3-way Conference................................................................................................- 17 -
Voicemail..............................................................................................................- 17 -
Using the Advanced Phone Functions............................. - 19 -
Account Setting ...........................................................................................................- 19 -
Network Setting...........................................................................................................- 19 -
VLAN Setting........................................................................................................- 19 -
Maintenance Tasks......................................................................................................- 20 -
Administrator Mode..............................................................................................- 20 -
Administrator/User Password ..............................................................................- 20 -
Reboot..................................................................................................................- 21 -
Reset to Factory...................................................................................................- 21 -
Firmware Update..................................................................................................- 21 -
Recovery mode....................................................................................................- 22 -
Decryption............................................................................................................- 22 -
System Log Export...............................................................................................- 23 -
DSS keys Configuration..............................................................................................- 23 -
Speed Dial............................................................................................................- 24 -
Forward................................................................................................................- 24 -
DND......................................................................................................................- 24 -
Call Return ...........................................................................................................- 24 -
Pick Up.................................................................................................................- 25 -
Call Park...............................................................................................................- 25 -
Voice Mail.............................................................................................................- 25 -
DTMF....................................................................................................................- 25 -
Tone Settings...............................................................................................................- 26 -
Voice............................................................................................................................- 26 -
Ring .............................................................................................................................- 27 -
Trouble Shooting................................................................ - 29 -

tiptel IP 28xs Getting Started
- 1 -
Getting Started
Packing List
The following components are included in your package:
tiptel IP 28xs
Phone Stand
Power Adapter
Handset & Handset Cord

tiptel IP 28xs Getting Started
- 2 -
Ethernet Cable
Quick Installation Guide
Check this list before installation to ensure that you have received each item. If you are missing
any items, contact your IP phone reseller.

tiptel IP 28xs Getting Started
- 3 -
Assembling the Phone
This section introduce how to assemble the phone with the components in the packing list
Attach the stand;
Connect Handset;
Connect Network and Power.
1) Attach the Stand, as shown below:
2) Connect Handset, as shown below:

tiptel IP 28xs Getting Started
- 4 -
3) Connect Network and Power
There are two ways for network and power source connections. You can either connect the phone
to the AC Power directly using the power adapter or to a PoE compliant switch or hub. Your
system administrator will advise you on which one to use.
Note:
1. If inline power is provided, do not install AC adapter. Make sure the Ethernet cable and
switch/hub are PoE compliant.
2. The Internet Port can be also connected to Hub/Switch/IP PBX or other internet devices.
Configuration and Registration
If you are administrator, you need to do some simple configuration to make the phone work. If not,
please contact with your internet administrator or service provider for more details.
Network Configuration
The network information can be set and check by the phone operations:
1) Network configuration
1. DHCP:
Pick up the handset and dial “**88#”, after hearing the prompt “Please enter the value after
beeping”, please input “1#” to enable DHCP or “0#” to disable DHCP, you will hear prompts
“Please hang up and wait for rebooting or continue setting after the tone” to indicate that the
configuration is successful.. Input other characters or numbers without #, for example input 222,
you will hear prompts “Invalid setting, please re-enter after the tone” to indicate that the
configuration is failed.

tiptel IP 28xs Getting Started
- 5 -
2. Static IP:
IP Address: Pickup the handset and dial “**80#”, after hearing the prompt “Please enter the
value after beeping”, please input the IP address (For example: 192.168.1.56#), you will hear
prompts “Please hang up and wait for rebooting or continue setting after the tone” to indicate
that the configuration is successful. If the input IP Address is not in conformity with the rules or
without #, it will prompt “Invalid setting, please re-enter after the tone” to indicate that the
configuration is failed.
Subnet Mask: Pickup the handset and dial “**81#”, after hearing the prompt “Please enter the
value after beeping”, please input the Subnet Mask (For example:255.255.255.0#), you will hear
prompts “Please hang up and wait for rebooting or continue setting after the tone” to indicate
that the configuration is successful. If the input Subnet Mask is no in conformity with the rules or
without #, it will prompt “Invalid setting, please re-enter after the tone” to indicate that the
configuration is failed.
Gateway: Pickup the handset and dial “**82#”, after hearing the prompt “Please enter the
value after beeping”, please input the gateway (For example:192.168.1.0#), you will hear prompts
“Please hang up and wait for rebooting or continue setting after the tone” to indicate that the
configuration is successful. If the input gateway is no in conformity with the rules or without #, it will
prompt “Invalid setting, please re-enter after the tone” to indicate that the configuration is failed.
DNS1 Pickup the handset and dial “**83#”, after hearing the prompt “Please enter the value
after beeping”, please input the DNS1 (For example:202.101.103.55#) you will hear prompts
“Please hang up and wait for rebooting or continue setting after the tone” to indicate that the
configuration is successful. If the input DNS is not in conformity with the rules or without #, it will
prompt “Invalid setting, please re-enter after the tone” to indicate that the configuration is failed.
DNS2 Pickup the handset and dial “**84#”, after hearing the prompt “Please enter the value
after beeping”, please input the DNS1 (For example:202.101.103.55#) you will hear prompts
“Please hang up and wait for rebooting or continue setting after the tone” to indicate that the
configuration is successful. If the input DNS is not in conformity with the rules or without #, it will
prompt “Invalid setting, please re-enter after the tone” to indicate that the configuration is failed.
Note:
If the first setting is successful, the second setting fails, it will prompt” Invalid setting, Please hang
up and wait for rebooting or continue setting after the tone”.
2) Check the Network
1. IPAddress Pickup the handset and dial “**90#”
2. Subnet Mask Pickup the handset and dial “**91#”
3. Gateway Pickup the handset and dial “**92#”

tiptel IP 28xs Getting Started
- 6 -
4. DNS1 Pickup the handset and dial “**93#”
5. DNS2 Pickup the handset and dial “**94#”
The default network configuration:
IPAddress 192.168.0.10
SUBNET_MASK 255.255.255.0
IPAddress GATEWAY 192.168.0.1
Recovery Mode IP Address Server 192.168.0.5
Configuring via Web Page
Pick up the handset and dial out “**90#” to obtain the IP address of IP phone. Enter it (for example
http://192.168.3.28) into the address bar of web browser. The default login name and password
are both “admin”.
Note:
Please locate your PC in the same network segment of IP phone (192.168.3.X) to access the web
configuration page. Please consult your system administrator for help.
Network Settings
Choose Network->Internet Port WAN .
DHCP: By default the phone attempts to contact a DHCP Server in your network in order to obtain
its valid network settings, e.g. IP address, sub mask, gateway, DNS server, etc.
Static IP Address: If your phone cannot contact a DHCP Server for any reason, you need to enter
the network settings manually via Static IP Address. Please contact your internet administrator for
more details.
Note:
Using the wrong network parameters may result in inaccessibility of your phone and may also
have an impact on your network performance. Please contact your network administrator.
Account Settings
The phone attempts to register to the SIP server using the account data provided by the automatic
or manual initialization.
Choose Account, you will find the following parameters:

tiptel IP 28xs Getting Started
- 7 -
Field
Description
Register Status
It shows the register status of the phone.
Account Active
You can choose on/off to enable/disable the account respectively.
Display Name
It is showed as Caller ID when making a phone call.
Register Name
It is authenticated ID for authentication, provided by ISP.
User Name
User account information, provided by VoIP service provider.
Password
It is provided by ISP for registration.
SIP Server
Server for registration, provided by ISP.
Note:
Should the IP PBX require an authentication, you will be prompted to enter the correct password.
Make sure you are using the appropriate input method or enter the password via the web user
interface.
You can refer to the above “Configuring via Web Page” for the parameter details.

tiptel IP 28xs Overview
- 8 -
Overview
Keypad Instruction
You can check the following list which introduces the IP phone’s keypad in details:
Hot Key
This IP phone has two DSS keys; users can specify corresponding functions through the Web UI.
DTMF Keypad
Use the DTMF hard keys to enter numbers, letters and special characters.
Volume Adjustment
Adjust the volume of the handset, ring tone and signal tone;
Hard Feature Keys
HOLD Call hold;

tiptel IP 28xs Overview
- 9 -
R Forward the current call to the third party;
Press to dial out the last dialed number;
: Mute audio transmission locally during calls;
Power Indication LED
Table 1 Green Light
LED Status
Description
Steady Green
The phone is in idle mode
Slow Blinking Green
There is a call on muted
Fast Blinking twice
The phone is in DND/Forward status
Table 2 Red Light
LED Status
Description
Steady Red
There is a new voicemail for your extension
Slow Blinking Red
There is an incoming call to the device
Fast Blinking twice
There is a call on hold
Table 3 Orange Light
LED Status
Description
Steady Orange
Power on/ Updating
Slow Blinking Orange
Network unavailable, the account is not registered or registration failed
User Interface
There are two ways to customize specific options on your phones:
1. Configure the network through keypad.
2. Configure through Web UI; for the details, please refer to “Configuration and Registration”.
Besides the network, other information can only be set through Web UI. Please refer to the
following table for differences:
Phone options
Content
Status
--IP
--MAC
--Firmware
--Hardware
--Network
--Link Status
--Forward

tiptel IP 28xs Overview
- 10 -
Phone Functions
--Call Waiting
--DSS Keys
--Key as Send
--Hot Line
--Anonym Call
--DND
--DND Code
--Dial Plan
--Tones
Basic Feature
--Ring Tone
--Phone Volume
Advanced Feature
--Accounts
--Network
--Reset Factory
--Set AES Key
--Set admin PWD
--Voice
--Upgrade
Note:
The above table only indicates most of phone functions rather than all of them. Please refer to the
relating parts for more details.
User and Administrator Mode
Your phone can be used in user or administrator mode. Administrator mode is the default setting
with full configuration rights. The default administrator password is admin.

Simply IP Phone Customizing Your Phone
- 11 -
Customizing Your Phone
General Settings
Phone Status
You can check the network status of your phone by keypad, or check the phone status by Web
interface.
To operate via the keypad, please refer to the above “Network configuration”.
To view the Phone Status via Web interface:
Open the web browsers and input the IP Address http://WAN-ip-address; Enter the account and
password (default account and password are both “admin”), choose Status directly to check the
status.
Audio Setting
Volume
You can adjust the volume of handset/ring tone/signal tone.
To adjust the volume when you are in an active call:
When Handset mode is activated, press the Volume Adjustment Bar to adjust the volume of signal
tone to a comfortable level. When phone is idle, press it to adjust the volume of ring tone. And
during a call, press it to adjust the volume of handset.
Note:
The volume can only be set via the volume adjustment bar on the keypad.
Ring Tone
You can adjust the type and volume of the ring tone.
To change the Ring Tone Type via Web interface:
Choose Phone->Preference->Ring Type, highlight the specific one in the scroll-down menu, click
confirm button to update the change.

Simply IP Phone Customizing Your Phone
- 12 -
Codec Selection
The IP phone supports the following voice codecs:
G723_63 G722 G726-16 G726-24 G726-32 G726-40 PCMA G729 PCMU and G723_53
You can enable/disable the desired codecs via Web interface. Please contact your System
Administrator for more details about the codecs.
To enable/disable the codecs:
1) Choose Account->Codecs.
2) Use the navigation keys to highlight the desired one in the Enable/Disable Codecs list, and
press the / to move to the other list.
3) Click Confirm button to save the change.
Note:
Codec Selection can only be set via Web interface.
Other Settings
Key as Send
The specific button (“#” or “*”) to be activated as the send button.
To set the send key via the Web interface:
1) Choose Phone->Features->Key As Send options.
2) Highlight the specific one in the pull-down menu, then click confirm button to save the
change.

Simply IP Phone Customizing Your Phone
- 13 -
Hot Line
To set the Hot Line via the Web interface:
1) Choose Phone->Features.
2) Input the Hotline Number, and then click the Confirm button to save the change.
Dial Plan
A dial plan establishes the expected number and pattern of digits for a telephone number. This
includes country codes, access codes, area codes and all combinations of digits dialed. For
example if you set the Prefix as 0 and Replace as 0086 (Chinese country code), when you dial
05702000 out, the number will be replaced by 00865702000 automatically.
To set a Dial Plan via the Web interface:
1) Choose Phone->Dial Plan->Replace Rule.
2) Enter the desired Prefix and Replace.
3) Press Add button to save the changes.
4) You can also delete a specific one from the dial plan list by pressing Del button.
Note:
Please contact with your system administrator for the country/area code if you want to set the dial
plan.
Dial Now
Dial-now enables you to define the specific length of any number/letter in advance(for example
xxx), next time when users dial out the 123 whose length matches the Dial-now rule, the phone
will dial out 123 immediately without pressing Send button.

Simply IP Phone Customizing Your Phone
- 14 -
To set a Dial Plan via the Web interface:
1) Choose Phone->Dial Plan->Dial Now.
2) Enter the desired “x/.”
3) Press Add button to save the changes.
4) You can also delete a specific one from the dial plan list by pressing Del button.
Note:
“x” represents any one character; “.” represents string of characters.
Block Out
The specific phone numbers can be forbidden to be called out from your IP phone.
1) Choose Phone->Dial Plan->Block Out.
2) Enter the phone number and click Add button to save the changes, or choose the specific one
in the list, click Del button to delete the record.
3) You can not dial out the number from your IP phone unless it is removed from the forbidden
List.

Simply IP Phone Using the Basic Phone Functions
- 15 -
Using the Basic Call Functions
Making a call
Call Devices
1) Pickup the handset, and dial the number you want to call, or
2) Press the button to dial out the last number you have called, or
3) Press the DSS keys which have been set as speed dial button.
Then press the SEND button to dial out if necessary.
Answering a call
Answering an incoming call
1) If you are not on another phone, lift the handset to answer it directly.
2) If you are on another call, press the Hold button to answer it.
Denying an incoming call
Press the button to deny the incoming call directly.
DND
If users enable the DND function, all the incoming calls will be rejected automatically.
In idle status press button, can also enable the DND feature
To configure the DND function via Web interface:
Choose Phone->DSS Key->DSS key option to do the relevant configuration. For the details,
please refer to the above configuration information.
Call Forward
This feature allows you to forward an incoming call to another phone number e.g. a cell phone or
voice mailbox.
The following call forwarding events can be configured:
Always: Incoming calls are immediately forwarded.
Busy: Incoming calls are immediately forwarded when the phone is busy.

Simply IP Phone Using the Basic Phone Functions
- 16 -
No Answer: Incoming calls are forwarded when the phone is not answered after a
specific ring times.
To configure Call Forward via Web interface:
Choose Phone->Features->Forward to do the relating changes. Please refer the above
configuration information.
During an Active Call
Mute
This function allows you to mute the microphone of the active audio device during a call; you
cannot be heard by the other party. You can still hear all other parties while mute is enabled.
To mute/resume the conversation:
Press the button during a conversation to mute the call, and press it again to get the
microphone return to normal conversation.
Call Hold
This call function allows you to place an active call on hold. In this case your IP PBX might play a
melody or message to the other party while waiting. Other calls can be received and made while
having a call on hold.
To hold/resume a call:
1) Press the HOLD button to put your active call on hold.
2) During the call, there will be a "dudu.." sound for each 30 second, suggesting that there is a
call in Hold state.
3) If there is only one call on hold, press the HOLD button again to retrieve the call.
4) If there are two calls, it can only be one call on hold, press the hold button to switch between
the two calls.
Note:
When you are under the call hold status, putting down the handset, the conversation will not be
hung up, the indication LED will prompt that the conversation is still in progress. Pick up the
handset; it will resume the call automatically.
Call Waiting
This call feature allows your phone to accept other incoming calls to the extension no matter under
which circumstances.
To enable/disable Call Waiting via Web interface:
Choose Phone->Feature->Call Waiting to do the relating changes.
Table of contents
Other TIPTEL IP Phone manuals

TIPTEL
TIPTEL 282 User manual

TIPTEL
TIPTEL ergoVoice A2 User manual

TIPTEL
TIPTEL 115 User manual

TIPTEL
TIPTEL IP 286 User manual

TIPTEL
TIPTEL IP 280 User manual

TIPTEL
TIPTEL Profi Clip User manual

TIPTEL
TIPTEL IP28xs User manual

TIPTEL
TIPTEL 3030 User manual

TIPTEL
TIPTEL IP 284 User manual

TIPTEL
TIPTEL 3020 User manual

TIPTEL
TIPTEL IP 280 User manual

TIPTEL
TIPTEL IP 280 User manual

TIPTEL
TIPTEL Ergophone 6040 User manual

TIPTEL
TIPTEL 3130 User manual

TIPTEL
TIPTEL IP 280 User manual

TIPTEL
TIPTEL 290 ISDN User manual

TIPTEL
TIPTEL 192 User manual

TIPTEL
TIPTEL 85 System UP0 Installation guide

TIPTEL
TIPTEL 83 VoIP User manual

TIPTEL
TIPTEL 117 User manual