4
XF 4100 PRO
NOTE D'USO
Ascoltare a volume alto per lungo tempo, potrebbe danneggiare il vostro udito.
Evitare di posizionare il riproduttore:
• Vicino a campi magnetici.
• Vicino a fonti di calore come caloriferi e stufe.
• In luoghi molto umidi come stanze da bagno, piscine, ecc...
• In luoghi molto polverosi.
• In luoghi soggetti a forti vibrazioni.
• Non avvicinare l’orecchio all’altoparlante durante le fasi di messa punto e regolazioni del volume, e regolare il volume al minimo
nella fase di accensione.
• Posizionare l’apparecchio in modo che ai suoi lati ci sia sempre abbastanza spazio per la libera circolazione di aria (almeno 5 cm).
• Se dei liquidi penetrano all’interno dell’apparecchio scollegare immediatamente la spina dalla presa e portare l’apparecchio al
più vicino centro assistenza autorizato TREVI.
• Controllare sempre prima di ricaricare l’apparecchio, che i cavi di alimentazione e di collegamento siano installati correttamente.
• Nessuna sorgente di fiamma nuda, quali candele accese, dovrebbe essere posta sull’apparecchio.
• L’apparecchio non deve essere esposto a stillicidio o a spruzzi d’acqua e nessun oggetto pieno di liquido, quali vasi, deve
essere posto sull’apparecchio.
• L’adattatore di corrente deve essere collegato a una presa vicina al dispositivo e deve essere facilmente accessibile.
• Se si nota un calore eccessivo sul dispositivo, scollegare immediatamente la spina dalla presa di corrente principale.
• Non tirare il cavo di alimentazione.
• Conservare il presente manuale per futuri riferimenti.
CURA E MANUTENZIONE
Per la pulizia si consiglia l’uso di un panno morbido, leggermente inumidito. Evitate solventi o sostanze abrasive.
IMPORTANTE
Questo dispositivo è progettato per uso domestico non professionale. La buona costruzione di questo apparecchio ne garantisce
per lungo tempo il perfetto funzionamento. Se tuttavia dovesse presentarsi qualche inconveniente, sarà opportuno consultare il
più vicino Centro Assistenza autorizzato TREVI.
TREVI persegue una politica di continua ricerca e sviluppo. Pertanto i prodotti possono presentare caratteristiche diverse da
quelle descritte.
ITALIANO
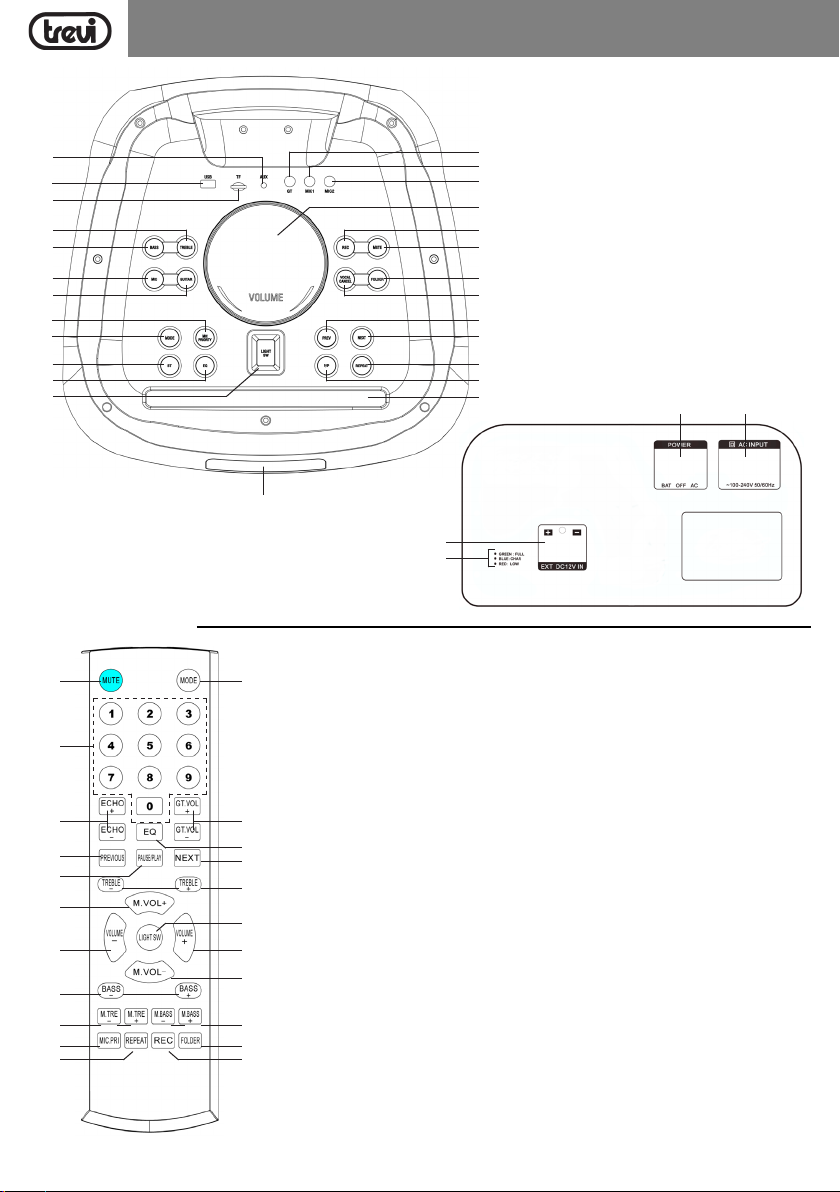
DESCRIZIONE COMANDI
1. AUX, ingresso audio
2. Ingresso USB
3. Ingresso Micro SD Card
4. Tasto TREBLE, regolazione toni Alti
5. Tasto BASS, regolazione toni Bassi
6. Tasto MIC, regolazione volume, eco e toni su microfoni
7. Tasto GUTAR, regolazione volume ingresso Guitar
8. Tasto MIC PRIORITY, attivazione/disattivazione priorità
microfono
9. Tasto MODE, selezione funzione, attivazzione/disattivazione
voce guida
10. Tasto BT, selezione funzione Bluetooth
11. Tasto EQ, equalizzazioni pre-impostate
12. Tasto LIGHT SW, selezione effetto Disco Light
13. Display
14. Porta Tablet/ Smartphone
15. Tasto P/P, Play/Pausa
16. Tasto REPEAT, ripetizione
17. Tasto NEXT, traccia successiva
18. Tasto PREV, traccia precedente
19. Tasto VOCAL CANCEL
20. Tasto FOLDER, selezione della cartella con file audio MP3
21. Tasto MUTE, disattivazione temporanea audio
22. Tasto REC, avvio registrazione/ riproduzione registrazione
23. Regolazione Volume generale
24. Ingresso MIC 2 per microfono con cavo
25. Ingresso MIC 1 per microfono con cavo
26. GT, ingresso chitarra
27. InterruttoreprincipalePOWER(BAT/OFF/AC),funzionamento
a batteria/ alimentazione a rete
28. Presa di alimentazione da rete 230V 50Hz.
29. Ingresso 12V per batteria ausiliaria (non in dotazione).
30. Indicatori Led stato batteria
Per evitare possibili danni all’udito, limitare il tempo di ascolto a volumi elevati