Trevi XF 950 KB User manual

ALTOPARLANTE AMPLIFICATO ALTA POTENZA CON TROLLEY
Manuale d'uso e collegamento
POWER PORTABLE SPEAKER WITH TROLLEY
Connection and Operation Manual
HAUT-PARLEUR PORTABLE AMPLIFIE AVEC TROLLEY
Mode d'emploi et branchement
BEWEGLICHER LAUTSPRECHER MIT TROLLEY
Gebrauchs- und Anschlusshandbuch
ALTAVOZ AMPLIFICADO PORTATIL CON TROLLEY
Manual para el uso y la conexión
LCD
DISPLAY
USB
MP3
XF 950 KB
Guida d’uso
User guide
2 x
MIC IN
80 W
MAX
BT
BLUETOOTH
Per informazioni integrative ed aggiornamenti su questo prodotto visita www.trevi.it
For additional information and updates of this product see www.trevi.it

2
XF 950 KB
ATENÇÃO
PERIGO DE CHOQUES ELÉTRICOS
NÃO EXPOR A CHUVA E UMIDADE
ATENÇÃO: NÃO ABRIR O APARELHO. NO INTERIOR DO MESMO NÃO EXISTEM
COMANDOS OU PEÇAS DE SUBSTITUIÇÃO QUE POSSAM SER MANIPULADOS
PELO USUÁRIO. EM CASO DE EVENTUAL OPERAÇÃO DE SERVIÇO, DIRIGIR-SE
A UM CENTRO DE ASSISTÊNCIA AUTORIZADO TREVI
PROSOCH
PROSOCH. MHN ANOIGETE THN SUSKEUH. DEN UPARCOUN
STO ESWTERIKO THS ENTOLES POU NA MPOREI NA CEIRISTEI
O KATANALWTHS OUTE ANTALLAKTIKA TMHMATA. GIA OPO-
IADHPOTE EPISKEUH H¢ SUNTHRHSH APEUQUNQEITE SE ENA
APO TA EXOUSIODOTHMENA KENTRA ANTIPROSWPEIAS TREVI.
KINDUNOS HLEKTROPLHXIAS
MHN EKQETETE
SE BROCH KAI UGRASIA
ATTENZIONE
RISCHIO DI SCOSSE ELET-
TRICHE!
NON ESPORRE A PIOGGIA E
UMIDITÀ
ATTENZIONE: NON APRITE L'APPARECCHIO. ALL'INTERNO NON VI SONO
COMANDI MANIPOLABILI DALL'UTENTE NE PARTI DI RICAMBIO. PER TUTTE
LE OPERAZIONI DI SERVIZIO RIVOLGERSI AD UN CENTRO DI ASSISTENZA
AUTORIZZATO TREVI
WARNING!
WARNING: DO NOT OPEN THE SET. NEITHER CONTROLS OR SPARE PARTS TO
BE USED BY THE USER ARE TO BE FOUND INSIDE IT. APPLY TO AUTHORISED
TREVI CENTERS FOR SERVICE OPERATIONS.
DANGER OF ELECTRIC SHOCK!
DO NOT EXPOSE TO
RAIN OR HUMIDITY
ATTENTION
ATTENTION: NE PAS OUVRIR L’APPAREIL, A L’INTERIEUR IL N’Y A PAS DE
COMMANDESAMANIPULERPAR L’UTILISATEUR OU DE PIECES DE RECHANGE.
POUR TOUTES LES OPERATIONS DE SERVICE IL FAUT S’ADRESSER A UN
SERVICE D’ASSISTANCE AUTORISE TREVI.
RISQUE DE DECHARGES ELEC-
TRIQUES
NE PAS EXPOSER A LA PLUIE ET A
L’HUMIDITE
ACHTUNG
ACHTUNG: DAS GERÄT NICHT ÖFFNEN. IM INNERN BEFINDEN SICH KEINE VOM
BENUTZERSELBSTINSTANDSETZBARENTEILEUNDAUCHKEINEERSATZTEILE.
FÜR JEGLICHE SERVICEARBEITEN, WENDEN SIE SICH BITTE AN EINE TREVI
AUTORISIERTEN KUNDENDIENSTSTELLE.
GEFAHR ELEKTRISCHER SCHLÄGE
NICHT DER FEUCHTIGKEIT UND
DEM REGEN AUSSETZEN
ATENCION
ATENCION: NO ABRIR EL APARATO, EN SU INTERIOR NO HAY MANDOS QUE
PUEDAN SER MANIPULADOS POR EL USUARIO NI PARTES DE REPUESTO.
PARA TODAS LAS OPERACIONES DE SERVICIO DIRIGIRSE A UN CENTRO DE
ASISTENCIA AUTORIZADO TREVI.
PELIGRO DE CHOQUES
ELECTRICOS
NO EXPONER A LLUVIA Y
HUMEDAD
UK PLUG ONLY
WIRES CONNECTIONS TO A UK THREE-PIN PLUG
The wires in this mains lead are coloured in accordance with the following wiring codes:
Blue:............................................................Neutral
Brown:.........................................................Live
The wires in this mains lead must be connected to the terminals in the plug as follows:
Blue wire:.....................................................N or Black
Brown wire: .................................................L or Red
Neither wire is to be connected to the earth (E or W) terminal of three-pin plug.
Should the fuse fail in the plug remove the plug form the wall socket and replace the fuse
with a 3 Amp. ASTA approved BS 1362 fuse.
WARNING!

3
XF 950 KB
NOTE D'USO
Ascoltare a volume alto per lungo tempo, potrebbe danneggiare il vostro udito.
Questo apparecchio è uno strumento elettronico di alta precisione, evitate quindi di utilizzarlo nei seguenti casi:
• Vicino a campi magnetici.
• Vicino a fonti di calore come caloriferi e stufe.
• In luoghi molto umidi come stanze da bagno, piscine, ecc...
• In luoghi molto polverosi.
• In luoghi soggetti a forti vibrazioni.
• Non avvicinare l’orecchio all’altoparlante durante le fasi di messa punto e regolazioni del volume, e in particolare di tenere il
volume al minimo nella fase di accensione.
• Posizionare l’apparecchio in modo che ai suoi lati ci sia sempre abbastanza spazio per la libera circolazione di aria (almeno 5
cm).
• Se dei liquidi penetrano all’interno dell’apparecchio scollegare immediatamente la spina dalla presa e portare l’apparecchio al
più vicino centro assistenza autorizato TREVI.
• Controllare sempre prima di ricaricare l’apparecchio, che i cavi di alimentazione e di collegamento siano installati correttamente.
• Nessunasorgentediammanuda,qualicandeleaccese,dovrebbeesserepostasull’apparecchio.
• L’apparecchio non deve essere esposto a stillicidio o a spruzzi d’acqua e nessun oggetto pieno di liquido, quali vasi, deve essere
posto sull’apparecchio.
• Conservare il presente manuale per futuri riferimenti.
CURA E MANUTENZIONE
Per la pulizia si consiglia l’ uso di un panno morbido, leggermente inumidito. Evitate solventi o sostanze abrasive.
IMPORTANTE
Questo dispositivo e' progettato per uso domestico non professionale. La buona costruzione di questo apparecchio ne garantisce
per lungo tempo il perfetto funzionamento. Se tuttavia dovesse presentarsi qualche inconveniente, sarà opportuno consultare il più
vicino Centro Assistenza autorizzato TREVI.
TREVI persegue una politica di continua ricerca e sviluppo. Pertanto i prodotti possono presentare caratteristiche diverse da
quelle descritte.
ITALIANO
DESCRIZIONE CONNETTORI/COMANDI
Comandi e prese sul dispositivo
1. Trolley
2. Maniglia di trasporto
3. Ingresso MIC 2
4. Ingresso MIC 1
5. Ingresso USB
6. Ingresso AUX IN
7. Regolazione volume
8. Regolazione del segnale in ingresso Mic1/2
9. Spia led PAIR (accoppiamento BT)
10. Indicatore led di carica CHARGE
11. Display LCD
12. TastoFUNCTION/STANDBY,selezionemodofunzionamento/accensione
da standby.
13. Tasto P-MODE, attiva la funzione di ripetizione dei brani
14. Tasto FOLD/10.+, selezione della cartella da riprodurre/selezione in
avanti di 10 brani
15.TastoEQ/ECHO, selezioneequalizzazione/attiva/disattivafunzioneecho
16. Tasto 9, selezione traccia precedente, ricerca indietro veloce
17. Tasto :, selezione traccia successiva, ricerca avanzamento veloce
18. Tasto //PAIR, lettura/pausa brano musicale/operazione di
accoppiamento BT
19. Interruttore ON / OFF, accensione/spegnimento
20. Presa di alimentazione
21. Ruote
22. Microfono

4
XF 950 KB
ITALIANO
TRASPORTO
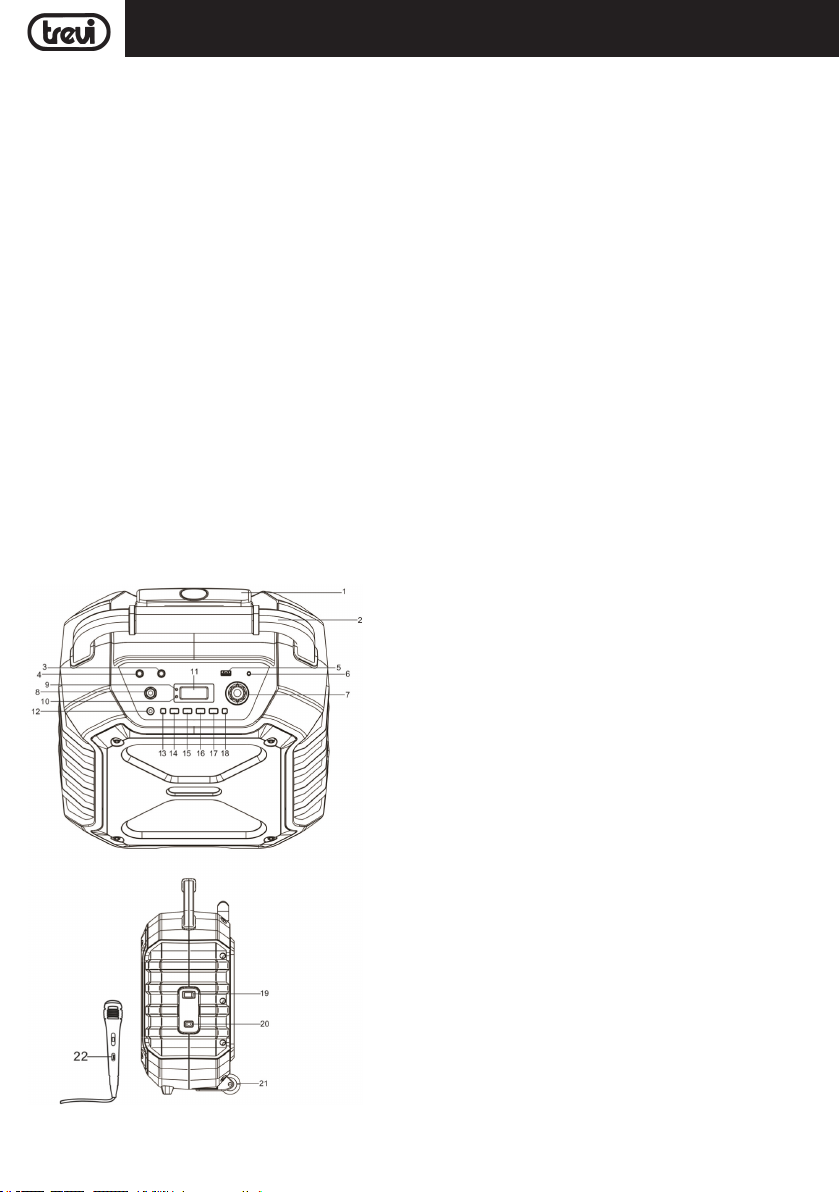
Premereilpulsantepresentesullamanigliadeltrolley,alzareilmaniconoalblocco(siudira'unoscattometallico).Periltrasporto,agendosulla
maniglia del trolley, piegare leggermente l'apparecchio e sfruttare le due ruote posteriori.
Per lo sblocco e chiusura del trolley, premere di nuovo il pulsante ed abbassare completamente il manico.
ALIMENTAZIONE
Questa unità funziona con batteria ricaricabile al piombo 12V 4Ah e alimentazione di rete 100-240V ~ 50/60Hz.
Quando la batteria e' in fase di esaurimento o l'apparecchio non si accende inserire il cavo di alimentazione nella presa sul dispositivo(20) e la spina
in una presa di corrente per effettuare la ricarica.
Stati della spia led CHARGE:
- SpiaCHARGEROSSAssa:ildispositivoe'collegatoconilcavodialimentazioneelabatteriae'incarica.
- SpiaCHARGEVERDEssa:operazionediricaricaterminata,labatteriae'carica.
- Spia CHARGE ROSSA lampeggiante: con il dispositivo in uso, indica che la batteria e' in fase di esaurimento ed e' nacessario ricaricarla.
Non collegare l'apparecchio a prese con tensione diversa da quella indicata.
FUNZIONI DI BASE
ACCENSIONE/SPEGNIMENTO
Premere l'interruttore POWER(20), portarlo in posizione ON/OFF per accendere/spegnere l'apparecchio.
NOTA: Dopo circa 15 minuti di inattivita', l'unità passa automaticamente in modalità standby.
Per accendere nuovamente l'unità, premere il pulsante FUNCTION/STANDBY(12) .
In caso di funzionamento anomalo dell'apparecchio scollegare il cavo di alimentazione ed attendere alcuni minuti prima di ricollegarlo.
IMPOSTAZIONE DEL MODO FUNZIONE
Per cambiare la modalità di funzionamento, premere piu' volte il pulsante FUNCTION/STANDBY(12) per selezionare USB(sul display compare USB)/
AUX/BLUETOOTH(sul display compare BT).
REGOLAZIONE DEL VOLUME
1. Ruotare la manopola del volume(7) per aumentare o diminuire il volume generale di riproduzione.
2. Ruotare la manopola MIC VOL(8) per regolare il volume del segnale sugli ingressi MIC1(4) e MIC2(3). La regolazione agisce sui due ingressi
contemporaneamente.
NOTA: l'ascolto a basso volume potrebbe attivare la modalità di risparmio energetico (l'unità passa automaticamente in modalità standby). In questo
caso e' necessario riaccendere l'unità e aumentare leggermente il volume di ascolto.
EQUALIZZATORE
Questa unità ha un sistema di equalizzazione audio preimpostato. Agire sul tasto EQ/ECHO(15) per selezionare un'impostazione che meglio si adatta
alla riproduzione sonora in corso (disponibili FLAT, POP, CLASSIC, JAZZ, ROCK, BASS).
EFFETTO ECHO
Premere a lungo il tasto EQ/ECHO(15) per attivare/disattivare l'effetto eco sugli ingressi MIC1 e MIC2 (icona ECHO sul display).
Nota: l'effetto eco agisce unicamente sugli ingressi microfonici.
INGRESSO USB
1. Premere il tasto FUNCTION/STANDBY(12) sull'unità e selezionare "USB".
2. Inserire una memoria Usb nell'ingresso USB(5). La riproduzione viene avviata automaticamente.
3. Per mettere in pausa la riproduzione, premere il tasto /(18), il display lampeggerà.
4. Per riprendere la riproduzione, premere di nuovo il tasto /(18).
5. Premendo il tasto :(17) durante l’ascolto si passa alla traccia successiva, mentre con il tasto 9(16) ai brani precedenti.
6. Premere e tenere premuto il tasto :(17) o 9(16) durante l'ascolto per ricercare velocemente un particolare passaggio musicale. Rilasciare il
tasto per tornare alla normale riproduzione.
NOTE
- Il lettore potrebbe non supportare alcuni dispositivi USB, questo è dovuto all'incompatibilità di alcuni processori.
- Per evitare interferenze dannose, collegare sempre le periferiche USB direttamente all'unità, non utilizzare cavi di prolunga.
FUNZIONE DI RIPETIZIONE DEI BRANI
È possibile riprodurre ripetutamente una traccia o tutte le tracce del USB.
Ripetere una singola traccia:
1. Premere il pulsante P-MODE(13) sull'unità durante la riproduzione, il display mostrerà " " e la traccia corrente verrà riprodotta di nuovo.
2.Perannullarelaripetizione,premerepiu'volteilpulsanteP-MODE(13)nchénessunaiconasaràpresentesuldisplay.
Ripetere tutte le tracce:
1.PremereilpulsanteP-MODE(13)sull'unitànoavisualizzare" " sul display, tutte le tracce verranno riprodotte continuamente.
2.Perannullarelaripetizione,premereilpulsanteP-MODE(13)nchénessunaiconasaràpresentesuldisplay.
Perripetereunacartellaspecica(solopermemorieUSBchecontengonopiùcartelle):
1.PremereilpulsanteP-MODE(13)sull'unitànoaquandononvienevisualizzato"FOLDER"suldisplay,lacartellacorrenteverràripetutacontinuamente.
2.Perannullarelaripetizione,premereilpulsanteP-MODE(13)sull'unitànoaquandonessunaiconasaràpresentesuldisplay.

5
XF 950 KB
LETTURA CASUALE DEI BRANI
PremereilpulsanteP-MODE(13)sull'unitàinmodalitàdiriproduzionenoaquandoildisplaymostra"RAND",lariproduzionecasualeiniziaautomatica-
mentedallatracciasuccessiva.PerannullarelafunzionepremerenuovamenteilpulsanteP-MODE(13)nchénessunaiconasaràpresentesuldisplay.
BLUETOOTH
1. Accendere l'apparecchio e premere il tasto FUNCTION/STANDBY(12) per selezionare la funzione bluetooth, sul display compare la scritta BT.
2. Nella modalità Bluetooth, il Led spia frontale (9, PAIR) comincerà a lampeggiare, il sistema entra automaticamente in ricerca.
3. Attivare la funzionalità Bluetooth sul dispositivo esterno da accoppiare.
4. Avviare la ricerca dei dispositivi. Al termine selezionare il dispositivo "XF950KB". Inserire la password "0000" se richiesto.
5. Avviare la riproduzione musicale dal dispositivo esterno.
6. Tenere premuto per qualche secondo il tasto //PAIR (18) per eliminare l'accoppiamento ed effettuare una nuova operazione di pairing.
AUX-IN
1. Premere il tasto FUNCTION/STANDBY(12) sull'unità per selezionare la modalità "AUX".
2. Collegare una qualsiasi unità provvista di uscita audio tramite apposito cavo Jack da 3,5mm (non incluso) all'ingresso AUX IN (6).
3. Regolare il dispositivo esterno dai propri comandi.
UTILIZZO DEL MICROFONO
1. Collegare il microfono in dotazione nella presa MIC1(4) o MIC2 (3).
2. Accendere il microfono agendo sull'interruttore presente sul manico del microfono stesso portandolo in posizione ON.
3. Regolare il volume di ingresso del microfono.
Nota: e' possibile utilizzare due microfoni contemporaneamente (secondo microfono non in dotazione).
CARATTERISTICHE TECNICHE
GENERALI
Alimentazione: .......................... 100-240V~50/60Hz - batteria interna al piombo 12V 4Ah ricaricabile
Consumo: ............................................................................................ Max 36W
Potenza massima in uscita: .................................................................................................... 80W
Dimensioni: ................................................................................ 370x230x524mm
Potenza di trasmissione di picco Bluetooth: ....................................................................................... 2,5mW
Banda di trasmissione Bluetooth: ................................................................................................ 2,4GHz
Peso: ................................................................................................. 7,2 Kg
INFORMATIVA SULLA RIMOZIONE E LO SMALTIMENTO DELLE BATTERIE
Attenzione: Questa operazione è riservata esclusivamente al personale tecnico specializzato!
PROCEDURA PER LA RIMOZIONE DELLA BATTERIA DALL’ALTOPARLANTE AMPLIFICATO
Operare esclusivamente in assenza di collegamento dell’apparecchio alla rete elettrica!
1. Rimuovereleviticheserranoilpannelloposterioredell'altoparlanteamplicatoesmontareilpannello.
2. Individuare la batteria.
3. Rimuovere le viti che serrano i sostegni della batteria, rimuovere i sostegni, scollegare la batteria e rimuoverla.
Qualunquesiailtipodibatteriaesaurita,essanondeveesseregettatatrairiutidomestici,nelfuocoonell’acqua.Ognitipodibatteriaesauritadeve
essere riciclata oppure smaltita presso gli appositi centri raccolta dedicati.
ITALIANO

6
XF 950 KB
ENGLISH
NOTES ON USE
This is a precision electronic appliance; avoid using it in the following cases:
• Near strong heat sources, such as central heating plants or stoves.
• Listening to high volume for a long time could damage your hearing.
• In very humid places such as bathrooms, swimming pools, etc.
• In very dusty places.
• In places subject to strong vibrations.
• Position the appliance in such a way that there is always enough room for free air circulation (at least 5 cm).
• Do not block the air inlets.
• Keep the ear speaker during the steps of focusing point and volume adjustments, and in particular to keep the volume to a
minimum in the ignition phase.
• If any liquid enters the appliance, unplug it immediately from the socket and take it to the nearest TREVI authorised service
centre.
• Before switching on the appliance, always check that the power cable and the connection cable are properly installed.
• Theapparatusshallnotbeexposedtodrippingorsplashingwater.Noobjectslledwithliquid,suchasvases,shouldbeplaced
on the unit.
• Nonakedamesources,suchaslightedcandles,shouldbeplacedon.
• Keep this manual.
CARE AND MAINTENANCE
Use a slightly damp soft cloth for cleaning. Do not use solvents and abrasive substances.
IMPORTANT
This device is designed for home use (not professional use). This appliance has been carefully built to ensure long-lasting perfect
performance. However, should any inconvenience occur, please contact your local authorised TREVI Service Centre.
TREVI follows a policy of ongoing research and development. Therefore products may have different features from those described.
LOCATION OF CONTROL
Controls and sockets on the device
1. Trolley
2. Handle of transport
3. MIC input 2
4. MIC input 1
5. USB Input
6. AUX IN Input
7. Adjust volume
8. Adjusting the Mic1 / 2 Input Signal
9. PAIR led indicator (BT coupling)
10. CHARGE charging indicator
11. LCD display
12. FUNCTION / STANDBY button, mode selection / switching
on from standby
13. P-MODE key, activates the repeat function of the tracks
14. FOLD / 10. + button, selecting the folder to play / forward
selection of 10 tracks
15.EQ/ECHO button,equalizerselection/on/offechofunction
16. 9, previous track selection, fast reverse search
17. :, next track selection, fast forward search
18.//PAIRbutton,musictrack/ pause/PairBToperation
19. ON / OFF switch, on / off
20. Power socket
21. Wheels
22. Microphone

7
XF 950 KBENGLISH
TRANSPORT
Press the button on the trolley handle, raise the handle to the lock (a metallic click will be heard). To transport, by pushing on the trolley handle, slightly
bend the appliance and use the two rear wheels.
To unlock and close the trolley, press the button again and lower the handle completely.
POWER
This unit works with 12V 4Ah lead rechargeable battery and 100-240V ~ 50/60Hz power supply.
When the battery is running out of power or the unit does not turn on, plug the power cord into the socket on the device (20) and plug it into a power
outlet to charge.
CHARGE LED Indicator Status:
- RED CHARGE indicator: the device is connected to the power cord and the battery is charging.
- CHARGE VERDE indicator lights up: Charge operation terminated, battery is charged.
- RED CHARGE indicator blinking: With the device in use, indicates that the battery is running out and is charging it.
Do not connect the appliance to sockets with a voltage other than that indicated.
BASIC FUNCTIONS
ON / OFF
Press the POWER switch (20), turn it ON / OFF to turn the unit on / off.
NOTE: After about 15 minutes of inactivity, the unit automatically switches to standby mode.
To turn on the unit again, press the FUNCTION / STANDBY button (12).
In the event of an abnormal operation of the appliance, disconnect the power cord and wait for a few minutes before reconnecting it.
SETTING THE FUNCTION MODE
To change the mode of operation, press the FUNCTION / STANDBY button (12) repeatedly to select USB (on the USB display display) / AUX / BLUE-
TOOTH (BT displays on the display).
VOLUME ADJUSTMENT
1. Rotate the volume knob (7) to increase or decrease the overall playback volume.
2. Turn the MIC VOL knob (8) to adjust the signal volume on the MIC1 (4) and MIC2 (3) inputs. The adjustment acts on the two inputs simultaneously.
NOTE: Listening to low volume may turn on the power saving mode (the unit automatically switches to standby mode). In this case, you need to turn
on the unit again and increase the listening volume slightly.
EQUALIZER
This unit has a preset audio equalizer system. Press the EQ / ECHO button (15) to select a setting that best suits the current sound reproduction
(Available FLAT, POP, CLASSIC, JAZZ, ROCK, BASS).
ECHO EFFECT
Press and hold the EQ / ECHO key (15) to activate / deactivate the echo effect on the MIC1 and MIC2 inputs (ECHO icon on the display).
Note: The echo effect only affects the microphone inputs.
USB INPUT
1. Press the FUNCTION / STANDBY (12) button on the unit and select "USB".
2. Insert a Usb memory into the USB input (5). Playback starts automatically.
3. To pause playback, press the /button (18), the display will blink.
4. To resume playback, press the /(18) button again.
5. Pressing the key :(17) during listening, you move to the next track and press the 9(16) key to the previous track.
6. Press and hold the key :(17) or 9(16) while listening to quickly search for a particular music passage. Release the key to return to normal
playback.
NOTES
- The player may not support some USB devices, this is due to the incompatibility of some processors.
- To avoid harmful interference, always connect the USB devices directly to the unit, do not use extension cables.
REPEAT FUNCTION
You can play a track or all tracks of USB repeatedly.
Repeat a single track:
1. Press the P-MODE button (13) on the unit during playback, the display will show " " and the current track will be played again.
2. To cancel the repeat, press the P-MODE button (13) several times until no icon is displayed on the display.
Repeat all tracks:
1. Press the P-MODE button (13) on the unit until " " appears in the display, all the tracks will be played continuously.
2. To cancel the repeat, press the P-MODE button (13) until no icon is displayed on the display.
Torepeataspecicfolder(onlyforUSBmemoriesthatcontainmultiplefolders):
1. Press the P-MODE button (13) on the unit until "FOLDER" is displayed on the display, the current folder will be repeated continuously.
2. To cancel the repeat, press the P-MODE button (13) on the unit until no icon is displayed on the display.

8
XF 950 KB
ENGLISH
RANDOM PLAY
Press the P-MODE button (13) on the unit in playback mode until "RAND" is displayed, random playback starts automatically from the next track. To
cancel the function, press the P-MODE button (13) again until no icon is displayed on the display.
BLUETOOTH
1. Turn on the unit and press the FUNCTION / STANDBY button (12) to select Bluetooth function, BT appears on the display.
2. In Bluetooth mode, the front led (9, PAIR) starts blinking.
3. Activate Bluetooth functionality on the external device to pair.
4. Start searching for devices. When done, select the "XF950KB" device. Enter the "0000" password if required.
5. Start playing music from the external device.
6. Press and hold the // PAIR (18) button for a few seconds to clear the pairing and perform a new pairing operation.
AUX-IN
1. Press the FUNCTION / STANDBY (12) button on the unit to select "AUX" mode.
2. Connect any audio output unit with a 3.5 mm jack cable (not included) to the AUX IN jack (6).
3. Adjust the external device from its own controls.
USING THE MICROPHONE
1. Connect the supplied microphone to the MIC1 (4) or MIC2 (3) socket.
2. Switch on the microphone.
3. Adjust the microphone input volume.
Note: You can use two microphones simultaneously (according to microphone not supplied).
TECHNICAL FEATURES
GENERAL
Power supply: 100-240V~50/60Hz - lead internal battery 12V 4 Ah rechargeable
Consumption: Max 36W
Maximum output power: 80W
Dimensions: 370x230x524mm
Bluetooth Peak Power: 2.5mW
Bluetooth transmission band: 2.4GHz
Weight: 7.2 Kg
INFORMATION NOTE ON THE REMOVAL AND DISPOSAL OF BATTERIES
Warning: Only high-qualied personnel should perform this operation!
BATTERY REMOVAL
The appliance should not be plugged to the mains socket when performing this operation!
1.Removethescrewsthatsecuretherearpaneloftheampliedspeakeranddisassemblethepanel.
2. Locate the battery.
3. Remove the screws that secure the battery holder, remove the brackets, unplug the battery and remove it.
Whatevertypeofbatteryisused,itshouldnotbedisposedofinhouseholdwaste,reorwater.Anyusedbatteryshouldberecycledordisposedof
at dedicated dedicated collection centers.

9
XF 950 KB
NOTES D’EMPLOI
Cetappareilestuninstrumentélectroniquedehauteprécision;évitezdoncdel’utiliserdanslescassuivants:
• Près de grosses sources de chaleur comme des radiateurs et des poêles.
• L'écouted'unvolumeélevépendantlongtempspourraitendommagervotreaudition.
• Dans des endroits très humides comme les salles de bains, les piscines, etc.
• Dansdesendroitstrèspoussiéreux.
• Dansdesendroitsexposésàdefortesvibrations.
• Placezl’appareildesortequ’ilyaittoujoursassezd’espacesursescôtéspourlaissercirculerlibrementl’air(aumoins5cm).
• Nebouchezpaslesfentesd’aération.
• Gardezlehaut-parleurdel'oreillependantlesétapesdemiseaupointdesajustementsponctuelsetdevolume,etenparticulier
pour maintenir le volume à un minimum dans la phase d'allumage.
• Sidesliquidespénètrentàl’intérieurdel’appareil,débranchez-leimmédiatementetportez-leaucentred’assistanceagrééTREVI
le plus proche.
• Contrôlez toujours, avant d’allumer l’appareil, que les câbles d’alimentation et les câbles de branchement sont correctement
installés.
• L'appareilnedoitpasêtreexposéàdeséclaboussuresd'eau.Aucunobjetremplideliquide,commedesvases,doiventêtre
placéssurl'appareil.
• Aucunesourcedeammenue,tellequedesbougiesallumées,doiventêtreplacéssur.
• Conservez ce manuel.
MANIEMENT ET ENTRETIEN
Pourlenettoyage,ilestconseilléd’utiliserunchiffondouxlégèrementhumide.Évitezl’emploidesolvantsoudesubstancesabrasives.
IMPORTANT
Cet appareil est conçu pour un usage domestique (usage non professionnel). La bonne fabrication de cet appareil garantit un fon-
ctionnementparfaitpourunelonguepériode.Sitoutefoisquelquesinconvénientsdevaientseprésenter,adressez-vousauCentre
d’AssistanceagrééTREVIleplusproche.
TREVIobserveunepolitiquederechercheetdedéveloppementcontinus. C’estpourquoisesproduitspeuventprésenterdes
caractéristiquesdifférentesparrapportàcellesquisontdécrites.
DESCRIPTION DES CONNECTEURS ET DES COMMANDES
Commandes et prises
1. Chariot
2.Poignéedetransport
3.EntréeMIC2
4.EntréeMIC1
5.EntréeUSB
6.EntréeAUXIN
7. Ajuster le volume
8.Réglagedusignald'entréeMic1/2
9. Indicateur LED PAIR (couplage BT)
10. Indicateur de charge CHARGE
11.AfchageLCD
12.BoutonFUNCTION/STANDBY,sélectiondumode/allumerdepuis
le mode veille
13.ToucheP-MODE,activelafonctionderépétitiondespistes
14.ToucheFOLD/10.+,sélectiondudossierpour lalecture/la
sélectionde10pistes
15.ToucheEQ/ECHO,sélectiondel'égaliseur/fonctiond'échoon/off
16. 9,sélectiondepisteprécédente,rechercherapideversl'arrière
17. :,sélectiondelapistesuivante,rechercherapideversl'avant
18.Touche//PAIR,pistemusicale/pause/opérationdepairageBT
19. Interrupteur ON / OFF, on / off
20. Prise de courant
21. Roues
22. Microphone
FRANÇAIS

10
XF 950 KB
FRANÇAIS
TRANSPORT
Appuyezsurleboutondelapoignéeduchariot,soulevezlapoignéeverslaserrure(undéclicmétalliqueseraentendu).Pourtransporter,enappuyant
surlapoignéeduchariot,pliezlégèrementl'appareiletutilisezlesdeuxrouesarrière.
Pourdéverrouilleretfermerlechariot,appuyezdenouveausurleboutonetabaissezcomplètementlapoignée.
PUISSANCE
Cetteunitéfonctionneavecunebatterierechargeableauplomb12V 4Ah et une alimentation 100-240V ~ 50/60Hz.
Lorsquelabatterieestpresquedéchargéeouquel'appareilnes'allumepas,branchezlecordond'alimentationdanslaprisedel'appareil(20)et
branchez-lesurunepriseélectriquepourlerecharger.
Indicateur LED CHARGE Statut:
-IndicateurREDCHARGE:l'appareilestconnectéaucordond'alimentationetlabatterieestencharge.
-L'indicateurCHARGEVERDEs'allume:l'opérationdechargeestterminée,labatterieestchargée.
-L'indicateurREDCHARGEclignote:lorsquel'appareilestencoursd'utilisation,ilindiquequelabatterieestpresquedéchargéeetqu'elleesten
cours de charge.
Neconnectezpasl'appareilàdesprisesdecourantd'unetensionautrequecelleindiquée.
LES FONCTIONS DE BASE
ALLUMÉ ÉTEINT
AppuyezsurlecommutateurPOWER(20),mettez-lesous/horstensionpourallumer/éteindrel'appareil.
REMARQUE: Après environ 15 minutes d'inactivité, l'appareil passe automatiquement en mode veille.
Pour rallumer l'appareil, appuyez sur le bouton FUNCTION / STANDBY (12).
Encasdefonctionnementanormaldel'appareil,débranchezlecordond'alimentationetattendezquelquesminutesavantdelerebrancher.
MODE DE FONCTION
Pourchangerlemodedefonctionnement,appuyezplusieursfoissurlatoucheFUNCTION/STANDBY(12)poursélectionnerUSB(surl'écrand'afchage
USB)/AUX/BLUETOOTH(lesafchagesBTsurl'écran).
AJUSTEMENT DU VOLUME
1. Tournez le bouton de volume (7) pour augmenter ou diminuer le volume de lecture global.
2.TournezleboutonMICVOL(8)pourréglerlevolumedusignalsurlesentréesMIC1(4)etMIC2(3).L'ajustementagitsurlesdeuxentréessimultanément.
REMARQUE: L'écoute à faible volume peut activer le mode d'économie d'énergie (l'appareil passe automatiquement en mode veille). Dans ce cas,
vous devez réactiver l'unité et augmenter légèrement le volume d'écoute.
ÉGALISEUR
Cetteunitéaunsystèmed'égaliseuraudioprédéni.AppuyezsurlatoucheEQ/ECHO(15)poursélectionnerleréglagequiconvientlemieuxàla
reproduction sonore actuelle (FLAT, POP, CLASSIC, JAZZ, ROCK, BASS disponibles).
EFFET ECHO
AppuyezsurlatoucheEQ/ECHO(15)etmaintenez-laenfoncéepouractiver/désactiverl'effetd'échosurlesentréesMIC1etMIC2(icôneECHO
surl'afchage).
Remarque: L'effet d'écho n'affecte que les entrées du microphone.
ENTRÉE USB
1.AppuyezsurlatoucheFUNCTION/STANDBY(12)del'appareiletsélectionnez"USB".
2.InsérezunemémoireUsbdansl'entréeUSB(5).Lalecturecommenceautomatiquement.
3. Pour interrompre la lecture, appuyez sur le bouton /(18),l'afchageclignote.
4. Pour reprendre la lecture, appuyez à nouveau sur la touche /(18).
5. En appuyant sur la touche :(17)pendantl'écoute,vouspassezàlapistesuivanteetpressezlatouche9(16)surlapisteprécédente.
6. Appuyez et maintenez la touche :(17) ou 9(16)toutenécoutantpourrechercherrapidementunpassagedemusiqueparticulier.Relâchezla
touche pour revenir à la lecture normale.
REMARQUES
- Le lecteur peut ne pas supporter certains périphériques USB, cela est dû à l'incompatibilité de certains processeurs.
- Pour éviter les interférences nuisibles, branchez toujours les périphériques USB directement sur l'appareil, n'utilisez pas de rallonges.
FONCTION REPETITION
Vous pouvez lire une piste ou toutes les pistes de l'USB à plusieurs reprises.
Répétezuneseulepiste:
1.AppuyezsurleboutonP-MODE(13)del'appareilpendantlalecture,l'écranafche" "etlapisteencoursserarejouée.
2.Pourannulerlarépétition,appuyezplusieursfoissurleboutonP-MODE(13)jusqu'àcequ'aucuneicônen'apparaissesurl'afchage.
Répéteztouteslespistes:
1. Appuyez sur le bouton P-MODE (13) de l'appareil jusqu'à ce que " "apparaissesurl'afcheur,touteslesplagesserontluesencontinu.
2.Pourannulerlarépétition,appuyezsurleboutonP-MODE(13)jusqu'àcequ'aucuneicônen'apparaissesurl'afchage.
Pourrépéterundossierspécique(uniquementpourlesclésUSBcontenantplusieursdossiers):
1.AppuyezsurleboutonP-MODE(13)del'appareiljusqu'àceque"FOLDER"s'afcheàl'écran,ledossierencoursserarépétéencontinu.
2.Pourannulerlarépétition,appuyezsurleboutonP-MODE(13)del'appareiljusqu'àcequ'aucuneicônen'apparaissesurl'afchage.

11
XF 950 KBFRANÇAIS
RANDOM PLAY
AppuyezsurleboutonP-MODE(13)del'appareilenmodedelecturejusqu'àceque"RAND"s'afche,lalecturealéatoiredémarreautomatiquementàpartir
delapistesuivante.Pourannulerlafonction,appuyezdenouveausurleboutonP-MODE(13)jusqu'àcequ'aucuneicônen'apparaissesurl'afchage.
BLUETOOTH
1.Allumezl'appareiletappuyezsurleboutonFUNCTION/STANDBY(12)poursélectionnerlafonctionBluetooth,BTapparaîtsurl'afchage.
2. En mode Bluetooth, la led avant (9, PAIR) commence à clignoter.
3.ActivezlafonctionnalitéBluetoothsurl'appareilexterneàassocier.
4.Commencezlarecherched'appareils.Unefoisterminé,sélectionnezlepériphérique"XF950KB".Entrezlemotdepasse"0000"sinécessaire.
5. Commencez à lire de la musique depuis l'appareil externe.
6. Appuyez sur le bouton //PAIR(18)etmaintenez-leenfoncépendantquelquessecondespoureffacerl'appariementeteffectuerunenouvelle
opérationd'appairage.
AUX-IN
1.AppuyezsurleboutonFUNCTION/STANDBY(12)del'appareilpoursélectionnerlemode"AUX".
2.Connectezn'importequelleunitédesortieaudioavecuncâblejack3,5mm(nonfourni)àlapriseAUXIN(6).
3.Ajustezlepériphériqueexterneàpartirdesesproprescontrôles.
UTILISATION DU MICROPHONE
1. Connectez le microphone fourni à la prise MIC1 (4) ou MIC2 (3).
2. Allumez le microphone.
3.Réglezlevolumed'entréedumicrophone.
Remarque: Vous pouvez utiliser deux microphones simultanément (selon le microphone non fourni).
CARACTÉRISTIQUES TECHNIQUES
GÉNÉRAL
Alimentation: 100-240V~50/60Hz - batterie interne au plomb 12V 4 Ah rechargeable
Consommation: Max 36W
Puissance audio max: 80W
Dimensions: 370x230x524mm
Puissance de pointe Bluetooth: 2,5 mW
Bande de transmission Bluetooth: 2,4 GHz
Poids: 7,2 kg
NOTE D'INFORMATION SUR LE RETRAIT ET ÉLIMINATION DES BATTERIES
Attention: Seul le personnel de haute qualié doit effectuer cette opération!
RETRAIT DE LA BATERIE
L'appareil ne doit pas être branché à la prise de courant lors de l'exécution de cette opération!
1.Retirezlesvisquixentlepanneauarrièreduhaut-parleurampliéetdémontezlepanneau.
2. Localisez la batterie.
3.Retirezlesvisquixentlesupportdelabatterie,retirezlessupports,débranchezlabatterieetretirez-la.
Quelquesoitletypedebatterieutilisé,ilnedoitpasêtrejetéaveclesorduresménagères,lefeuoul'eau.Toutebatterieusagéedoitêtrerecycléeou
éliminéedansdescentresdecollectedédiés.

12
XF 950 KB
DEUTSCH
GEBRAUCHSHINWEISE
Dieses Gerät ist ein elektronisches Instrument höchster Präzision. Die Inbetriebnahme des Geräts sollte daher in den folgenden Fällen vermieden werden:
• In der Nähe von Wärmequellen wie Heizkörpern und Öfen.
• Das Hören einer hohen Lautstärke für eine lange Zeit kann Ihr Gehör schädigen.
• In sehr feuchten Räumen wie Badezimmern, Schwimmbädern usw.
• In sehr staubigen Räumen.
• An Orten, die starken Schwingungen ausgesetzt sind.
• Das Gerät sollte so aufgestellt werden, dass an den Seiten jeweils genügend Raum verbleibt, um eine freie Luftzirkulation zu ermöglichen (mindestens 5 cm).
• Die Ventilationsöffnungen dürfen nicht abgedeckt werden.
• Halten Sie das Ohr Lautsprecher während der Schritte des Brennpunkts und Volumenanpassungen , insbesondere die Lautstärke auf ein Minimum in der Zündungsphase
zu halten.
• Sollten Flüssigkeiten ins Innere des Geräts eindringen, den Stecker von der Steckdose unmittelbar abziehen und sich an die nächstgelegene autorisierte TREVI-Kunden-
dienststelle wenden.
• Vor dem Einschalten des Geräts ist sicherzustellen, dass Netzkabel und Anschlusskabel korrekt installiert sind.
• Das Gerät darf nicht mit Wasser oder Spritzwasser ausgesetzt werden. Keine Gegenstände, die mit Flüssigkeit gefüllt ist, wie Vasen, auf das Gerät gestellt werden.
• Keine offenen Flammen, wie brennende Kerzen, platziert werden.
• In diesem Handbuch halten.
PFLEGE UND WARTUNG
Für die Reinigung wird die Verwendung eines leicht angefeuchteten, weichen Tuchs empfohlen. Der Einsatz von Lösungsmitteln oder scheuernden Substanzen sollte vermieden
werden.
WICHTIG
Dieses Gerät ist für den Heimgebrauch (nicht professionellen Gebrauch). Der fachgemäße Bau dieses Geräts gewährleistet langfristig einen einwandfreien Betrieb. Sollten
dennoch Betriebsstörungen auftreten, wenden Sie sich bitte an nächstgelegene autorisierte TREVI-Kundendienststelle.
Die Firma TREVI verfolgt eine Politik ständiger Forschung und Weiterentwicklung. Die Produkte können daher andere als die beschriebenen Eigenschaften aufweisen.
BESCHREIBUNG DER ANSCHLÜSSE/BEDIENELEMENTE
Kontrollen und Steckdosen am Gerät
1. Trolley
2. Transportmittel
3. MIC-Eingang 2
4. MIC-Eingang 1
5. USB Eingang
6. AUX IN Eingang
7. Lautstärke einstellen
8. Einstellen des Mic1 / 2-Eingangssignals
9. PAIR LED-Anzeige (BT-Kopplung)
10. CHARGE Ladeanzeige
11. LCD-Anzeige
12. FUNCTION / STANDBY-Taste, Modusauswahl / Einschalten aus
dem Standby.
13. P-MODE-Taste, aktiviert die Wiederholfunktion der Spuren
14. FOLD / 10. + -Taste, Auswahl des Ordners zur Wiedergabe /
Auswahl von 10 Titeln
15. EQ / ECHO-Taste, Equalizer-Auswahl / Ein / Aus Echo-Funktion
16. 9, vorherige Titelauswahl, schnelle Rückwärtssuche
17. :, nächste Titelauswahl, schnelle Suche nach vorne
18.// PAIR-Taste, Musiktitel / Pause / Pair BT-Betrieb
19. EIN / AUS-Schalter, ein / aus
20. Steckdose
21. Räder
22. Mikrofon

13
XF 950 KBDEUTSCH
TRANSPORT
Drücken Sie den Knopf am Trolleygriff, heben Sie den Griff zum Schloss an (ein metallisches Klicken ist zu hören). Zum Transport, indem Sie auf den
Wagengriff drücken, biegen Sie das Gerät leicht und verwenden Sie die beiden Hinterräder.
Um den Wagen zu entriegeln und zu schließen, drücken Sie die Taste erneut und senken Sie den Griff vollständig ab.
LEISTUNG
Dieses Gerät arbeitet mit 12V 4Ah Bleiakku und 100-240V ~ 50/60Hz Netzteil.
Wenn der Akku fast leer ist oder das Gerät nicht eingeschaltet wird, stecken Sie das Netzkabel in die Buchse am Gerät (20) und stecken Sie es in
eine Steckdose, um es aufzuladen.
CHARGE LED-Anzeige Status:
- ROTE CHARGE-Anzeige: Das Gerät ist an das Netzkabel angeschlossen und der Akku wird geladen.
- CHARGE VERDE-Anzeige leuchtet auf: Ladevorgang beendet, Batterie ist geladen.
- ROTE CHARGE-Anzeige blinkt: Zeigt bei eingeschaltetem Gerät an, dass der Akku leer ist und lädt ihn auf.
Schließen Sie das Gerät nicht an eine andere als die angegebene Spannung an.
BASISFUNKTIONEN
AN AUS
Drücken Sie den Schalter POWER (20) und schalten Sie das Gerät ein / aus.
HINWEIS: Nach etwa 15 Minuten Inaktivität schaltet das Gerät automatisch in den Standby-Modus.
Um das Gerät wieder einzuschalten, drücken Sie die Taste FUNCTION / STANDBY (12).
Ziehen Sie das Netzkabel ab und warten Sie einige Minuten, bevor Sie es wieder anschließen.
EINSTELLEN DES FUNKTIONSMODUS
Um den Betriebsmodus zu ändern, drücken Sie wiederholt die Taste FUNCTION / STANDBY (12), um USB auszuwählen (auf dem USB-Display) / AUX
/ BLUETOOTH (BT wird auf dem Display angezeigt).
VOLUMENANPASSUNG
1. Drehen Sie den Lautstärkeregler (7), um die Gesamt-Wiedergabelautstärke zu erhöhen oder zu verringern.
2. Drehen Sie den MIC VOL-Regler (8), um die Signallautstärke an den Eingängen MIC1 (4) und MIC2 (3) einzustellen. Die Einstellung wirkt gleichzeitig
auf die beiden Eingänge.
HINWEIS: Wenn Sie auf eine niedrige Lautstärke achten, kann der Energiesparmodus eingeschaltet werden (das Gerät wechselt automatisch in den
Standby-Modus). In diesem Fall müssen Sie das Gerät wieder einschalten und die Hörlautstärke etwas erhöhen.
EQUALIZER
Dieses Gerät verfügt über ein voreingestelltes Audio-Equalizer-System. Drücken Sie die EQ / ECHO-Taste (15), um eine Einstellung auszuwählen, die
der aktuellen Tonwiedergabe am besten entspricht (Verfügbare FLAT, POP, CLASSIC, JAZZ, ROCK, BASS).
ECHO EFFEKT
Halten Sie die Taste EQ / ECHO (15) gedrückt, um den Echoeffekt an den Eingängen MIC1 und MIC2 zu aktivieren / deaktivieren (ECHO-Symbol auf
dem Display).
Hinweis: Der Echo-Effekt wirkt sich nur auf die Mikrofoneingänge aus.
USB-EINGANG
1. Drücken Sie die Taste FUNCTION / STANDBY (12) am Gerät und wählen Sie "USB".
2. Legen Sie einen USB-Speicher in den USB-Eingang ein (5). Die Wiedergabe startet automatisch.
3. Um die Wiedergabe zu unterbrechen, drücken Sie die Taste /(18), die Anzeige blinkt.
4. Um die Wiedergabe fortzusetzen, drücken Sie erneut die Taste /(18).
5. Durch Drücken der Taste :(17) während des Abhörens gelangen Sie zum nächsten Titel und drücken die Taste 9(16) zum vorherigen Titel.
6. Halten Sie die Taste :(17) oder 9(16) gedrückt, während Sie schnell nach einer bestimmten Passage suchen. Lassen Sie die Taste los, um zur
normalen Wiedergabe zurückzukehren.
NOTIZEN
- Der Player unterstützt einige USB-Geräte möglicherweise nicht, da einige Prozessoren nicht kompatibel sind.
- Um schädliche Störungen zu vermeiden, schließen Sie die USB-Geräte immer direkt an das Gerät an, verwenden Sie keine Verlängerungskabel.
WIEDERHOLFUNKTION
Sie können einen Titel oder alle Spuren von USB wiederholt wiedergeben.
Wiederhole eine einzelne Spur:
1. Drücken Sie während der Wiedergabe die P-MODE-Taste (13) am Gerät. Auf dem Display erscheint " " und der aktuelle Titel wird wiedergegeben.
2. Um die Wiederholung abzubrechen, drücken Sie mehrmals die Taste P-MODE (13), bis kein Symbol auf dem Display angezeigt wird.
Wiederholen Sie alle Titel:
1. Drücken Sie die P-MODE-Taste (13) am Gerät, bis " " im Display erscheint. Alle Titel werden kontinuierlich abgespielt.
2. Um die Wiederholung abzubrechen, drücken Sie die Taste P-MODE (13), bis kein Symbol auf dem Display angezeigt wird.
Wiederholen eines bestimmten Ordners (nur für USB-Speicher, die mehrere Ordner enthalten):
1. Drücken Sie die P-MODE-Taste (13) am Gerät, bis "FOLDER" im Display angezeigt wird. Der aktuelle Ordner wird fortlaufend wiederholt.
2. Um die Wiederholung abzubrechen, drücken Sie die Taste P-MODE (13) am Gerät, bis kein Symbol auf dem Display angezeigt wird.

14
XF 950 KB
DEUTSCH
RANDOM
Drücken Sie im Wiedergabemodus die Taste P-MODE (13) am Gerät, bis "RAND" angezeigt wird. Die Zufallswiedergabe beginnt automatisch mit
dem nächsten Titel. Um die Funktion abzubrechen, drücken Sie erneut die Taste P-MODE (13), bis kein Symbol auf dem Display angezeigt wird.
BLUETOOTH
1.SchaltenSiedasGerät ein unddrücken Sie dieTasteFUNCTION/STANDBY(12),umdie Bluetooth-Funktionauszuwählen.Aufdem Displayerscheint BT.
2. Im Bluetooth-Modus beginnt die vordere LED (9, PAIR) zu blinken.
3. Aktivieren Sie die Bluetooth-Funktion auf dem externen Gerät zum Pairing.
4. Starten Sie die Suche nach Geräten. Wenn Sie fertig sind, wählen Sie das Gerät "XF950KB" aus. Geben Sie bei Bedarf das Passwort "0000" ein.
5. Starten Sie die Wiedergabe von Musik vom externen Gerät.
6.HaltenSie dieTaste// PAIR(18)einigeSekunden langgedrückt, umdieKopplungzulöschenund einenneuen Kopplungsvorgangdurchzuführen.
AUX-IN
1. Drücken Sie die Taste FUNCTION / STANDBY (12) am Gerät, um den "AUX" -Modus auszuwählen.
2. Schließen Sie eine beliebige Audioausgabeeinheit mit einem 3,5-mm-Klinkenkabel (nicht im Lieferumfang enthalten) an die AUX IN-Buchse (6) an.
3. Stellen Sie das externe Gerät von seinen eigenen Steuerungen ein.
DAS MIKROFON VERWENDEN
1. Schließen Sie das mitgelieferte Mikrofon an die Buchse MIC1 (4) oder MIC2 (3) an.
2. Schalten Sie das Mikrofon ein.
3. Stellen Sie die Mikrofonlautstärke ein.
Hinweis: Sie können zwei Mikrofone gleichzeitig verwenden (je nachdem, welches Mikrofon nicht mitgeliefert wird).
TECHNISCHE EIGENSCHAFTEN
GENERAL
Stromversorgung: 100-240V~50/60Hz - interner Akku 12V 4Ahwiederauadbar
Verbrauch: Max 36W
Maximale Ausgangsleistung: 80W
Abmessungen: 370x230x524mm
Bluetooth Spitzenleistung: 2,5 mW
Bluetooth Übertragungsband: 2.4GHz
Gewicht: 7,2 kg
Informationen Hinweis auf die Entfernung und Entsorgung von Batterien
Achtung: Nur qualitativ qualiziertes Personal darf diese Operation durchzuführen!
BATTERIE AUSBAUEN
Das Gerät darf nicht an die Netzsteckdose angeschlossen werden um diesen Vorgang auszuführen!
1. Entfernen Sie die Schrauben, mit denen die Rückseite des verstärkten Lautsprechers befestigt ist, und bauen Sie die Abdeckung aus.
2. Suchen Sie den Akku.
3. Entfernen Sie die Schrauben, mit denen der Batteriehalter gesichert ist, entfernen Sie die Halterungen, ziehen Sie die Batterie ab und entfernen Sie sie.
Welche Art von Batterien verwendet wird, sollte nicht im Hausmüll, Feuer oder Wasser entsorgt werden. Jede gebrauchte Batterie sollte recycelt oder
in dafür vorgesehenen Sammelstellen entsorgt werden.

15
XF 950 KBESPAÑOL
NOTAS PARA EL USO
Este aparato es un instrumento electrónico de alta precisión; por lo tanto debe evitar utilizarlo en los siguientes casos:
• Cerca de fuertes fuentes de calor como caloríferos y estufas.
• En lugares muy húmedos como cuartos de baño, piscinas, etc.
• En lugares muy polvorientos.
• En lugares sujetos a fuertes vibraciones.
• Posicione el aparato de manera que el espacio circundante sea amplio para la libre circulación del aire (por lo menos 5 cm).
• No obstruya las ranuras de ventilación.
• Escuchar un volumen alto durante mucho tiempo podría dañar su audición.
• Mantenga el altavoz durante los pasos de centrarse ajustes de punto y de volumen, y en particular para mantener el volumen a un mínimo en la fase de encendido.
•Si penetran líquidos dentro del aparato, desconecte inmediatamente el enchufe de la toma de corriente y lleve el aparato al centro de asistencia autorizado TREVI más
cercano.
• Siemprecompruebequeloscablesdealimentaciónydeconexiónesténinstaladoscorrectamenteantesdeencenderelaparato.
• Elaparatonodebeexponerseagoteososalpicadurasdeagua.Losobjetosquecontenganlíquidos,comooreros,debesercolocadoenlaunidad.
• No hay fuente de llamas, como una vela encendida, se deben colocar en.
• Mantenga este manual.
CUIDADO Y MANTENIMIENTO
Para efectuar la limpieza se aconseja utilizar un paño suave, ligeramente humedecido. Evite solventes o sustancias abrasivas.
IMPORTANTE
Estedispositivoestádiseñadoparausodoméstico(usonoprofesional).Labuenaconstruccióndelaparatogarantizasuperfectofuncionamientodurantemuchotiempo.Si
se presentase algún inconveniente, será oportuno consultar al Centro de Asistencia autorizado TREVI más cercano.
TREVI cultiva una política de investigación y desarrollo continuos. Por consiguiente, los productos pueden presentar características distintas a las descritas..
DESCRIPCIÓN DE LOS CONECTORES/MANDOS
Controles y conectores
1. Trolley
2. Manija del transporte
3. Entrada MIC 2
4. Entrada MIC 1
5. Entrada USB
6. Entrada AUX IN
7. Ajuste el volumen
8. Ajuste de la señal de entrada Mic1 / 2
9. Indicador led PAIR (acoplamiento BT)
10. Indicador de carga CHARGE
11. Pantalla LCD
12. Botón FUNCTION / STANDBY, selección de modo / encendido desde
el modo de espera.
13. Tecla P-MODE, activa la función de repetición de las pistas
14. Botón FOLD / 10. +, seleccionando la carpeta para reproducir /
reenviar la selección de 10 pistas
15. Botón EQ / ECHO, selección de ecualizador / función de eco activado
/ desactivado
16. 9, selección de pista anterior, búsqueda inversa rápida
17. :, próxima selección de pista, búsqueda rápida
18. Botón // PAIR, play / pausa de música / operación Pair BT
19. Interruptor ON / OFF, encendido / apagado
20. Toma de corriente
21. Ruedas
22. Micrófono

16
XF 950 KB
ELLEHNIKA
ESPAÑOL
TRANSPORTE
Presione el botón en la manija , levante la manija hacia la cerradura (se escuchará un clic metálico). Para transportarlo, empujando la manija del
trolley, doble ligeramente el aparato y use las dos ruedas traseras.
Para desbloquear y cerrar el trolley, presione el botón nuevamente y baje el mango por completo.
ALIMENTACION
Esta unidad funciona con una batería recargable de plomo de 12V 4Ah y una fuente de alimentación de 100-240V ~ 50/60Hz.
Cuando la batería se está quedando sin energía o la unidad no se enciende, enchufe el cable de alimentación en el enchufe del dispositivo (20) y
conécteloauntomacorrienteparacargarlo.
Estado del indicador LED de carga:
- Indicador ROJO : el dispositivo está conectado al cable de alimentación y la batería se está cargando.
-ElindicadorVERDEseilumina:laoperacióndecarganaliza,labateríaestácargada.
- El indicador de carga ROJA parpadea: con el dispositivo en uso, indica que la batería se está agotando y se está cargando.
No conecte el aparato a tomas con un voltaje diferente al indicado.
FUNCIONES BÁSICAS
ENCENDIDO APAGADO
PresioneelinterruptorPOWER(20),enciéndalo/apágueloparaencender/apagarlaunidad.
NOTA: Después de aproximadamente 15 minutos de inactividad, la unidad cambia automáticamente al modo de espera.
Para volver a encender la unidad, presione el botón FUNCTION / STANDBY (12).
En el caso de una operación anormal del dispositivo, desconecte el cable de alimentación y espere unos minutos antes de volver a conectarlo.
MODO DE FUNCIÓN
Para cambiar el modo de operación, presione el botón FUNCTION / STANDBY (12) repetidamente para seleccionar USB (en la pantalla de visualización
USB) / AUX / BLUETOOTH (BT aparece en la pantalla).
AJUSTE DE VOLUMEN
1. Gire la perilla de volumen (7) para aumentar o disminuir el volumen de reproducción general.
2.Gire laperilla MICVOL (8)para ajustarel volumen dela señalen lasentradas MIC1(4) yMIC2 (3). Elajuste actúaen lasdos entradassimultáneamente.
NOTA: escuchar un volumen bajo puede activar el modo de ahorro de energía (la unidad cambia automáticamente al modo de espera). En este caso,
debe encender la unidad nuevamente y aumentar ligeramente el volumen de escucha.
ECUALIZADOR
Esta unidad tiene un sistema de ecualizador de audio preestablecido. Presione el botón EQ / ECHO (15) para seleccionar el ajuste que mejor se adapte
a la reproducción de sonido actual (Disponible FLAT, POP, CLASSIC, JAZZ, ROCK, BASS).
EFECTO ECHO
Mantenga presionada la tecla EQ / ECHO (15) para activar / desactivar el efecto de eco en las entradas MIC1 y MIC2 (icono de ECHO en la pantalla).
Nota: El efecto de eco solo afecta las entradas de micrófono.
ENTRADA USB
1. Presione el botón FUNCTION / STANDBY (12) en la unidad y seleccione "USB".
2. Inserte una memoria USB en la entrada USB (5). La reproducción comienza automáticamente.
3. Para pausar la reproducción, presione el botón /(18), la pantalla parpadeará.
4. Para reanudar la reproducción, presione el botón/(18) nuevamente.
5. Al presionar la tecla :(17) durante la escucha, se pasa a la siguiente pista y se presiona la tecla 9(16) en la pista anterior.
6. Mantenga presionada la tecla :(17) o 9(16) mientras escucha para buscar rápidamente un pasaje de música en particular. Suelta la tecla para
volver a la reproducción normal.
NOTAS
- Es posible que el reproductor no admita algunos dispositivos USB, esto se debe a la incompatibilidad de algunos procesadores.
- Para evitar interferencias dañinas, siempre conecte los dispositivos USB directamente a la unidad, no use cables de extensión.
FUNCION REPETICION
Puede reproducir una pista o todas las pistas de USB repetidamente.
Repite una sola pista:
1. Presione el botón P-MODE (13) en la unidad durante la reproducción, la pantalla mostrará " " y la pista actual se reproducirá nuevamente.
2. Para cancelar la repetición, presione el botón P-MODE (13) varias veces hasta que no aparezca ningún icono en la pantalla.
Repite todas las pistas:
1. Presione el botón P-MODE (13) en la unidad hasta que aparezca " " en la pantalla, todas las pistas se reproducirán continuamente.
2. Para cancelar la repetición, presione el botón P-MODE (13) hasta que no aparezca ningún icono en la pantalla.
Pararepetirunacarpetaespecíca(soloparamemoriasUSBquecontienenvariascarpetas):
1. Presione el botón P-MODE (13) en la unidad hasta que aparezca "FOLDER" en la pantalla, la carpeta actual se repetirá continuamente.
2. Para cancelar la repetición, presione el botón P-MODE (13) en la unidad hasta que no aparezca ningún icono en la pantalla.

17
XF 950 KBESPAÑOL
REPRODUCCIÓN ALEATORIA
Presione el botón P-MODE (13) en la unidad en el modo de reproducción hasta que se muestre "RAND", la reproducción aleatoria comienza automática-
mente desde la siguiente pista. Para cancelar la función, presione el botón P-MODE (13) nuevamente hasta que no aparezca ningún icono en la pantalla.
BLUETOOTH
1. Encienda la unidad y presione el botón FUNCTION / STANDBY (12) para seleccionar la función Bluetooth, BT aparece en la pantalla.
2. En modo Bluetooth, el led frontal (9, PAR) comienza a parpadear.
3. Active la funcionalidad Bluetooth en el dispositivo externo para emparejar.
4. Comience a buscar dispositivos. Cuando termine, seleccione el dispositivo "XF950KB". Ingrese la contraseña "0000" si es necesario.
5. Comienza a reproducir música desde el dispositivo externo.
6. Mantenga presionado el botón // PAIR (18) durante unos segundos para borrar el emparejamiento y realizar una nueva operación de
emparejamiento.
AUX-IN
1. Presione el botón FUNCTION / STANDBY (12) en la unidad para seleccionar el modo "AUX".
2. Conecte cualquier unidad de salida de audio con un cable jack de 3.5 mm (no incluido) a la toma AUX IN (6).
3. Ajuste el dispositivo externo desde sus propios controles.
USO DEL MICRÓFONO
1. Conecte el micrófono suministrado a la toma MIC1 (4) o MIC2 (3).
2. Enciende el micrófono.
3. Ajuste el volumen de entrada del micrófono.
Nota: Puede usar dos micrófonos simultáneamente (según micrófono no suministrado).
CARACTERÍSTICAS TÉCNICAS
GENERAL
Fuente de alimentación: 100-240V~50/60Hz - batería interna de plomo 12V 4Ah recargable
Consumo: Max 36W
Potencia de salida máxima: 80W
Dimensiones: 370x230x524mm
Potencia pico Bluetooth: 2.5mW
Banda de transmisión Bluetooth: 2.4GHz
Peso: 7.2 Kg
NOTA INFORMATIVA SOBRE LA ELIMINACIÓN Y TRATAMIENTO DE LAS PILAS
Advertencia: Sólo el personal de alta cualicación deberían poder realizar esta operación!
REMOCIÓN DE LA BATERÍA
El aparato no debe estar enchufado a la toma de red para realizar esta operación!
1.Retirelostornillosqueaseguranelpanelposteriordelaltavozamplicadoydesmonteelpanel.
2. Ubica la batería.
3. Retire los tornillos que aseguran el soporte de la batería, retire los soportes, desenchufe la batería y quítela.
Independientementedeltipodebateríaqueseuse,nosedebetirarenlabasuradoméstica,fuegooagua.Todabateríausadadebereciclarseo
desecharse en centros dedicados dedicados a la recolección.

18
XF 950 KB
CORRECT DISPOSAL WARNINGS
INFORMAZIONI AGLI UTENTI ai sensi del Decreto Legislativo N° 49 del 14 Marzo 2014
“Attuazione della Direttiva 2012/19/UE sui riuti di apparecchiature elettriche ed elettroniche (RAEE)”
Ilsimbolodelcassonettobarratoriportatosull’apparecchiaturaindicacheilprodottoallanedellapropriavitautiledeveessere
raccoltoseparatamentedaglialtririuti.L’utentedovrà,pertanto,conferirel’apparecchiaturaintegradeicomponentiessenziali
giuntaanevitaagliidoneicentridiraccoltadifferenziatadeiriutielettroniciedelettrotecnici,oppurericonsegnarlaalrivenditoreal
momento dell’acquisto di nuova apparecchiatura di tipo equivalente, in ragione di uno a uno, oppure 1 a zero per le apparecchiature
aventi lato maggiore inferiore a 25 cm. L’adeguata raccolta differenziata per l’avvio successivo dell’apparecchiatura dimessa al
riciclaggio, al trattamento e allo smaltimento ambientale compatibile contribuisce ad evitare possibili effetti negativi sull’ambiente
e sulla salute e favorisce il riciclo dei materiali di cui è composta l’apparecchiatura. Lo smaltimento abusivo del prodotto da parte
dell’utente comporta l’applicazione delle sanzioni amministrative di cui al D.Lgs n. Decreto Legislativo N° 49 del 14 Marzo 2014.
TREVI persegue una politica di continua ricerca e sviluppo, pertanto i prodotti possono presentare caratteristiche diverse da quelle
descritte.
Precautions for correct disposal of the product.
The symbol shown on the equipment indicates that waste must be disposed of in “separate collection” and so the product must
not be disposed of together with urban waste.
The user must take the product to special “separate waste collection centres” provided by local government, or deliver it to the
retailer against the purchase of a new product.
Separate collection of waste and subsequent treatment, recycling and disposal operations promotes the production of equipment
with recycled materials and limits negative effects on the environment and on health caused by improper handling of waste.
Illegal disposal of the product leads to the enforcement of administrative penalties.
Recommandations pour l’élimination correcte du produit.
Lesymbolegurantsurl’appareilindiquequeleproduitfaitl’objetd’une“collecteséparée“.C’estpourquoi,leproduitnedoitpas
êtreéliminéaveclesdéchetsurbains.
L’utilisateurdoitremettreleproduitauprèsde“déchargesspécialiséesdecollecteséparée“prévuesparlesautoritéslocales,ou
bienlerendreaurevendeurquandilachèteraunnouvelappareiléquivalent.
Lacollecteséparéeduproduitetlesopérationssuccessivesdetraitement,recyclageetéliminationfavorisentlaproductiond’ap-
pareilscomposéspardesmatériauxrecyclésainsiquepermettentd’éviterdeseffetsnégatifssurl’environnementetsurlasanté
despersonnessuiteàunegestionimpropredudéchet.
Touteéliminationabusiveduproduitentraînel’applicationdesanctionsadministratives.

19
XF 950 KBCORRECT DISPOSAL WARNINGS
Hinweise zur ordnungsgemäßen Entsorgung des Produkts.
Das auf dem Gerät angebrachte Symbol weist darauf hin, dass das Altgerät “getrennt zu sammeln” ist und das Produkt daher nicht
zusammen mit dem Gemeindeabfall entsorgt werden darf.
Der Benutzer muss das Produkt zu den entsprechenden, von der Gemeindeverwaltung eingerichteten “Wertstoffsammelstellen”
bringen oder dem Händler beim Kauf eines neuen Produkts übergeben.
DiegetrennteMüllsammlungundanschließendeAufbereitung,Wiederverwertungund EntsorgungförderndieHerstellungvonGeräten
unter Verwendung wiederverwerteter Materialien und vermindern die negativen Auswirkungen auf die Umwelt und Gesundheit in
Folge einer falschen Müllverwaltung.
Die widerrechtliche Entsorgung des Produkts führt zur Auferlegung von Verwaltungsstrafen.
Advertencias para la correcta eliminación del producto.
El símbolo que aparece en el aparato indica que el residuo debe ser objeto de “recogida selectiva” por tanto el producto no se debe
eliminar junto con residuos urbanos.
El usuario deberá entregar el producto a los “centros de recogida selectiva” creados por las administraciones municipales o bien
al distribuidor cuando adquiera un nuevo producto.
La recogida selectiva del residuo y las sucesivas operaciones de tratamiento, recuperación y eliminación favorecen la fabricación
de aparatos con materiales reciclados y limitan los efectos negativos en el medio ambiente y la salud causados por una gestión
incorrecta del residuo.
La eliminación abusiva del producto da lugar a la aplicación de sanciones administrativas.
Advertências para a correcta demolição do produto.
O símbolo indicado na aparelhagem indica que o resíduo deve ser objecto de “recolha separada” portanto o produto não deve ser
desmantelado junto dos resíduos urbanos.
O utilizador deverá entregar o produto nos apropriados “centros de recolha diferenciada” predispostos pelas administrações
comunais, ou entregá-lo ao revendedor em troca de uma compra de um novo produto.
A recolha diferenciada do resíduo e as sucessivas operações de tratamento, recuperação e desmantelamento favorecem a pro-
dução de aparelhagens com materiais reciclados e limitam os efeitos negativos no ambiente e na saúde causados por uma gestão
imprópria do resíduo.
O desmantelamento abusivo do produto comporta a aplicação de sanções administrativas.
Προειδοποιήσεις για τη σωστή διάθεση του προϊόντος.
Το σύμβολο που απεικονίζεται επάνω στη συσκευή υποδεικνύει ότι το απόβλητο πρέπει να αποτελέσει αντικείμενο
“χωριστής συλλογής” ως εκ τούτου το προϊόν δεν πρέπει να διατίθεται μαζί με τα αστικά απόβλητα.
Ο χρήστης θα πρέπει να παραδώσει το προϊόν στα ειδικά “κέντρα διαφοροποιημένης συλλογής” που έχουν
διευθετηθεί από τις δημοτικές διοικήσεις, ή να το παραδώσει στο κατάστημα πώλησης με την αγορά ενός νέου
προϊόντος.
Η διαφοροποιημένη συλλογή του αποβλήτου και οι ακόλουθες επεμβάσεις επεξεργασίας, ανάκτησης και διάθεσης
βοηθούν την παραγωγή συσκευών με ανακυκλωμένα υλικά και περιορίζουν τις αρνητικές επιπτώσεις για το
περιβάλλον και την υγεία που προκαλούνται από την ακατάλληλη διαχείριση του αποβλήτου.
Η αυθαίρετη διάθεση του προϊόντος συνεπάγεται την εφαρμογή διοικητικών κυρώσεων.

Dichiarazione di conformità UE semplicata
Il fabbricante TREVI S.p.a. dichiara che il tipo
Altoparlante portatile con trolley XF 950 KB
éconformealladirettiva2014/53/UE.
Il testo completo della dichiarazione di conformità UE è disponibile al seguente indirizzo internet: www.trevi.it
Simplied EU Declaration Of Conformity
Hereby TREVI S.p.a declares that the radio equipment type
"Power portable speaker with trolley" model XF 950 KB
is in compliance with Directive 2014/53/EU.
The full text of the EU declaration of conformity is available at the following internet address www.trevi.it
Made in CHINA
Trevi S.p.A.
Strada Consolare Rimini-San Marino, 62 47924 Rimini (RN) Italy
Table of contents
Languages:
Other Trevi Portable Speakers manuals

Trevi
Trevi XF 350 User manual

Trevi
Trevi XF 3500 PRO User manual

Trevi
Trevi XF 1800KB User manual

Trevi
Trevi XF 1560 KB User manual

Trevi
Trevi XF 4200 DJ User manual

Trevi
Trevi XR 400 APP User manual

Trevi
Trevi XF 1750KB User manual

Trevi
Trevi XR 8A01 User manual

Trevi
Trevi XF 470 KB User manual

Trevi
Trevi XFest XF 1560 KB User manual

Trevi
Trevi XF 300 User manual

Trevi
Trevi XF 1500 KB User manual

Trevi
Trevi XF 1700KB User manual

Trevi
Trevi XF 3200 PRO User manual

Trevi
Trevi SL 3841 User manual

Trevi
Trevi XF 800 User manual

Trevi
Trevi XF 1250 KB User manual

Trevi
Trevi XF 600 KB User manual

Trevi
Trevi XF 1200 KB User manual

Trevi
Trevi XF 1550 KB User manual