7
механическим ударам. Не ставьте на устройство
источники открытого пламени, такие как свечи.
Не допускайте попадания посторонних предме-
тов в отверстия устройства.
Не допускайте, чтобы сетевой шнур свешивался
со стола, и следите, чтобы шнур не касался
острых кромок мебели и горячих поверхностей.
При отсоединении вилки сетевого шнура от
электрической розетки следует держаться за
вилку сетевого шнура, а не за сам шнур.
Не подсоединяйте, не отсоединяйте и не бери-
тесь за сетевой шнур или вилку сетевого шнура
мокрыми руками, это может привести к удару
электрическим током.
Запрещается пользоваться устройством с по-
вреждениями сетевого шнура или сетевой
вилки, а также в тех случаях, когда устройство
функционирует со сбоями, если оно упало с вы-
соты или повреждено иным образом.
Во избежание удара электрическим током не
открывайте корпус устройства самостоятельно.
Не ремонтируйте устройство самостоятельно и
не вносите в него изменения. При обнаружении
неисправностей отключите устройство от элек-
трической сети и обратитесь в авторизованный
(уполномоченный) сервисный центр.
Из соображений безопасности детей не остав-
ляйте полиэтиленовые пакеты, используемые в
качестве упаковки, без надзора.
• Внимание! Не разрешайте детям играть с поли-
этиленовыми пакетами или упаковочной плён-
кой. Опасность удушья!
Будьте особенно внимательны, если рядом с ра-
ботающим устройством находятся дети или лица
с ограниченными возможностями.
Данное устройство не предназначено для ис-
пользования детьми и людьми с ограничен-
ными возможностями, если только лицом,
отвечающим за их безопасность, им не даны
соответствующие и понятные им инструкции
о безопасном пользовании устройством и тех
опасностях, которые могут возникать при его не-
правильном использовании.
УСТРОЙСТВО ПРЕДНАЗНАЧЕНО ТОЛЬКО ДЛЯ
БЫТОВОГО ИСПОЛЬЗОВАНИЯ
ИНСТРУКЦИЯ ПО ЭКСПЛУАТАЦИИ
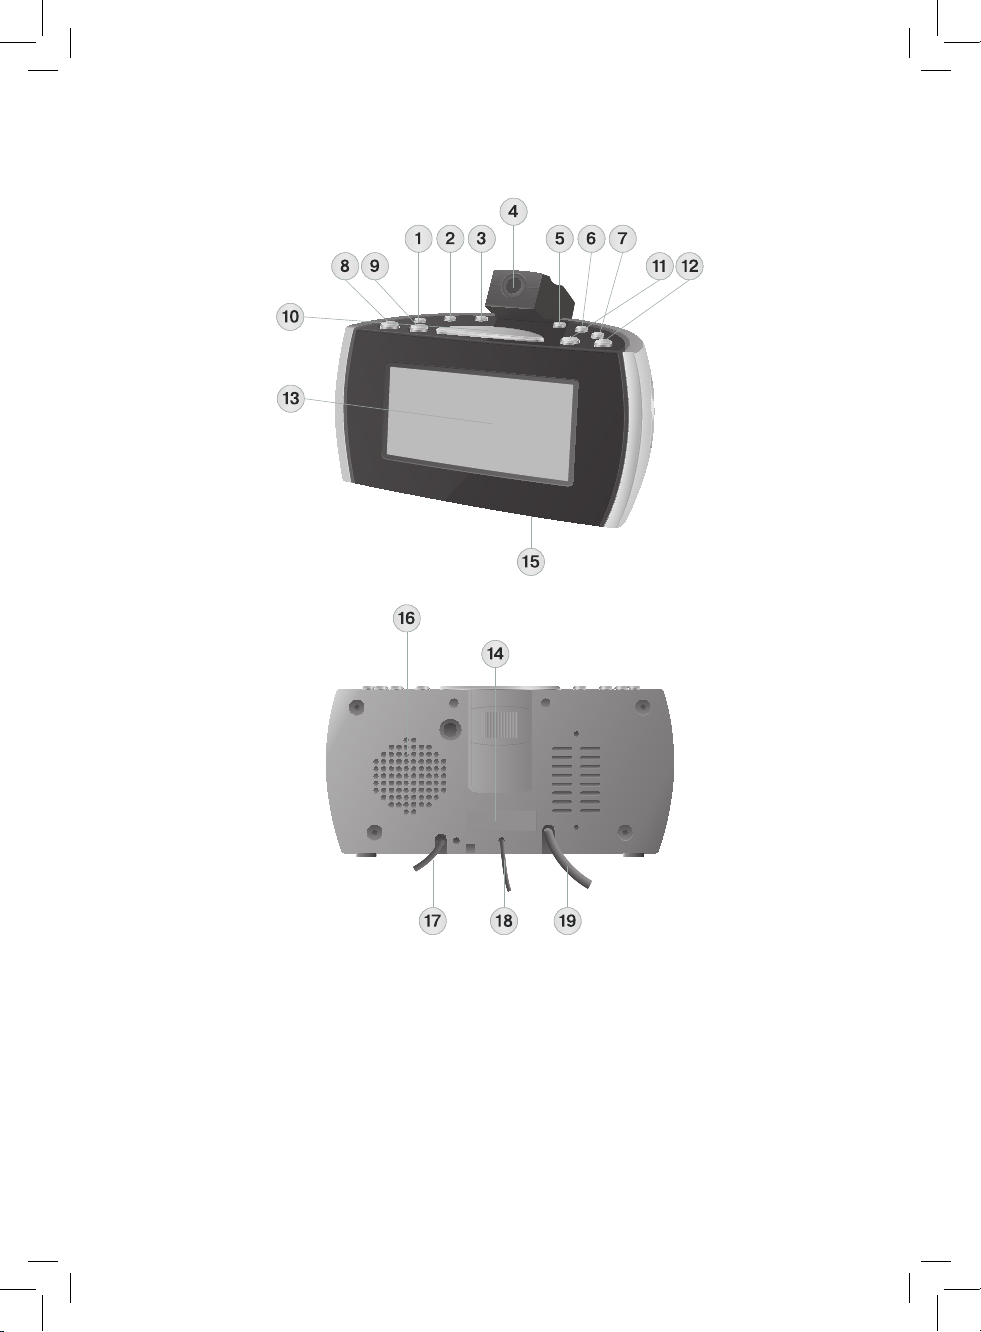
Установка батареек
Откройте крышку батарейного отсека (14) и уста-
новите элемент питания CR2032, 3 В (не входит в
комплект поставки), соблюдая полярность.
Закройте крышку батарейного отсека (14).
Внимание!
Протечка батарейки может стать причиной травм
или повреждения устройства. Чтобы избежать по-
вреждения устройства, следуйте приведенным ниже
рекомендациям:
устанавливайте батарейку правильно;
вынимайте батарейку, если устройство не будет
использоваться в течение длительного времени;
не перезаряжайте батарейку, не разбирайте её,
не подвергайте воздействию высокой темпе-
ратуры;
своевременно меняйте батарейку.
Примечание:
Устройство предназначено для работы от элек-
трической сети, работа от батарейки является ре-
зервным вариантом. Наличие батарейки сохраняет
настройки текущего времени при отключении или
пропадании основного питания.
Вынимайте батарейку, если устройство не будет ис-
пользоваться в течение длительного времени.
Подключение устройства к электрической сети
Перед подключением устройства к электрической
сети убедитесь в том, что напряжение в электри-
ческой сети соответствует рабочему напряжению
устройства.
Вставьте вилку сетевого шнура в электрическую
розетку.
Установка текущего времени и даты
В режиме текущего времени нажмите и удерживайте
кнопку (11) «MEM/M+» более 2 секунд для входа в
режим установки текущего времени и даты.
При этом на дисплее начнут мигать цифры года.
При помощи кнопок (2) и (6) устано-
вите год.
Нажмите кнопку (11) «MEM/M+». На дисплее нач-
нут мигать цифры месяцев. Используя кнопки (2)
и (6) , установите месяц.
Нажмите кнопку (11) «MEM/M+». На дисплее нач-
нут мигать цифры дня. Используя кнопки (2)
и (6) , установите день.
Нажмите кнопку (11) «MEM/M+». На дисплее
начнут мигать символы, обозначающие формат
отображаемого времени: 24 часа или 12 часов.
Используя кнопки (2) и (6) , выберите
формат отображения времени.
Нажмите кнопку (11) «MEM/M+». На дисплее нач-
нут мигать цифры часа.
Используя кнопки (2) и (6) , выберите
нужный час.
Нажмите кнопку (11) «MEM/M+». На дисплее нач-
нут мигать цифры минут. Используя кнопки (2)
и (6) , установите значение минут.
Примечание: Если в течение 2 секунд кнопки (2)
◄◄ и (6) ►► не будут нажаты, произойдёт возврат
в режим отображения текущего времени.
Отображение даты
В режиме текущего времени нажмите кнопку (2)
для отображения даты; для отображения года
нажмите кнопку (6) . Через 5 секунд произойдёт
возврат в режим отображения текущего времени.
VT-3505_IM.indd 7 17.12.2013 12:20:21