Vuzix M300 User manual

Page | 1 Part number 446PB0005-01
M300 SMART GLASSES
U
SER
M
ANUAL
Version 1.0

Page | 2 Part number 446PB0005-01
TABLE OF CONTENTS
1.M300 Smart Glasses Introduction ........................................................................................... 4
Getting Started ......................................................................................................................... 4
Read Me First .............................................................................................................................. 5
Manual Icons & Notations ........................................................................................................... 6
Unboxing ..................................................................................................................................... 7
Package Contents .................................................................................................................... 7
Device Layout & Components .................................................................................................... 8
Nose Pad Options .................................................................................................................... 9
2. Preparation & Assembly ........................................................................................................... 10
Charging ................................................................................................................................ 10
Determine Your Dominant Eye ............................................................................................. 12
Assembly ............................................................................................................................... 12
Ear Hooks .............................................................................................................................. 13
M300 Power Button .............................................................................................................. 14
Display Adjustment ............................................................................................................... 14
3.M300 Interface & Navigation ............................................................................................... 16
Navigation ................................................................................................................................. 16
Button Navigation ................................................................................................................. 16
Swipe Navigation .................................................................................................................. 17
Voice Navigation ................................................................................................................... 17
4. M300 Apps ................................................................................................................................ 20
Carousel ..................................................................................................................................... 20
Installing Apps .......................................................................................................................... 21
Install via Vuzix App Store ................................................................................................... 22
Install via Vuzix Smart Glasses System File Manager .......................................................... 23
Install via ADB ...................................................................................................................... 23
Uninstall Apps ........................................................................................................................... 23
App Maps .................................................................................................................................. 24
Pre-installed Apps ..................................................................................................................... 25
Settings .................................................................................................................................. 25
Scanner .................................................................................................................................. 40
Camera ................................................................................................................................... 41
Clock ..................................................................................................................................... 42
Downloads ............................................................................................................................. 43

Page | 3 Part number 446PB0005-01
Gallery ................................................................................................................................... 44
Browser ................................................................................................................................. 45
6. Additional Mounting Options & Accessories ........................................................................... 48
M300 Safety Frames Kit ....................................................................................................... 48
Vuzix 9000 mA External Battery .......................................................................................... 49
M300 Safety Frame Mounting Clips ..................................................................................... 49
M300 On-Frame Battery ....................................................................................................... 49
M300 Power Cable ................................................................................................................ 50
M300 Headband .................................................................................................................... 50
M300 Safety Helmet Mounts (L&R) .................................................................................... 51
M300 Micro USB Power Adaptor ......................................................................................... 51
7. Maintenance & Support ............................................................................................................. 52
Updates ...................................................................................................................................... 52
OTA Update .......................................................................................................................... 52
Offline Updates ..................................................................................................................... 52
Maintenance .............................................................................................................................. 52
Technical Support ...................................................................................................................... 53
Contacting Customer Service ................................................................................................ 53
Regulatory Compliance ............................................................................................................. 55

Page | 4 Part number 446PB0005-01
1. M300 SMART GLASSES INTRODUCTION
Congratulations and welcome to the next generation of hands-free mobile
computing, the Vuzix M300 Smart Glasses.
The Vuzix M300 Smart Glasses (M300) is a rugged, Android-based wearable
computer with an integrated high-resolution monocular display. It provides most
of the features and capabilities of a modern Android smartphone, minus cellular
connectivity, in a hands-free wearable device.
Getting Started
The M300 Quick Start Guide included in your M300 package provides concise
information on the assembly and basic use of the M300 Smart Glasses. This
document is designed for experienced users requiring only minimal assistance.
This M300 Smart Glasses User Manual provides more comprehensive and
detailed information on a broad array of M300 related topics including setup and
configuration, use and maintenance, as well as the included suite of stock
applications.
Regardless of your experience level, we highly recommend that all M300 Smart
Glasses users read this manual and retain it for future reference.

Page | 5 Part number 446PB0005-01
Read Me First
Read the Safety & Warranty document, included
with your Vuzix product, before proceeding.
Product, features and operation descriptions are based on the device’s default
settings and may change without notice.
Some content and operation descriptions may differ from your device
depending on your region, service provider, options, and/or software.
Display brightness and content requiring high CPU and RAM usage will
affect the overall performance of the device and its battery life.
Some Android applications and content may not work as expected due to the
M300 Smart Glasses design characteristics and its application.
Vuzix is not liable for performance issues caused by applications supplied by
other providers or alteration of the device, its settings, or software.
Attempting to customize the device or software may result in improper
operation and voiding of the device’s warranty.
Software, data, images, and other media provided with this device are
licensed for limited use. Using or incorporating these materials for
commercial or other purposes is an infringement of copyright laws.
You may incur additional charges for services provided by third parties, such
as, but not limited to, an ISP, Wi-Fi provider, or software or other service
providers.
Applications provided with the device are subject to updates and
discontinuation without prior notice.
!
Page | 6 Part number 446PB0005-01
Manual Icons & Notations
A red exclamation icon denotes items of extreme importance.
An amber caution icon highlights noteworthy items.
This green information icon is associated with additional product information
and/or usage tips.
!
Page | 7 Part number 446PB0005-01
Unboxing
Package Contents
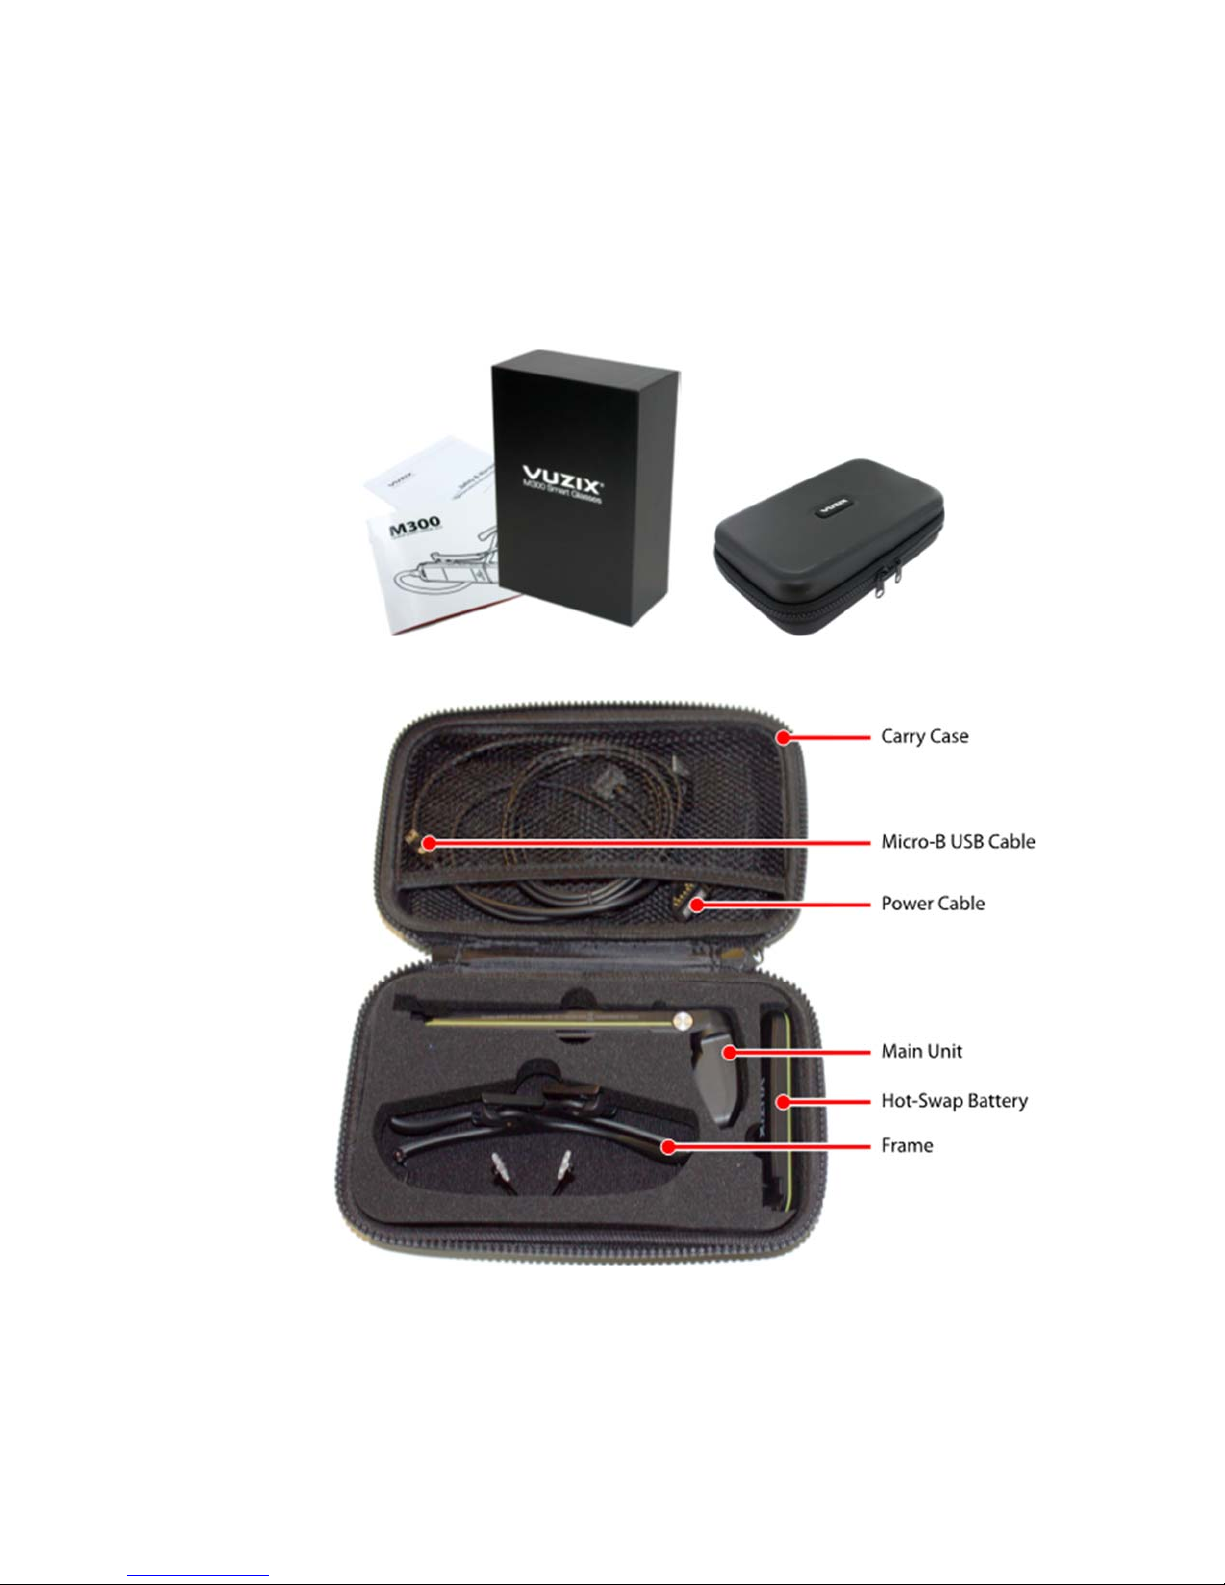
Your M300 Smart Glasses package contains a Safety & Warranty document, a
Quick Start Guide and a carry case containing the various M300 Smart Glasses
components and cables.
Your M300 Carry Case contains:
Also included (not pictured) are a pair of ear hooks to help secure the frame on
the user’s head, as well as a set of interchangeable frame nose pads for comfort.
See the section Device Layout & Components below for more detail.
Inspect the package’s contents. In the unlikely event that any items are damaged
or missing contact your purchase source immediately.
Page | 8 Part number 446PB0005-01
If you purchased your M300 Smart Glasses directly from Vuzix, contact
Vuzix Customer Service in the region in which they were purchased. (see
Customer Service)
If you purchased your M300 Smart Glasses from another vendor, contact
that vendor directly.
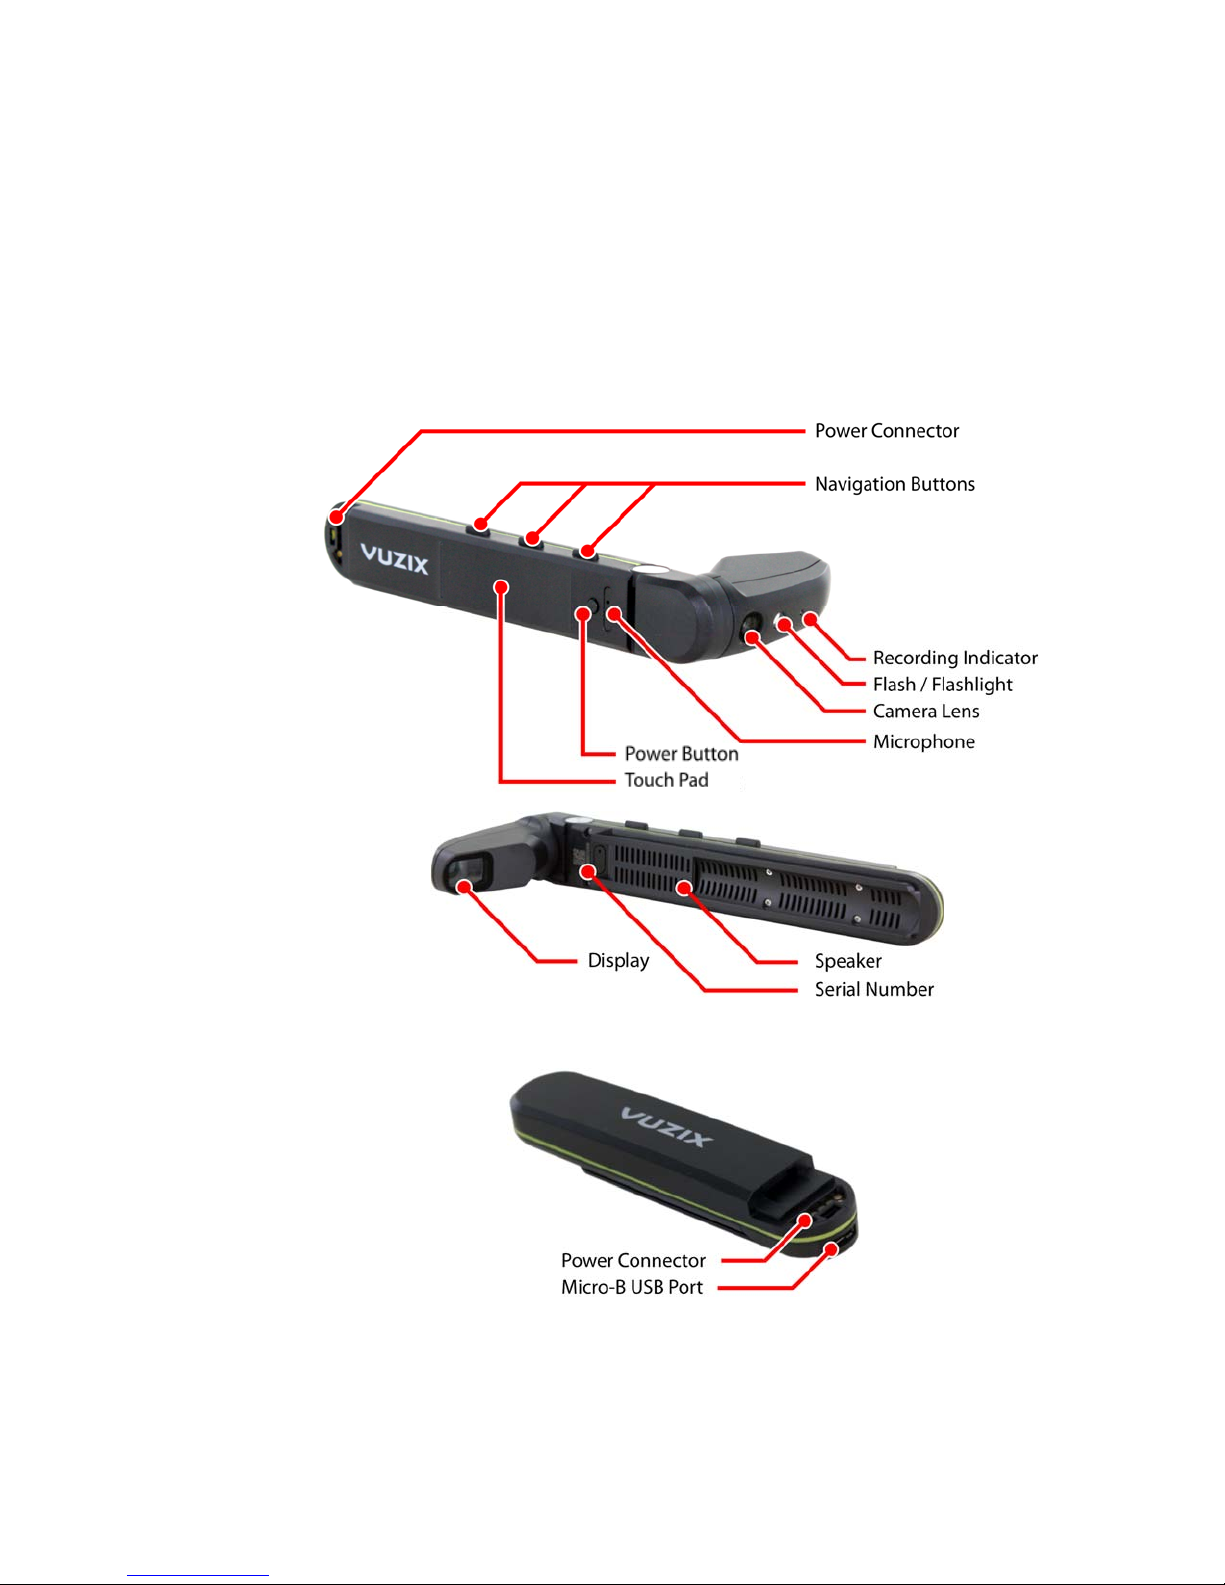
Device Layout & Components
Main Unit
Hot-Swap Battery

Page | 9 Part number 446PB0005-01
Smart Glasses Frame
Nose Pad Options
There are three different nose pad options that come with your M300. The default
set of pads that sit on either side of the nose, and the included alternate full
bridge pads come in two sizes and span the bridge of the nose for added comfort
and stability. These pads can be swapped with the included screwdriver. It is
recommended to compare each and use the one that fits you best.
Page | 10 Part number 446PB0005-01
2. PREPARATION & ASSEMBLY
Prior to using your M300 Smart Glasses, please read through all of the below
sections to ensure the best initial user experience.
Charging
Your M300 Smart Glasses contain two batteries, both of which must be fully
charged prior to their initial use. The Hot-Swap Battery module contains the
primary battery and a standby battery is contained in the Main Unit to keep the
M300 powered during swapping of the Hot-Swap Battery modules.
The Hot-Swap Battery can be charged independently using a USB power source
providing a minimum of 500mA. You can also connect the Main and Hot-Swap
Battery units together using the Power Cable to charge them simultaneously
using a USB power source providing a minimum of 1.5A.
Standard USB ports on computers provide only 500mA. A USB power source
providing a minimum of 1.5A is required to charge the M300 while connected to
the Hot-Swap Battery.
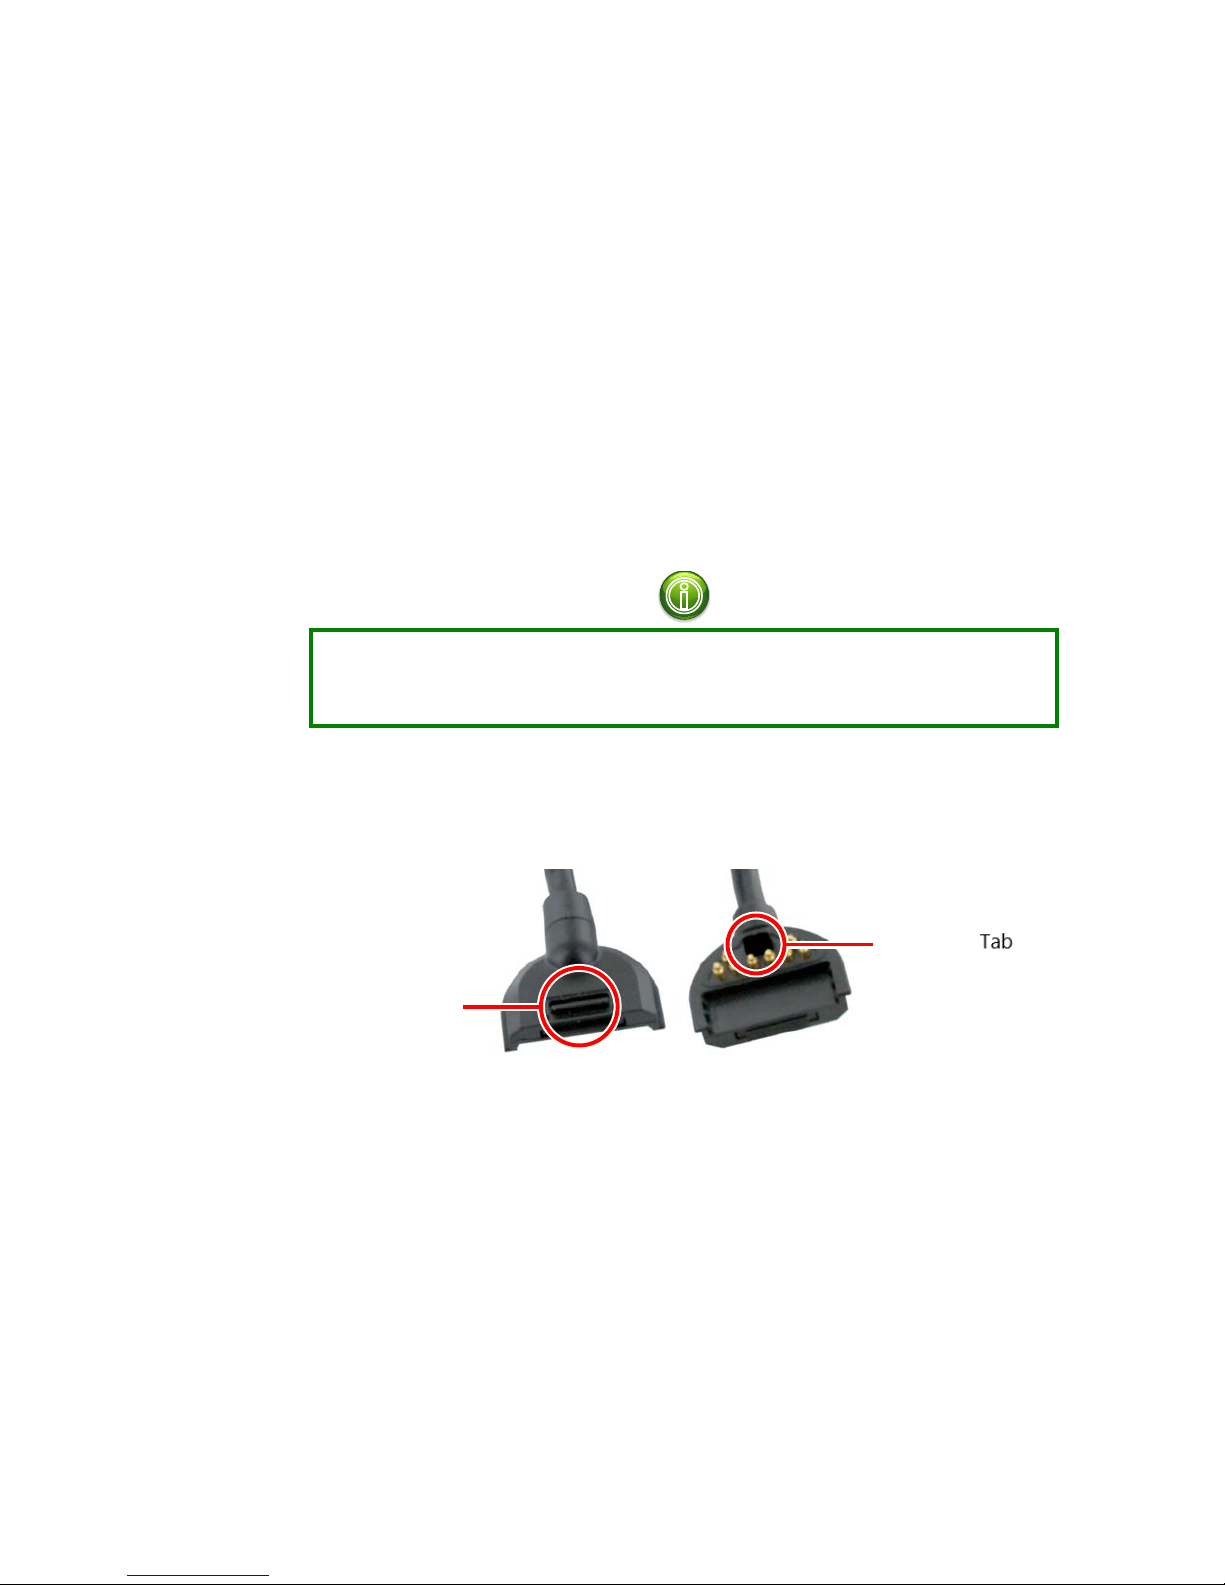
The connectors on each end of the Power Cable are interchangeable and can be
connected to either the Hot-Swap Battery or Main Unit. The tab on the heel of
the connector which secures the connector can be used to help align the
connector for a proper connection.
To connect the Power Cable:
Align the positioning tab on the heel of the connector with the
corresponding indent in the female connector on the Hot-Swap Battery,
then rotate the front edge of the connector down until its spring clip
clicks into place.
Positioning Pin
Release Clip
Other manuals for M300
2
Table of contents
Other Vuzix Smart Glasses manuals

Vuzix
Vuzix Wrap 1200DX User manual

Vuzix
Vuzix M300XL User manual

Vuzix
Vuzix BLADE 2 User manual

Vuzix
Vuzix M400C User manual

Vuzix
Vuzix Smart Swim SS-147B User manual

Vuzix
Vuzix SHIELD 492 User manual

Vuzix
Vuzix STAR 1200XLD User manual

Vuzix
Vuzix Blade User manual

Vuzix
Vuzix CamAR User manual

Vuzix
Vuzix M400 User manual

Vuzix
Vuzix Blade 494 User manual

Vuzix
Vuzix M300 User manual

Vuzix
Vuzix Blade User manual

Vuzix
Vuzix M400 Installation instructions manual

Vuzix
Vuzix M4000 User manual

Vuzix
Vuzix M100 User manual

Vuzix
Vuzix Star 1200 User manual

Vuzix
Vuzix Blade User manual

Vuzix
Vuzix M300 User manual

Vuzix
Vuzix Smart Swim User manual


