Vuzix Smart Swim SS-147B User manual

v1.0.6

2
Table of Contents
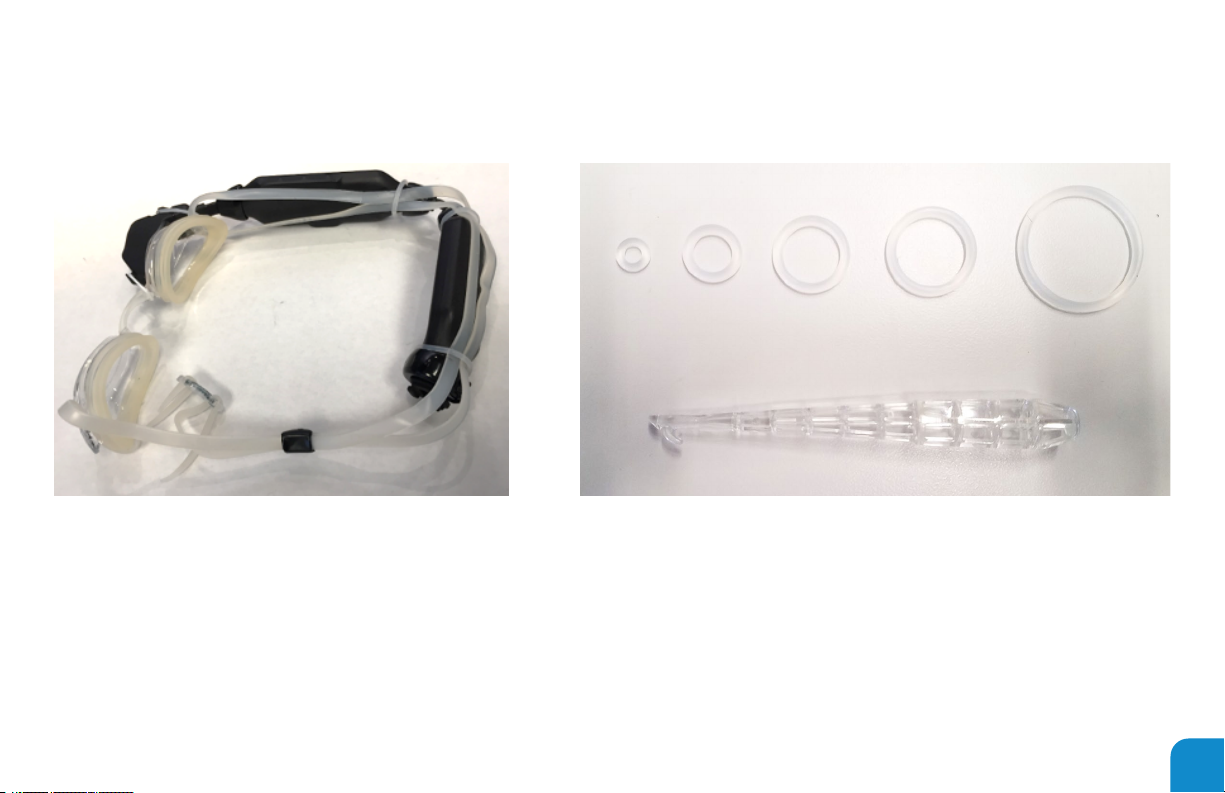
What’s in the Box................. 3
Selecting Your Dominant Eye ....... 4
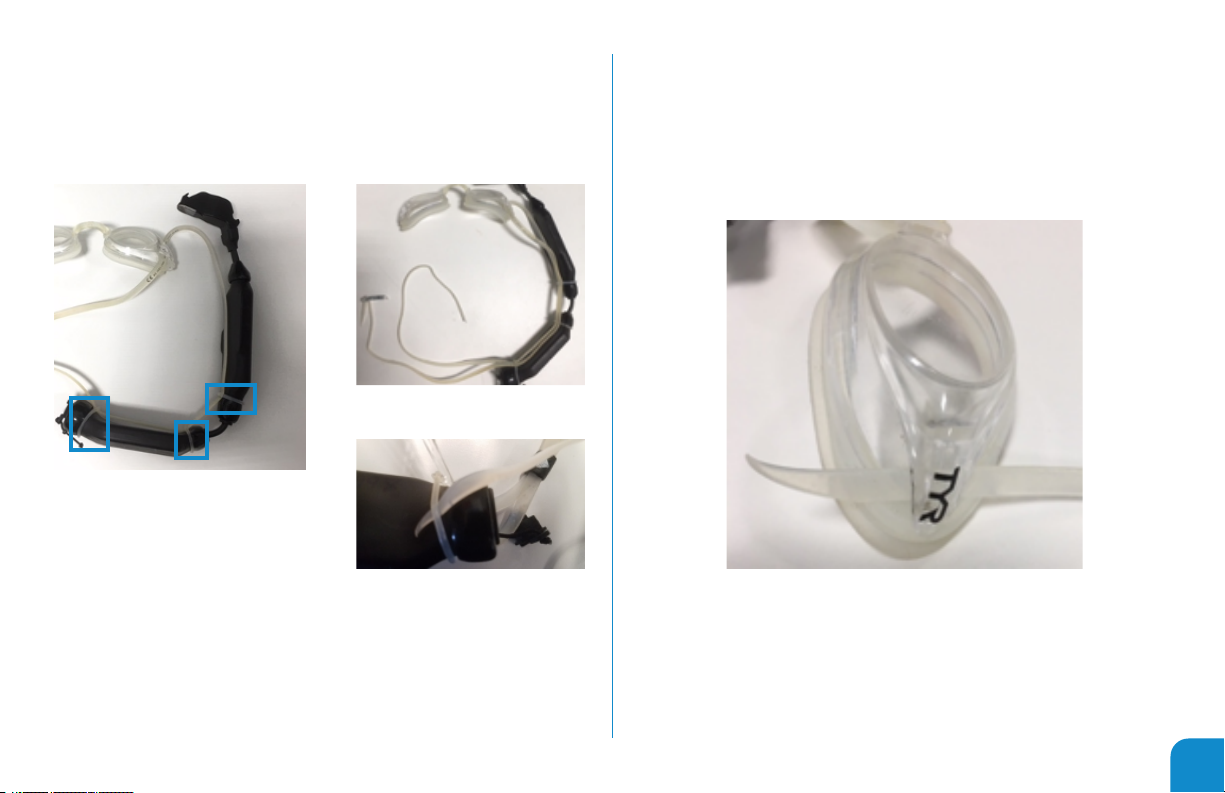
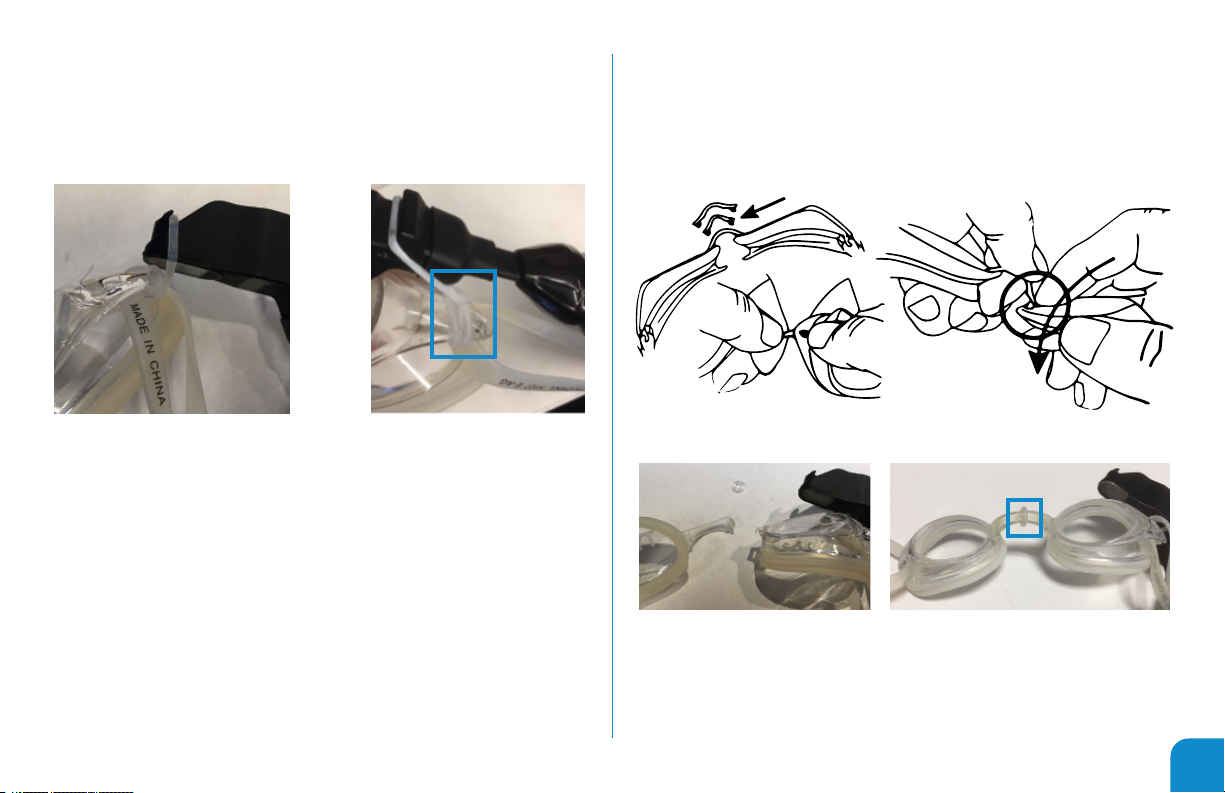
Assembly of Smart Swim™......... 5
Charging Smart Swim.............11
Power On Smart Swim ........... 14
Application Overview .............15
Button Interface ............. 16
Carousel Operations ......... 17
System Congure............ 18
System Settings............. 22
Apps and Updates ........... 23
Lap Trainer ................. 24
Open Water................. 29
Media Player................ 34
YouTube Streamer ........... 37
Streamer Playlist Formats..... 43
Sport DV Camera ............ 45
Naming Your Smart Swim ........ 48
Your First Swim................. 52
Date and Time Settings .......... 53
Enable Wi-Fi Networks ........... 55
Pairing Bluetooth devices......... 56
Managing Installed Applications ... 58
Smart Swim Phone App .......... 60
Smart Swim – Theme Design ..... 68
Theme Tutorial ................. 72
Technical Specications.......... 73
Trouble Shooting .................74

3
WHAT’S IN THE BOX
• Smart Swim™ (1x)
• Bungies (4@5 sizes)
• Battery pack (1x) (not waterproof)
• USB charge cable (1x)
• USB splitter cable (1x)
• Floats (6x)
• Grappling tool (1x)
• Case (1x)
• Reference Card (1x)
• Warrantee (1x)
• The Box (1x)

4
SELECTING YOUR DOMINANT EYE
1. Power on Smart Swim™
2. Scroll to “System Congure”
3. Open “System Congure” App
― *The rst time opening this app will require a system reboot
4. Select the “eye orientation” property
5. Use the Select button to select your dominant eye setting
―See below for instructions on how to determine your dominant eye
DETERMINE YOUR DOMINANT EYE
Extend your hands, placing them together to make a small triangle between your thumbs and knuckle. Keeping both eyes open,
center a nearby object inside the triangle. Close each eye one at a time. Notice how the object moves out of view when one eye
is closed? When the object remains in view, the open eye is your dominat eye.

5
ASSEMBLY OF SMART SWIM™
BUNGIE SIZE CHART:
EXTRA-SMALL(9MM), SMALL(14MM), MEDIUM(19MM), LARGE(23MM),
EXTRA-LARGE(32MM)

6
Step 1:
Remove strap and Adjustable Strap Retainer from the goggles.
Step 2:
Pull the 23mm O-Ring through the right hole of the goggle. Use
the tip of the Grappling Tool to help push the O-ring through and
use the Grappling Tool to grab it from the other end.
RETAINER
RIGHT EYE HAVE A TYR LOGO
(LOOKING FROM THE FRONT)

7
Step 3:
Pull the lower strap through three of the 23mm O-rings as
shown and repeat with the upper strap.
Step 4:
Put inside strap through left goggle slot and pull it through.

8
Step 5:
Put the end of the strap through the inner hole of the
Adjustable Strap Retainer.
Step 6:
Put the end of the strap through the outer hole of the
Adjustable Strap Retainer to secure it.
OUTER HOLE INNER HOLE
NOTE:
ENSURE THAT THE “TYR” LOGO IS FACING
UPRIGHT. IF THE LOGO IS UPSIDE DOWN,
THE GOGGLES MAY NOT WORK WELL.

9
Step 7:
Grab the O-Ring loop on the right goggle slot and pull over
eyepiece. Then, slide the O-ring to the second Hook of the
Smart Swim Eyepiece.
Step 8:
In the Goggle Guide, follow the instructions to disconnect the
right side of the nose piece. Then, push the nosepiece through
the 9mm O-ring and reassemble the goggles.

10
Step 9:
Slide the 9mm O-ring all the way to the right and over the
bump. Then, pull the O-ring to the rst hook of the Smart
Swim Eyepiece.
Step 10: Optional
Slide the upper strap over the battery and the lower strap
under the battery to get the straps behind the battery.

11
CHARGING SMART SWIM™
Use the included Y-Splitter to share your charging source with
your smart swim.
Charge state can be determined by plugging in the battery
pack and observing.
• Blue LEDs: Flashing (charging)
• Blue LEDs: Not Flashing (not charging)
• LEDs must be lit to ensure device is being charged
• LEDs Circled in red
• Removes requirement of a laptop or desktop to charge
your Smart Swim.
• Will require extra time to charge both systems depending on
current rating of charger and charge rate of both devices.

12
Using the phone pairing app, you will observe the power percent:
Red = Not ChargingGreen = Charging

13
The carousel will indicate the charge state from the lower right corner.
Green Percent = Charging
Red Percent = Not Charging
NOTE:
YOUR SMART SWIM REQUIRES 3+ HOURS TO
FULLY CHARGE. 100% INDICATED ON THE
CHARGE STATE WILL NOT BE ACCURATE WITH-
OUT 3+ HOURS OF CONTINUOUS CHARGING.
NOTE:
MAY TAKE LONGER IF CHARGE SOURCE IS
SHARED WITH OTHER DEVICES.

14
POWER ON SMART SWIM™
Power on Smart Swim™
Carousel is ready for navigation
Power on Smart Swim™

15
APPLICATION OVERVIEW
THE SMART - CAROUSEL
Apps+And
Updates
Lap
Trainer
Open
Water
YouTube
Streamer
System
Settings
Media
Player
System
Congure

16
SELECT
BACK
POWER
FORWARD
BUTTON INTERFACE
• SELECT = Select current item.
• BACK (Button A) = Move cursor down/right.
• FORWARD (Button B) = Move cursor up/left.
• POWER = Sleep or Power off system.
• Button Actions are application dependent.
• When keyboard is open, press and hold Button B to
switch keyboard mode to numbers and back to letters.
• Press and hold Button A to go to the main carousel.

17
CAROUSEL OPERATIONS
• Scroll the icons left or right using button A or button B
―Use the Select button to open the center icon/
application
• Display the Date and Time by triple pressing the up button
• A Progress Bar will update during data transfers
• The battery Power Charge State is indicated by the
Percent value in the lower right corner of the display
• The smart carousel will remember your last active
application and will execute that application upon startup
• Booting to Safe Mode is accomplished by continuously
pressing and releasing the up or down button during the
boot up process
• A Blue Tooth Connection can be established by the phone
pairing app to connect and congure the Smart Swim™
• Several Blue Tooth Commands are available to enhance
the congurability of your Smart Swim™ from your phone
• Press and hold Select to reset Bluetooth interface
Button Chart
(Single Press)
Button B: Scroll Icons Right
Button A: Scroll Icons Left
Select: Select/Open Application
(Double Press)
Button B: n/a
Button A: n/a
Select: n/a
(Triple Press)
Button B: Show Date-Time
Button A: n/a
Select: n/a
Theme-Settings
BackGroundColor, CountDownColor, HidePowerState

18
1. SYSTEM CONFIGURE
• Setup misc. non-Realtime settings
• Select dominant eye
• Create Smart Swim™ Device Name. (Format: “username”
“[SS-####]”)
―requires reboot
―all user generated sessions will be stored in this
location
― all workout les will be in this folder
• Select Unit Standard (Yards, Meters, Laps, Miles,
Kilometers)
―Used by Lap Training app
―Used by Open Water app
• Select Length of Pool (25, 50, 100) Sets length of pool for
sessions
• Select Countdown Timer (3, 5, 10, 15) Provides delay to
start of sessions
• Select Log Splits (Yes, No)
― Removes splits from session les
―Splits can be enabled or disable via pre-programmed
workouts
• Select Split Interval Distance (25, 50, 100, 200, 500)
―Sets split distance for lap training sessions
• Select Speed Display Format (Split Interval Time, MPH,
KPH)
―Split Interval Time…aka x.xx seconds in 100 yards.
• Select SPM – Calorie Display (Disabled, Swimming,
Running-Paddling, calories Burned)
―Disable do not show any SPM info
―Swimming Use gyroscope to compute SPM
―Running-Paddling Use Accelerometer to compute SPM
―Calories burned only show calories no SPM will be
display or computed

19
• Body Weight – Used in calorie computations
―The current algorithm considers users weight, and
weather the user is resting or actively moving, total
active time vs total rest time.
• Compass Options (Performance=Use Gyroscope with acc
and mags to determine heading (No ltering), Accuracy =
Use only acc and mags to determine heading (highly ltered)
―conserve power
• GPS Sensitivity (Low-Marathon Swim mode (GPS
Readings will be extended of longer distance segments
to determine metrics and waypoints), Medium-Swimming
mode (GPS and Smart Course readings are held off longer
to better determine motion and waypoints, High-Running
mode (GPS motion and waypoints are very sensitive to
short distance motion, may generate false readings if
movement is at low speeds)
• Select GPS le Format (KML-Google
Earth, GPX-Garmin Uploads)
―Only one format will be saved during a session
― Open Water app will generate a session le that mates
with the GPS le created
―Smart Courses will be saved with Raw GPS course
maps
• GPS Show Tracks (Yes, No)
―Will render a grid with distances from starting point.
―Will render the current course tracks being received
from GPS
― Will render a pre-dened course map selected by user.
See “GPS Course File” Below
• GPS Zoom Tracks (1x, 2x, 4x, 8x)
―Provides a means of zooming into or out of the current
rendered tracks
―Can be changed in Realtime in the GPS open Water
App using Buttons A and B

20
• GPS Course File (Undened, “File Name”)
―Allows the user to select a GPS Course mapping to
overlay onto the current rendered tracks
• Display Clock Format (Digital, Analog)
―Will use the currently selected analog clock from
the Theme or the default system analog clock if not
dened by the current theme
• Media Still image Time (Seconds) (5, 15, 30)
―Media Player option to determine when to render the
next picture if any exist
• Snapshot Period (Seconds) (Disabled, 3, 15, 30)
―Provides a means of saving HUD snapshot images
during a session
―These images can be post processed
• Exist in the “\android\data\HUD Images” folder
• Display Theme (“lename”)
―This option allows the user to change the appearance
of the apps based on the theme le selected.
Ex: Black on White background vs. White on Black
background
―Theme Settings can be used to disable portions of the
HUD in any apps that support themes
― All Themes are stored here: “\android\data\Themes”
―All Analog Clock designs are stored here: “\android\
data\Analogclocks”
• Restore System Defaults – Will restore all system default
Theme settings and all conguration settings to their
default states
― May require a reboot
Table of contents
Other Vuzix Smart Glasses manuals

Vuzix
Vuzix M400C User manual

Vuzix
Vuzix M300 User manual

Vuzix
Vuzix M300 User manual

Vuzix
Vuzix M400 User manual

Vuzix
Vuzix SHIELD 492 User manual

Vuzix
Vuzix M4000 User manual

Vuzix
Vuzix Blade User manual

Vuzix
Vuzix M400 Installation instructions manual

Vuzix
Vuzix Blade User manual

Vuzix
Vuzix Smart Swim User manual

Vuzix
Vuzix Blade 494 User manual

Vuzix
Vuzix Wrap 1200DX User manual

Vuzix
Vuzix BLADE 2 User manual

Vuzix
Vuzix M300 User manual

Vuzix
Vuzix M300XL User manual

Vuzix
Vuzix Blade User manual

Vuzix
Vuzix CamAR User manual

Vuzix
Vuzix STAR 1200XLD User manual

Vuzix
Vuzix M100 User manual

Vuzix
Vuzix Star 1200 User manual