ATEQ VT47 User manual

USER MANUAL
VT47
www.ateq-tpms.com

VT47–User Manual
Page 1/43
REVISION OF THE USER MANUAL
Due to continuing improvements, the information contained in this user manual, the features and design of this
device are subject to be changed without prior notice.
Edition/
Revision
Reference
Date
(week/year)
Chapters updated

VT47–User Manual
Page 2/43
TABLE OF CONTENTS
REVISION OF THE USER MANUAL.................................................................................1
INTRODUCTION.................................................................................................................4
1. SPECIFICATIONS............................................................................................................................... 4
2. IMPORTANT SAFETY INSTRUCTIONS ............................................................................................ 6
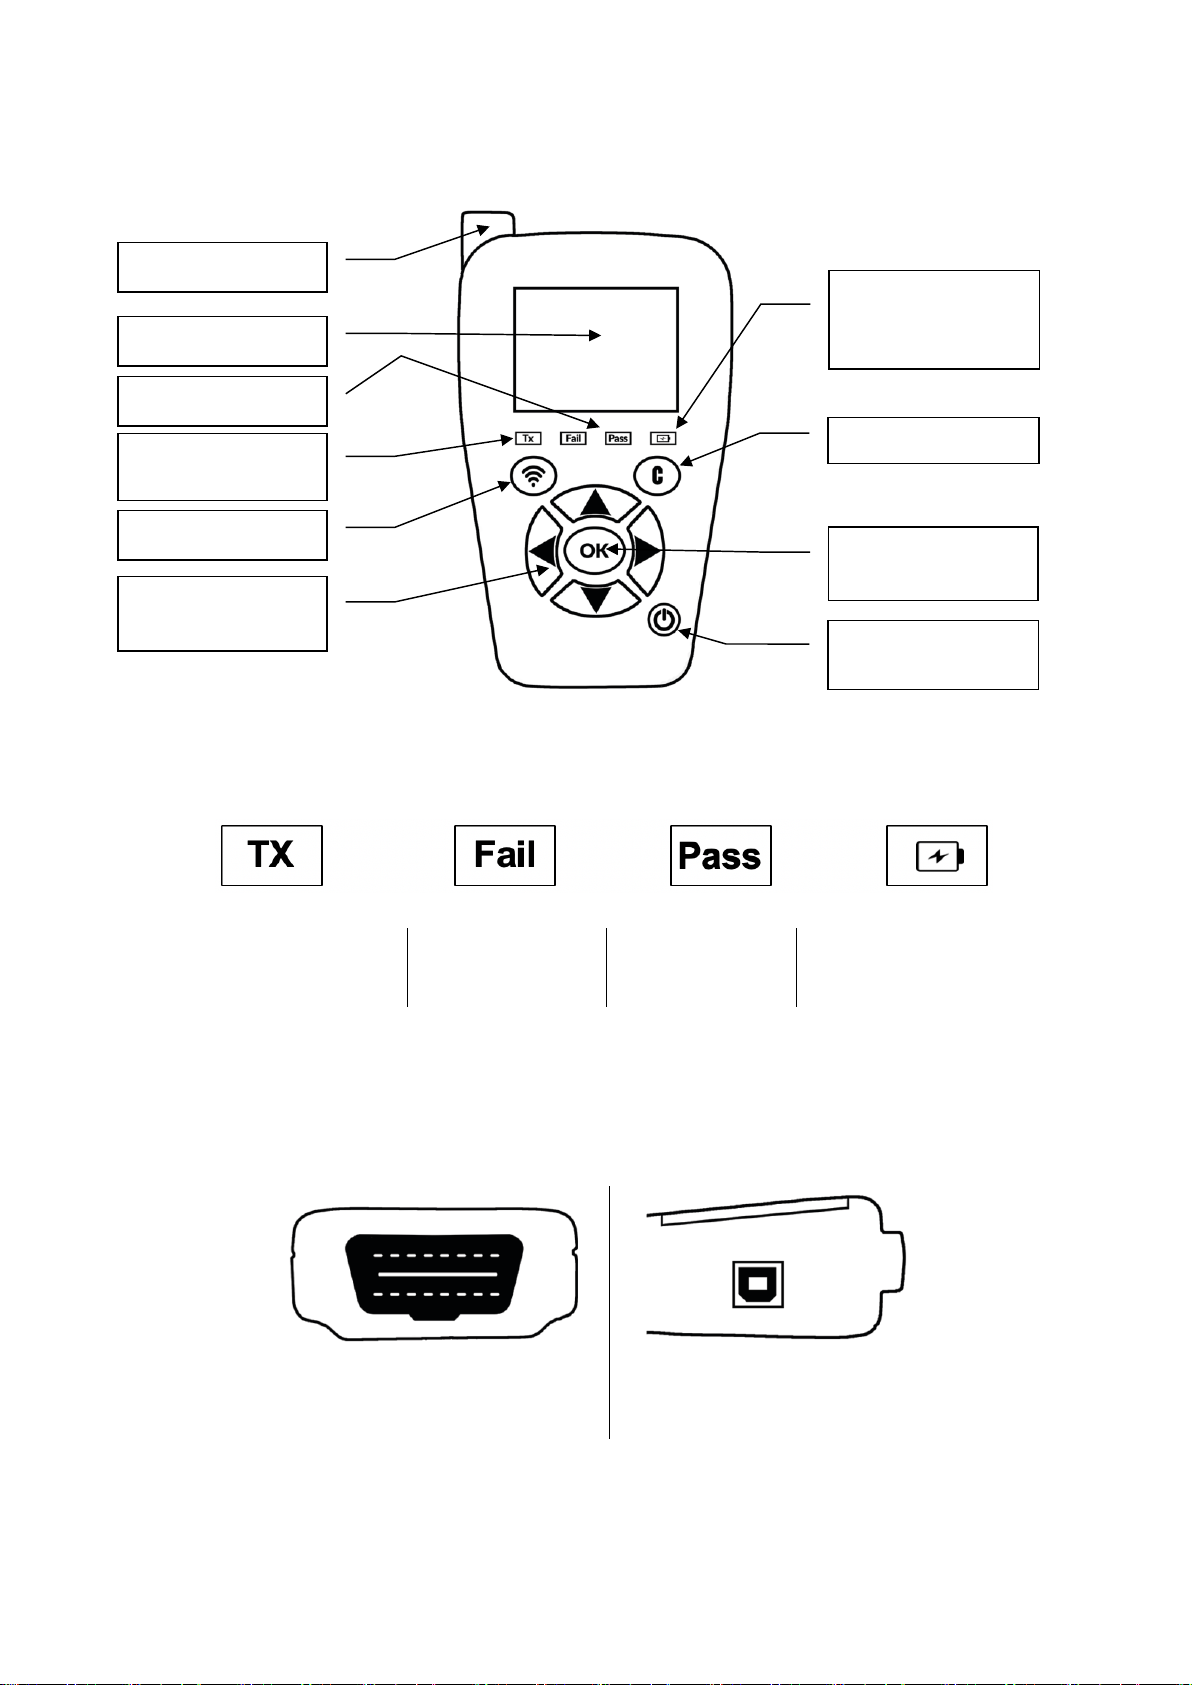
3. VT47 OVERVIEW ................................................................................................................................ 8
3.1. Lights............................................................................................................................................8
3.2. Connectors................................................................................................................................... 8
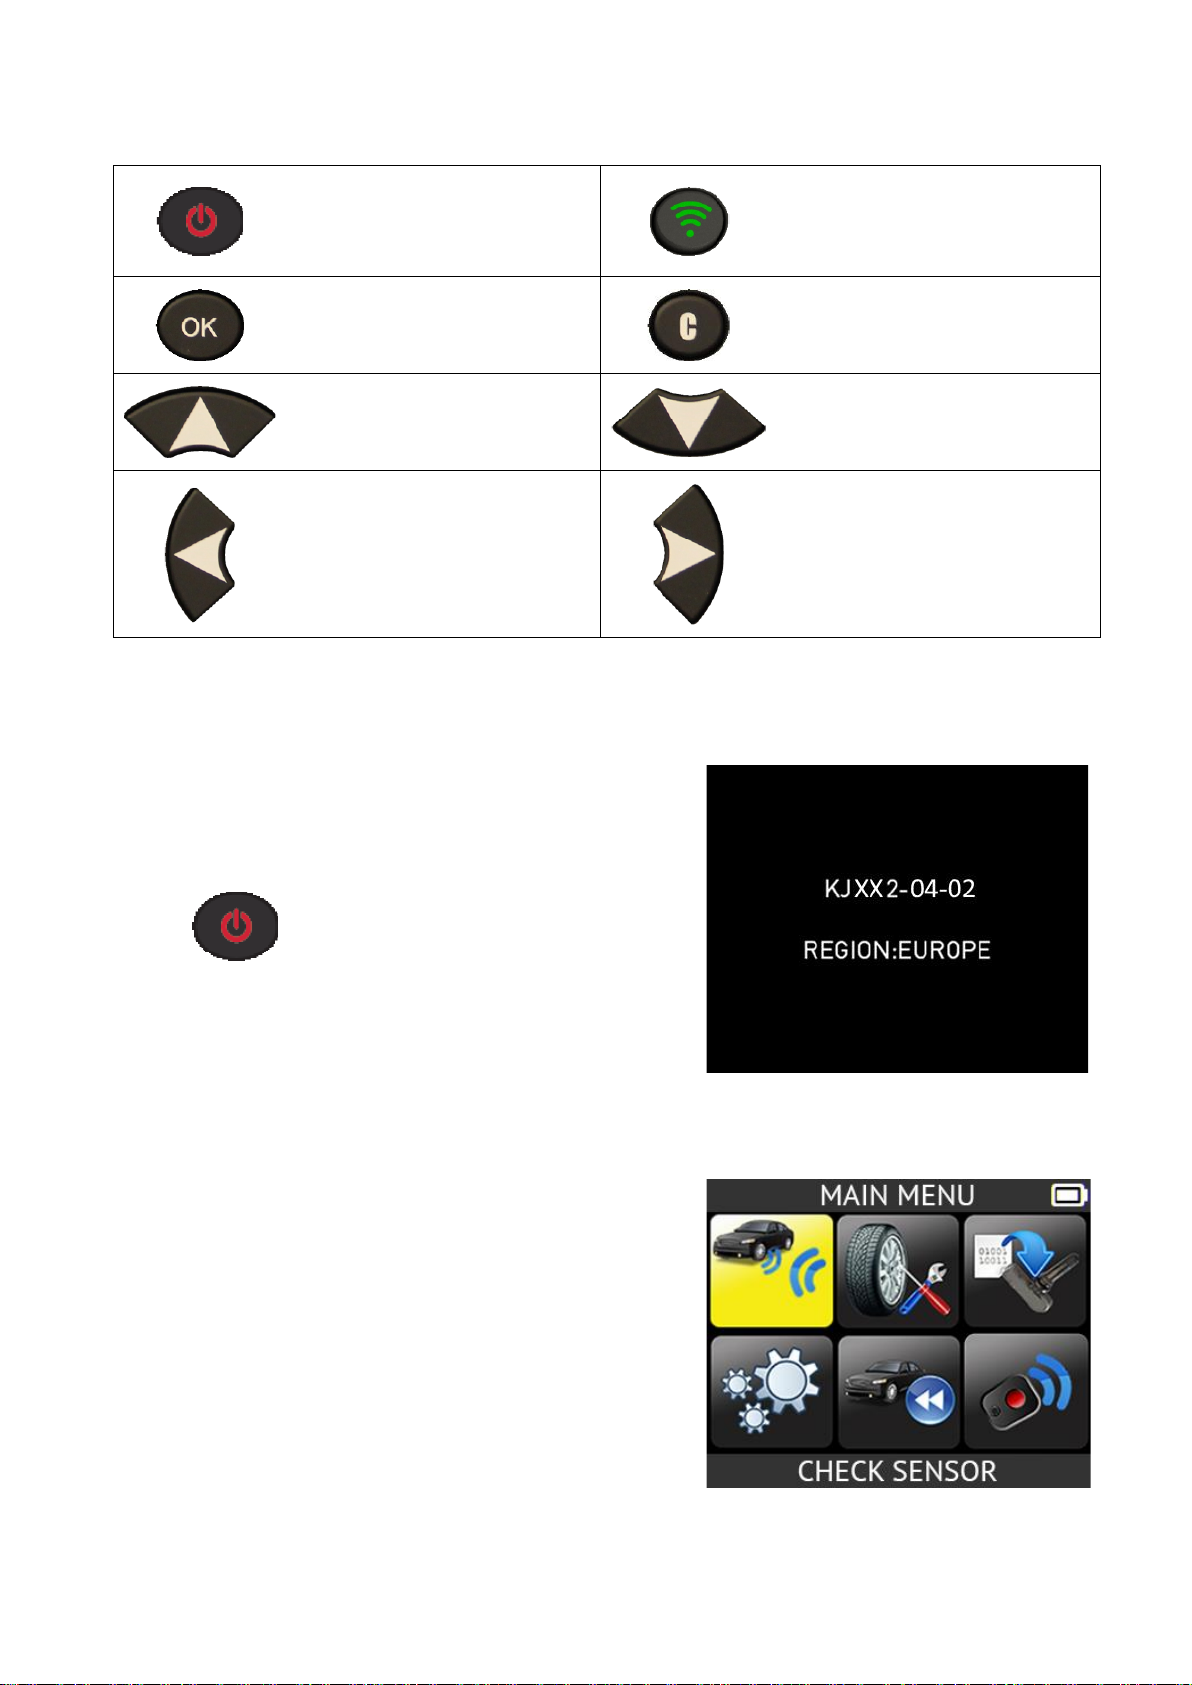
4. FUNCTION KEYS................................................................................................................................ 9
5. POWER ON ......................................................................................................................................... 9
6. SERVICE PROCEDURE ................................................................................................................... 10
6.1. Test sensors...............................................................................................................................10
6.2. Replace sensors ........................................................................................................................ 10
6.3. Relearn the TPM system............................................................................................................ 10
6.4. Troubleshooting ......................................................................................................................... 11
TPMS TOOL USAGE .......................................................................................................12
1. CHECK SENSOR .............................................................................................................................. 12
1.1. Select Car Manufacturer............................................................................................................ 12
1.2. Select Car Model........................................................................................................................ 12
1.3. Select year .................................................................................................................................13
1.4. Select number of wheels and select tire....................................................................................13
1.5. Test Sensors..............................................................................................................................14
1.6. Service TPMS ............................................................................................................................15
1.7. OBDII relearn .............................................................................................................................15
1.8. Reprogram ECU through OBDII Port.........................................................................................16
2. PART # LOOKUP.............................................................................................................................. 17
3. PROGRAM UNIVERSAL SENSOR .................................................................................................. 18
3.1. Copy ID function......................................................................................................................... 19
3.2. Create new sensor function ....................................................................................................... 21
3.1. Copy set of sensors function......................................................................................................22
3.2. Retrieve ID function....................................................................................................................23
RECENT SENSOR DATA................................................................................................26
1. RECENT SENSOR DATA................................................................................................................. 26
RKE TEST.........................................................................................................................27
1. RKE TEST.......................................................................................................................................... 27
1.1. Select Car Manufacturer............................................................................................................ 27
1.2. Select Frequency .......................................................................................................................27
1.3. Read instructions ....................................................................................................................... 28
1.4. Test results.................................................................................................................................28

VT47–User Manual
Page 3/43
SETTINGS.........................................................................................................................29
1. SETTINGS MENU.............................................................................................................................. 29
1.1. Change Units settings................................................................................................................30
1.2. Change Format settings.............................................................................................................30
1.3. Change Buzzer On settings....................................................................................................... 31
1.4. Change Auto Off Settings ..........................................................................................................31
1.5. Change Zone settings................................................................................................................32
WIFI SETTINGS................................................................................................................33
1. WIFI MENU ........................................................................................................................................ 33
ABOUT..............................................................................................................................35
1. ABOUT MENU................................................................................................................................... 35
LANGUAGE......................................................................................................................36
1. LANGUAGE MENU........................................................................................................................... 36
MISCELLANEOUS...........................................................................................................37
1. CHARGE............................................................................................................................................ 37
2. TOOL UPDATE (WIFI)....................................................................................................................... 38
3. TOOL UPDATE (PC)......................................................................................................................... 39
3. LIMITED HARDWARE WARRANTY ................................................................................................ 40
4. SAFETY BATTERY AND CHARGE INFORMATION....................................................................... 40
5. MANUFACTURER............................................................................................................................. 42
6. FCC STATEMENTS........................................................................................................................... 42
7. CE STATEMENTS............................................................................................................................. 42
8. RECYCLING ...................................................................................................................................... 43

VT47–User Manual
Page 4/43
INTRODUCTION
1. SPECIFICATIONS
Power Supply
3.000 mAh rechargeable lithium-polymer battery
Battery Life
Approximately 300 activations per full charge
Size (H x W x D)
174 mm x 97 mm x 36 mm (6.850 in x 3.818 in x 1.417 in)
without rubber boot
176 mm x 109 mm x 43 mm (6.929 in x 4.291 in x 1.692 in) with
rubber boot
Case Material
High Impact ABS
Radio reception
315/433 MHz
Weight
280 g (0.617 lb) TPMS tool without rubber cover
449 g (0.989 lb) TPMS tool with rubber cover
Temperature
Operating: -4°F to 131°F (-20°C to +55°C)
Storage: -40°F to 140°F (-40°C to +60°C)
Operating Altitude
Up to 6560 ft (2000 m)
Screen
2.8” display
Language
- North American/European version: English, German,
Italian, French, Spanish, Croatian, Czech, Danish,
Dutch, Finnish, Hebrew, Hungarian, Norwegian, Polish,
Portuguese, Russian, Romanian, Slovak, Slovenian,
Swedish, Turkish.
Warranty
1 year

VT47–User Manual
Page 6/43
2. IMPORTANT SAFETY INSTRUCTIONS
Do not discard. Retain for future reference.
Please note that changes or modifications not expressly approved by the party responsible
for compliance could void the user’s authority to operate the equipment.
Note: This equipment has been tested and found to comply with the limits for a Class
B digital device, pursuant to part 15 of the FCC Rules. These limits are designed to provide
reasonable protection against harmful interference in a residential installation. This
equipment generates, uses and can radiate radio frequency energy and, if not installed and
used in accordance with the instructions, may cause harmful interference to radio
communications. However, there is no guarantee that interference will not occur in a
particular installation. If this equipment does cause harmful interference to radio or television
reception, which can be determined by turning the equipment off and on, the user is
encouraged to try to correct the interference by one or more of the following measures:
- Reorient or relocate the receiving antenna.
- Increase the separation between the equipment and receiver.
- Connect the equipment into an outlet on a circuit different from that to which the
receiver is connected.
- Consult the dealer or an experienced radio/TV technician for help.
This device complies with:
- Part 15 of the FCC Rules (FCC ID: 2AK5Y-C427)
- CE / CEM standards
- ROHS standards
Operation is subject to the following two conditions:
(1) This device will not cause harmful interference, and
(2) This device will accept any interference received, including interference that may cause
undesired or improper operation.
WARNING:
Do not use on live electrical circuits.
Must read instructions before use.
Wear safety glasses. (User and bystanders)
Risk of entanglement.

VT47–User Manual
Page 7/43
WARNING: This product emits electromagnetic and electronically generated
waves that may interfere with the safe operation of pacemakers.
Individuals that have pacemakers should never use this product.
Read the Warranty, Safety, FCC Statements and recycling information
at the end of this user manual.
Caution : PLEASE READ THESE INSTRUCTIONS BEFORE USE
Your Tire Pressure Monitoring (TPM) tool has been designed to be durable, safe, and
reliable when properly used.
All TPMS TOOLS are intended for use only by qualified and trained automotive technicians
or in a light industrial repair shop environment. Please read all instructions below before use.
Always follow these safety instructions. If you have any questions pertaining to the safe or
reliable use of this tool, please call your local dealer.
1. Read All Instructions
All warnings on the tool and in this manual should be adhered to. All operating instructions
should be followed.
2. Retain Instructions
The safety and operating instructions should be retained for future reference.
3. Heed Warnings
Users and bystanders must wear safety glasses and must read instructions before use. Do
not use on live electrical circuits, risk of entanglement.
4. Cleaning
Clean with a soft dry cloth, or if necessary, a soft damp cloth. Do not use any harsh chemical
solvents such as acetone, thinner, brake cleaner, alcohol…as this may damage the plastic
surface.
5. Water & Moisture
Do not use this tool where contact or immersion in water is a possibility. Never spill liquid of
any kind onto the tool.
6. Storage
Do not use or store the tool in an area where it is exposed to direct sunlight or excessive
moisture.
7. Usage
To reduce the risk of fire, do not operate the tool in the vicinity of open containers or
flammable liquids. Do not use if the potential for explosive gas or vapors exists. Keep the
tool away from heat generating sources. Do not operate the tool with the battery cover
removed.

VT47–User Manual
Page 8/43
3. VT47 OVERVIEW
3.1. LIGHTS
Trigger light
Result light
"Fail"
Result light
"Pass"
Battery status
3.2. CONNECTORS
OBDII connector
for OBDII cable connection
USB connector for battery
charge and software update
Display screen
OK/Confirmation
button
LF/RF Antenna
Trigger button
Cancel/No
button
Power ON/OFF
button
Navigation
buttons
Result indicators
Transmission
indicator
Battery
charge/low
battery indicator

VT47–User Manual
Page 9/43
4. FUNCTION KEYS
Power ON/OFF switch
Test or trigger sensor
Next, continue or confirm
Cancel, previous step
Navigate to select "up”
Navigate to select “down”
Navigate to select “left”
Navigate to select “right”
5. POWER ON
Press key to turn on the TPMS TOOL
➢Display the software version as Fig. 1.
➢The MAIN MENU will then be displayed as
Fig. 2.
Fig.2.
Fig. 1

VT47–User Manual
Page 10/43
6. SERVICE PROCEDURE
Follow this TPMS service procedure each time before and after servicing tires/wheels.
6.1. TEST SENSORS
Following the instructions in the CHECK TPMS menu of your TPMS TOOL. Trigger each of
the vehicle’s sensors, to ensure they work properly.
This procedure allows you to quickly identify damaged or defective sensors, as some
vehicles do not report a bad sensor condition on the vehicle dashboard until after more than
20 minutes.
Testing the sensors before any service also eliminates the liability associated with replacing
previously damaged or defective sensors.
Note: If the sensors do not respond to trigger, please refer to the Troubleshooting section of
this guide.
6.2. REPLACE SENSORS
Faulty sensors must be replaced to allow the vehicle’s TPM system to work properly. Use
the SERVICE SENSOR of your TPMS TOOL to find the original equipment replacement
sensor or a universal aftermarket sensor.
Universal sensors must be programmed before use. Follow the instructions in PROGRAM
SENSOR to create or clone universal sensors.
6.3. RELEARN THE TPM SYSTEM
Once a replacement sensor has been installed, the new sensor ID must be registered by
TPMS ECU, to allow communication between the sensor and the vehicle.
The SERVICE TPMS menu indicates which relearn method is required: MANUAL
RELEARN, OBD RELEARN or AUTO RELEARN. Follow the on-screen instructions.
When the relearn procedure requires to trigger the sensors, always begin with the Left Front
(LF) wheel sensor. Proceed to the nextwheel sensor in clockwise rotation, until ALL sensors
have been retrained. Example : LF (Left Front), RF (Right Front), RR (Right Rear), LR (Left
Rear). If the spare wheel is TPMS equipped, this must be trigger at last.
Some vehicles provide an audible beep confirming that the sensor ID has been learned by
the TPMS ECU.
For vehicles that do not require retraining, it is recommended to trigger each wheel sensor,
one final time, to ensure they are working properly prior to releasing the vehicle to the
customer.

VT47–User Manual
Page 11/43
6.4. TROUBLESHOOTING
If the TPMS TOOL is unable to trigger one or more of the sensors, please use the following
troubleshooting guide:
1) The sensor itself may be damaged or defective.
3) Wrong make, model, year is selected.
4) Your TPMS TOOL may require a software update.
5) Your TPMS TOOL is damaged or defective.
Please contact your tool supplier for further assistance.
For vehicles that do not require retraining,we recommend to trigger each wheel sensor, one
final time, to make sure they are working correctly prior to releasing the vehicle to the
customer.

VT47–User Manual
Page 12/43
TPMS TOOL USAGE
IMPORTANT:
Vehicle specific information in this manual is used as an example and may not
represent specific instructions each make and model may require. When performing
various functions with the tool, it is important torefer to the on-screen prompts and/or
repair manual information.
1. CHECK SENSOR
Select “CHECK SENSOR”
function.
= continue
= previous
1.1. SELECT CAR MANUFACTURER
1.2. SELECT CAR MODEL

VT47–User Manual
Page 13/43
1.3. SELECT YEAR
1.4. SELECT NUMBER OF WHEELS AND SELECT TIRE
This option does not
appear for all vehicles.
For example, this option is
used for vehicles with a
TPMS sensor fitted on the
spare wheel.
= continue
The first selected tire is
highlighted in yellow.

VT47–User Manual
Page 14/43
1.5. TEST SENSORS
Left Front
Press this button to read
the sensor and press OK
or use the arrow buttons to
select next tire to read.
Right Front
Right Rear
Left Rear
Spare Wheel
Trigger if the car is
equipped with a TPMS
sensor fitted into the
spare wheel
If the tool does not detect a sensor press
to test again.

VT47–User Manual
Page 15/43
1.6. SERVICE TPMS
This menu has two main functions. One is to relearn the ID of the 4 sensors into the ECU.
The other function aims at reading the spare part for all the sensors available by vehicle.
Select "SERVICE TPMS"
function.
= continue
= previous
➢Select car manufacturer.
➢Select car model.
➢Select year.
1.7. OBDII RELEARN
This is for ID relearn to the ECU through the OBDII port.
➢Select the number of wheels
➢Proceed as "Sensor check" to trigger all the sensors.

VT47–User Manual
Page 16/43
1.8. REPROGRAM ECU THROUGH OBDII PORT
Read all the
sensors
Plug OBDII cable to the
tool and to the vehicle.
Note: this following screen message is displayed when all the sensors are triggered and the
OBDII cable is connected to the TPMS TOOL.
Wait a few seconds during
the data upload.

VT47–User Manual
Page 17/43
The data is successfully
transferred to the ECU.
The OBDII cable can be
unplugged from the ECU
to the tool.
2. PART # LOOKUP
This is a spare parts database which indicates all the sensors references available for each
car.
Select “PART #
LOOKUP” function
= continue
= previous
= continue
= previous

VT47–User Manual
Page 18/43
3. PROGRAM UNIVERSAL SENSOR
This section explains how to get a sensor ID in order to enter it in a universal sensor. If the
"old" sensor can be read, use the COPY ORIGINAL SENSOR section to recover the ID. If
it cannot be read, use the CREATE NEW SENSOR section to create a new ID.
Select the sensor model.
= continue
The device displays
compatible sensor
reference.
= continue
Note: here is an example; please choose the right sensors.
Select the
"PROGRAM SENSOR"
function.
= continue

VT47–User Manual
Page 19/43
3.1. COPY ID FUNCTION
Use the keyboard to select
“COPY ID”function.
= continue
Press
to trigger the original
sensor
Wait a few seconds.
The ID of the old sensor is
displayed.
= continue
Table of contents
Other ATEQ Test Equipment manuals

ATEQ
ATEQ VT66MB User manual

ATEQ
ATEQ PRIMUS F Series User manual

ATEQ
ATEQ D6 Series User manual

ATEQ
ATEQ VT47S User manual

ATEQ
ATEQ VT TRUCK 2.0 User manual

ATEQ
ATEQ F620 User manual

ATEQ
ATEQ F5200 Instruction manual

ATEQ
ATEQ BH SENS DT41 User manual

ATEQ
ATEQ F6 Profinet Series User manual

ATEQ
ATEQ F600HP User manual