BURSA 3
DE
EN
FR
8 9
• -
haltesystems müssen so positioniert und installiert werden, dass sie
während des täglichen Gebrauchs des Fahrzeugs nicht von einem
verstellbaren Sitz oder einer Fahrzeugtür eingeklemmt werden.
• Gurte, mit denen das System am Fahrzeug befestigt ist, müssen
stehen sowie Gurte oder Aufprallschutzvorrichtungen, die das Kind
schützen, müssen so an den Körper des Kindes angepasst werden,
dass die Gurte nicht verdrehen.
• Achten Sie darauf, dass Beckengurte niedrig angelegt werden.
• Es ist gefährlich, das Gerät ohne die Genehmigung einer benannten
-
lationsanleitungen vom Hersteller des Rückhaltesystems können
Gefahrensituationen verursacht werden.
• Stellen Sie sicher, dass Kinder nicht unbeaufsichtigt in diesem Rück-
haltesystem zurückbleiben.
• Sichern Sie alle Gegenstände oder Gepäckstücke, die bei einem Auf-
prall des Autos Verletzungen verursachen könnten.
• Das erweiterte Kinder-Rückhaltesystem darf nur mit dem Bezug ver-
wendet werden.
• Der Bezug dieses Kinder-Rückhaltesystems ist ein wichtiger Bestand-
teil der Rückhalteleistung dieses Produkts und darf daher nur durch
einen vom Hersteller empfohlenen Bezug ersetzt werden.
SORGFÄLTIG DURCHLESEN UND DIESE
BEDIENUNGSANLEITUNG FÜR EIN ZUKÜNFTIGES
NACHSCHLAGEN AUFBEWAHREN
WICHTIG
Vital information-READ NOW03 04
The rigid items and plastic parts of an Enhanced Child Restraint System shall be so located and installed that they are not liable, during everyday use of the vehicle, to become trapped by a movable seat or in a door of the vehicle.Any straps holding the restraint to the vehicle should be tight, any support-leg should be in contact with the vehicle floor, any straps or impact shields restraining the child should be adjusted to the child's body, and straps should not be twisted.It is important to ensure that any lap strap is worn low down.It is danger to make any alterations or additions to the device without the approval of the Type Approval Authority, and it is also danger not following closely the installation instructions provided by the Enhanced Child Restraint System manufacturer.Be sure that children are not left in their Enhanced Child Restraint System unattended.Be sure that any luggage or other objects liable to cause injuries in the event of a collision shall be properly secured.Be sure that the Enhanced Child Restraint System shall not be used without the cover.Be sure that the Enhanced Child Restraint System cover should not be replaced with any other than the one recommended by the manufacturer, because the cover constitutes an integral part of the restraint performance.Universal booster cushion135-150cm
135-150cmISOFIX+3-point Belt3-point BeltSIZE RANGE
,,
Universal booster cushion
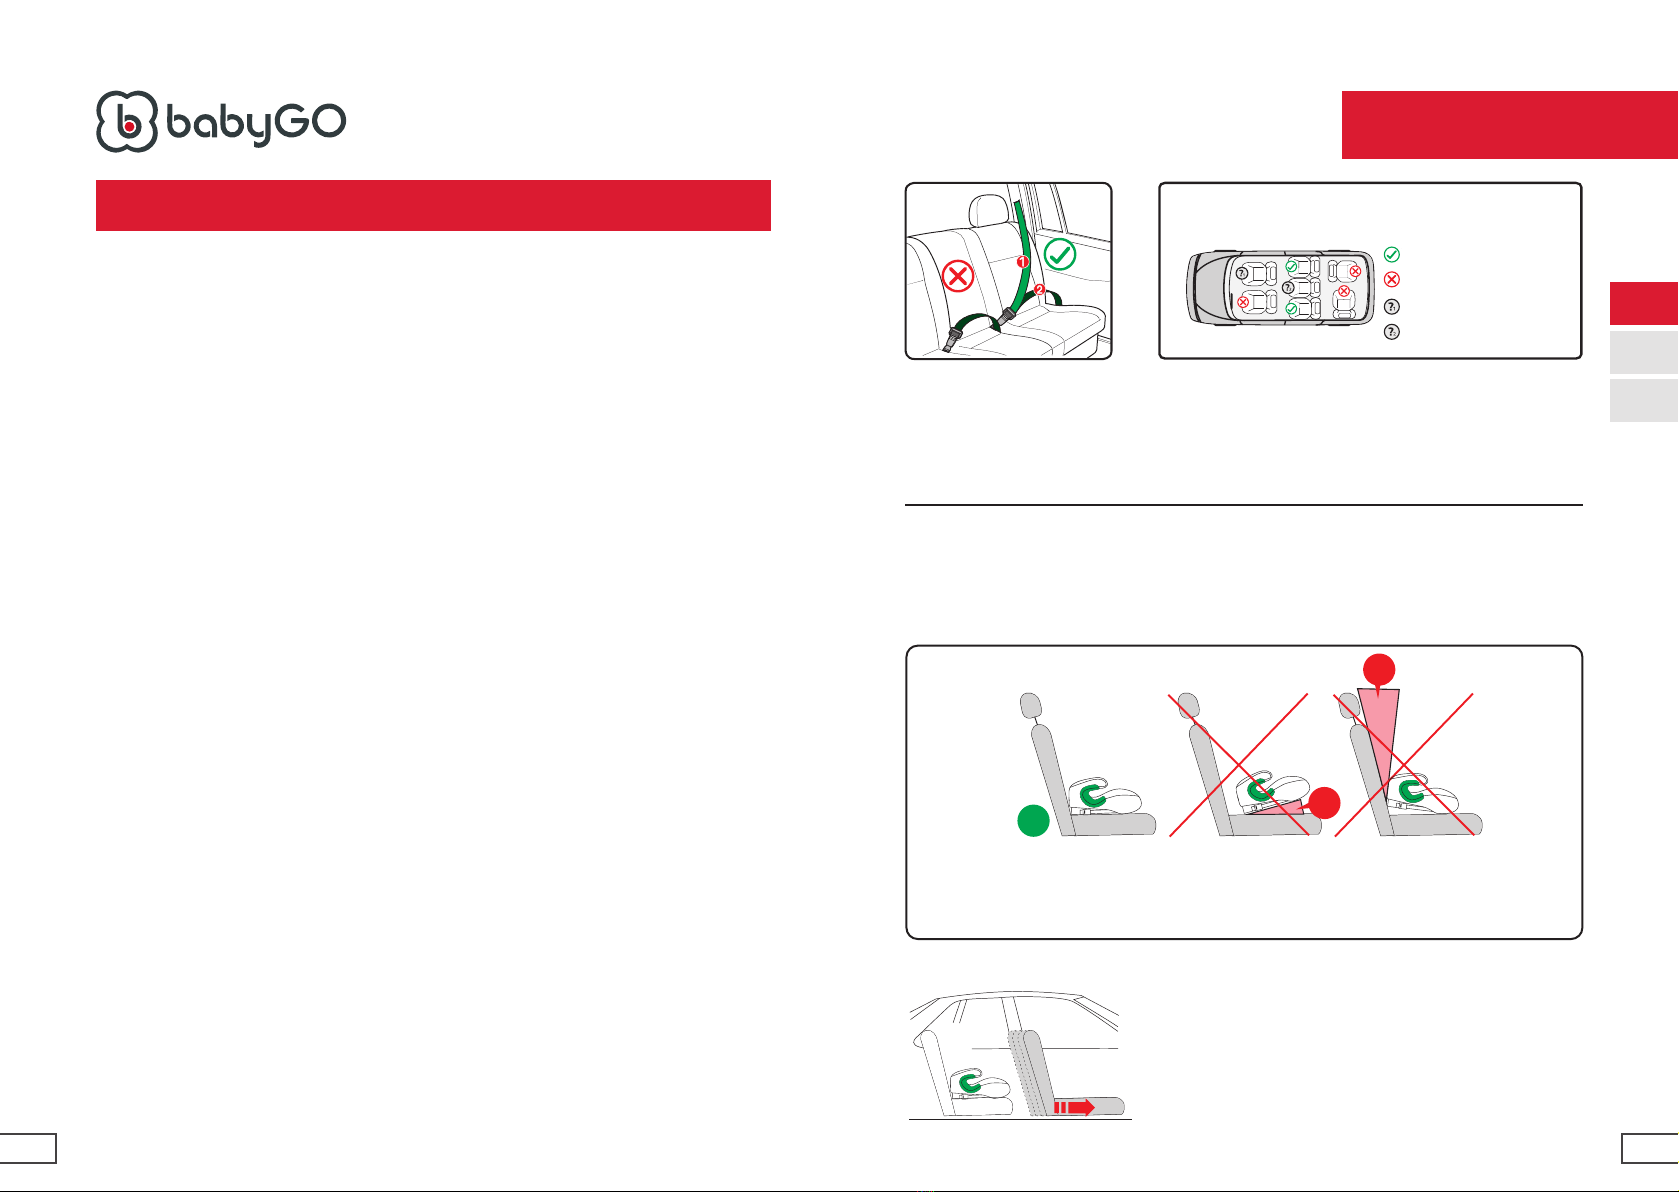
Der Rücksitz eines Fahrzeugs ist die sicherste Position für Kinder unter 12 Jahren.
Dieser Kindersitz muss nach vorn gerichtet installiert werden. Es ist nicht erlaubt, den
Sitz nach hinten oder zur Seite gerichtet zu installieren. Installieren Sie den Kindersitz
nicht auf Vordersitzen mit Airbags.
Installation in dieser
Position möglich
Installation in dieser Position
nicht möglich
Kindersitz nicht auf Vordersitzen mit
Airbag installieren.
Diese Position nur mit
3-Punkt-Gurt.
Vital information-READ NOW03 04
The rigid items and plastic parts of an Enhanced Child Restraint System shall be so located and installed that they are not liable, during everyday use of the vehicle, to become trapped by a movable seat or in a door of the vehicle.Any straps holding the restraint to the vehicle should be tight, any support-leg should be in contact with the vehicle floor, any straps or impact shields restraining the child should be adjusted to the child's body, and straps should not be twisted.It is important to ensure that any lap strap is worn low down.It is danger to make any alterations or additions to the device without the approval of the Type Approval Authority, and it is also danger not following closely the installation instructions provided by the Enhanced Child Restraint System manufacturer.Be sure that children are not left in their Enhanced Child Restraint System unattended.Be sure that any luggage or other objects liable to cause injuries in the event of a collision shall be properly secured.Be sure that the Enhanced Child Restraint System shall not be used without the cover.Be sure that the Enhanced Child Restraint System cover should not be replaced with any other than the one recommended by the manufacturer, because the cover constitutes an integral part of the restraint performance.Universal booster cushion135-150cm
135-150cmISOFIX+3-point Belt3-point BeltSIZE RANGE,,Universal booster cushion
WARNUNG! Nur geeignet, sofern das zugelassene Fahrzeug mit einem
3-Punkt-Gurt ausgestattet ist; gemäß UN/ECE Sicherheitsstandard Nr. 16
oder äquivalenter Normen. Diagonaler Gurt oder Beckengurt!
RICHTUNG GRÖSSE INSTALLATION TYP
Nach vorn gerichtet 135-150cm ISOFIX+3-Punkt-Gurt Universal-
Kindersitz
Nach vorn gerichtet 135-150cm 3-Punkt-Gurt Universal-
Kindersitz
ACHTUNG! Verstellen Sie den Vordersitz so
weit wie möglich nach vorn, um dem Kind ge-
nügend Bewegungsfreiheit zu geben.
OKNONO
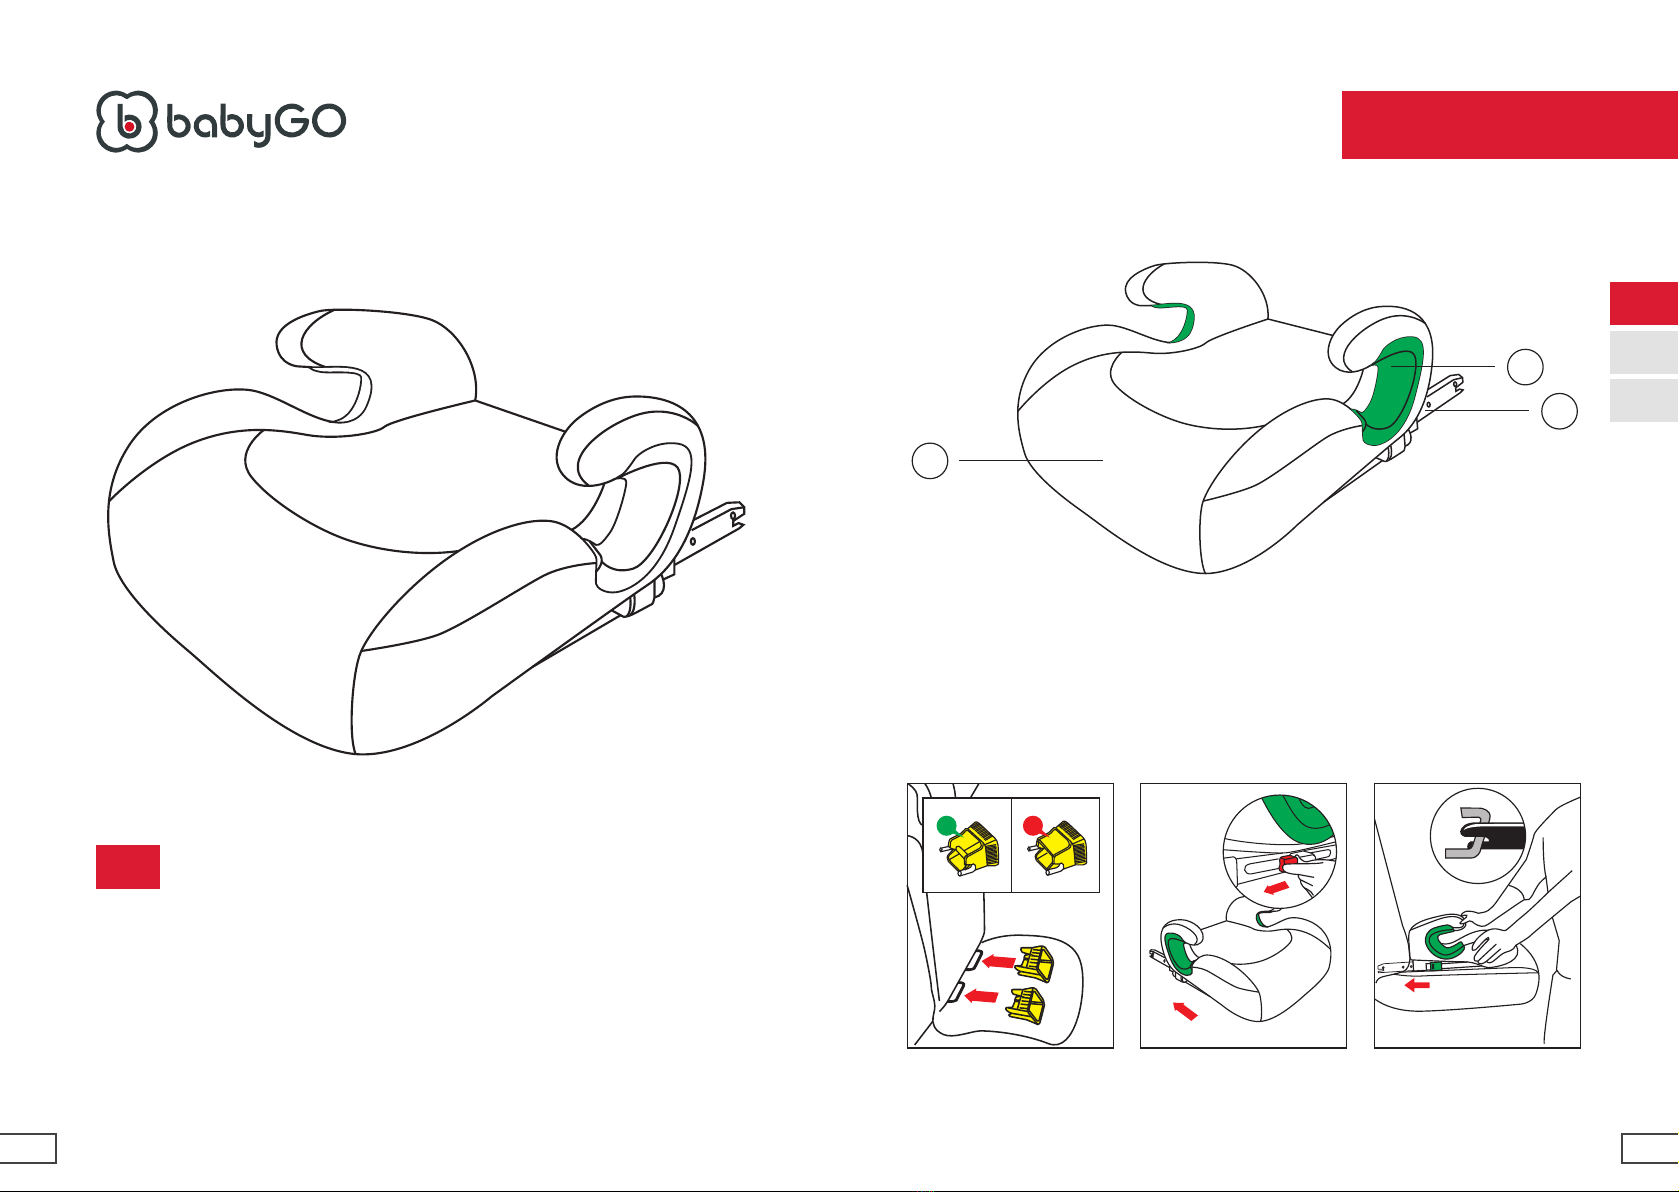
1-Base 2-Belt guidance 3-ISOFIX connector123Safety notice05 06
Move the front seat as far forward as possible to ensure that the baby's legs have a comfortable space for movement.Child seat parts introductionCheck whether the safety seat is installed correctly. Proper installation is crucial to ensure the safety of children. The fixing of the childseat must follow the instructions on the belting stickers located on both sides of the seat or the instructions in the manual.
OKNONO1-Base 2-Belt guidance 3-ISOFIX connector123Safety notice05 06
Move the front seat as far forward as possible to ensure that the baby's legs have a comfortable space for movement.Child seat parts introductionCheck whether the safety seat is installed correctly. Proper installation is crucial to ensure the safety of children. The fixing of the childseat must follow the instructions on the belting stickers located on both sides of the seat or the instructions in the manual.
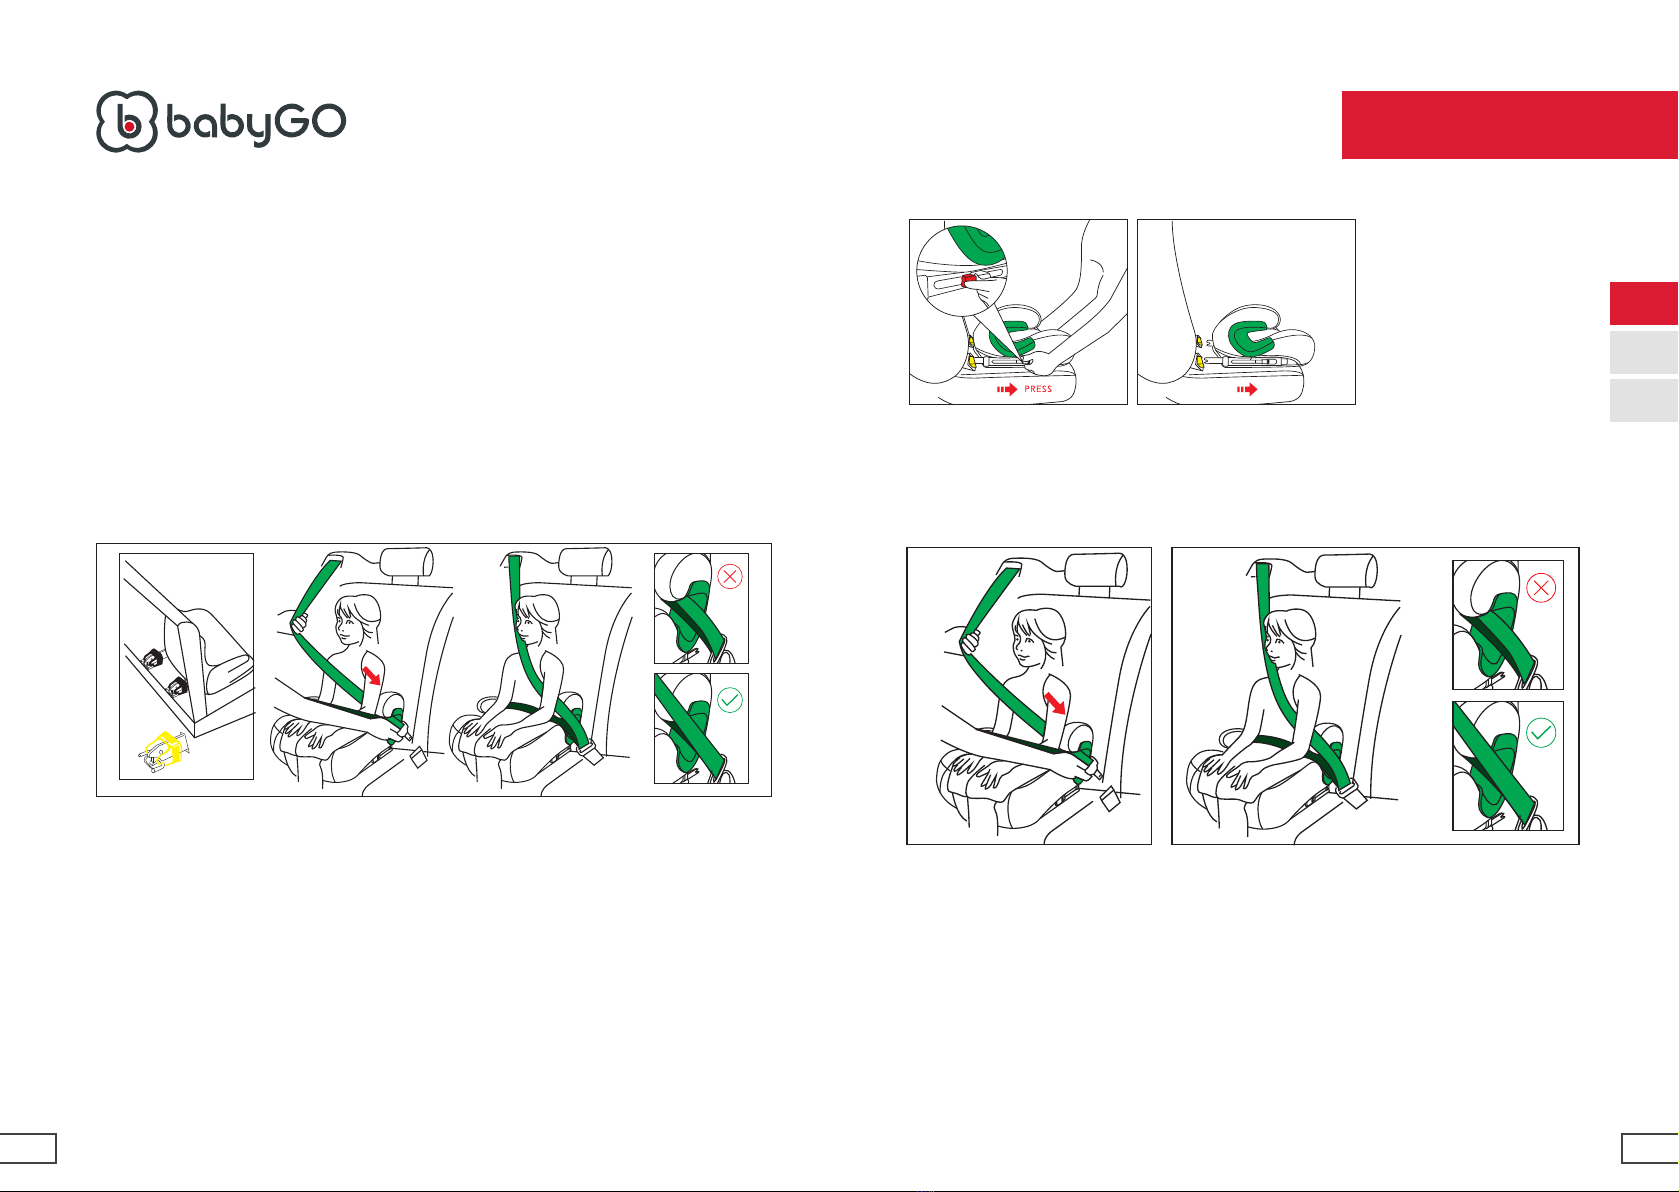
Prüfen Sie, ober der Kindersitz richtig installiert ist. Eine ordnungsgemäße Installa-
tion ist für die Sicherheit des Kindes unabdingbar. Folgen Sie für die Befestigung des
Kindersitzes den Anleitungen auf den Gurt-Etiketten an beiden Seiten des Sitzes und
in der Bedienungsanleitung.