GROW UP 360
DE
EN
FR
10 11
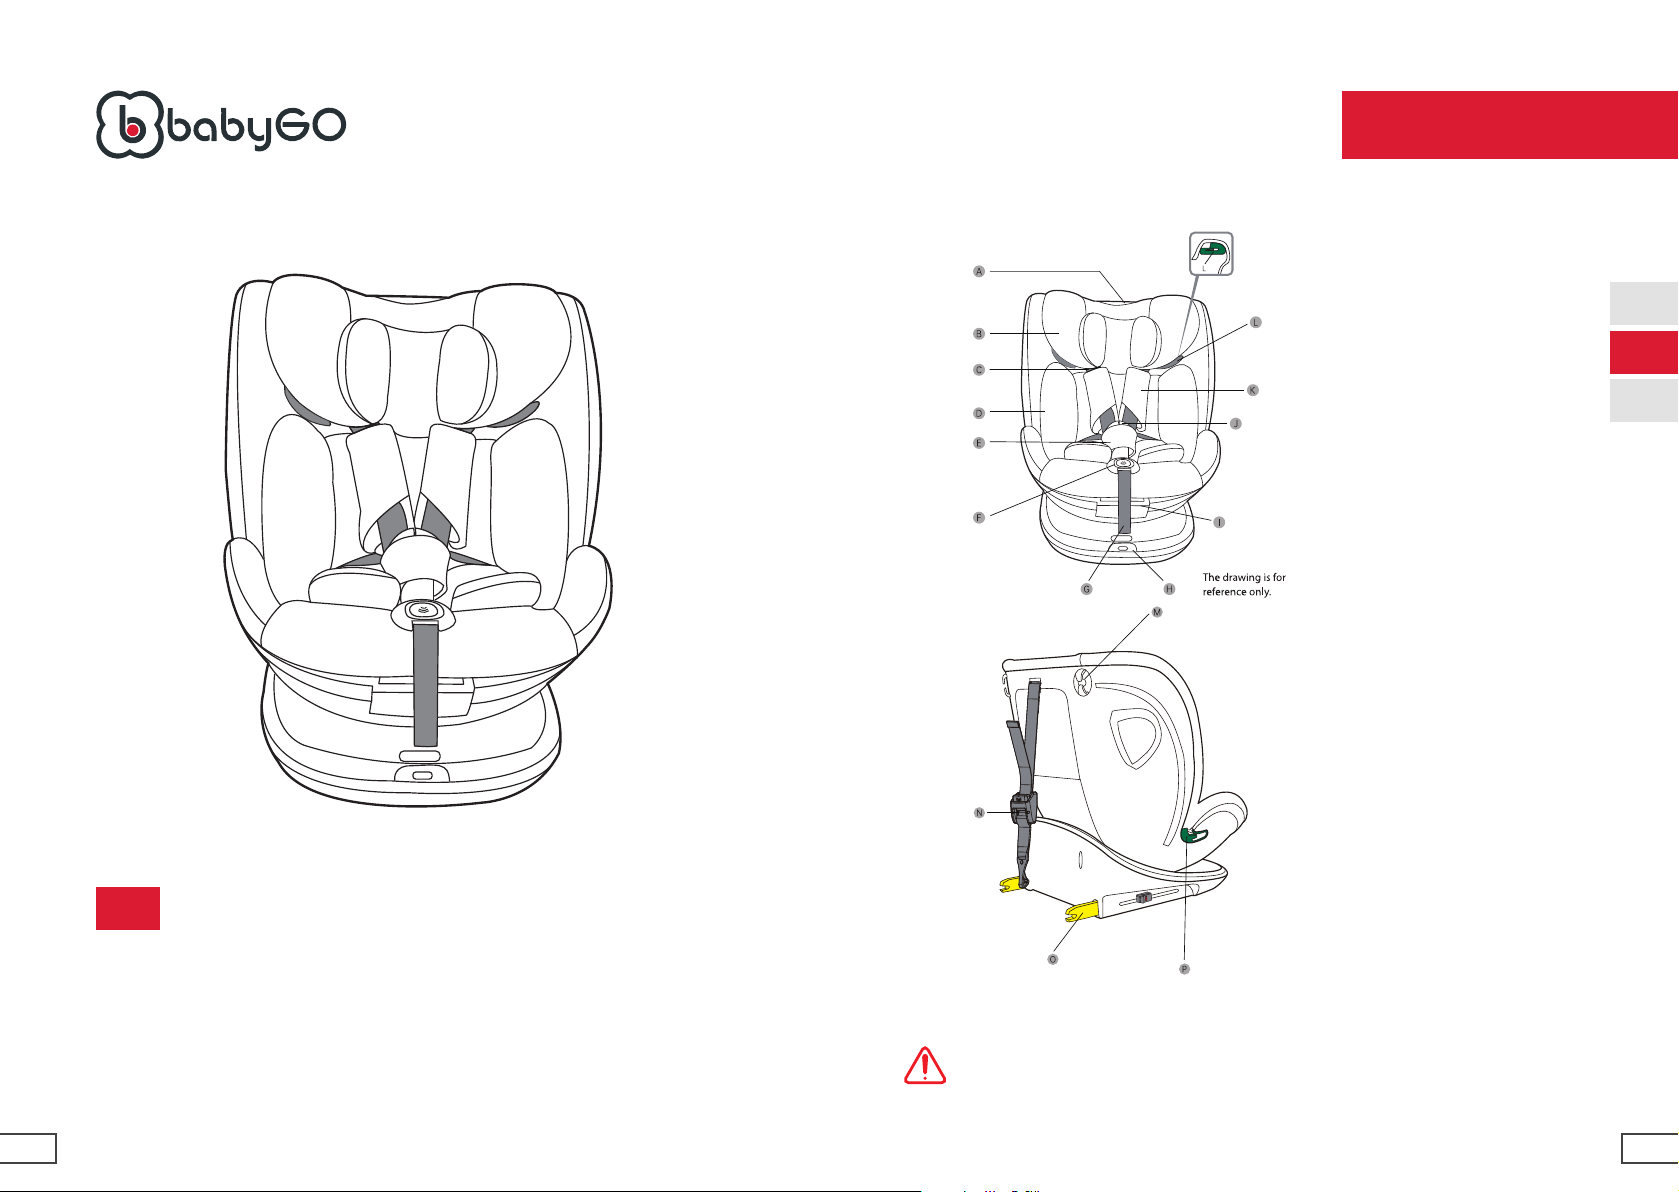
4. The adjustment and installation of child
safety seat
Correct device/suitable wrong device/unsuitable device
It cannot be used in the passenger seat where the airbag has been activated.
Car seats ISOFIX
ISOFIX
The car under
the seat anchor
point
TOP TETHER
An anchor point
on a car seat
Read the car manual rst and check whether the car seat is equipped with
ISOFIX xed anchor points, and check the size of recommended ISOFIX
constraints on the system if it is matched our ISOFIX size.
Group
40-87cm
76-105cm
100-135cm
Size
ISO/R2
ISO/F2X,ISO/R2
ISO/B2
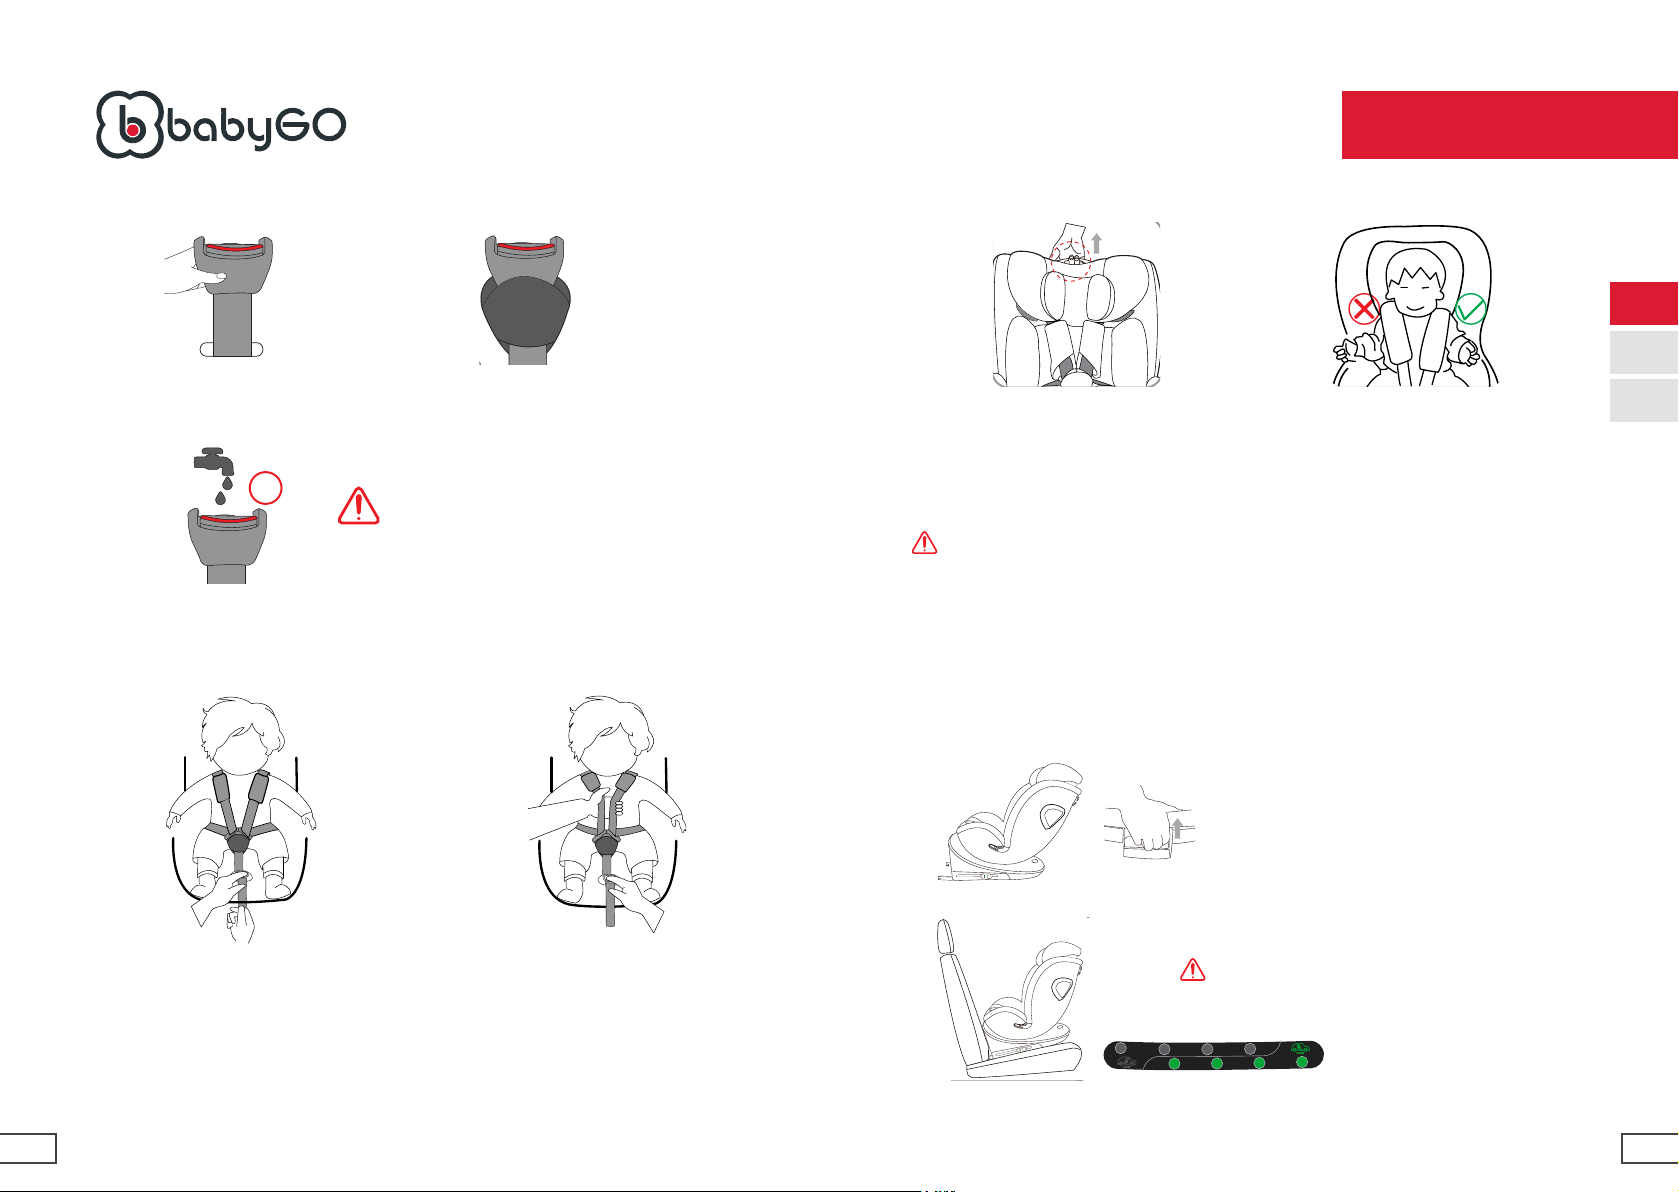
1. Put the left and right clamps of the buckle
together
(As shown in Figure 1), ensure the left and right
tongues are meeting together.
2. The left and right clamps should be
closed, and no gap should be left
And keep face up.(See Figure 2)
×
1
2
Instruction Manual 40-150cm.
3. The vehicle using notice
Child safety seat must not be used on the position where an airbag has
been activated
(airbags can be fatal to children).
Please read the instructions carefully to use the child safety seat properly.
4-1 The usage of buckle
40-150 cm
Bei einer Größe von 76-105 cm verwenden Sie bitte die
Positionen 1, 2, 3 und 4. Die Position 4 kann möglicher-
weise nicht in allen Fahrzeugen eingestellt werden. Bei
einer Größe von 100-150 cm verwenden Sie bitte nur
Position 1.
Drücken Sie mit einer Hand auf den Autositz und ziehen Sie an
der Einstelltaste unterhalb des Gehäuses, um die Position zu
verändern (es gibt vier Positionen).
4-5 Adjust the reclining of seat
Put the newborn baby cushion under the
shoulder pad, and put on the buckle cover
1
Forward facing:
Press the base of car seat by one hand, and
pull the adjustable button under the shell to
adjust to the suitable position(there are four
position)
4-6 Cushion for newborn baby
Notice:
1.When theheight of baby is40-87cm,pleaseusethenewborn baby’s
cushion.
3
The safety seat can be adjusted to many dierent angles.
The maximum angle help your child to
sleep soundly.
If your child’sweighsislessthan 15
months, it must be rearward facing.
1
2
For stature76-105cm, plsuse1,2,3,4 position.
when useposition 4 may not fit in all vehicles.
For stature100-150cm,pleaseusonly 1 position
Rearward facing:
40-150cm.
InstructionManual
40-150cm
1
2
3
123 4
4
“IMPORTANT-DO NOT USEFORWARD FACING
BEFORETHECHILD’SAGEEXCEEDS15 MONTHS”
For stature40-105cm, plsuse1,2,3,4 position.
Nach vorn gerichtet:
KISSEN FÜR NEUGEBORENE
4-5 Adjust the reclining of seat
Put the newborn baby cushion under the
shoulder pad, and put on the buckle cover
1
Forward facing:
Press the base of car seat by one hand, and
pull the adjustable button under the shell to
adjust to the suitable position(there are four
position)
4-6 Cushion for newborn baby
Notice:
1.When theheight of baby is40-87cm,pleaseusethenewborn baby’s
cushion.
3
The safety seat can be adjusted to many dierent angles.
The maximum angle help your child to
sleep soundly.
If your child’sweighsislessthan 15
months, it must be rearward facing.
1
2
For stature76-105cm, plsuse1,2,3,4 position.
when useposition 4 may not fit in all vehicles.
For stature100-150cm,pleaseusonly 1 position
Rearward facing:
40-150cm.
InstructionManual
40-150cm
1
2
3
123 4
4
“IMPORTANT-DO NOT USEFORWARD FACING
BEFORETHECHILD’SAGEEXCEEDS15 MONTHS”
For stature40-105cm, plsuse1,2,3,4 position.
4. The adjustment and installation of child
safety seat
Correct device/suitable wrong device/unsuitable device
It cannot be used in the passenger seat where the airbag has been activated.
Car seats ISOFIX
ISOFIX
The car under
the seat anchor
point
TOP TETHER
An anchor point
on a car seat
Read the car manual rst and check whether the car seat is equipped with
ISOFIX xed anchor points, and check the size of recommended ISOFIX
constraints on the system if it is matched our ISOFIX size.
Group
40-87cm
76-105cm
100-135cm
Size
ISO/R2
ISO/F2X,ISO/R2
ISO/B2
1. Put the left and right clamps of the buckle
together
(As shown in Figure 1), ensure the left and right
tongues are meeting together.
2. The left and right clamps should be
closed, and no gap should be left
And keep face up.(See Figure 2)
×
1
2
Instruction Manual 40-150cm.
3. The vehicle using notice
Child safety seat must not be used on the position where an airbag has
been activated
(airbags can be fatal to children).
Please read the instructions carefully to use the child safety seat properly.
4-1 The usage of buckle
40-150 cm
Hinweis:
Verwenden Sie das Baby-Kissen, wenn das Baby zwischen 40 und 87 cm groß
ist.
Legen Sie das Baby-Kissen unter das Schulterpolster und installieren Sie die Abdeckung an
der Schnalle.
DREHFUNKTIONEN
Seat from rearward facing to forward
facing:
1. Pressthe rotation button (asshown in pic)
and rotate it by hand.
Turn the seat to forward facing by rotation 180
degrees.
2. After rotating the child safety seat in the
correct direction, please make sure
The child safety seat rotation hasbeen locked.
1
180°
7
34
Seat from forward facing to
rearward facing:
1. Adjust the seat to the maximum
reclining position by pulling the
reclining handle (asshown in pic)
40-150cm.
InstructionManual
40-150cm
6
8
5
2. Pressthe rotation button and
rotate it by hand.
Turn the seat to rearward facing by
rotation 180 degrees.
4-7 The rotation functions
Sitz von hinten nach vorn drehen:
Drücken Sie auf die Drehtaste (siehe Abbildung) und
drehen Sie den Sitz mit der Hand um 180 Grad nach
vorn.
2.Vergewissern Sie sich nach dem
Drehen, dass der Kindersitz wie-
der richtig einrastet.
Seat from rearward facing to forward
facing:
1. Pressthe rotation button (asshown in pic)
and rotate it by hand.
Turn the seat to forward facing by rotation 180
degrees.
2. After rotating the child safety seat in the
correct direction, please make sure
The child safety seat rotation hasbeen locked.
1
180°
7
34
Seat from forward facing to
rearward facing:
1. Adjust the seat to the maximum
reclining position by pulling the
reclining handle (asshown in pic)
40-150cm.
InstructionManual
40-150cm
6
8
5
2. Pressthe rotation button and
rotate it by hand.
Turn the seat to rearward facing by
rotation 180 degrees.
180°
2
4-7 The rotation functions
Seat from rearward facing to forward
facing:
1. Pressthe rotation button (asshown in pic)
and rotate it by hand.
Turn the seat to forward facing by rotation 180
degrees.
2. After rotating the child safety seat in the
correct direction, please make sure
The child safety seat rotation hasbeen locked.
1
180°
7
3
4
Seat from forward facing to
rearward facing:
1. Adjust the seat to the maximum
reclining position by pulling the
reclining handle (asshown in pic)
40-150cm.
InstructionManual
40-150cm
6
8
5
2. Pressthe rotation button and
rotate it by hand.
Turn the seat to rearward facing by
rotation 180 degrees.
4-7 The rotation functions
Sitz von vorn nach hinten drehen:
Neigen Sie den Sitz bis ganz
nach hinten, indem Sie an dem
Seat from rearward facing to forward
facing:
1. Pressthe rotation button (asshown in pic)
and rotate it by hand.
Turn the seat to forward facing by rotation 180
degrees.
2. After rotating the child safety seat in the
correct direction, please make sure
The child safety seat rotation hasbeen locked.
1
180°
7
34
Seat from forward facing to
rearward facing:
1. Adjust the seat to the maximum
reclining position by pulling the
reclining handle (asshown in pic)
40-150cm.
InstructionManual
40-150cm
6
8
5
2. Pressthe rotation button and
rotate it by hand.
Turn the seat to rearward facing by
rotation 180 degrees.
4-7 The rotation functions
2.Drücken Sie die Drehtaste und
drehen Sie den Sitz mit der Hand
um 180 Grad nach hinten.
4. The adjustment and installation of child
safety seat
Correct device/suitable wrong device/unsuitable device
It cannot be used in the passenger seat where the airbag has been activated.
Car seats ISOFIX
ISOFIX
The car under
the seat anchor
point
TOP TETHER
An anchor point
on a car seat
Read the car manual rst and check whether the car seat is equipped with
ISOFIX xed anchor points, and check the size of recommended ISOFIX
constraints on the system if it is matched our ISOFIX size.
Group
40-87cm
76-105cm
100-135cm
Size
ISO/R2
ISO/F2X,ISO/R2
ISO/B2
1. Put the left and right clamps of the buckle
together
(As shown in Figure 1), ensure the left and right
tongues are meeting together.
2. The left and right clamps should be
closed, and no gap should be left
And keep face up.(See Figure 2)
×
1
2
Instruction Manual 40-150cm.
3. The vehicle using notice
Child safety seat must not be used on the position where an airbag has
been activated
(airbags can be fatal to children).
Please read the instructions carefully to use the child safety seat properly.
4-1 The usage of buckle
40-150 cm
Achtung! Vergewissern Sie sich vor jeder Fahrt, dass der Drehmechanismus eingeras-
tet ist, indem Sie versuchen, den Sitz in beide Richtungen zu drehen
4. The adjustment and installation of child
safety seat
Correct device/suitable wrong device/unsuitable device
It cannot be used in the passenger seat where the airbag has been activated.
Car seats ISOFIX
ISOFIX
The car under
the seat anchor
point
TOP TETHER
An anchor point
on a car seat
Read the car manual rst and check whether the car seat is equipped with
ISOFIX xed anchor points, and check the size of recommended ISOFIX
constraints on the system if it is matched our ISOFIX size.
Group
40-87cm
76-105cm
100-135cm
Size
ISO/R2
ISO/F2X,ISO/R2
ISO/B2
1. Put the left and right clamps of the buckle
together
(As shown in Figure 1), ensure the left and right
tongues are meeting together.
2. The left and right clamps should be
closed, and no gap should be left
And keep face up.(See Figure 2)
×
1
2
Instruction Manual 40-150cm.
3. The vehicle using notice
Child safety seat must not be used on the position where an airbag has
been activated
(airbags can be fatal to children).
Please read the instructions carefully to use the child safety seat properly.
4-1 The usage of buckle
40-150 cm
Achtung! Falls Ihr Kind jünger als 15 Monate ist, drehen Sie den Sitz nach hinten.
4. The adjustment and installation of child
safety seat
Correct device/suitable wrong device/unsuitable device
It cannot be used in the passenger seat where the airbag has been activated.
Car seats ISOFIX
ISOFIX
The car under
the seat anchor
point
TOP TETHER
An anchor point
on a car seat
Read the car manual rst and check whether the car seat is equipped with
ISOFIX xed anchor points, and check the size of recommended ISOFIX
constraints on the system if it is matched our ISOFIX size.
Group
40-87cm
76-105cm
100-135cm
Size
ISO/R2
ISO/F2X,ISO/R2
ISO/B2
1. Put the left and right clamps of the buckle
together
(As shown in Figure 1), ensure the left and right
tongues are meeting together.
2. The left and right clamps should be
closed, and no gap should be left
And keep face up.(See Figure 2)
×
1
2
Instruction Manual 40-150cm.
3. The vehicle using notice
Child safety seat must not be used on the position where an airbag has
been activated
(airbags can be fatal to children).
Please read the instructions carefully to use the child safety seat properly.
4-1 The usage of buckle
40-150 cm
Achtung! Vergewissern Sie sich vor jeder Fahrt, dass der Sitz richtig eingestellt und
positioniert ist.
Seat from rearward facing to forward
facing:
1. Pressthe rotation button (asshown in pic)
and rotate it by hand.
Turn the seat to forward facing by rotation 180
degrees.
2. After rotating the child safety seat in the
correct direction, please make sure
The child safety seat rotation hasbeen locked.
1
180°
7
34
Seat from forward facing to
rearward facing:
1. Adjust the seat to the maximum
reclining position by pulling the
reclining handle (asshown in pic)
40-150cm.
InstructionManual
40-150cm
6
8
5
2. Pressthe rotation button and
rotate it by hand.
Turn the seat to rearward facing by
rotation 180 degrees.
4-7 The rotation functions