Brevi Grillo 710 Series User manual


PL WAZNE:
Przeczytaj uwanie instrukcje obsługi przed uzyciem i
zachowaj ja w razie potrzeby. Dziecko moe ulec zra-
nieniu jeeli nie będąprzestrzegane zalecenia z tej
instrukcji.
Важно! Перед использованием внимательно
прочитайте инструкцию и сохраните ее на
будущее.
Необходимо следить эти инструции: их не
следить может быть опаздно для ребенка.
RUS
IMPORTANTE:
Leggere le istruzioni attentamente prima dell’uso e
conservarle con cura per futuro riferimento.
Qualora tali istruzioni venissero disattese, ne
potrebbero derivare lesioni al bambino.
WICHTIG:
Lesen Sie diese Hinweise sorgfältig vor der
Benutzung und bewahren Sie sie auf.
Wenn Sie diese Hinweise nicht beachten, kann die
Sicherheit Ihres Kindes beeinträchtigt Werden.
IMPORTANT:
Lire attentivement les instructions avant toute utili-
sation et les conserver soigneusement pour toute
ultérieure consultation. Si ces instructions ne sont
pas suivies correctement, l’enfant pourrait se faire
mal.
IMPORTANTE:
Leer las instrucciones atentamente antes del uso y
conservarlas con cuidado para futura referencia.
No seguir estas instrucciones podría provocar
lesiones al niño.
IMPORTANTE:
Leia atentamente as instruções antes do uso e con-
serve-as para futuras consultas.
No caso em que estas instruções não sejam respei-
tadas há perigo de lesões para o bebé.
I
D
F
E
P
2 3
ISTRUZIONI GRILLO 710-36:ISTRUZIONI GRILLO 710-36 22-02-2008 11:25 Pagina 3

Esploso ricambi - Spare parts list - Ersatzteil-Liste - Liste des pièces détachées
4
Pos. Codice
1 710.03.00.0.000.00
2 710.04.00.0.000.00
3 710.05.00.0.000.00
4 710.06.00.0.000.00
5 710.07.00.0.000.00
6 710.08.00.0.000.00
7 710.09.00.0.000.00
8 710.10.00.0.000.00
9 710.11.00.0.000.00
10 710.12.00.0.000.00
11 710.13.00.0.000.00
12 710.14.00.0.000.00
13 710.15.00.0.000.00
14 710.16.00.0.000.00
15 710.17.00.0.000.00
16 710.18.00.0.000.00
17 710.19.00.0.000.00
18 710.20.00.0.000.00
19 710.21.00.0.000.00
20 710.22.00.0.000.00
21 710.23.00.0.000.00
22 710.24.00.0.000.00
23 710.25.00.0.000.00
24 710.26.00.0.000.00
25 710.27.00.0.000.00
26 710.28.00.0.000.00
27 710.29.00.0.000.00
28 710.30.00.0.000.00
29 710.31.00.0.000.00
Despiece piezas de recambio - Lista de acessórios - Перечень запасных деталей
5
ISTRUZIONI GRILLO 710-36:ISTRUZIONI GRILLO 710-36 22-02-2008 11:25 Pagina 5

1
3
4
1a
3a
2a
4a
1b
3b
2
6 7
7b 7c7a
5 6
7
8
6a 6b 6c
8b
8a
ISTRUZIONI GRILLO 710-36:ISTRUZIONI GRILLO 710-36 22-02-2008 11:25 Pagina 7


PARASOLE
Il passeggino è dotato di un parasole sfilabile (fig.4+4a) grazie a due perni, che scorrono nelle apposite sedi
poste sui lati
.
CINTURE DI SICUREZZA
Il passeggino è dotato di cinture di sicurezza a 5 punti (fig.5). Regolare gli spallacci secondo la taglia del bam-
bino. Allacciare sempre le cinture di sicurezza e utilizzare sempre lo spartigambe.
Attenzione: assicurarsi che le cinture siano sempre allacciate correttamente.
CORRIMANO
Per rimuovere il corrimano premere i due tasti posti su uno dei braccioli (fig. 6) e contemporaneamente impu-
gnare il terminale corrispondente (fig. 6a); sollevare il corrimano (fig. 6b), quindi procedere allo stesso modo
per l’altro terminale. Per coprire i due fori rimasti, utilizzare gli appositi tappi a pressione collocati nel cestel-
lo (fig. 6c). Per rimontare il corrimano è sufficiente togliere i tappi a pressione e inserirlo negli appositi fori.
RUOTE POSTERIORI CON FRENO
Per bloccare il passeggino, premere verso il basso la leva posta sulle ruote posteriori (fig. 7a).
Attenzione: i freni sono centralizzati e si bloccano contemporaneamente. Con la leva in posizione alta le
ruote non sono bloccate. Utilizzare sempre il freno quando si sosta.
Attenzione: non lasciare mai il bambino incustodito, anche se il freno è azionato.
RUOTE ANTERIORI PIROETTANTI
Le ruote anteriori possono ruotare su se stesse a 360° (fig.7b); per escludere la funzione piroettante alzare la
leva posta tra le due ruote (fig. 7c), abbassarla per sbloccarle (fig. 7b).
Attenzione: le ruote piroettanti permettono una migliore manovrabilità del passeggino; su terreni sconnes-
si è consigliabile utilizzare le ruote bloccate. Per la pulizia delle ruote anteriori, premere l’anello di bloccag-
gio posto sul raccordo della ruota, e sfilare (fig.8a+fig. 8b).
CHIUSURA
Per chiudere il passeggino è necessario premere l'apposito tasto rosso (fig. 9a), spingere il cursore sul mani-
glione a destra finché non compare l'etichetta rossa e premere contemporaneamente il pulsante (fig. 9b).
Infine impugnare il corrimano e tirare verso di sé compattando il passeggino (fig. 9a). Chiudere il maniglione,
seguendo le indicazioni delle figure 1a e 1b. Una maniglia posta sul fianco agevola il trasporto del passeg-
gino (fig. 9b).
ACCESSORI
Mantellina parapioggia (cod. 701)
È disponibile come accessorio una pratica e leggera mantellina parapioggia. Aprire la mantellina e applicar-
la sulla capotta coprendo tutto il passeggino (fig.10). Fissare la mantellina con l’apposito velcro alla base dei
tubi anteriori e posteriori del passeggino.
LAVAGGIO
Il passeggino è interamente sfoderabile mediante bottoni a pressione e velcro. Togliere la fodera (fig.11) e lava-
re a mano con sapone neutro. Seguire le indicazioni riportate sull’etichetta di composizione tessuto cuci-
ta sul prodotto.
10 11
Conforms to EN 1888:2003, EN 1888/A1-A2-A3:2005
CARE AND MAINTENANCE
• For washing any removable fabric parts always refer to the fabric washing instructions on the care label.
• If necessary lubricate with a silicone-based lubricant.
• Periodically wipe clean the strollers plastic parts with a soft damp cloth.
• Always dry the metal parts to protect them from rusting.
• Periodically check the status of the wheels and make sure that they are free from dust and sand.
SAFETY
•Make sure that all persons who operate this stroller know how to operate it.
•The use of this stroller is intended for children from 6 month to 3 years, up to 15 kg weight
•Do not overload the basket. Maximum loading weight allowed: 4,5 kg
• Warning: Never leave your child unattended.
•Do not open or close the stroller with a child on board.
•Never carry more than one child at a time.
• Warning: Do not hang onto the push handle bags or other items that could risk the stroller to overturn.
•Do not use accessories, spare parts or components not supplied by the manufacturer.
•Always apply the brakes when the stroller is stationary. Attention: never leave the stroller on a slo-
ped surface with your child on board even with the brakes applied. Attention: the brakes may not
work at their optimum on very steep slopes.
•Make sure that your child wears a correctly fitted and adjusted harness at all times.
•Ensure children are clear of moving parts before making adjustments to the stroller.
• Attention: do not use the stroller if any part is lost or damaged.
•Do not allow children to play with or hang onto the stroller.
•After prolonged exposure to direct sunlight, wait until the stroller cools down before placing your child
into it.
•Avoid exposure to salt water; this may cause formation of rust.
•A prolonged exposure to sunlight could cause colour fading of fabric and textile parts.
•Keep any plastic packaging away from children to avoid danger of suffocation.
• Warning: this product is not suitable for use while running or skating
OPENING
1. Put the push handle in vertical position pressing at the same time the internal push buttons (fig. 1a+1b).
2. To open the stroller grasp the release mechanism on the centre of the push handle as shown in figure 2,
move the sliding button to the right until the red label appears and at the same time press the button.
3. Push the bumper bar forwards until the stroller is completely opened. Releasing the release mechanism
the stroller will lock definitively (fig.3).
RECLINING THE BACKREST
The backrest can be reclined in different positions with the buttons located on the backrest (fig. 3+3a+3b).
To raise the backrest just push it upwards and it will lock automatically. The backrest can also be reclined
with a child on board.
SUN CANOPY
The stroller is equipped with a removable sun canopy (fig. 4+4a).
SAFETY HARNESS
The stroller is supplied with 5 point safety harness with central locking device (fig. 5). Adjust the shoulder
straps to baby’s size. Always use the harness provided. Attention: make sure that the safety harness is always
correctly fitted.
ENGLISH
GBI
ISTRUZIONI GRILLO 710-36:ISTRUZIONI GRILLO 710-36 22-02-2008 11:25 Pagina 11

BUMPER BAR
The bumper bar can be removed pressing simultaneously the two release buttons located on the armrests
(fig. 6 a+b) Close the remaining holes with the two plugs located in the basket (fig. 6c) To re-fit the bumper
bar just pull out the plugs and insert the bumper bar.
REAR WHEELS WITH BRAKE
To apply the strollers brakes press the brake lever down on the rear wheels. (fig. 7a). Attention: the rear- bra-
kes are connected and get locked simultaneously. When brake lever is in upper position wheels are not loc-
ked. Always apply the brakes whenever the stroller is stationary.
Attention: never leave your child unattended in the stroller even if the brakes are applied.
FRONT SWIVEL WHEEL
The stroller is equipped with swivel front wheels (fig. 7b); to set the front wheels to swivel lower the swivel
lock between the two front wheels. To lock the front swivel wheels in place simply raise the swivel lock (fig. 7c)
Attention: the swivel wheels allow a better manoeuvrability; use the locked swivel mode on uneven terrain.
To clean the front wheels, press the two levers that are located on the junction of the wheel and pull (fig. 8a +
fig 8b).
FOLDING
To fold the stroller grasp the release mechanism on the centre of the push handle, move the sliding button
to the right until the red label appears and at the same time press the button (fig. 9). Finally pull the bumper
bar towards the push handle and close the stroller (fig. 9a). Close the push handle as shown in figure 1a and
1b. The stroller is equipped with a practical carrying handle (fig. 9b)
RAINCOVER (separately available accessory cod. 701)
To fit the stroller with the separately available rain-cover, open it up and fit it over the sun canopy, covering
the whole stroller (fig. 10). Attach the rain-cover to the front legs and the sides of the stroller using the Velcro
fasteners.
CLEANING
The strollers fabric cover can be removed for cleaning by unfastening the velcro and press-stud fasteners.
Remove the fabric cover (fig. 11) and hand wash with mild soap. Refer to the care label attached to the fabric
cover.
12 13
Gemäß der Norm EN 1888:2003, EN 1888/A1-A2-A3:2005
REINIGUNG UND WARTUNG
• Zur Reinigung des Bezuges ist die Anleitung auf dem Etikett zu befolgen.
• Bei Bedarf bewegliche Teile mit Trocken-Silikonöl ölen.
• Kunststoffteile regelmäßig mit einem feuchten Tuch reinigen.
• Nasse Metallteile abtrocknen, um Rostbildung zu vermeiden.
• Überprüfen Sie in regelmäßigen Abständen den Zustand der Räder und säubern Sie sie, wenn diese
staubig oder sandig sind.
WICHTIGE HINWEISE
• Vergewissern Sie sich darüber, dass auch andere Benutzer des Sportwagens genau mit dessen
Funktionsweise vertraut ist.
• „WARNUNG: Vergewissern Sie sich vor Gebrauch, dass alle Verriegelungen geschlossen sind”
• Die Verwendung dieses Sportwagens ist für Kinder von 6 Monate bis 3 Jahre, bzw. bis maximal 15 kg
Körpergewicht geeignet. „WARNUNG: Dieser Sitz ist nicht für Kinder unter 6 Monaten geeignet”
• Der Ablagekorb darf nicht mit mehr als 4,5 kg Gewicht beladen werden.
• Warnung: Lassen Sie Ihr Kind nicht unbeaufsichtigt.
• Beim Öffnen oder Zusammenklappen des Sportwagens darf sich das Kind nicht im Wagen befinden.
• Transportieren Sie nicht mehr als ein Kind in dem Wagen.
• Warnung: Befestigen Sie am Schieber keine Taschen oder andere Gegenstände, welche die
Standfestigkeit des Sportwagens beeinträchtigen könnten.
• Nur vom Hersteller vorgesehenes Zubehör bzw. Ersatzteile verwenden.
• Betätigen Sie bei jedem Halt die Bremse. Warnung: Lassen Sie den Sportwagen mit dem Kind nie-
mals auf einer geneigten Ebene stehen; auch dann nicht wenn der die Bremse getätigt wurde.
• Achten Sie stets darauf, dass das Kind immer mit dem Sicherheitsgurt angeschnallt ist. Achtung: die
Verwendung der Gurte ist für die Sicherheit des Kindes erforderlich.
• Beim Verstellen des Wagens ist immer darauf zu achten, dass alle Körperteile des Kindes fern von den
bewe-glichen Teilen des Gestelles sind und nicht eingeklemmt werden.
• Achtung: Der Sportwagen darf nicht mehr benutzt werden, wenn Teile davon beschädigt sind oder
fehlen.
• „WICHTIG: Vom Hersteller nicht zugelassene Zubehörteile dürfen nicht verwendet werden”.
•
Sorgen Sie dafür, dass andere Kinder nicht unbeaufsichtigt in der Nähe von dem Sportwagen spielen.
• Sollte der Sportwagen für längere Zeit unter der Sonne gestanden haben, vergewissern Sie sich darü-
ber, dass der aufgeheizte Wagen abgekühlt ist, bevor das Kind in den Wagen gesetzt wird.
• Starke Sonneneinstrahlung kann Farbveränderungen an Bezug bzw. Materialien verursachen.
• Achtung: Vermeiden Sie den Kontakt mit Salzwasser. Es könnte Rostbildung am Sportwagen verur-
sachen.
• Polybeutel sind immer fern von Kindern aufzubewahren. Erstickungsgefahr!
• Achtung: diese Produkte sind nicht zum Rennen oder Skaten geeignet
ÖFFNUNG DES KINDERSPORTWAGENS
1. Bringen Sie den Schieber in die erwünschte Position, indem Sie gleichzeitig die auf dem Schieber seit-
lich gelegenen Tasten drücken (s. Abbildung 1a+1b).
2. Um den Sportwagen zu öffnen ergreifen Sie die Einhandbedienung (s. Abbildung 2). Schieben Sie die
Taste nach rechts bis die rote Markierung zu erkennen ist und drücken Sie gleichzeitig die Drucktaste.
3. Öffnen Sie den Wagen, indem Sie den Schieber nach oben ziehen und den Frontbügel nach vorne drüc-
ken, bis der Sportwagen sich vollständig öffnet. Beim Loslassen der Einhandbedienung blockiert der
Sportwagen automatisch (s. Abbildung 3).
DEUTSCH
DGB
ISTRUZIONI GRILLO 710-36:ISTRUZIONI GRILLO 710-36 22-02-2008 11:25 Pagina 13

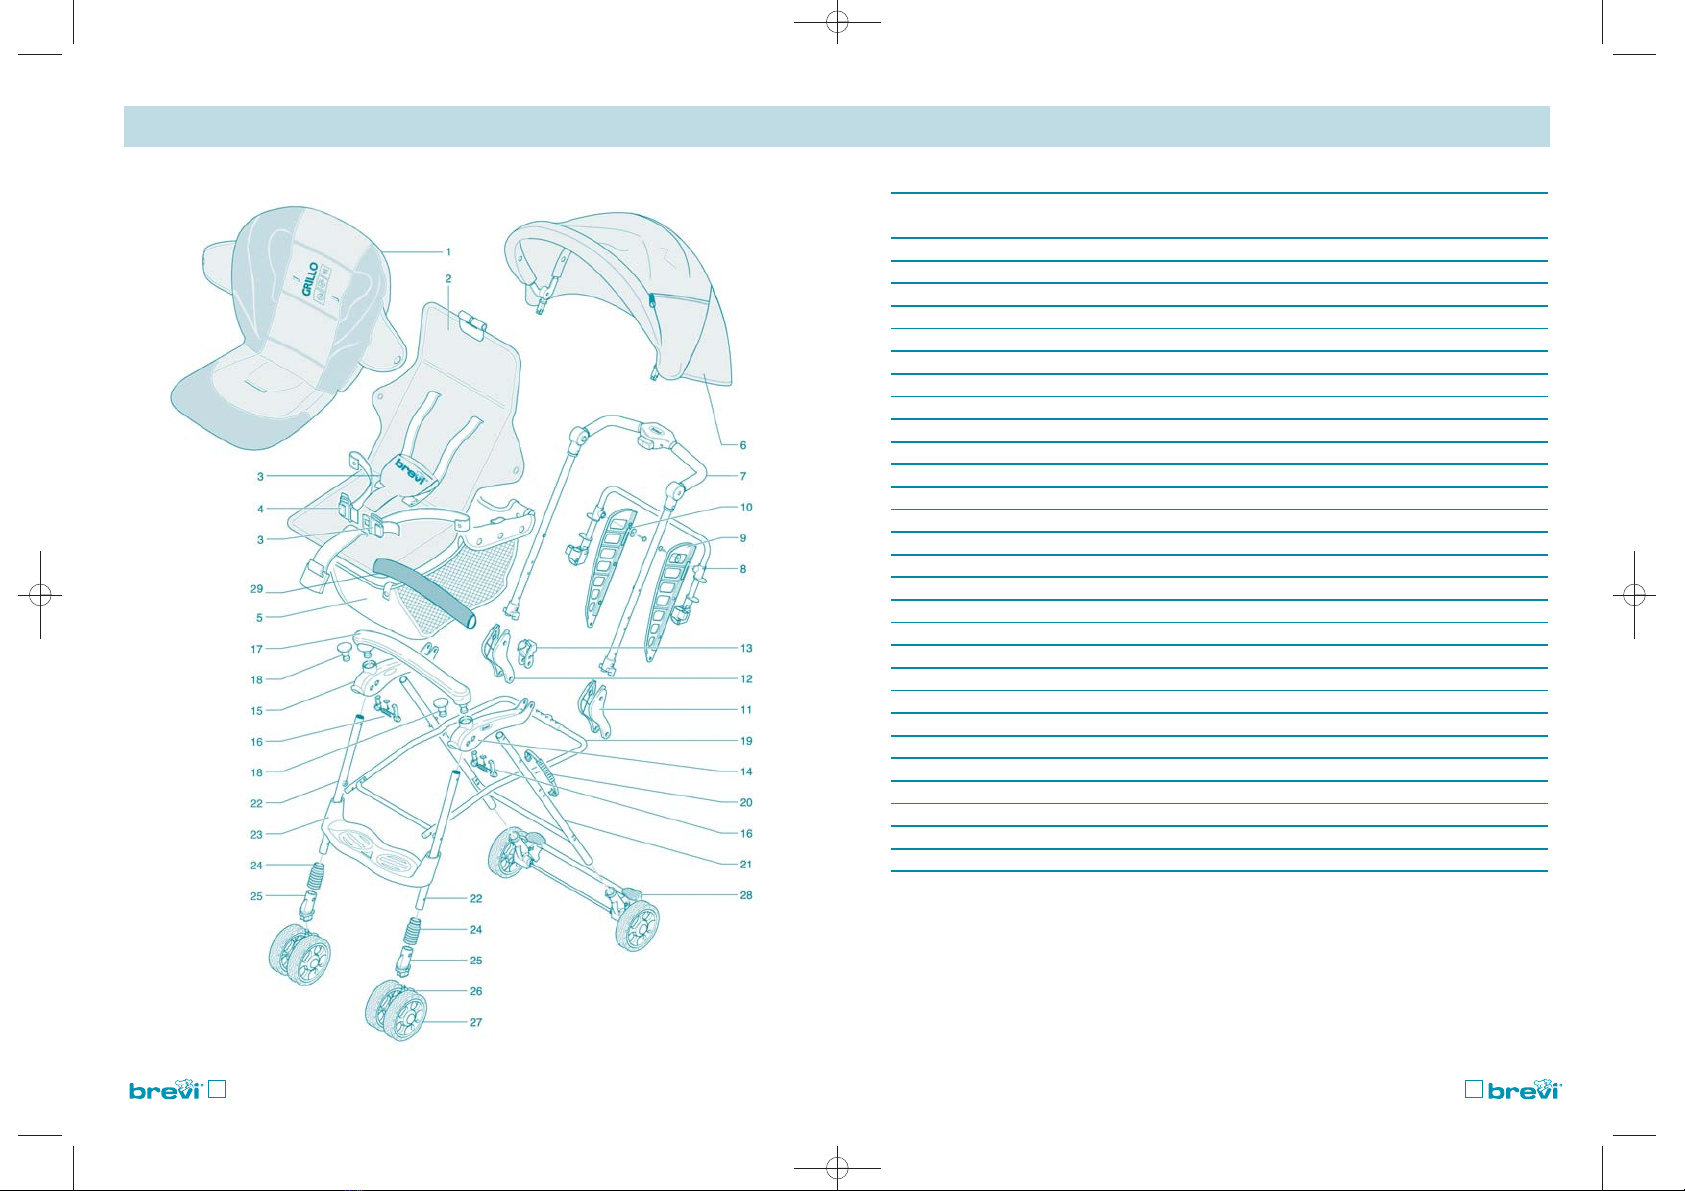
VERSTELLUNG DER RÜCKENLEHNE
Die Rückenlehne ist verstellbar. Um die Rückenlehne nach hinten zu verstellen, bedienen Sie die beiden
Taste, die sich rechts und links auf der Rückenlehne befinden und drücken Sie die Rückenlehne nach unten
(s. Abbildung 3+3a+3b). Um die Rückenlehne in die vertikale Position einzustellen genügt es sie nach oben
zu drücken. Die Rückenlehne rastet automatisch ein. Die Verstellung der Rückenlehne kann auch mit dem
Kind im Sportwagen erfolgen.
VERDECK
Der Kinderwagen ist mit einem abnehmbarem Verdeck ausgestattet (s. Abbildung 4+4a).
SICHERHEITSGURT
Der Sportwagen ist mit einem 5-Punkt-Sicherheitsgurt ausgestattet (s. Abbildung 5). Die Schultergurte müs-
sen immer gut anliegen. Legen Sie dem Kind immer die Gurte an und benutzen Sie dabei immer den
Mittelsteg. Achtung: Überprüfen Sie immer, ob die Gurte korrekt angeschnallt sind.
FRONTBÜGEL
Der Frontbügel ist abnehmbar. Drücken Sie dazu auf die beiden Druckknöpfe die sich jeweils auf der rechten
und linken Armlehne befinden (s. Abbildung 6). Zuerst auf einer Seite drücken und das entsprechende Ende
des Frontbügels herausziehen und dann auf der andere Seite drücken und das Ende des Frontbügels herau-
sziehen. Die zwei entstehenden Öffnungen sind mit den dazu eigens vorgesehenen Stöpseln zu schließen,
die sich in dem Ablagekorb befinden (s. Abbildung 6c). Um den Bügel wieder zu befestigen, entfernen sie
die Stöpsel und stecken Sie die Enden des Bügels in die Öffnungen.
HINTERRÄDER MIT BREMSE
Um den Sportwagen zu blockieren drücken Sie die Bremshebel an den Hinterrädern nach unten (s. Abbildung
7a). Achtung: Die Bremse wirkt zentral, d.h. gleichzeitig auf beide Hinterräder. Wenn die Bremshebel nach
oben zeigen, sind die Räder des Sportwagens nicht „gebremst“. Betätigen Sie bei jedem Halt die Bremse.
Achtung: Lassen Sie das Kind im Sportwagen auch mit getätigter Bremse niemals ohne Aufsicht.
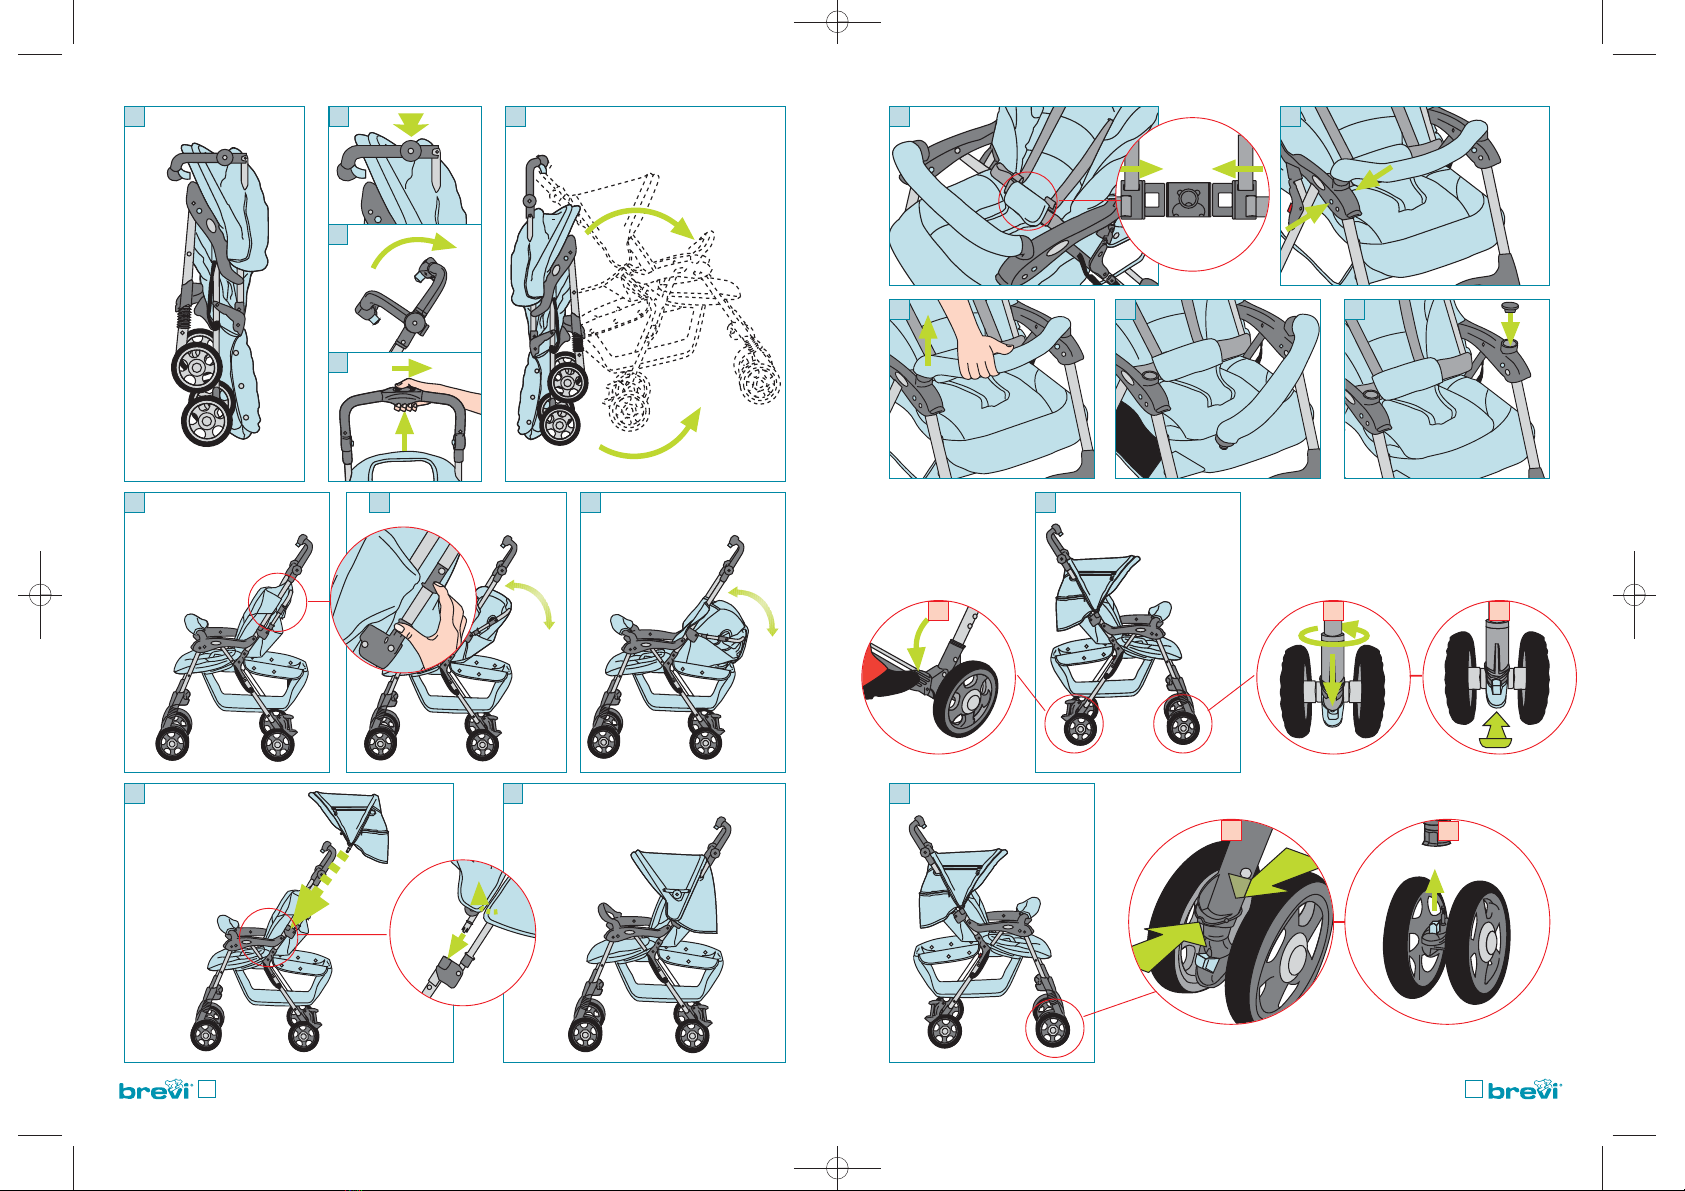
SCHWENKBARE VORDERRÄDER
Die Schwenkräder sollten nur auf glatten Böden benutzt werden. Um die Räder schwenkbar zu machen, zie-
hen Sie die Befestigungshebel zwischen den Doppelrädern nach unten (s. Abbildung 7b).
Wichtig: Auf unebenen Böden sollten die Räder festgestellt werden. Um die Räder festzustellen drücken Sie
die Befestigungshebel zwischen den Doppelrädern nach oben (s. Abbildung 7c).
Zur Reinigung der Vorderräder drücken Sie auf den am Radanschluss befindlichen Arretierungsring und zie-
hen Sie die Räder heraus (s. Abbildung 8a+8b).
ZUSAMMENKLAPPEN DES KINDERSPORTWAGENS
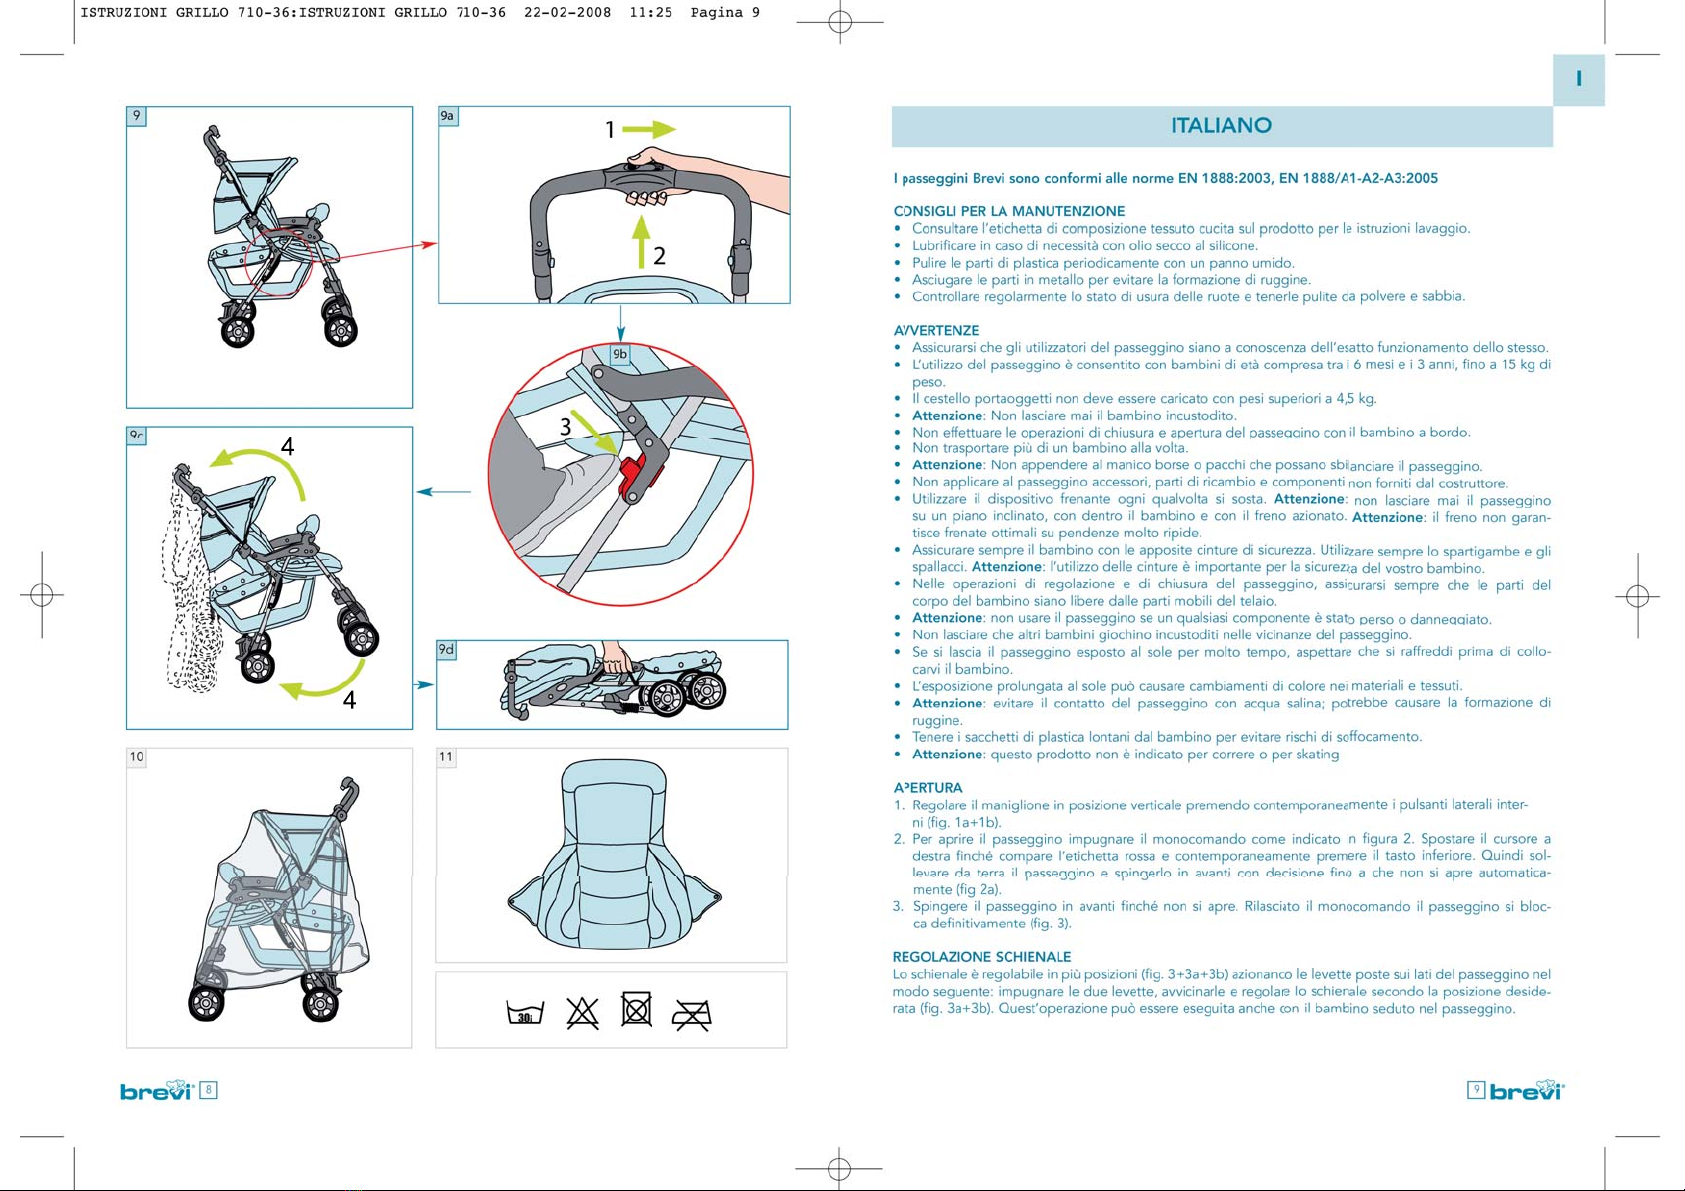
Um den Sportwagen zusammenzuklappen ergreifen Sie die Einhandbedienung auf dem Schieber und schie-
ben Sie die Schiebetaste nach rechts bis die rote Markierung ersichtlich wird und drücken Sie gleichzeitig die
Drucktaste (s. Abbildung 9). Um den Sportwagen zu schließen, ergreifen Sie den Frontbügel und ziehen Sie
in Richtung Schieber (s. Abbildung 9a). Den Schieber in die Ausgangsposition bringen indem Sie Schritt 1a
und 1b folgen. Der Kindersportwagen ist mit einem praktischen Tragegriff ausgestattet (s. Abbildung 9b)
REGENSCHUTZ (Zubehör separat erhältlich Art. Nr. 701)
Der Sportwagen kann mit einem praktischen und leichtem Regenschutz ausgestattet werden. Falten Sie den
Regenschutz auseinander und legen Sie ihn über das Verdeck (Fig. 10) und befestigen Sie ihn am Gestell des
Sportwagens mit Hilfe der Klettverschlüsse.
REINIGUNG
Der Bezug des Sportwagens ist vollständig abnehmbar: lösen Sie dafür die Druckknöpfe und die
Klettverschlüsse. Entfernen Sie den Bezug (s. Abbildung 11) und waschen Sie ihn von Hand mit milder Seife.
Beachten Sie die Pflegehinweise auf dem Etikett.
14 15
Conforme à la norme : NF EN 1888 (juillet 2003) NF EN 1888/A1-A2-A3 (décembre 2005)
CONSEILS D'ENTRETIEN
La poussette est entièrement déhoussable grâce aux boutons pression et au velcro.
Laver la housse de préférence à la main avec un savon neutre et à 30° maximum. Ne pas mettre en sèche linge.
Maintenir toutes les parties métalliques bien sèches afin d'éviter la formation de rouille.
Lubrifier régulièrement les parties mobiles avec une huile légère.
Nettoyer les parties plastiques avec une éponge humide. Contrôler régulièrement l'état d'usure des roues et nettoyer le
sable et la poussière.
Entreposer votre poussette dans un endroit sec afin d'éviter tous risques de moisissure.
Eviter une exposition directe et prolongée au soleil ce qui pourrait entraîner le changement de couleur des matériaux et
tissus.
PRECAUTIONS D’EMPLOI
S'assurer que les utilisateurs de la poussette ont une bonne connaissance de son fonctionnement.
Cette poussette est conçue pour transporter un enfant à la fois.
Attention ne pas placer de charge supérieure à 4.5 kg dans le panier, ce qui entraînerait un déséquilibre de la pous-
sette.
Ce véhicule est conçu pour des enfants de plus de 6 mois et jusqu'à 15 kg (environ 3 ans).
AVERTISSEMENT Il peut être dangereux de laisser votre enfant sans surveillance dans la poussette.
AVERTISSEMENT S'assurer que tous les dispositifs de verrouillage sont correctement enclenchés avant utilisation.
AVERTISSEMENT Ne pas utiliser ce siège pour des enfants de moins de 6 mois.
AVERTISSEMENT Le fait d'accrocher au guidon une charge influe sur la stabilité de la poussette.
AVERTISSEMENT Ne jamais utiliser l’entrejambe sans la ceinture de maintien.
AVERTISSEMENT Ne pas utiliser ce produit en faisant du jogging ou des promenades en rollers.
Attention l'utilisation d'accessoires qui ne sont pas approuvés par le constructeur pourrait rendre l'utilisation de la
poussette dangereuse. Ne pas utiliser la poussette si l'un de ses éléments est manquant ou cassé. Conserver les
sacs en plastique hors de portée de l’enfant afin d’éviter tout risque d’étouffement.
OUVERTURE DE LA POUSSETTE
1. Relever et régler le guidon en appuyant simultanément sur les boutons latéraux situés sur le guidon (fig.
1a+b) et en faisant pivoter le guidon à la position désirée.
2. Déplier la poussette en actionnant le dispositif centralisé situé au centre du guidon : Avec la paume de la
main faire glisser le curseur vers la droite jusqu'à l'apparition du cadenas sur fond rouge, maintenir le curseur
et sans le relâcher presser simultanément le bouton (fig.2).
3. Soulever légèrement la poussette à l'aide du guidon afin qu'elle se déplie, lâcher le dispositif centralisé,
faire une pression sur le guidon et la poussette se bloque automatiquement (fig. 2a).
REGLAGE DU DOSSIER
Le dossier est inclinable à l'aide des deux dispositifs latéraux situés sur l'armature arrière (fig. 3+3a+3b).
Pincer simultanément ces boutons entre le pouce et l'index afin de libérer le dossier dans la position souhaitée.
En position allongée ou intermédiaire, la position du dossier s'enclenche automatiquement lorsqu'on le
remonte vers le haut. Cette opération peut être effectuée avec l'enfant dans la poussette.
CAPOTE MULTIFONCTION
La poussette est équipée d'une capote multifonction (pluie-soleil) amovible (fig.4+4a).
HARNAIS DE SECURITE 5 POINTS
Ajuster le harnais de sécurité 5 points (fig.5) muni d'un entrejambe, à la taille de votre enfant en faisant adhé-
rer les bretelles aux épaules.
Attention: toujours attacher l'enfant dans la poussette même si l'arceau de protection est en place et véri-
fier que les ceintures sont toujours correctement fixées.
FRANÇAIS
FD
ISTRUZIONI GRILLO 710-36:ISTRUZIONI GRILLO 710-36 22-02-2008 11:25 Pagina 15

ARCEAU DE PROTECTION
Pour retirer l'arceau de protection, presser simultanément les deux boutons situés à l'intérieur et à l'extérieur
de l'accoudoir (fig.6+6a). Retirer l'arceau de protection, placer et enfoncer les deux bouchons situés dans la
petite poche latérale du filet (fig.6c) afin de boucher les orifices dans lesquels l'enfant pourrait se coincer les
doigts. Pour replacer l'arceau de protection, faire l'opération dans le sens inverse.
SYSTEME DE FREINAGE SUR ROUES ARRIERE
Pour actionner le système de freinage, appuyer au centre de la barre transversale située entre les roues arriè-
re (fig.7). Attention cette poussette est équipée d'un système de freinage centralisé qui bloque les 2 roues
arrière en même temps. Lorsque la barre transversale est en position haute, les roues sont débloquées.
Utiliser le dispositif de freinage à chaque arrêt, et ne jamais laisser l'enfant seul sans surveillance dans la pous-
sette même lorsque le frein est actionné.
ROUES AVANT PIVOTANTES
Utiliser les roues pivotantes sur les surfaces planes (fig.7). Pour débloquer en roues pivotantes, abaisser le
levier situé au centre de chaque bloc 2 roues. Pour bloquer en roues fixes remonter le levier.
Attention: La poussette est beaucoup plus maniable avec les roues pivotantes, toutefois, sur un terrain accidenté
il est fortement conseillé de bloquer les roues.
Pour nettoyer les roues pivotantes avant : Enlever les roues (fig.8a+fig.8b) en pressant les clips situés sur le
raccord entre le pouce et l'index afin de libérer le bloc 2 roues, pour le replacer faire opération dans le sens
inverse.
PLIAGE DE LA POUSSETTE
Actionner le dispositif centralisé situé au centre du Guidon. Avec la paume de la main faire glisser le curseur
vers la droite jusqu'à l'apparition du cadenas sur fond rouge, maintenir le curseur et sans le relâcher presser
simultanément le bouton (fig.9), prendre appui en plaçant votre pied au centre la barre transversale arrière
du dispositif de freinage, pousser le guidon légèrement vers l'avant, afin de mettre la poussette à la vertica-
le, puis appuyer sur le guidon afin de compacter la poussette qui se bloque automatiquement (fig.9a+9b).
HABILLAGE PLUIE (accessoire optionnel code 701)
Déplier l'habillage pluie intégral en pvc cristal, ouvrir la capote multifonction de la poussette et placer
l'habillage pluie en recouvrant complètement la poussette (fig.10). Fixer l'habillage sur les tubes latéraux
avant de la poussette à l'aide du velcro prévu à cet effet.
LAVAGE
La poussette est entièrement déhoussable grâce aux boutons pression et au velcro. Enlever la housse (fig.
11) et la laver à la main avec du savon neutre. Suivre les instructions figurant sur l'étiquette de lavage
16 17
En conformidad al EN 1888:2003, EN 1888/A1-A2-A3:2005.
CONSEJOS DE MANTENIMIENTO
• Para el lavado consultar la etiqueta de composición del tejido cosida sobre la tela.
• Lubricar en caso de necesidad con aceite seco a la silicona.
• Limpiar las partes plásticas periodicamente con un paño húmedo.
• Secar las partes de metal para evitar formaciones de óxido.
• Controlar regularmente el estado de uso de las ruedas y mantenerlas limpias de polvo y arena.
ADVERTENCIAS
• Asegurarse que los usuarios de la silla de paseo conozcan el funcionamiento de la misma.
• La utilización de la silla de paseo está permitida con niños de edad comprendida entre los 6 meses
y los tres años de edad, hasta 15 kg de peso.
• La cesta porta-objetos no debe ser cargada con pesos superiores a 4,5 kg.
• ADVERTENCIA: No dejar nunca al niño sin vigilancia.
• No efectuar la operación de plegado y apertura de la silla de paseo con el niño a bordo.
• No transportar mas de un niño a la vez.
• ADVERTENCIA: No colgar del manillar bolsas y paquetes que puedan balancear la silla de paseo.
• No aplicar a la silla de paseo accesorios, partes de recambio y componentes no provistos por el
fabricante.
• Utilizar el dispositivo de freno cada vez que se suelta. Atención: no dejar nunca la silla sobre un
plano inclinado, con el niño dentro y con el freno accionado. Atención: el freno no garantiza una
frenada óptima sobre pendientes pronunciadas.
• Asegurar siempre al niño con el cinturón de seguridad. Utilizar siempre la cinta entrepierna y el
arnés. Atención: La utilización de los cinturones es importante para la seguridad del niño.
• En las operaciones de regulación y de plegado de la silla de paseo, asegurarse siempre que estén
libres las partes móviles de la estructura.
• Atención: no usar la silla de paseo si cualquiera de sus componentes está roto o dañado.
• No dejar que otros niños jueguen sin vigilancia alrededor de la silla de paseo.
• Si la silla de paseo ha estado expuesta al sol durante mucho tiempo, esperar a que se enfríe antes de
meter al niño dentro.
• La exposición prolongada al sol puede causar cambios de color en los materiales y tejidos.
• Atención: evitar el contacto de la silla de paseo con agua salina; puede causar formaciones de
óxido.
• Guardar las bolsas de plástico lejos del niño para evitar riesgos de asfixia.
• Atención: Los productos no son aconsejados para correr o "Skating"
APERTURA
1. Regular el manillar en la posición deseada presionando al mismo tiempo los pulsadores laterales
(fig. 1a+b).
2. Para abrir la silla de paseo apretar el monocomando como indica la figura 2. Soltar el cursor de la
derecha hasta que se vea el rojo y al mismo tiempo presionar la tecla.
3. Abrir la silla empujando el posamanos hacia delante hasta el final (fig. 2a). Soltando el monocomando la
silla se bloquea automáticamente (fig. 3).
REGULACION DEL RESPALDO
El respaldo es regulable en mas posiciones mediante las teclas situadas detrás (fig. 3+3a+3b). Para elevarlo
se engancha automáticamente empujando hacia arriba. Esta operación puede hacerse con el niño dentro.
PARASOL
La silla de paseo está dotada de un parasol orientable (fig. 4+4a).
ESPAÑOL
EF
ISTRUZIONI GRILLO 710-36:ISTRUZIONI GRILLO 710-36 22-02-2008 11:25 Pagina 17

CINTURON DE SEGURIDAD
La silla de paseo está dotada de cinturón de seguridad en 5 puntos (fig. 5). Regular el arnés ajustándolo a
los hombros del niño. Ajustar siempre el cinturón de seguridad y utilizar siempre la cinta entrepierna.
Atención: asegurarse que el cinturón esté siempre ajustado correctamente.
POSAMANOS
El posamanos es extraible presionando al mismo tiempo las teclas situadas bajo los brazos (fig. 6). Quitar el
posamanos (fig. 6a+6b), insertar las dos tapas a presión situadas en el interior de la cesta (fig. 6c). Para poner
el posamanos basta con hacer la operación a la inversa.
RUEDAS POSTERIORES CON FRENOS
Para frenar la silla de paseo, apretar hacia abajo la leva puesta sobre las ruedas posteriores (fig. 7a).
Atención: los frenos son centralizados y se bloquean al mismo tiempo. Con la leva en posición alta las rue-
das no están bloqueadas. Utilizar siempre el freno cuando se suelta.
Atención: no dejar nunca al niño sin vigilancia, ni cuando el freno esté accionado.
RUEDAS GIRATORIAS ANTERIORES
Usar las ruedas giratorias sobre superficies lisas (fig. 7b). Para dejar las ruedas libres, bajar la leva puesta entre
ambas ruedas . Usar las ruedas fijas sobre superficies variables. Alzar la leva para bloquear las ruedas (fig. 7c).
Atención: las ruedas giratorias permiten un mejor manejo de la silla de paseo; sobre terrenos variables es
aconsejable utilizar las ruedas fijas.
Para la limpieza de las ruedas anteriores, acercar las dos levas situadas sobre el empalme de la rueda (fig.
8a+fig. 8b).
PLEGADO
Para plegar la silla de paseo empujar la tecla roja de la derecha " segundo bloqueo de seguridad " (fig. 9a),
Entonces empujar el cursor de la derecha hasta que se vea el rojo, presionar al mismo tiempo los pulsado-
res (fig.9b). Por ùltimo coger el posamanos y tirar hacia sí compactando la silla de paseo (fig. 9c).
CAPOTA IMPERMEABLE (accesorio cod. 701)
Está disponible como accesorio una práctica y ligera capota impermeable. Abrir la capota y aplicarla cubrien-
do toda la silla de paseo (fig. 10). Fijar la capota a los tubos anteriores y laterales de la silla de paseo con los
velcros.
LAVADO
La silla de paseo es completamente desvestible mediante broches automáticos y velcros. Quitar la funda (fig.
11) y lavar a mano con jabón neutro. Seguir las indicaciones de la etiqueta de lavado.
18 19
Em conformidade com o EN 1888:2003, EN 1888/A1-A2-A3:2005.
CONSELHOS PARA A MANUTENÇÃO
• Para lavagem de qualquer componente de tecido, consulte a etiqueta de composição têxtil cosida no
produto.
• Em caso de necessidade lubrifique com óleo de silicone.
• Limpar periodicamente as partes plásticas com um pano húmido.
• Secar sempre as partes metálicas para evitar a formação de ferrugem.
• Verificar periodicamente o estado das rodas e certifique-se de que as mesmas estão livres de poeiras
e areia.
SEGURANÇA
• Certifique-se que todas as pessoas que utilizem a cadeira de rua sabem como utiliza-la.
• O uso desta cadeira de rua é aconselhado para bebés de 6 meses a 3 anos, ou até 15 kg de peso.
• Não sobrecarregue o cesto. Máximo peso aconselhado: 4,5 kg.
• Advertência: Nunca deixe o seu bebé sem vigilância.
• Não abra nem feche a cadeira de rua com o bebé a bordo.
• Nunca transporte mais de um bebé ao mesmo tempo.
• Advertência: Não pendure no manípulo sacos ou outros objectos que possam aumentar o risco de virar
a cadeira.
• Não use acessórios, peças de substituição ou componentes que não sejam fornecidos pelo fabricante.
• Accione os travões sempre que a cadeira se encontre parada. Atenção: Nunca deixe a cadeira de
rua numa superfície inclinada com o bebé a bordo mesmo que os travões estejam accionados.
Cuidado: os travões podem não funcionar em pleno em rampas muito acentuadas.
• Certifique-se de que o bebé usa sempre os cintos de segurança devidamente ajustados e apertados.
• Certifique-se que o bebé não corre riscos antes de fazer ajustamentos na cadeira de rua.
• Atenção: Não use a cadeira de rua se se perdeu ou estragou algum componente.
• Não deixe que o bebé brinque ou se pendure na cadeira de rua.
• Após prolongada exposição directa ao sol, aguarde que a cadeira de rua arrefeça antes de lá colocar o
bebé.
• Evitar a exposição á agua salgada; poderá causar a formação de ferrugem.
• Uma prolongada exposição ao sol poderá causar descoloração no tecido e partes têxteis.
• Mantenha os sacos plásticos longe do bebé para evitar o perigo de sufocamento.
• Aviso: este produto não é adequado para ser usado enquanto pratica corrida ou patinagem
ABERTURA
1. Colocar o manípulo na posição vertical pressionando ao mesmo tempo os botões laterais interiores (fig.
1a+1b).
2. Para abrir a cadeia de rua, agarre firmemente o mecanismo no centro do manípulo como ilustra-
do, movendo o botão superior para o lado direito até aparecer a marca vermelha e ao mesmo tempo
pressione o botão inferior (fig. 2).
3. Empurrar o pousa braço frontal (fig. 2a) até a cadeira de rua estar completamente aberta. Largando o
mecanismo a cadeira de rua bloqueia definitivamente (fig. 3).
RECLINAR O ENCOSTO
O encosto pode ser reclinado em diferentes posições com os botões localizados no encosto (fig. 3+3a+3b).
Para levantar basta empurrar o encosto para cima que bloqueará automaticamente. O encosto poderá tam-
bém se reclinado com o bebé sentado.
CAPOTA DE SOL
A cadeira de rua está equipada com capota de sol removível (fig. 4+4a).
PORTUGUESE
PE
ISTRUZIONI GRILLO 710-36:ISTRUZIONI GRILLO 710-36 22-02-2008 11:25 Pagina 19

CINTOS DE SEGURANÇA
A cadeira de rua é fornecida com cintos de segurança de 5 pontos com dispositivo de fecho central (fig. 5).
Ajuste os cintos dos ombros com o tamanho do bebé. Use sempre os cintos fornecidos. Atenção: certifique-
se de que os cintos de segurança estão correctamente ajustados.
POUSA BRAÇO
O pousa braço pode ser removido pressionando simultaneamente os botões localizados nos braços da
cadeira de rua (fig. 6+6a+6b). Tape os referidos buracos com dois tampões de pressão que se encontram na
cesta (fig. 6c). Para repor o pousa braço proceda á operação inversa.
RODAS DETRÁS COM TRAVÃO
Para accionar o travão da cadeira de rua pressione a alavanca do travão situada junto das rodas detrás (fig.
7a). Atenção: Os travões detrás estão ligados e bloqueiam-se simultaneamente. Quando a alavanca do tra-
vão está na posição alta as rodas não estão bloqueadas. Accione os travões sempre que a cadeira se encon-
tre parada. Atenção: Nunca deixe o seu bebé sozinho na cadeira de rua, mesmo que os travões estejam
accionados.
RODA DA FRENTE GIRATÓRIA
A cadeira de rua está equipada com rodas giratórias na frente: para colocar as rodas da frente giratórias,
baixe o fecho situado entre as duas rodas da frente (fig. 7b). Para bloquear as rodas giratórias da frente,
levante simplesmente o fecho (fig. 7c).
Atenção: As rodas giratórias permitem uma melhor manobrabilidade use as rodas bloqueadas em terrenos
irregulares. Para limpar as rodas da frente, pressione as duas alavancas situadas na junção de cada roda e
puxe (fig. 8a+fig. 8b).
FECHO
Para fechar a cadeira de rua desbloqueie o mecanismo lateral levantando a alavanca (fig. 9a), de seguida
agarre firmemente o mecanismo no centro do manípulo, movendo o botão superior para o lado direito até
aparecer a marca vermelha e ao mesmo tempo pressione o botão inferior (fig. 9b). Finalmente puxe o pousa
braço até ao manípulo e feche a cadeira de rua (fig. 9c).
CAPOTA DE CHUVA (Disponível separadamente acessório cod. 701)
Para adaptar a cadeira de rua com a capota de chuva disponível separadamente, abra-a e coloque-a sobre
a capota de sol, cobrindo toda a cadeira de rua (fig. 10). Prenda a capota de chuva ás pernas da frente e aos
lados da cadeira de rua usando as cintas de velcro.
LIMPEZA
A cobertura têxtil da cadeira de rua pode ser removida para limpeza desapertando as molas de pressão e
velcro. Retire a cobertura têxtil (fig. 11) e lave á mão com sabão neutro. Seguir as indicações que se encon-
tram na etiqueta de lavagem.
Fabricado na China.
20 21
Zgodny z EN 1888:2003, EN 1888/A1-A2-A3:2005
UTRZYMANIE I KONSERWACJA
• Aby wyczyścić którąkolwiek ze zdejmowanych czesci zawsze odwolaj siędo instrukcji czyszczenia znaj-
dującej sięna metce.
• Jeeli jest taka potrzeba smarowac smarem na bazie sylikonu
• Okresowo przetrzec plastikowe czesci miekka i wilgotna szmatka
• Zawsze osuszac metalowe czesci wozka aby zapobiec korozji
• Okresowo sprawdzaj stan kolek wozka i upewnij sięze nie ma na nich kurzu i piasku.
BEZPIECZENSTWO
• Upewnij sięze wszystkie osoby które operuja wozkiem wiedza jak go uywać
• Uzytkowanie tego wozka jest przeznaczone dla dzieci od 6 miesiaca do 3 roku zycia, do 15 kg
• Nie przeciazac kosza. Maksymalna dopuszczalna ladownosc to 4,5 kg
• Ostrzezenie: Nigdy nie pozostawiaj dziecka bez opieki
• Nie otwierac i zamykac wozka z dzieckiem w srodku
• Nigdy nie przewoz w wozku wiecej nijednego dziecka
• Ostrzezenie: nie wieszac na raczce toreb lub innych przedmiotow gdyz istnieje ryzyko przewrocenia
wozka
• Czesci zamiennych lub innych komponentow nie zapewnionych przez producenta.
• Zawsze uzywaj hamulcow kiedy wozek nie jest w ruchu. Uwaga: nigdy nie pozostawiaj wozka na pochylej
powierzchni w dzieckiem w wozku nawet jeśli uruchomiłeśhamulec. Uwaga: hamulce mogąnie działać
poprawnie na bardzo stromych zboczach.
• Upewnij sięze Twoje dziecko ma zalozone poprawnie szelki bezpieczeństwa przez caly czas.
• Upewnij sięze dzieci sa z dala od ruchomych czesci wozka podczas jego regulacji.
• Uwaga: Nie uzywaj wozka jeeli adna z czesci jest zgubiona lub uszkodzona.
• Nie dopuszczaj aby dzieci bawily sięwozkiem lub na nim wieszaly.
• Po wydłuonym wystawieniu wozka na słońce, poczekaj az wozek ostygnie zanim ułoysz w nim dziecko.
• Unikaj kontaktu wozka ze slona woda; moe to powodowac korozje.
• Dlugie wystawienie wozka na promienie słoneczne moe powodowac blekniecie kolorow metrialu i czesci
tekstylnych.
• Utrzymuj jakiekolwiek plastikowe opakowania z dala od dzieci aby zapobiec zagrozeniu uduszenia.
• Ostrzezenie: produkt nie jest odpowiedni do uzytkowania podczas biegania lub jazdy na rolkach
OTWIERANIE
1. Uloz raczke w pionowej pozycji poprzez nacisniecie w tym samym momencie wewnetrznych przyciskow
(rys. 1a+1b).
2. Aby otworzyc wozek chwyc mechanizm zwalniający znajdujący sięna srodku raczki, tak jak jest to wska-
zane na rysunku 2, rusz przesuwana blokade w prawo do momentu jak pojawi sięczerwona etykieta, wtedy
take naciśnij przycisk znajdujący sięz przodu raczki.
3. Pchnij plastikowa obrecz do przodu az do momentu w którym wozek nie będzie kompletnie otwarty.
Uwalniajac mechanizm uwalniający wozek z sięzablokuje w otwartej pozycji (rys. 3)
USTAWIENIE OPARCIA
Oparcie moze byc ustawione w roznych pozycjach za pomoca przycisku znajdującego sięna tyle oparcia (rys.
3+3a+3b). Aby podnieść oparcie po prostu popchnij je ku gorze a ono samoczynnie sięzablokuje. Oparcie
moe być ustawiane z dzieckiem w srodku.
DASZEK PRZECIWSŁONECZNY
Wozek jest wyposazony w zdejmowany daszek przeciwsloneczny (rys.4+4a)
POLSKI
PLP
ISTRUZIONI GRILLO 710-36:ISTRUZIONI GRILLO 710-36 22-02-2008 11:25 Pagina 21

Русский язык
Соответствует стандартам EN 1888:2003, EN 1888/A1-A2-A3:2005
Основные рекомендации по уходу за коляской
•Для стирки чехлов следуйте инструкциям на этикетке
•При необходимости можно смазать механические части коляски силиконовым маслом
•Периодически необходимо протирать пластиковые части коляски влажной тряпкой.
•Вытирайте металлические части коляски для предохранения их от ржавчины
•Колеса коляски всегда должны быть чистыми, предотвращайте попадание грязи и песка
Правила безопасности
•Убедитесь, что каждый, кто собирается возить в коляске ребенка, знает, как ей пользоваться.
•Коляска предназначена для детей в возрасте от 6-ти месяцев до 3-х лет, весом не более 15 кг.
•Не перегружайте коляску. Максимально разрешенный дополнительный вес – 4,5 кг.
•ПРЕДУПРЕЖДЕНИЕ: Никогда не оставляйте ребенка в коляске без присмотра.
•Нельзя раскладывать или складывать коляску, когда в ней находится ребенок.
•Не сажайте в коляску более одного ребенка.
•Не вешайте на ручки коляски тяжелые сумки, так как коляска может перевернуться.
•Не используйте аксессуары для коляски, компоненты или запасные части, не рекомендованные
производителем
•Всегда используйте тормоза, где бы Вы не останавливались. ПРЕДУПРЕЖДЕНИЕ: Никогда не
оставляйте ребенка в коляске со снятым рычагом тормоза. ПРЕДУПРЕЖДЕНИЕ: Тормоз не
гарантирует безопасность на крутой наклонной поверхности.
•Убедитесь, что ремни безопасности, которыми пристегнут ребенок, правильно отрегулированы и
застегнуты.
•Раскладывая или складывая коляску, следите, чтобы не прищемить ребенка подвижными частями
рамы.
•ПРЕДУПРЕЖДЕНИЕ: Нельзя пользоваться коляской, если какая-либо из ее частей сломана
или потеряна.
•Не позволяйте ребенку играть рядом с коляской.
•Коляска может нагреться, если ее держать долгое время на солнце, поэтому необходимо охладить
ее, прежде чем сажать в нее ребенка.
•При длительном нахождении коляски на солнце цвет ткани может поблекнуть.
•Беречь от попадание соленой воды на коляску, во избежание образования ржавчины.
•Держите пластиковые детали вне досягаемости ребенка, чтобы он не смог взять их в рот.
•ПРЕДУПРЕЖДЕНИЕ: Когда везете ребенка в коляске, не бегайте и не пользуйтесь
роликовыми коньками.
Как разложить коляску
1. Приведите ручку коляски в вертикальное положение, нажимая одновременно на обе внутренние
кнопки (рис. 1а – 1b).
2. Чтобы полностью открыть коляску, возьмитесь за раскладной механизм в центре ручки, как
показано на рис.2, сдвиньте скользящую задвижку вправо, пока не покажется красная отметина,
и одновременно нажмите кнопку.
3. Раскрывайте коляску, взявшись за поручень и двигая его вперед, пока коляска не разложится
полностью. Отпустите раскладной механизм, и коляска зафиксируется окончательно (рис.3).
Регулировка спинки
Спинка может фиксироваться в нескольких положениях с помощью рычага, расположенного сзади
(рис.3 – 3b). Чтобы привести спинку в вертикальное положение, просто поднимите ее вверх, и она
автоматически зафиксируется. Положение спинки можно менять, даже когда ребенок находится в
коляске.
22 23
SZELKI BEZPIECZENSTWA
Wozek jest wyposazony w 5 punktowe pasy bezpieczenstwa z centralna klamra blokujaca (rys. 5). Dopasuj
paski ramienne do wysokości dziecka. Zawsze uzywaj szelek bezpieczeństwa. Uwaga: upewnij sięze szelki
bezpieczeństwa sa zawsze poprawnie dopasowane.
BARIERKA
Barierka moze byc usunieta ez jednoczesne przycisniecie dwoch guzikow umieszonych na oparciach wozeczka
(rys. 6a+b). Zamknij otwory pozostale po berierce zatyczkami umieszczonymi w koszu (rys. 6c). Aby ponownie
umieścić barierke wyciągnij zatyczki i wloz w te miejsca barierke.
TYLNE KOŁA Z HAMULCAMI
Aby uzyc hamulca przycisnij drazek hamulca przy tylnych kolach ku dolowi (rys 7a) Uwaga: tylne hamulce sa
polaczone w związku z czym blokuja sięjednoczesnie. Kiedy drazek hamulca jest w gornym ustawieniu
oznacza to ze kola nie sa zablokowane. Zawsze uzywaj hamulca jeeli wozek stoi w miejscu.
Uwaga: nigdy nie pozostawiaj dziecka bez opieki w wozku nawet jeeli jest uruchomiony hamulec.
PRZEDNIE OBRACANE KOŁA
wózek jest wyposaony w mechanizm obrotowy (rys 7b); aby ustawic przednie kola tak aby mogly sięswo-
bodnie obracac naley obnizyc mechanizm blokujacy znajdujaca siępomiedzy przedimi kolami; aby ustawic
przednie kola w pozycji stalej naley uwolnic blokade znajdujaca siępomiedzy przedimi kolami rys(7c)
Uwaga: obrotowe kola umoliwiająlepsza manewrowość; uzywaj blokady na nierownym terenie. Aby wyc-
zyścić przednie kola , naciśnij dwie dzwignie umieszczone na skrzyowaniu kol i pociągnij (rys. 8a + 8b).
SKŁADANIE
Aby zlozyc wozek chwyc mechanism uwalniajacy znajdujacy sie na srodku raczki, przesun przycisk do
momentu az pojawi sie czerwona etykieta nastepnie naciskajac przycisk znajdujacy sie z przodu raczki (rys. 9).
Na koncu popchnij barierke do przodu w strone raczki i zamknij wozek (rys.9a). Zamknij raczke tak jak jest to
pokazane na rys. 1a i 1b. Wozek jest wyposaony w praktyczna raczke do przenoszenia (rys. 9b)
OKRYCIE PRZECIWDESZCZOWE (dostepne oddzielnie kod. 701)
Aby zalozyc folie przecideszczowa, otworz wozek, rozłófolie i umiesc ja ponad daszkiem przecislonecznym,
pokrywając caly wozek (rys. 10). Przymocuj folie do bokow przednich nozek uywając zapiec.
CZYSCZENIE
Materiał wozka moze byc sciagana do czyszczenia poprzez odpiecie zapiec. Zdejmij tapicerke (rys.11) i
wypierz w reku w letniej wodzie z mydlinami. Stosuj siędo zalecen znajdujących sięna metce przy materiale
RUSPL
ISTRUZIONI GRILLO 710-36:ISTRUZIONI GRILLO 710-36 22-02-2008 11:25 Pagina 23
This manual suits for next models
1
Table of contents
Other Brevi Stroller manuals

Brevi
Brevi MilleStrade 759 User manual

Brevi
Brevi InDue User manual

Brevi
Brevi Wally 700 User manual

Brevi
Brevi Presto 773 User manual

Brevi
Brevi OVO TWIN User manual

Brevi
Brevi Presto User manual

Brevi
Brevi B.Flexy Twin User manual

Brevi
Brevi Avenue 748 User manual

Brevi
Brevi Presto 769 User manual

Brevi
Brevi FLEXY TWIN 779 User manual

Brevi
Brevi Scatto 717 User manual

Brevi
Brevi OVO User manual

Brevi
Brevi Avenue 748 User manual

Brevi
Brevi B.FLEXY User manual

Brevi
Brevi Eolo User manual

Brevi
Brevi Marathon 765 User manual

Brevi
Brevi Grillo 2.0 User manual

Brevi
Brevi Presto 770 User manual

Brevi
Brevi Molla 787 User manual

Brevi
Brevi Marathon User manual