Installation Instructions
2
Tools You Will Need
For easHRI installation you will need:
ƔTo read the installation LQVWUXFWLRQVcompletely before
beginning.
ƔTo read all warnings, care, and maintenance information.
Flat Head ScrewdriverPencil Drill PhilOips Screwdriver Level
Ɣ2QO\XVHDVRIWGDPSHQHGVSRQJHRUFORWKWRFOHDQDQGSROLVKWKHIL[WXUH
Ɣ:LSHIL[WXUHVDQGWKHLPPHGLDWHDUHDVFOHDQDQGULQVHFRPSOHWHO\ZLWKZDWHULPPHGLDWHO\DIWHULQVWDOODWLRQDQGDIWHU
applying any cleaner.
Ɣ,I\RXDUHXVLQJDFOHDQLQJFRPSRXQGRQRUFORVHWRWKHSURGXFWSOHDVHWHVWWKHFRPSRXQGRQDKLGGHQDUHDRIWKH
trim to ensure it will not damage the finish.
Ɣ'RQRWDOORZFOHDQHUVWRVRDNDQ\ZKHUHRQWKHSURGXFW
Cleaning Instructions
1
17-65-PC,SN,PN,BZ
17-66-PC,SN,PN,BZ
17-67-PC,SN,PN,BZ
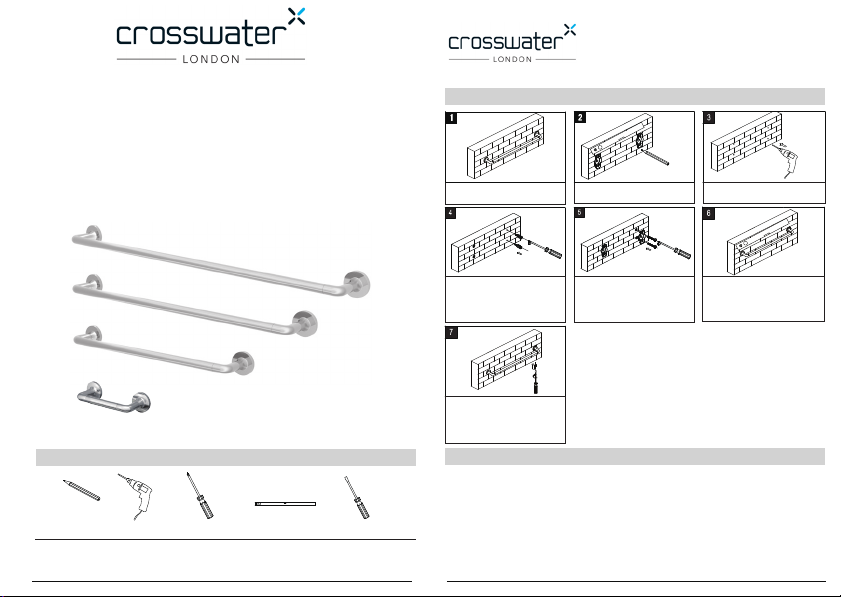
Determine the location of the towel
bar.
$OLJQEUDFNHWVDQGPDUNGULOOKROHV
in desired location. 'ULOOKROHVLQPDUNHGORFDWLRQV
Drive the wall anchors into the drilled
holes with a Phillips screwdriver.
3ODFHWKHPRXQWLQJEUDFNHWVRYHU
the wall anchors. Secure them to
the wall using the supplied screws.
Temporarily place the towel bar on
WKHPRXQWLQJEUDFNHWVWRFKHFN
DOLJQPHQW,IQHFHVVDUy, loosen the
screws and realign the mounting
EUDFNHWV
Place towel bar assembly on the
PRXQWLQJEUDFNHWV6HFXUHLWWRWKH
wall using the bottom set screws.
%HIRUHEHJLQQLQJLQVWDOODWLRQFKHFNIRUGDPDJHWKDW
PD\KDYHRFFXUUHGGXULQJWUDQVSRUW
1RWH'DPDJHFODLPVFDQQRWEHPDGHGXULQJRU
DIWHULQVWDOODWLRQ
7DRV7",DQG7RZHO%DUV
17-59,
,QVWDOODWLRQ,QVWUXFWLRQV
Installation Instructions
2
Series # 17
18", 24" & 30" Towel Bar
Tools You Will Need
17-65-PC,SN,PN,BZ
17-66-PC,SN,PN,BZ
17-67-PC,SN,PN,BZ
Installation Instructions
For easy installation of your towel bar you will need:
ƔTo read all the installation completely before beginning.
ƔTo read all warnings, care, and maintenance information.
Flat Head ScrewdriverPencil Drill Philips Screwdriver Level
5LQVHDZD\DQ\WUDFHVRIVRDSDQGJHQWO\GU\ZLWKDFOHDQVRIWFORWKDIWHUHDFKXVH5LQVHFRPSOHWHO\ZLWKZDWHUDQGGU\
DQ\RYHUVSUD\7KLVZLOOPDLQWDLQWKHILQLVKDQGDYRLGZDWHUVSRWWLQJ
7RUHPRYHPLQHUDOGHSRVLWVXVHDVROXWLRQRIZKLWHYLQHJDUDQGZDWHU'RQRWDOORZWKHVROXWLRQWRVRDNRQWKH
SURGXFW
6LPLFKURPH3ROLVKFRQWDLQVDSURWHFWLYHILOPWRHQKDQFHPDLQWHQDQFHDQGLVKHOSIXOLQSUHYHQWLQJZDWHUVSRWEXLOGXS
)ROORZLQVWUXFWLRQVWRHQVXUHRSWLPXPUHVXOWV
1HYHUXVHDQDEUDVLYHPDWHULDOVXFKDVDEUXVKRUVFRXULQJSDGWRFOHDQWKHVXUIDFH7KHXVHRIDEUDVLYHFOHDQHUV
FOHDQVHUVRUGLVLQIHFWDQWVZLOODOWHUWKHVXUIDFHILQLVKDQGYRLGWKHZDUUDQW\
'RQRWDOORZFHUWDLQPDWHULDOVVXFKDVWRRWKSDVWHFRORJQHVKDYLQJFUHDPQDLOSROLVKUHPRYHUYLQHJDUZLQHGUDLQDQG
JODVVFOHDQHUVWRUHPDLQRQWKHVXUIDFH3URORQJHGFRQWDFWZLOODOWHUVXUIDFHILQLVKHVDQGYRLGWKHZDUUDQW\
:H'2127UHFRPPHQGXVLQJDQ\KRXVHKROGFOHDQHUVDVPDQ\FDQFDXVHGDPDJHWRWKHILQLVK
3OHDVHVHHWKHZHEVLWHIRUFDUHLQVWUXFWLRQVIRUVSHFLILFILQLVKHV
Cleaning Instructions
17-59
17-65
17-66
17-67
Determine the location of the towel
bar.
$OLJQEUDFNHWVDQGPDUNGULOOKROHV
in desired location. 'ULOOKROHVLQPDUNHGORFDWLRQV
Drive the wall anchors into the drilled
holes with a Phillips screwdriver.
3ODFHWKHPRXQWLQJEUDFNHWVRYHU
the wall anchors. Secure them to
the wall using the supplied screws.
Temporarily place the towel bar on
WKHPRXQWLQJEUDFNHWVWRFKHFN
DOLJQPHQW,IQHFHVVDUy, loosen the
screws and realign the mounting
EUDFNHWV
Place towel bar assembly on the
PRXQWLQJEUDFNHWV6HFXUHLWWRWKH
wall using the bottom set screws.


