manuals.online logo
Brands
  1. Home
  2. •
  3. Brands
  4. •
  5. Elo TouchSystems
  6. •
  7. Touchscreen
  8. •
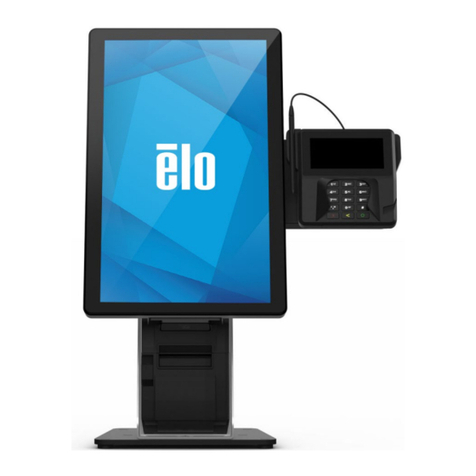
  9. Elo TouchSystems SELF SERVICE STAND User manual

Elo TouchSystems SELF SERVICE STAND User manual

© Copyright 2019 Elo Touch Solutions, Inc. 1
E796783 ELO-STAND-SELF-SERVICE-15-22-COUNTERTOP
ASSEMBLY INSTRUCTIONS, ELO SELF SERVICE STAND
© Copyright 2019 Elo Touch Solutions, Inc. 2
Contents for Kit: E796783, ELO-STAND-SELF-SERVICE-15-22-COUNTERTOP
Tie-wrap
Qty. 2
Screws
Bag AQty.10 SCREW, M4X8, PAN-HEAD, CROSS-
RECESS
Bag BQty.4 SCREW, M4X8, FLAT-HEAD,
CROSS-RECESS
Bag CQty.3 SCREW, M3X8, PAN-HEAD,
CROSS-RECESS,
Bag DQty.4 SCREW, 3mm X8L,
THREAD-FORMING, PAN-HEAD
Bag IQty.4 SCREW, M4X8, PAN-HEAD,
CROSS-RECESS
Bag LQty.4 SCREW, M4X6, PAN-HEAD,
CROSS-RECESS
Bag SQty.2 SCREW, M4X5, PAN-HEAD,
CROSS-RECESS
Bag TQty.2 SCREW, M3X10, PAN-HEAD,
CROSS-RECESS
Head Assembly
Qty. 1
Countertop Base
Qty. 1
Display Bracket, Windows
Qty. 1
Display Bracket, Android
Qty. 1
USB Hub
Qty. 1
Cable Cover, Windows
Qty. 1
Panel Hardware
Qty.2 SCREW, M6X14, PAN-HEAD, CROSS-
RECESS
Qty.2 BACKER BOARD SPACER
Qty.2 THUMB SCREW
© Copyright 2019 Elo Touch Solutions, Inc. 3
Remove and save (2) screws on
rear of Head, pull out printer tray.
Add (2) screws from bag “A”;
leave ~3mm (1/8”) gap for Head.
Gap
Align slots on bottom rear of Head with (2) screws on base and
slide on stand. Add (4) screws from bag “B”. Tighten (2) previous
screws at rear.
12
3
© Copyright 2019 Elo Touch Solutions, Inc. 4
Remove and save (2) screws,
open cover of Display Bracket;
pivot out and fix prop.
Gap
45
Add (2) screws from bag “A”; leave
~3mm (1/8”) gap (for Display Bracket).
Choose Android or Windows Display Bracket
© Copyright 2019 Elo Touch Solutions, Inc. 5
Assemble Display Bracket onto Head.
Position “A” for 15”, 22” in landscape.
Position “B” for 15” in portrait
Position “C” for 22” in portrait
Add (2) screws from bag “A” at bottom holes.
6
A
B
C
Assemble USB Hub.
Add (2) screws from bag “S”; leave ~3mm (1/8”)
gap for USB bracket to slide on; tighten screws.
For Android, continue to step 8
For Windows, continue to step 12
7
If using an EMV Cradle, follow those
instructions before moving on.
© Copyright 2019 Elo Touch Solutions, Inc. 6
8
Top Landscape
Cable
direction
Add (2) screws from bag “L” to top VESA
positions. Leave ~3mm (1/8”) gap for mounting
to display bracket.
Remove cable cover(s) before mounting displays
on stand.
Add tie-wrap
Mount I-Series, add (2) screws from bag “L”
to bottom VESA positions.
Route power, LAN cables through bottom
of stand head. Route USB Hub cable or
other USB if used.
Android Landscape
(For Portrait, go to step 10) 9
Continue to step 18
© Copyright 2019 Elo Touch Solutions, Inc. 7
10
Top Portrait
Cable
direction
Add tie-wrap
Add (2) screws from bag “L” to top VESA
positions. Leave ~3mm (1/8”) gap for mounting
to display bracket.
Remove cable cover(s) before mounting displays
on stand.
Mount I-Series, add (2) screws from bag “L”
to bottom VESA positions.
Route power, LAN cables through bottom
of stand head. Route USB Hub cable or
other USB if used.
Android Portrait 11
Continue to step 18
© Copyright 2019 Elo Touch Solutions, Inc. 8
12
Top Landscape
Cable
direction
Add tie-wrap
A
B
Add (2) screws from bag “T” at positions labeled
“B”. Leave ~3mm (1/8”) gap for later mounting of
Cable Bracket.
Remove original plastic cable cover.
Add (2) screws from bag “L” to top VESA positions (“A” label
below). Leave ~3mm (1/8”) gap for mounting to Display Bracket.
Mount I-Series, add (2) screws from bag “L” to bottom VESA positions.
Route power, LAN cables through bottom of stand head to I-Series.
Route USB Hub cable or other USB, if used. To I-Series.
Windows Landscape
(For Portrait, go to step 15) 13
© Copyright 2019 Elo Touch Solutions, Inc. 9
Continue to step 18
14
Attach metal Cable Cover and tighten (2) screws.
© Copyright 2019 Elo Touch Solutions, Inc. 10
15
Top Portrait
Cable
direction
B
Add (2) screws from bag “T” at positions labeled “B”.
Leave ~3mm (1/8”) gap for later mounting of Cable
Bracket.
Remove original plastic cable cover.
Add (2) screws from bag “L” at positions shown on VESA
mount (“A” label below). Leave ~3mm (1/8”) gap for mounting
to Display Bracket.
A
Before attaching I-Series, route power, LAN cables through
bottom of stand head and through Display Bracket. Route
USB Hub cable or other USB if used.
16
Windows Portrait
© Copyright 2019 Elo Touch Solutions, Inc. 11
17a
Continue to step 18
Close Display Bracket and attach cables
to I-Series. Attach metal Cable Cover
and tighten (2) screws.
Open Display Bracket, rout and tie-wrap cables.
Mount I-Series, add (2) screws from
bag “L” to bottom VESA positions.
17b 17c
© Copyright 2019 Elo Touch Solutions, Inc. 12
Add (2) screws from bag “C”
to printer tray; use Star printer
bracket to set depth of screws
than remove Star bracket.
Go to step 19 for Star printers.
For Epson TM-T88, go to step 22.
18 19
If using printer, remove cover
to add printer.
If no printer, skip to step 23
© Copyright 2019 Elo Touch Solutions, Inc. 13
Add (4) screws from bag “D” to attach
printer to the tray.
22
Add Star printer bracket to printer; refer to Star
instructions.
Add Star printer with bracket to printer tray. Secure
printer to printer tray using 3rd screw from bag “C”.
Continue to step 23
21
20
Epson TM-T88
Continue to step 23
© Copyright 2019 Elo Touch Solutions, Inc. 14
Route cables from/to printer as needed, slide in
printer tray assembly (or printer tray with cover
if no printer).
Close Display Bracket and add (2) screws saved from step 5.
Secure printer assembly with (2) screws saved from step 1.
2423
© Copyright 2019 Elo Touch Solutions, Inc. 15
25
EMV-SELF-SERV-ING-RP757 EMV-SELF-SERV-15-22-ING-IPP320/350/315
EMV-SELF-SERV-15-22-VF-MX915-ING-ISC250
If installing an EMV Cradle, finish by adding
(1) screw from bag “N”.
© Copyright 2019 Elo Touch Solutions, Inc. 16
For more information, go to www.elotouch.com/support, or call the office nearest you.
Elo reserves the right to change or update, without notice, any information contained herein; to change, without notice, the design, construction,
materials, processing or specifications of any products; and to discontinue or limit production or distribution of any products. Elo and the Elo logo
are either trademarks or registered trademarks of Elo Touch Solutions, Inc. All other trademarks are the property of their respective owners.
© 2019 Elo Touch Solutions, Inc. All rights reserved.
© Copyright 2019 Elo Touch Solutions, Inc. 1
E796965 ELO-STAND-SELF-SERVICE-15-22-FLOOR-TOP
E797162 ELO-STAND-SELF-SERVICE-15-22-FLOOR-BASE
ASSEMBLY INSTRUCTIONS, ELO SELF SERVICE STAND
© Copyright 2019 Elo Touch Solutions, Inc. 2
Contents for Kit: E796965 ELO-STAND-SELF-SERVICE-15-22-FLOOR-TOP
Tie-wrap
Qty. 2
Screws
Bag AQty.10 SCREW, M4X8, PAN-HEAD,
CROSS-RECESS
Bag BQty.4 SCREW, M4X8, FLAT-HEAD,
CROSS-RECESS
Bag CQty.3 SCREW, M3X8, PAN-HEAD,
CROSS-RECESS
Bag DQty.4 SCREW, 3mm X8L,
THREAD-FORMING, PAN-HEAD
Bag KQty.6 SCREW, M5X10, FLAT-HEAD,
CROSS-RECESS
Bag LQty.4 SCREW, M4X6, PAN-HEAD,
CROSS-RECESS
Bag SQty.2 SCREW, M4X5, PAN-HEAD,
CROSS-RECESS
Bag TQty.2 SCREW, M3X10, PAN-HEAD,
CROSS-RECESS
Floor-Head Assembly
Qty. 1 Display Bracket, Windows
Qty. 1
Display Bracket, Android
Qty. 1
USB Hub
Qty. 1
Cable Cover, Windows
Qty. 1
Straps
Qty. 3
Panel Hardware
Qty.2 SCREW, M6X14, PAN-HEAD, CROSS-
RECESS
Qty.2 BACKER BOARD SPACER
Qty.2 THUMB SCREW
© Copyright 2019 Elo Touch Solutions, Inc. 3
Contents for Kit: E797162 ELO-STAND-SELF-SERVICE-15-22-FLOOR-BASE
Floor Base
Qty. 1
© Copyright 2019 Elo Touch Solutions, Inc. 4
Assemble tower to base
plate using (4) screws
from bag “K”.
12
X4 Remove and save the (4) screws on the
left and right of the stand front cover. Pull off the
silver cover and set aside. Add (2) remaining
screws from bag “K” to bottom front of stand.

This manual suits for next models

1

Other Elo TouchSystems Touchscreen manuals
Elo TouchSystems 3000 Series User manual

Elo TouchSystems

Elo TouchSystems 3000 Series User manual

Elo TouchSystems ET3201L User manual

Elo TouchSystems

Elo TouchSystems ET3201L User manual

Elo TouchSystems 2400LM User manual

Elo TouchSystems

Elo TouchSystems 2400LM User manual

Elo TouchSystems 1739L Parts list manual

Elo TouchSystems

Elo TouchSystems 1739L Parts list manual

Elo TouchSystems IntelliTouch Ultra User manual

Elo TouchSystems

Elo TouchSystems IntelliTouch Ultra User manual

Elo TouchSystems I-Series User manual

Elo TouchSystems

Elo TouchSystems I-Series User manual

Elo TouchSystems 3243L User manual

Elo TouchSystems

Elo TouchSystems 3243L User manual

Elo TouchSystems 19R SERIES User manual

Elo TouchSystems

Elo TouchSystems 19R SERIES User manual

Elo TouchSystems 1900L User manual

Elo TouchSystems

Elo TouchSystems 1900L User manual

Elo TouchSystems 1739L User manual

Elo TouchSystems

Elo TouchSystems 1739L User manual

Elo TouchSystems Entuitive 1825L Series User manual

Elo TouchSystems

Elo TouchSystems Entuitive 1825L Series User manual

Elo TouchSystems I-Series User manual

Elo TouchSystems

Elo TouchSystems I-Series User manual

Elo TouchSystems LCD User manual

Elo TouchSystems

Elo TouchSystems LCD User manual

Elo TouchSystems 1729L Parts list manual

Elo TouchSystems

Elo TouchSystems 1729L Parts list manual

Elo TouchSystems 1919L User manual

Elo TouchSystems

Elo TouchSystems 1919L User manual

Elo TouchSystems ET17 XXL Series User manual

Elo TouchSystems

Elo TouchSystems ET17 XXL Series User manual

Elo TouchSystems 1919L User manual

Elo TouchSystems

Elo TouchSystems 1919L User manual

Elo TouchSystems 3239L User manual

Elo TouchSystems

Elo TouchSystems 3239L User manual

Elo TouchSystems 1938L User manual

Elo TouchSystems

Elo TouchSystems 1938L User manual

Elo TouchSystems ET1517L User manual

Elo TouchSystems

Elo TouchSystems ET1517L User manual

Elo TouchSystems ET1515L Series User manual

Elo TouchSystems

Elo TouchSystems ET1515L Series User manual

Elo TouchSystems 1928LM User manual

Elo TouchSystems

Elo TouchSystems 1928LM User manual

Elo TouchSystems ET1509L User manual

Elo TouchSystems

Elo TouchSystems ET1509L User manual

Elo TouchSystems Z30POS Stand User manual
Elo TouchSystems

Elo TouchSystems Z30POS Stand User manual

Popular Touchscreen manuals by other brands

Axium AX-KPC 2.8 quick start guide

Axium

Axium AX-KPC 2.8 quick start guide

Elo Touch Solutions ET3201L user manual

Elo Touch Solutions

Elo Touch Solutions ET3201L user manual

Crestron TSS-7 Supplemental guide

Crestron

Crestron TSS-7 Supplemental guide

Tyco Electronics Elo TouchSystems ET1225L-7SWC-1 user guide

Tyco Electronics

Tyco Electronics Elo TouchSystems ET1225L-7SWC-1 user guide

Omron Sti H-T40M-P Installation and operating manual

Omron

Omron Sti H-T40M-P Installation and operating manual

LEGRAND 7" Video Touch Screen installation manual

LEGRAND

LEGRAND 7" Video Touch Screen installation manual

HCP TPR15 user manual

HCP

HCP TPR15 user manual

SunBriteDS DS-3214TSL Operator's manual

SunBriteDS

SunBriteDS DS-3214TSL Operator's manual

Carel pGDx Touch 4.3" manual

Carel

Carel pGDx Touch 4.3" manual

Bosch Control Air M Installation & operation manual

Bosch

Bosch Control Air M Installation & operation manual

2N Indoor Touch user guide

2N

2N Indoor Touch user guide

Colormetrics S4300S user manual

Colormetrics

Colormetrics S4300S user manual

panel PSG2-EM Series user manual

panel

panel PSG2-EM Series user manual

ADT WTS700 Installation and setup guide

ADT

ADT WTS700 Installation and setup guide

Kenwood LZ-7500 instruction manual

Kenwood

Kenwood LZ-7500 instruction manual

Lorex L22LT11B instruction manual

Lorex

Lorex L22LT11B instruction manual

Panasonic TH-80LFB70E operating instructions

Panasonic

Panasonic TH-80LFB70E operating instructions

InTouch INDT215 user manual

InTouch

InTouch INDT215 user manual

manuals.online logo
manuals.online logoBrands
  • About & Mission
  • Contact us
  • Privacy Policy
  • Terms and Conditions

Copyright 2025 Manuals.Online. All Rights Reserved.