manuals.online logo
Brands
  1. Home
  2. •
  3. Brands
  4. •
  5. eta
  6. •
  7. Watch
  8. •
  9. eta 989.331 User manual

eta 989.331 User manual

1
sur mouvement
auf Werk
on movement
sur pile
auf Batterie
on battery
HAUTEUR
HÖHE
HEIGHT
mm
3,85
4,20
ETA 989.331
81/4
´´´
x 9
´´´
Français
Deutsch
English
ETA SA Fabriques d'Ebauches
Marketing-Ventes
CH-2540 Grenchen
+
ø
7
,
9
H
2
,
6
7
01
TECHNICAL
COMMUNICATION
COMMUNICATION
TECHNIQUE
TECHNISCHE
MITTEILUNG
81/4
´´´
x 9
´´´
Ø18,50 x 20,50 mm
2
Lubrification – Schmierung – Lubrication
Huile fine
Dünnflüssiges Öl Moebius 9030
Fine oil
Huile épaisse àviscosité
élevée ou graisse
Dickflüssiges druckfestes Moebius D5
Öl oder Fett
Thick, pressure-resistant
oil or grease
Montage du module moteur
(Liste des fournitures par ordre d'assemblage)
Zusammenstellen der Antriebsbaugruppe
(Bestandteilliste in Montagereihenfolge)
Assembling of the motor module
(Parts listed in order of assembly)
4180 250
4021 110
201 5110
260 5110
4211 4060
203 54060
4021
4060
54060
4180
260
110
250
201
5110
5110
203
4211
3
Montage du mouvement
(Liste des fournitures par ordre d'assemblage)
Zusammenstellen des Werkes
(Bestandteilliste in Montagereihenfolge)
Assembling of the movement
(Parts listed in order of assembly)
4000 54000 (3x)
4414 443/1
920 407
Module moteur 445
Antriebsbaugruppe 5445
Motor module 405
54180 (2x) 4405
5920 54405
Montage du module d'affichage
(Liste des fournitures par ordre d'assemblage)
Zusammenstellen der Zeitanzeige- augruppe
(Bestandteilliste in Montagereihenfolge)
Assembling of the display module
(Parts listed in order of assembly)
4820 4033
9447 4929
9447
4033
4000
4929
4414
54180
54180 5920
4405
54405
920
443/1
5445
445
4820
54000
405
407
Module moteur
Antriebsbaugruppe
Motor module
7
4
10.048.07
30.015
30.012
31.046
31.041
51.020
31.121
51.080.06
51.090
93.040
10.513
20.582
20.590
10.540
20.580
20.765
61.530
14.601
56.520
20.570
10.014
16.065
10.048.01
10.048.01
51.090.01
93.040.01
10.513.01
20.590.01
10.540.01
20.765.01
No
Nr
No
989.331
989.331
989.331
989.331
989.331
989.331
958.335
989.331
989.331
989.331
989.331
989.331
989.331
989.331
989.331
989.331
989.331
989.331
989.331
989.331
989.331
989.331
251.xxx
988.331
989.331
958.333
976.001
989.331
251.xxx
251.xxx
Pont de rouage, empierré
Roue de centre
Roue intermédiaire
Roue des heures
Roue de minuterie
Tige de mise àl'heure
Pignon coulant
Tirette, montée
Sautoir de tirette
Tube de protection
Module électronique
Stator
Bobine, montée
Pont moteur empierré
Rotor
Bride de contact
Ressort de contact
Vibreur
Connecteur
Pile 7,90 x 2,60 mm
Module d'affichage
Couvre-module d'affichage
Vis de pont de rouage
Vis de sautoir de tirette
Vis de tube de protection
Vis de module électronique
Vis de bobine
Vis de pont moteur
Vis de bride de contact
Räderwerkbrücke, mit Steinen
Minutenrad
Zwischenrad
Stundenrad
Wechselrad
Stellwelle
Kupplungstrieb
Winkelhebel, montiert
Winkelhebelraste
Schutzrohr
Elektronik-Baugruppe
Stator
Spule, montiert
Motor-Brücke, mit Steinen
Rotor
Kontaktbügel
Kontaktfeder
Summer
Verbinder
Batterie 7,90 x 2,60 mm
Zeitanzeige-Baugruppe
Deckplatte für Zeitanzeige-
Baugruppe
Schraube für Räderwerkbrücke
Schraube für Winkelhebelraste
Schraube für Schutzrohr
Schraube für Elektronik-
Baugruppe
Schraube für Spule
Schraube für Motor-Brücke
Schraube für Kontaktbügel
Train wheel bridge, jewelled
Centre wheel
Intermediate wheel
Hour wheel
Minute wheel
Handsetting stem
Sliding pinion
Setting lever, assembled
Setting lever jumper
Guard tube
Electronic module
Stator
Coil, assembled
Motor bridge, jewelled
Rotor
Contact strip
Contact spring
Buzzer
Connector
Battery 7.90 x 2.60 mm
Display module
Display module cover
Screw for train wheel bridge
Screw for setting lever jumper
Screw for guard tube
Screw for electronic module
Screw for coil
Screw for motor bridge
Screw contact bridle
Vis identiques 1) 5110
Identische Schrauben 54180
Identical screws 54405
1x
1x
1x
1x
3x
1x
2x
1x
110
201
203
250
260
405
407
443.1
445
920
4000
4021
4060
4180
4211
4405
4414
4451
4820
4929
9447
9628
5110
5110
5445
5920
54000
54060
541800
544050
Interchangeabilité–Auswechselbarkeit –Interchangeability
1)
1)
1)
No
Nr ISO
No
LIST OF MATERIALS
BESTANDTEILE
LISTE DES
FOURNITURES
Cal. –Kal. –
Cal.
989.331
5
Fournitures – Bestandteile – Materials
443/1
201 260203 250
4211 4405 4820 4929
405 407
920 441440604021
110
5110
54180
54405
54060 5920 540005445
445
4180 4000 4033 9447
7
6
Contrôles électriques –Elektrische Kontrollen –Electrical tests
* Les mesures en position 2 doivent être faites uniquement avec le mouvement en marche (affichage numérique
visible); au besoin, tourner la couronne.
Messungen mit Messpunkt 2 dürfen nur bei laufendem Werk gemacht werden (numerische Anzeige sichtbar);
wenn nötig, die Krone drehen.
When using position 2 for measurements, make sure that the movement is running (numerical display visible); if
necessary, turn the crown.
+
ø
7
,
9
H
2
,
6
+
ø
7
,
9
H
2
,
6
a5 a6 a7
a8
a2
a3
a4
a11
a9 a10
a12
a5 a6 a7
a8
a2
a3
a4
a11
a9 a10
a12
1 2
4
3
5
7
7
7
10 µA
1 mA
102kΩ
200 µA
10 kΩ
200 µA
1 kΩ
2,0 - 4,0 kΩ
50 - 100 µA
> 10 kΩ
~ 0 µA
80 - 200 Ω
< 800 µA
< 2 µA
1,55 V
Résistance des bobines (M1-M2)
Spulenwiderstand (M1-M2)
Resistance of coils (M1-M2)
Isolation de la bobine
Spulenisolation
Coil isolation
Résistance de la bobine (Alarme)
Spulenwiderstand (Alarm)
Resistance of coil (Alarm)
Consommation avec réveil
Totalstrom mit Wecker
Alarm consumption
Consommation du mouvement
Stromaufnahme Uhrwerk
Consumption of movement
Tension de la pile
Spannung der Batterie
Battery voltage
Mesure avec pile
Messung mit Batterie
Measurement with battery
Mesure sans pile, avec
alimentation extérieure 1,55 V.
(toutes les fonctions, sauf alarme)
Messung ohne Batterie, mit
Speisegerät 1,55 V.
(alle Funktionen, ausser Alarm)
Measurement without battery with
power supply unit 1.55 V.
(all functions, except alarm)
Contrôles électriques –Elektrische Kontrollen –Electrical tests
ETA 989.331
Remarques
Bemerkungen
Remarks
Contrôle
Kontrolle
Test
2 V
(Ri > 10kΩ/ V)
Mesure sans pile, avec
alimentation extérieure 1,55 V.
- Sélectionner la fonction
"Alarm".
Presser sur la couronne pour
enclencher la sonnerie et
mesurer.
Messung ohne Batterie, mit
Speisegerät 1,55 V.
- Funktion "Alarm" wählen.
Durch drücken der Krone Alarm
auslösen und messen.
Measurement without battery,
with power supply unit 1.55 V.
- Select the "Alarm" function.
Press on the crown to activate
the alarm and measure.
Position
Messpunkt
Position
Echelle de mesure
Einstellung Messgerät
Setting of apparatus
1
a9 - a11
2
a9 - a11
3
a2 - a4
4
a4 - a9
5
a9 - a10
2 V
EOL Fonction
EOL Funktion
EOL Function
Mesure sans pile, avec tension
d'alimentation 1,30 V.
Détection EOL chaque minute àla
seconde 30.
Messung ohne Batterie, mit
Speisespannung 1,30 V.
EOL- Prüfung alle Minuten bei
30 Sekunden.
Measurement without battery,
with feed voltage 1.30 V.
EOL detection every minute at
30 seconds.
Mesure sans pile.
Ohmmètres avec tension de
mesure supérieure à0,4 V
inappropriés.
Tension recommandée 0,2 V.
Température ambiante 20°C.
Messung ohne Batterie.
Ohmmeter mit Prüfspannung
über 0,4 V ungeeignet.
Empfehlungswerte Spannung 0,2 V.
Raumtemperatur 20°C.
Measurement without battery.
Ohmmeters with a test voltage
higher than 0.4 V unsuitable.
Voltage recommended 0.2 V.
Ambient temperature 20°C.
(1,30 V)
Les chiffres clignotent
Die Ziffern blinken
The numerals blink
Mesure
Messung
Measurement
8
0
,55
1
,0
0
A
B
D
E
0,25
0,05
Ajustement aiguille des heures
Stundenzeigerpassung
Hour hand fitting Cylindrique
Zylindrisch
Cylindrical
Ajustement aiguille des minutes
Minutenzeigerpassung
Minute hand fitting
+ 4
–2
+ 6
–4
Module d'affichage
Zeitanzeige - Baugruppe
Display module
Roue de centre
Zentrumrad
Centre wheel
A
Roue des heures
Stundenrad
Hour wheel
B
Roue de centre
Zentrumrad
Centre wheel
D
Roue des heures
Stundenrad
Hour wheel
E
Longueur
Länge
Length
mm
Dépassement platine
Höhe ab Werkplatte
Overstepping main plate
mm
Aiguillage
Zeigerwerk
Hand fitting
réduit
niedrig
reduced
4,21 2,45 0,63 0,33
Aiguillage –Ziegerwerkhöhe –Hand fitting height
9
Pose des aiguilles
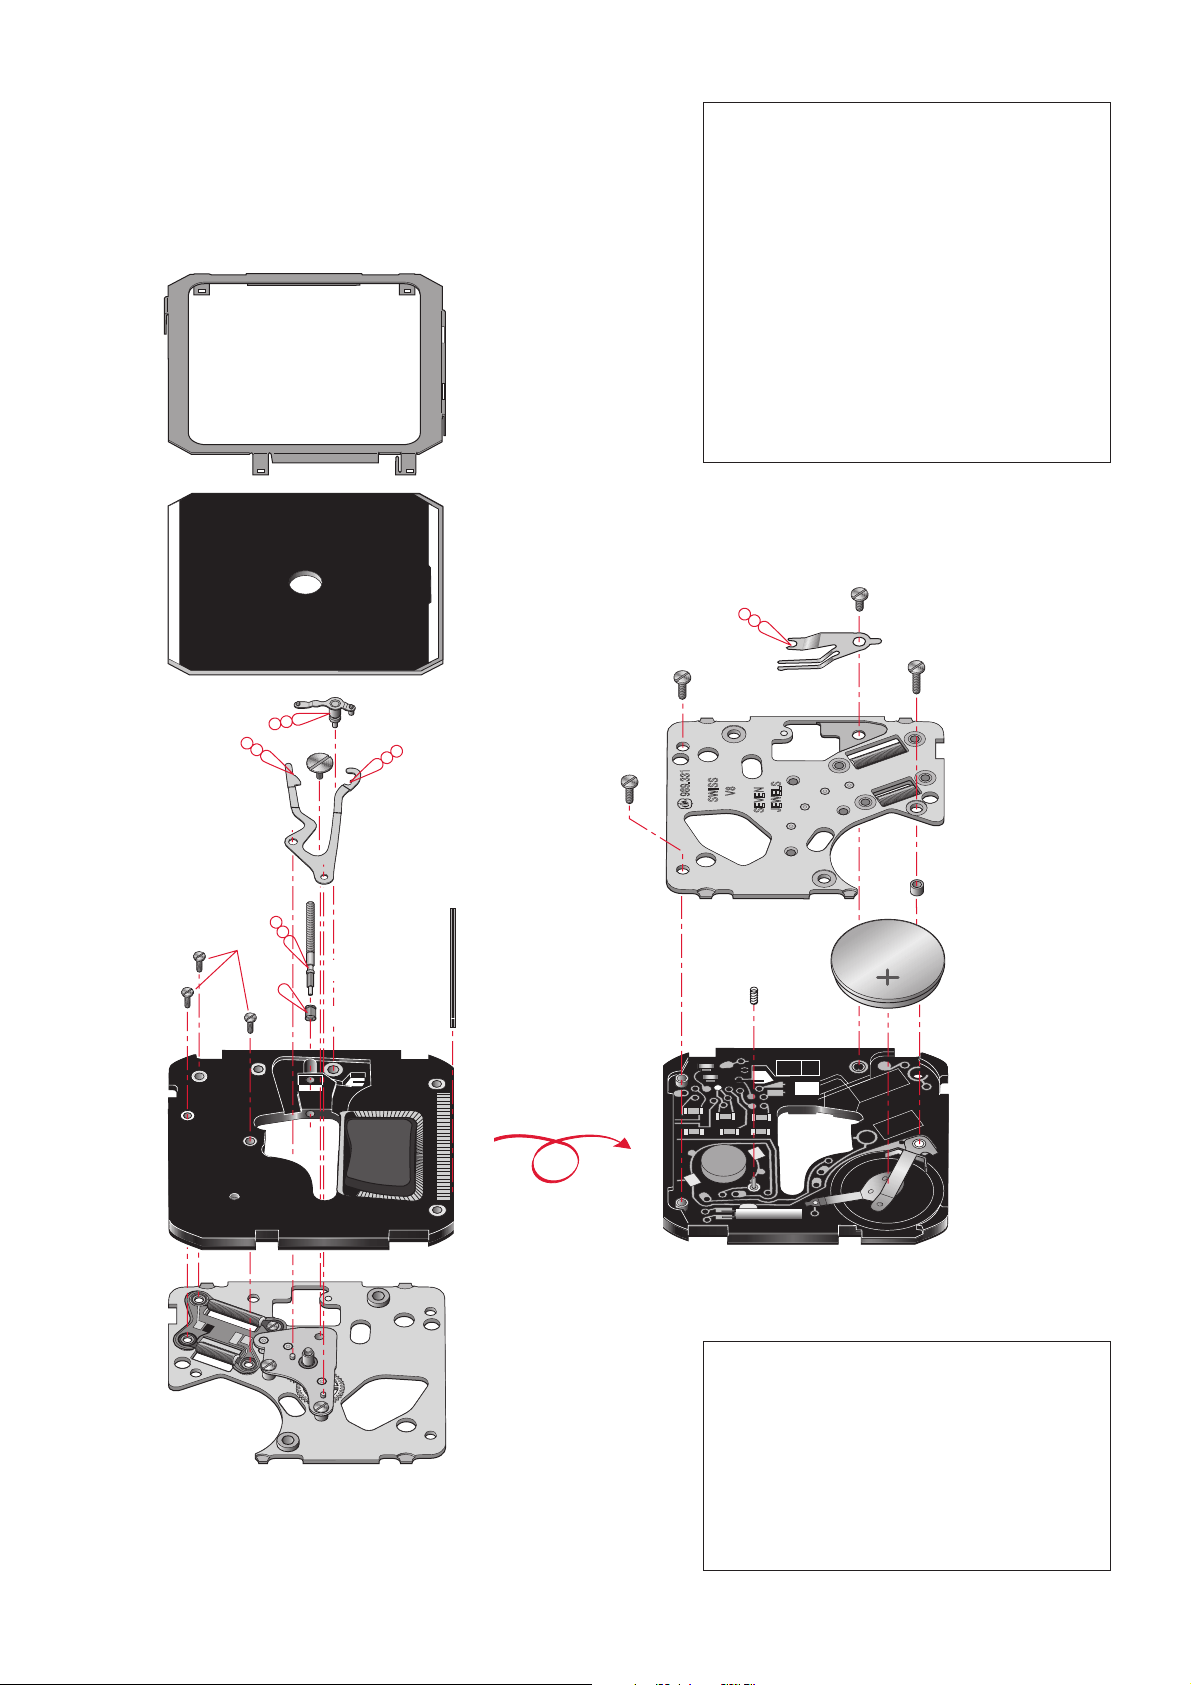
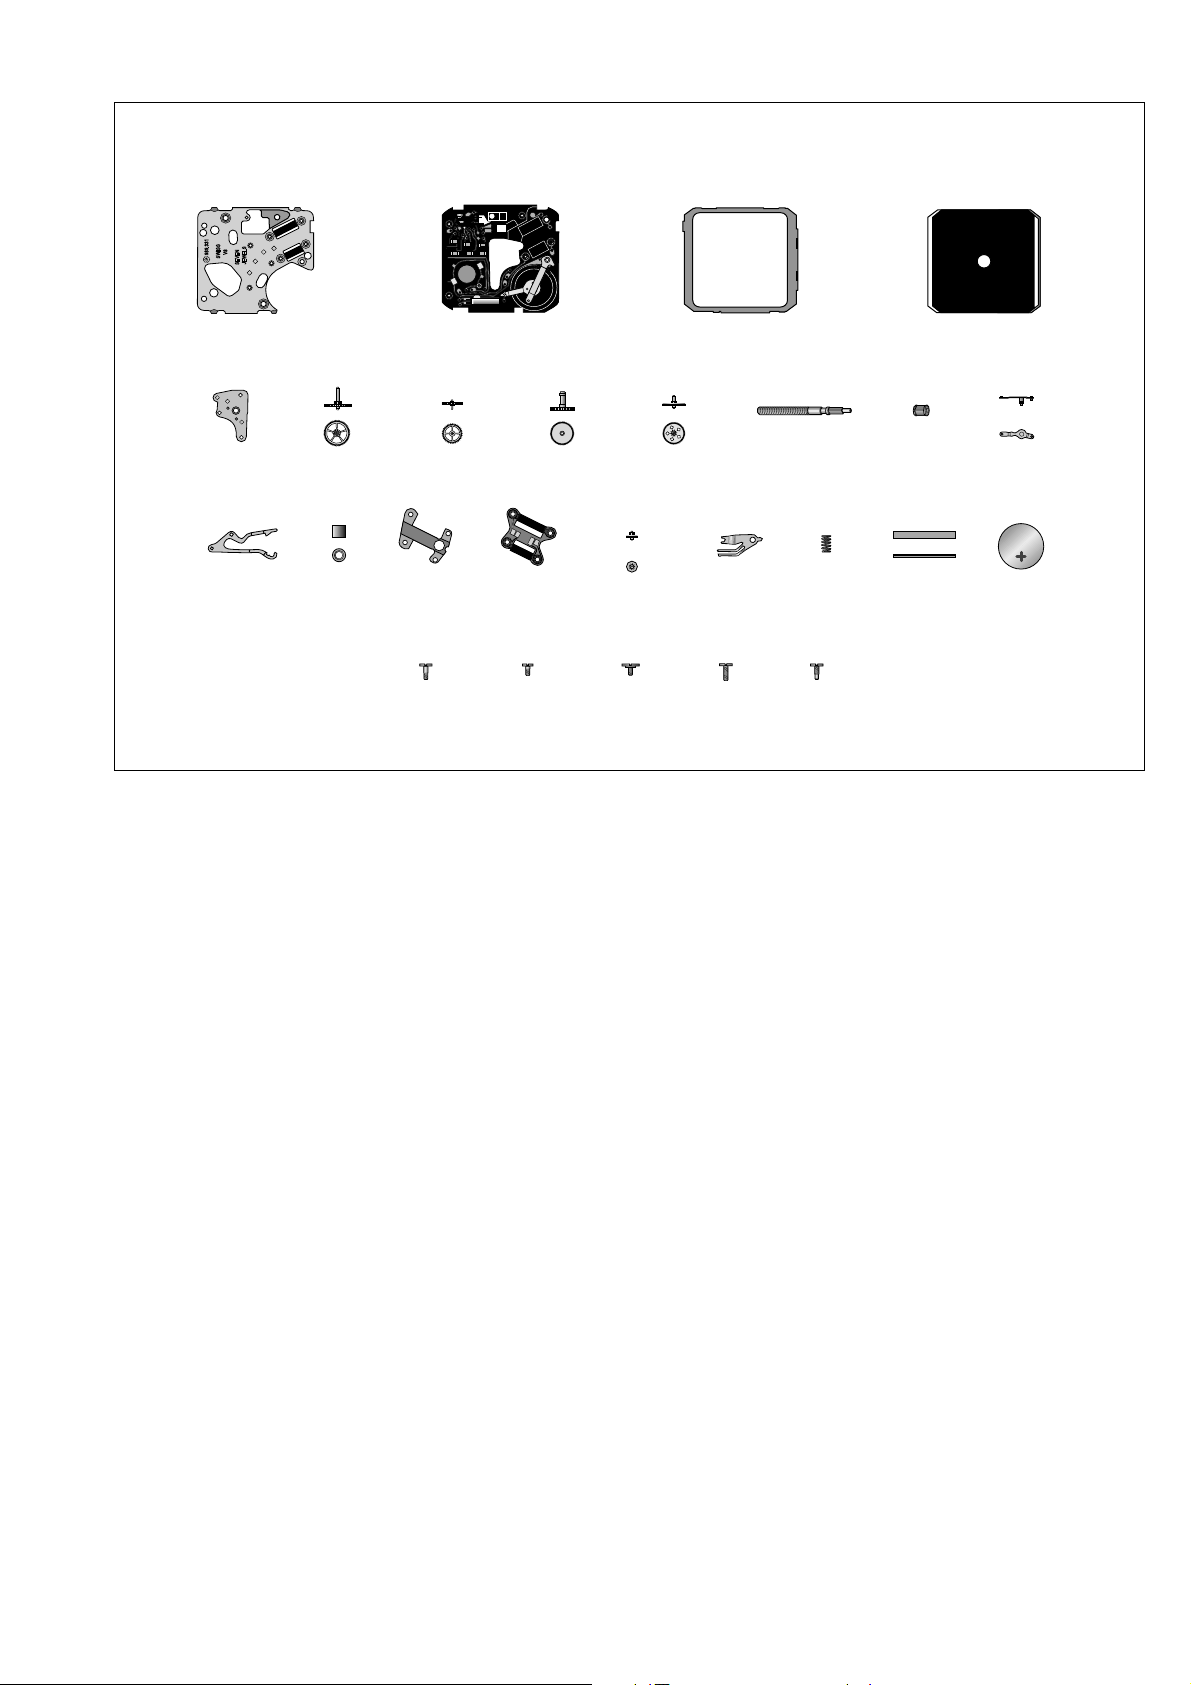
L'emploi d'un porte-pièce est indispensable, pour
soutenir le pivot inférieur du pignon de centre. Le porte-
pièce No 4080.35.244 est recommandé.
Il peut être obtenu auprès de :
ETA SA Fabriques d'Ebauches
Service après-vente
CH - 2540 Grenchen
La pose des aiguilles doit être faite obligatoirement sur
des mouvements en marche avec pile.
1. Poser la pile, la couronne étant en position
neutre.
La cellule d'affichage passe en mode "All on"
(tous les segments de l'affichage sont visibles).
2. Tourner légèrement la couronne.
La cellule d'affichage passe en mode "Heure
locale" (voir mode d'emploi) tous chiffres mis à
zéro.
La montre commence à fonctionner.
3. Poser l'aiguille des heures, bien centrée sur le
repère situé à 12 heures, le centrage pouvant
être éventuellement corrigé en tournant la
couronne en position tirée.
4. Tirer et repousser la couronne.
Les chiffres indiquant les secondes se mettent à
clignoter.
5. Pendant que les chiffres clignotent : presser à
fond sur la couronne.
Les chiffres indiquant les secondes sont remis à
zéro.
6. Durant les 30 secondes qui suivent, c'est-à-dire
avant le prochain saut du moteur, poser l'aiguille
des minutes bien centrée sur le repère de
12 heures.
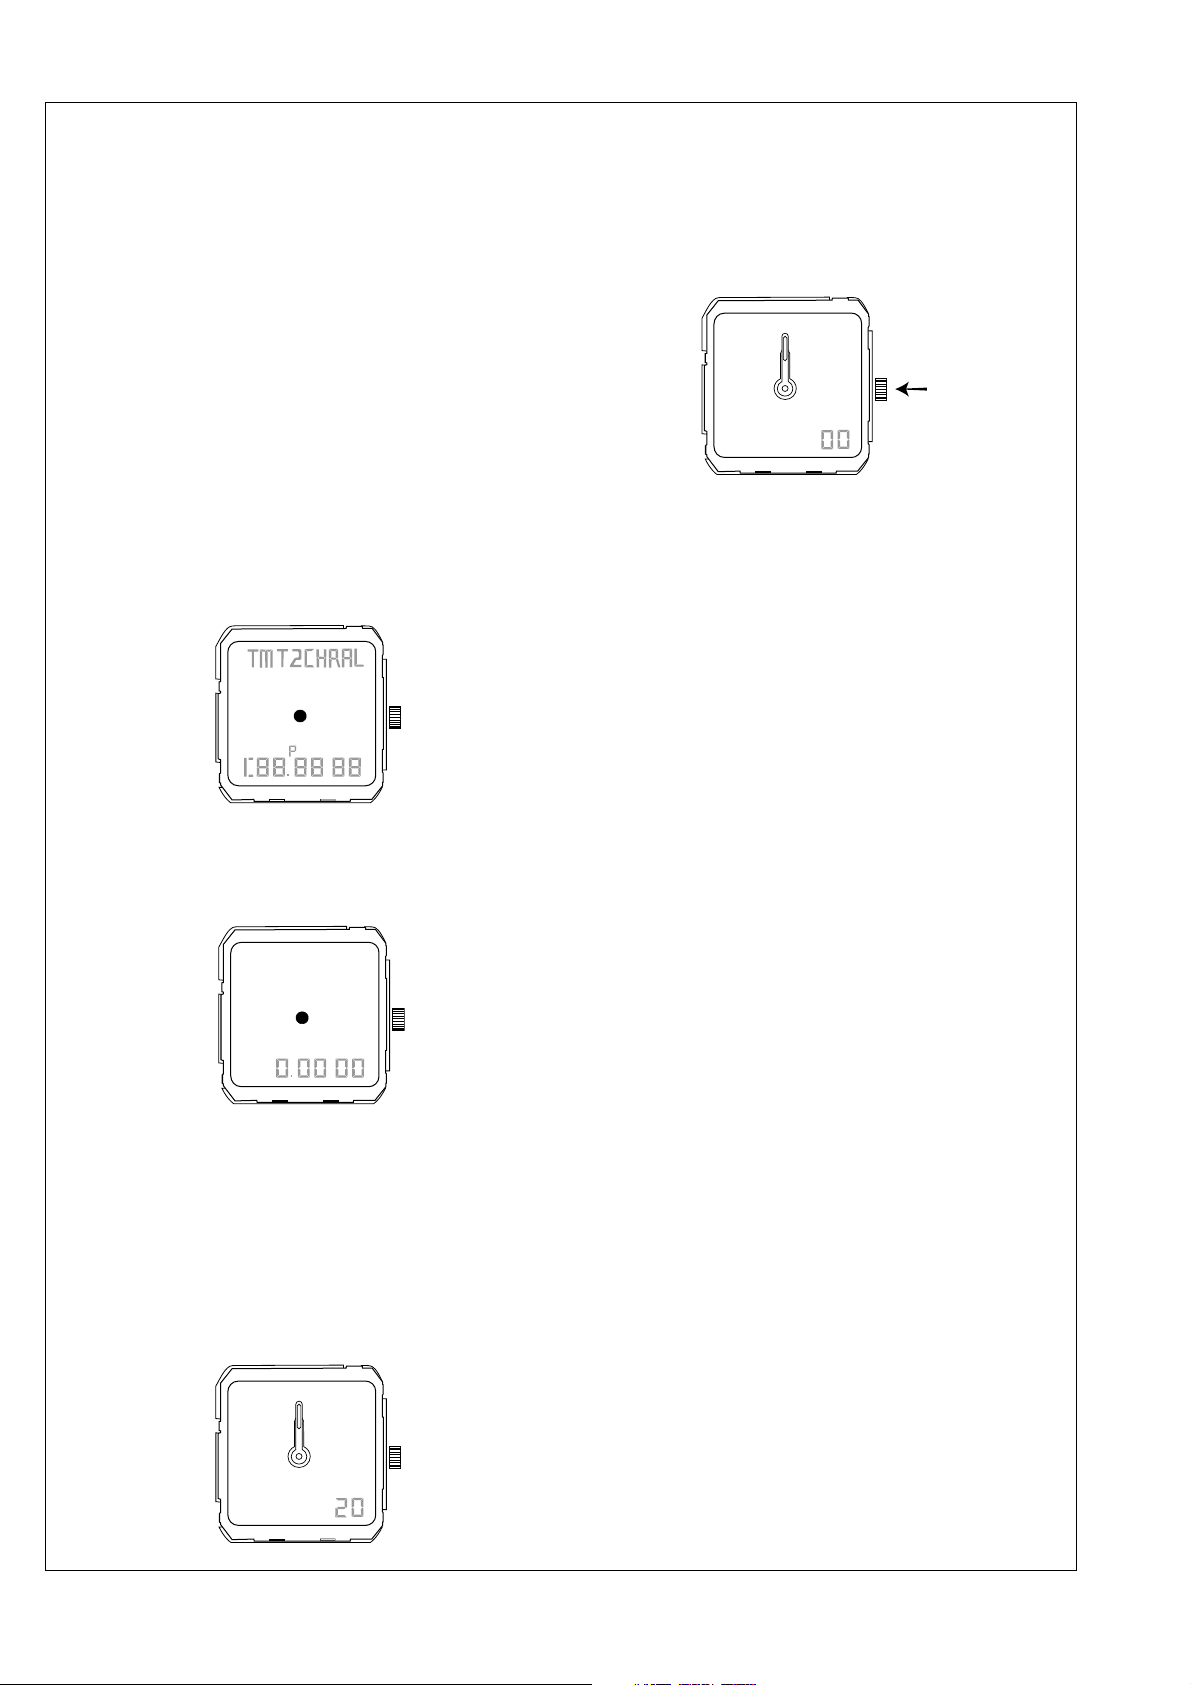
7. Synchroniser les deux affichages analogique
(aiguilles) et numérique.
A cet effet :
- Sélectionner l'affichage neutre de la cellule (voir
mode d'emploi), sans aucune indication numé-
rique, en tournant la couronne.
- Tirer la couronne.
- Tourner la couronne, en avant ou en arrière
jusqu'à ce que les aiguilles indiquent exacte-
ment la même heure que celle affichée par la
cellule d'affichage.
- Repousser la couronne.
8. Effectuer la mise à l'heure
A cet effet :
- Revenir à l'affichage de l'heure locale en
tournant la couronne (voir mode d'emploi).
- Tirer la couronne (les chiffres indiquant les
heures et les minutes se mettent à clignoter).
- Mettre la montre à l'heure en tournant la cou-
ronne en avant ou en arrière (une rotation rapide
permet de faire avancer les aiguilles d'une
heure entière).
- Repousser la couronne.
N.B. :
Dans les cas où l'on souhaiterait poser les piles
d'avance on peut, sans autre, interrompre le processus
aussi longtemps que nécessaire, entre les opérations 2
et 3. Les aiguilles seront toujours posées sur 12 heures,
le décalage entre les deux affichages étant rattrapé lors
de l'opération 7 de synchronisation.
Dépose des aiguilles :
Enlever les aiguilles uniquement avec un outil Bergeon
réf. 30.671-7.
Recommandations pour la pose des aiguilles
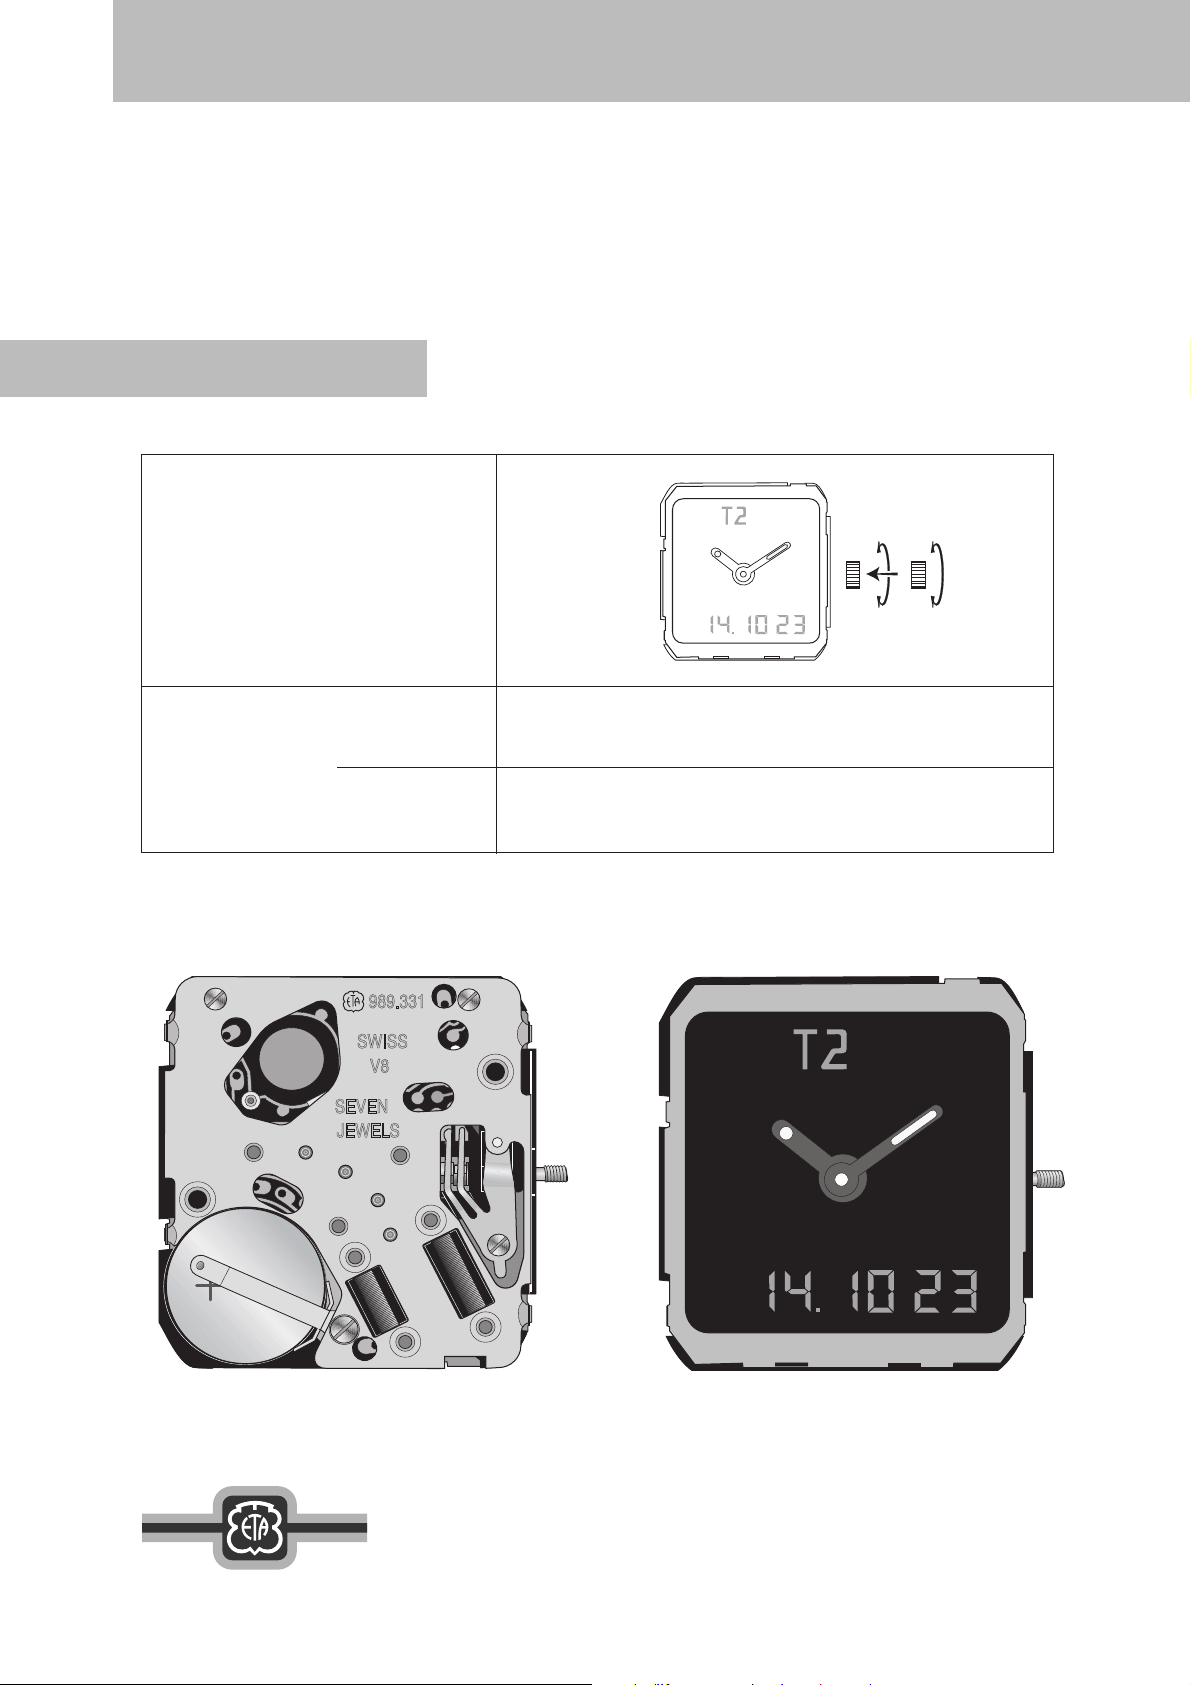
Cal. 989.331
10
Empfehlungen zum Zeigersetzen
Kal. 989.331
Zeigersetzen
Die Verwendung eines Werkträgers ist notwendig um
die Kontaktbügel zu schützen und den Zapfen des
Zentrumrades zu stützen. Empfohlen wird der Werk-
träger Nr. 4080.35.244.
Er kann bezogen werden bei :
ETA SA Fabriques d'Ebauches
Service après-vente
CH - 2540 Grenchen
Das Setzen der Zeiger muss bei laufendem Werk mit
Batterie durchgeführt werden.
1. Batterie setzen, Krone in Neutralstellung.
Die numerische Anzeige zeigt "All on" (alle
Segmente der Anzeige sind in Funktion).
2. Krone ein wenig drehen.
Die Anzeige wechselt auf "Ortszeit" (siehe :
Gebrauchsanweisung), alle Ziffern sind auf Null.
Die Uhr beginnt zu laufen.
3. Den Stundenzeiger genau auf die 12-Uhr-Markierung
ausrichten und setzen (die Genauigkeit kann im
Bedarfsfall durch Drehen der Krone in gezogener
Stellung korrigiert werden).
4. Krone ziehen und zurückdrücken.
Die Anzeige zeigt die Sekunden an und beginnt
zu blinken.
5. Während die Anzeige blinkt : die Krone bis zum
Anschlag drücken.
Die Sekundenanzeige wird auf Null gestellt.
6. Während der 30 folgenden Sekunden, das heisst vor
dem nächsten Schritt des Motors, den Minutenzeiger
genau auf die 12-Uhr-Markierung setzen.
7. Synchronisieren der beiden Anzeigen analog
(Zeiger) und numerisch :
- Neutrale Anzeige der Zelle (siehe Gebrauchs-
anweisung) wählen (ohne numerische
Anzeige) durch Drehen der Krone.
- Krone ziehen.
- Krone vor- oder rückwärts drehen bis die Zeiger
die gleiche Zeit anzeigen wie die numerische
Anzeige.
- Krone drücken.
8. Einstellen der Uhrzeit :
- Durch Drehen der Krone wieder auf "Ortszeit"
(siehe : Gebrauchsanweisung) einstellen.
- Krone ziehen (die Stunden- und Minutenanzeige
blinkt).
- Uhrzeit einstellen durch vor- oder Rückwärts-
drehen der Krone (durch eine schnelle Drehung
der Krone lässt sich die Zeit um jeweils eine volle
Stunde verstellen).
- Krone drücken.
Anmerkung :
Falls die Batterien vorher gesetzt werden, kann
zwischen den Arbeitsvorgängen 2 und 3 beliebig lange
unterbrochen werden. Die Zeiger werden auch dann auf
12 Uhr gesetzt. Die Zeitdifferenz zwischen den beiden
Anzeigen wird dann durch die Synchronisierung
(Arbeitsvorgang 7) ausgeglichen.
Zeigerentfernen :
Nur mit einem Bergeon-Werkzeug Ref. 30.671-7.
11
Fitting the hands
The use of a movement holder is indispensable for
supporting the lower pivot of the centre wheel. The
movement holder No 4080.35.244 is recommended.
This can be ordered from :
ETA SA Fabriques d'Ebauches
Service après-vente
CH - 2540 Grenchen
The hands must be fitted on a running movement i.e.
with the battery in place.
1. Fit the battery with the crown in neutral position.
The numerical display passes automatically to the
"All on" mode.
2. Turn the crown slightly.
The display pass to the "Local time" mode (see :
Instructions for use). All the numerals indicate zero.
The watch starts functioning.
3. Fit the hour hand by centering it precisely at the
12 o'clock mark. Slight displacement of the hand
can be, if needed, corrected by turning the crown
in the pulled out position.
4. Pull the crown out and then push it back in.
The numerical display indicates flashing seconds.
5. While the numerals flash : press the crown in.
The seconds are brought back to zero.
6. Fit within the next 30 seconds i.e. before the next
jump of the motor, the minute hand precisely at the
12 o'clock mark.
7. Synchronising the analog and the numerical display.
Proceed as follows :
- Select the neutral numerical display of the cell
(see : Instructions for use), without any
indication, by turning the crown.
- Pull the crown out.
- Turn the crown forwards or backwards till the
hands indicate precisely the same time as shown
by the numerical display.
- Push the crown back in.
8. Setting the time
Proceed as follows :
- Bring back the numerical display to the "Local
time" (see Instructions for use), by turning the
crown.
- Pull the crown out (the numerals indicating the
hours and the minutes start flashing).
- Set the watch to time by turning the crown
backwards or forwards (a rapid rotation causes
the hands to move one full hour).
- Push the crown back in.
N.B. :
In case the batteries are fitted in advance, then the
process between the point 2 and the point 3 can be
interrupted without any problem even for a long time, if
so desired. The hands will still be fitted at 12 o'clock and
the time lapse between the two displays will be overcome
with the synchronisation operation as described in point 7.
Removal of hands :
Only with Bergeon tool ref. 30.671-7.
Recommendations for fitting the hands
Cal. 989.331
12
989.331-17-7.95
ETA SA Fabriques d’Ebauches
Marketing-Ventes
CH-2540 Grenchen
Tél. 065 51 71 71
Téléfax 065 51 71 74
A company of
SMH

Other eta Watch manuals

eta 2894-2 User manual

eta

eta 2894-2 User manual

eta 2894-2 Use and care manual

eta

eta 2894-2 Use and care manual

eta 251.274 PWD Use and care manual

eta

eta 251.274 PWD Use and care manual

eta G10.212 PRD Use and care manual

eta

eta G10.212 PRD Use and care manual

eta 2894S2 Skeleton User manual

eta

eta 2894S2 Skeleton User manual

eta QUARTZ E61.111 Use and care manual

eta

eta QUARTZ E61.111 Use and care manual

eta G15.261 Use and care manual

eta

eta G15.261 Use and care manual

eta G10.791 Use and care manual

eta

eta G10.791 Use and care manual

eta 251.292 User manual

eta

eta 251.292 User manual

eta Valjoux 7753 Use and care manual

eta

eta Valjoux 7753 Use and care manual

eta G10.711 User manual

eta

eta G10.711 User manual

eta ETA 2094 Use and care manual

eta

eta ETA 2094 Use and care manual

eta 976.001 Use and care manual

eta

eta 976.001 Use and care manual

eta F06.115 Use and care manual

eta

eta F06.115 Use and care manual

eta 955.114 Use and care manual

eta

eta 955.114 Use and care manual

eta 251.252 User manual

eta

eta 251.252 User manual

eta Chronograph ETA 251.272 User manual

eta

eta Chronograph ETA 251.272 User manual

eta 251.265 User manual

eta

eta 251.265 User manual

eta 251.292 Use and care manual

eta

eta 251.292 Use and care manual

eta F06.461 Use and care manual

eta

eta F06.461 Use and care manual

eta Chronograph ETA 251.272 User manual

eta

eta Chronograph ETA 251.272 User manual

eta ETA 2094 Use and care manual

eta

eta ETA 2094 Use and care manual

eta Laptimer G10.212 AP PWD Use and care manual

eta

eta Laptimer G10.212 AP PWD Use and care manual

eta 252.511 User manual

eta

eta 252.511 User manual

Popular Watch manuals by other brands

LEMFO H2 user manual

LEMFO

LEMFO H2 user manual

Casio 3290 Operation guide

Casio

Casio 3290 Operation guide

Nordmende BravoFIT BF100HR user manual

Nordmende

Nordmende BravoFIT BF100HR user manual

MobileHelp Smart user guide

MobileHelp

MobileHelp Smart user guide

Casio 5145 Operation guide

Casio

Casio 5145 Operation guide

Garmin Instinct 2 Series owner's manual

Garmin

Garmin Instinct 2 Series owner's manual

NB 902 user manual

NB

NB 902 user manual

Citizen U200 user guide

Citizen

Citizen U200 user guide

iTOUCH Slim user manual

iTOUCH

iTOUCH Slim user manual

Rip curl FUNCTION SOLAR 3 HAND manual

Rip curl

Rip curl FUNCTION SOLAR 3 HAND manual

WatchMinder WATCHMINDER3 instructions

WatchMinder

WatchMinder WATCHMINDER3 instructions

DETOMASO WALZ HARDCORE CYCLES Benchmark manual

DETOMASO

DETOMASO WALZ HARDCORE CYCLES Benchmark manual

Breitling BENTLEY SUPERSPORTS B55 Connection instructions

Breitling

Breitling BENTLEY SUPERSPORTS B55 Connection instructions

Canyon Wasabi CNS-SW82 Series quick guide

Canyon

Canyon Wasabi CNS-SW82 Series quick guide

Oakley FUSE BOX instruction manual

Oakley

Oakley FUSE BOX instruction manual

Casio 2514 Operation guide

Casio

Casio 2514 Operation guide

Seiko Alba user guide

Seiko

Seiko Alba user guide

Suunto 9 Peak user guide

Suunto

Suunto 9 Peak user guide

manuals.online logo
manuals.online logoBrands
  • About & Mission
  • Contact us
  • Privacy Policy
  • Terms and Conditions

Copyright 2025 Manuals.Online. All Rights Reserved.